Se requiere una suscripción a JoVE para ver este contenido. Inicie sesión o comience su prueba gratuita.
Testing Sensory Nerve Function in a Surgically Denervated Mouse Model
En este artículo
Overview
This video demonstrates testing sensory nerve function in a mouse model by surgically denervating one side and leaving the other as a control. The response to mechanical stimulation confirms the role of sensory nerves.
Protocolo
All procedures involving animal models have been reviewed by the local institutional animal care committee and the JoVE veterinary review board.
1. Surgical Denervation
- Inject the anesthetic solution intraperitoneally at a dose of 200 µl per 20 g mouse body weight. Check that the animal has reached the proper plane of sedation by toe pinch assay, and confirm that heart and respiratory rates are normal (approximately 600 beats and 160 breaths per min, respectively).
- Prepare the surgical area of the back skin using Betadine and alcohol wipes, and cover the animal with a sterile surgical drape (for demonstration purposes, sterile drape was omitted to increase visibility). Keep the animal warm using a heating pad while operating in an aseptic surgical area.
- Make an incision using a sterile #11 scalpel along the dorsal midline from the base of the neck to roughly 0.5 cm above the tail.
- Using blunt forceps, gently reflect the skin on the left side away from the flank to visualize the underlying tissue from the scapular fat pads near the neck to just above the hind limb.
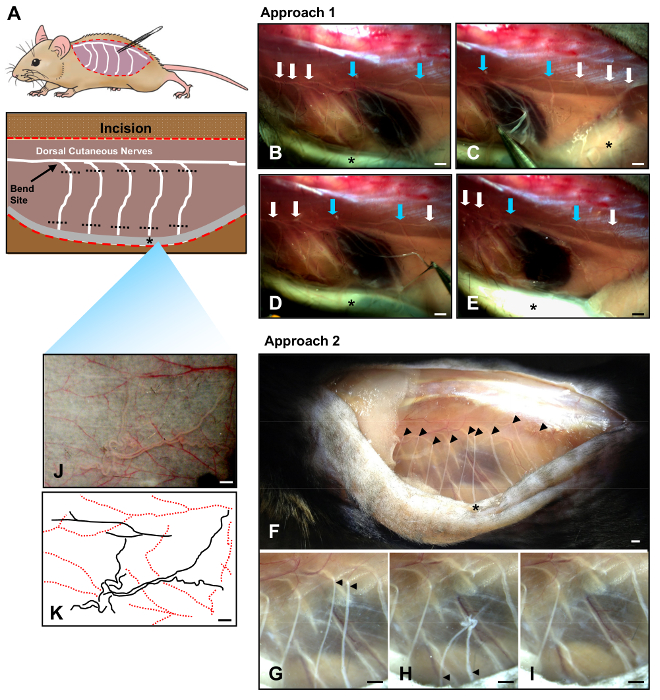
NOTE: Dorsal cutaneous nerves appear as white strands that travel caudally through the translucent fascia of the trunk wall before making sharp bends and entering the loose connective tissue underneath the skin (Figure 1). - Using ultra-fine forceps under a dissecting light microscope, remove the nerves exclusively from the left side of the animal located at anatomical sites T3-12 by plucking from where the segments bend at the trunk wall to their entry sites into the skin (Figure 1).
- Orient forceps vertically and removes the nerves by grasping approximately 0.5 cm below their bend sites and pulling upwards, causing the nerve to stretch and separate from the surrounding tissue (Figure 1C-E). Be careful to avoid rupturing adjacent blood vessels.
- Continue until all nerves extending from the trunk wall to the skin are removed. Do not disrupt the nerves within the dense fascia of the trunk wall. Keep the tissue moist throughout the procedure by periodically applying drops of sterile 0.9% saline solution.
- Alternatively, remove nerves by grasping their proximal ends near the trunk wall with forceps and snipping with fine scissors. Afterwards, sever the distal ends near the skin (Figures 1F-H). Finally, remove the intervening nerve segments (Figure 1I).
- Remove any nerves from the skin flap exposed in Step 1.4. These fibers comprise the distal branches of the dorsal cutaneous nerves and appear as white branching strands located sporadically within the connective tissue on the dermal side of the skin flap (Figures 1J-K).
- To remove these fine branches, position the fine forceps roughly parallel to the dermal surface, grasp the nerves and pluck upwards to avoid disrupting blood vessels and puncturing the skin. Continue until all visible nerves have been removed.
- Using blunt dissection, reflect the skin on the right side of the dorsal midline incision, but do not remove the nerves. This will serve as the contralateral sham-operated control.
- Suture along the dorsal midline in a simple interrupted pattern to close the incision using 6-0 nylon sutures, in a simple interrupted pattern spaced roughly 3 mm apart.
- Do not return mice that have undergone surgery into the same cage as other animals until after full recovery.
- Monitor animals immediately after surgery until they regain consciousness, and also daily until the surgical area has healed, typically within 1 week. Use analgesics in accordance with designated institutional animal care and use guidelines if mice exhibit signs of pain or distress. Remove sutures within 7-10 days after surgery. NOTE: If needed, prepare analgesic solution by diluting carprofen (50 mg/ml stock solution) 1:100 in sterile water. Inject the solution subcutaneously between the shoulder blades near the scruff of the neck, at a dose of 200 µl per 20 g body weight (5 mg/kg mouse body weight).
- To functionally assess stable denervation up to several weeks after surgery, remove the hair from the dorsal skin using an electric clipper.
- Gently prick the denervated skin area using a hypodermic needle, and note whether the animal responds, typically by shuddering or turning its head. If the skin area has been stably denervated, the animal will exhibit little or no response.
Resultados

Figure 1. Two approaches for denervating dorsal skin. (A) Cartoon diagram of innervated mouse skin. Red dotted lines indicate a single excision made along the dorsal midline to expose the underlying musculature on the trunk wall (purple) as well as the dermis (grey, asterisk) beneath the reflected skin. Dorsal cutaneous nerves traveling caudally appear to "bend" as they leave the trunk w...
Divulgaciones
Materiales
| Name | Company | Catalog Number | Comments |
| Alcohol prep pads | PDI | B339 | |
| AnaSed (Xylazine) | Lloyd | NADA 139-236 | |
| Betadine prep pads | Medline | MDS093917 | |
| Carprofen (Rimadyl) | Zoetis | ||
| Cordless rechargable clipper | Wahl | trimmer model 8900 | |
| 6-0 nylon sutures | DemeTECH | NL166012F4P | |
| Ultra fine forceps | Dumont | 0103-5-PO |
This article has been published
Video Coming Soon
Source: Peterson, S. C. et al., Cutaneous Surgical Denervation: A Method for Testing the Requirement for Nerves in Mouse Models of Skin Disease. J. Vis. Exp. (2016)
ACERCA DE JoVE
Copyright © 2025 MyJoVE Corporation. Todos los derechos reservados