Exploración pélvica II: Examen con espéculo
Fuente:
Alexandra Duncan, GTA, Praxis clínica, New Haven, CT
Cocinero de Tiffany, GTA, Praxis clínica, New Haven, CT
Jaideep S. Talwalkar, MD, medicina interna y Pediatría, Facultad de medicina de Yale, New Haven, CT
Colocación de espéculo cómodo es una habilidad importante para los proveedores a desarrollar, ya que el espéculo es una herramienta necesaria en muchos procedimientos ginecológicos. Pacientes y los proveedores a menudo están preocupados por el examen de espéculo, pero es totalmente posible Coloque un espéculo sin malestar del paciente. Es importante para el clínico conocer el papel que desempeña el lenguaje en la creación de un ambiente confortable; por ejemplo, un proveedor debe consultar el espéculo "cuentas" en lugar de "hojas" para evitar perturbar al paciente.
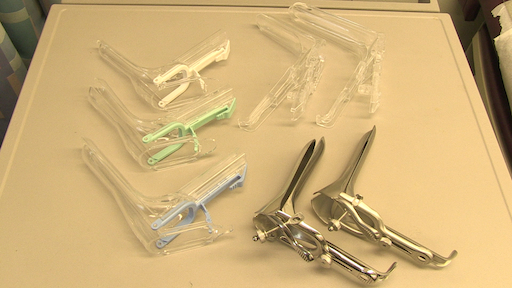
Hay dos tipos de espéculos: metal y plástico (figura 1). Esta demostración utiliza plástico, espéculos de plástico son más comúnmente utilizados en las clínicas para las pruebas de rutina. Cuando se utiliza un espéculo de metal, recomienda el uso de un espéculo de Graves si el paciente ha dado a luz por vía vaginal y un espéculo Pederson si el paciente no tiene. Espéculos de Pederson y tumbas son formas diferentes, y ambos vienen en muchos tamaños diferentes (medio se utiliza más a menudo). Antes de colocar un espéculo de metal, es útil realizar un examen cervical digital para evaluar el tamaño de espéculo adecuado. La profundidad y la dirección de la cerviz se calcula colocando un dedo en la vagina. Si el cuello uterino de la paciente puede localizar mientras el paciente está sentado, es probable que el paciente tiene una vagina poco profunda y por lo tanto debe ser más cómodo con un espéculo de metal corto.

Figura 1. Una fotografía de espéculos disponibles comercialmente en diferentes tamaños.
Espéculos de plástico están en forma de Pederson espéculos de metal y vienen en diferentes tamaños. Para determinar el tamaño adecuado para un espéculo plástico, el examinador coloca dos dedos en la vagina del paciente, Palma abajo e intenta separar los dedos: Si no hay ningún espacio entre los dedos, debe utilizarse un espéculo plástico pequeño; Si hay espacio entre los dedos, debe utilizarse un medio. El examen no debe realizarse con un espéculo grande (como lo es significativamente mayor) sin antes de determinar la longitud de la vagina.
El espéculo se usa para realizar la prueba de Papanicolaou como parte de exámenes de detección del cáncer de cuello uterino. Cáncer de cuello uterino fue la principal causa de muerte por cáncer para las mujeres en los Estados Unidos, pero en las últimas décadas el número de casos y muertes ha disminuido significativamente de1. Este cambio se le atribuye el descubrimiento hecho por Georgios Papanicolaou en 1928 que el cáncer de cuello uterino podría ser diagnosticado por frotis vaginales y cervicales. La prueba de Papanicolau, como se le llama ahora, detecta las células anormales en el cuello uterino, canceroso y precanceroso. Las guías actuales para los intervalos de detección recomendadas pueden encontrarse a través de la Task Force de servicios preventivos Estados Unidos (USPSTF) sitio Web2.
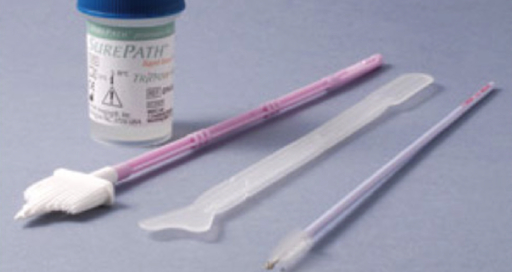
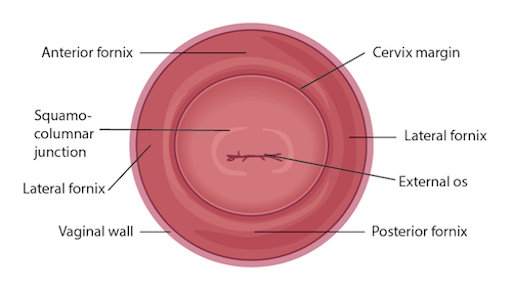
La prueba puede realizarse utilizando cualquiera de los dos 1) una diapositiva de cristal convencional y fijador con un cepillo espátula y endocervical (el tradicional "citología vaginal") o 2) más comúnmente utilizados de citología de base líquida con una escoba cervical o un cepillo espátula y endocervical (figura 2). No importa qué herramientas se utilizan, las muestras se recogen desde dentro el os externo y escamoso o zona de transición en el sistema operativo (figura 3). Este video muestra la espátula y cepillo endocervical con citología de base líquida, como la preparación de líquidos es una técnica más efectiva para la detección de lesiones cervicales, y el cepillo espátula y endocervicales mejorar la recogida de la muestra.

Figura 2. Herramientas de prueba de Papanicolaou. Se muestra en la secuencia son: un frasco de citología líquida cervical escoba, espátula y cepillo endocervical.

Figura 3. Diagrama de la cerviz conestructuras relevantes etiquetadas.
El examen de espéculo comienza inmediatamente después del final del examen de los genitales externos; por lo tanto, el paciente ya ha proporcionado una historia y está en la posición de litotomía modificada. Asegúrese de que el paciente está sentado en el extremo de la mesa, como el espéculo no se puede insertar totalmente cualquier otra forma.
1. preparación
- Coloque los suministros para la prueba de Papanicolau.
- Etiqueta de la lata de citología líquida con la información
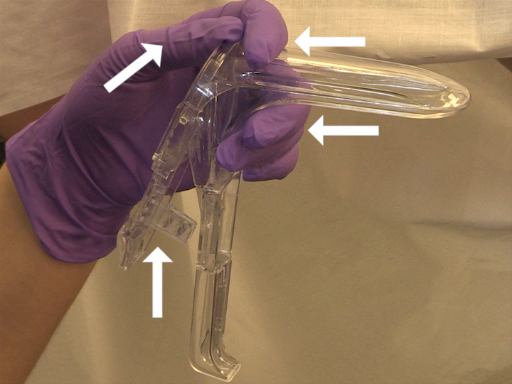
Este vídeo repasa las técnicas para realizar un examen de espéculo cómodo y recoger las muestras para la prueba de Papanicolau. Antes de inicia el examen, el examinador debe garantizar todos los suministros están preparados y que el paciente sabe qué esperar. Ser capaz de realizar un examen cómodo espéculo es una habilidad importante para cualquier practicante, ya que se utiliza en una amplia variedad de procedimientos ginecológicos y puede proporcionar una gran cantidad de información. Cuando se inserta el esp...
- Cervical Cancer Statistics. U.S. Preventive Services Task Force. Centers for Disease Control and Prevention (2014).
- Cervical Cancer: Screening. Recommendation Summary. U.S. Preventive Services Task Force (2012).
- Wright, D., Fenwick, J., Stephenson, P., Monterosso, L. Speculum 'self-insertion': a pilot study. Journal of Clinical Nursing. 14(9): 1098-1111 (2005).
Saltar a...
Vídeos de esta colección:

Now Playing
Exploración pélvica II: Examen con espéculo
Physical Examinations II
147.7K Vistas

Examen de la vista
Physical Examinations II
75.6K Vistas

Oftalmoscopía
Physical Examinations II
66.5K Vistas

Examen de los oídos
Physical Examinations II
53.4K Vistas

Exploración de la nariz, senos paranasales, cavidad oral y faringe
Physical Examinations II
64.4K Vistas

Exploración de la tiroides
Physical Examinations II
103.1K Vistas

Exploración de ganglios linfáticos
Physical Examinations II
379.4K Vistas

Exploración abdominal I: Inspección y auscultación
Physical Examinations II
199.9K Vistas

Exploración abdominal II: Percusión
Physical Examinations II
244.7K Vistas

Exploración abdominal III: Palpación
Physical Examinations II
137.1K Vistas

Exploración abdominal IV: Evaluación de dolor abdominal agudo
Physical Examinations II
66.1K Vistas

Tacto rectal masculino
Physical Examinations II
111.9K Vistas

Exploración mamaria
Physical Examinations II
85.0K Vistas

Exploración pélvica I: Evaluación de los genitales externos
Physical Examinations II
297.5K Vistas

Exploración pélvica III: Bimanual y examen rectovaginal
Physical Examinations II
144.8K Vistas
ACERCA DE JoVE
Copyright © 2025 MyJoVE Corporation. Todos los derechos reservados
