このコンテンツを視聴するには、JoVE 購読が必要です。 サインイン又は無料トライアルを申し込む。
Lentiviral Vector-Based Perivitelline Injection: A Method to Transduce the Gene of Interest Into Fertilized Single-Cell Mouse Oocytes
Overview
This video describes the pronuclear injection of lentiviral vectors into the perivitelline space of a fertilized mouse embryo. The lentivirus contains the transgene, which is incorporated into the genome of the fertilized embryo, eventually giving rise to transgenic mice.
プロトコル
All procedures involving animal models have been reviewed by the local institutional animal care committee and the JoVE veterinary review board.
1. Remove cumulus cells from fertilized eggs.
- Under a stereomicroscope, use 2 insulin syringes: the first one to hold the oviduct and the second one to tear up the ampulla and disperse fertilized eggs into the hyaluronidase working solution.
- Take the prepared glass pipet for collecting eggs and connect it to the tubing and a 0.22 μm filter mounted on the mouthpiece to aspirate all the eggs. Collect all eggs and wash them by successive passage into 6 different drops of 100 µL of M2 medium.
- Place washed fertilized eggs into humidified 37 °C incubator with an atmosphere of 5% CO2 in M16 medium.
2. Making Injection Pipettes
- Use thin-walled glass capillary tubing (10-15 cm long) with an outside diameter of 1 mm and clamp this capillary into horizontal micropipette puller.
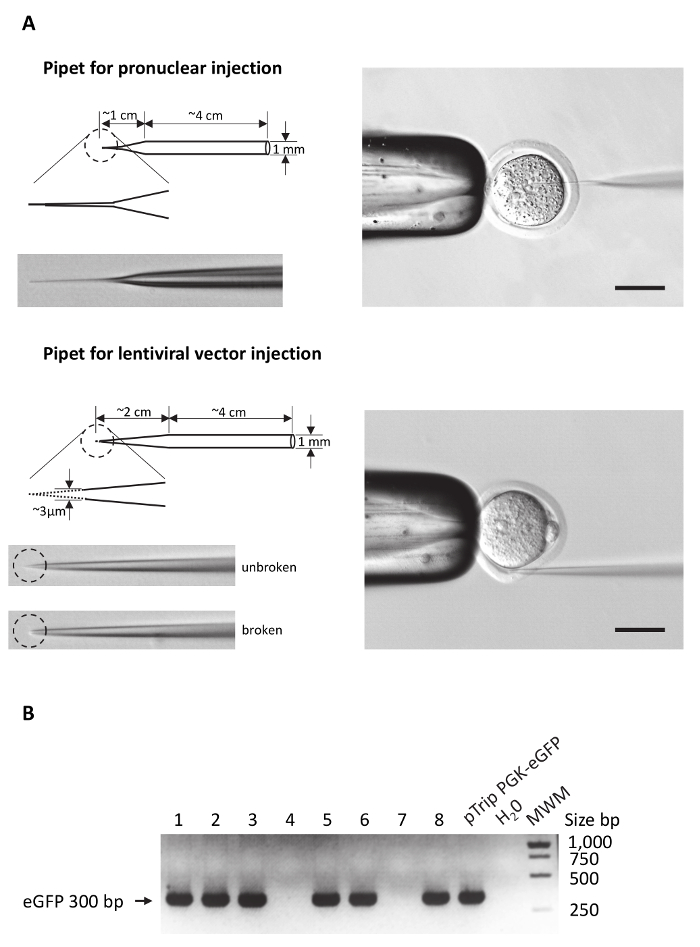
NOTE: In most horizontal pipette pullers, 3 parameters can be adjusted: heat power, pulling strength and time delay between heating and pulling. Adjust these parameters to obtain injecting pipets that resembles the one presented in Figure 1A. For users that are routinely performing DNA microinjection, use the standard settings and adjust the delay between heating and pulling to change the global shape of the pipette tip.
3. Making Holding Pipettes
- Use an injecting pipette to prepare the holding pipette.
- Attach an injecting pipette to a microforge. Cut the pipette with the microforge to obtain a sharp symmetrical tip of 80 to 100 µm diameter. Then polish the tip with heat on the microforge to obtain a symmetrical round shape without sharp hedges.
4. Preparation of Injection Pipette Containing the Lentiviral Vector
- Centrifuge the lentiviral vector suspension at 160 x g for 2 min to pellet debris often present in frozen lentiviral stocks.
- Recover the supernatant and transfer it into a new 0.5 mL tube in a class II safety cabinet.
- Transfer 1 µL of supernatant to an injection pipette prepared as described in step 5 using a Micro-loader.
- Set the injection pipette on the instrument holder of the right micromanipulator. Connect the holding pipet to the left micromanipulator.
NOTE: The transduction titter of the lentiviral vector will be directly correlated with the efficacy of founder production. For high efficacy (>70%), use viral vectors with a titter in the range of 100 ng of p24 capsid protein/µL. When the titer is expressed as transduction units (TU), the titter should be above 109 TU/mL. Lentiviral vector stocks must be produced by transient transfection of 293T cells with the p8.91 encapsidation plasmid, pHCMV-G, encoding the vesicular stomatitis virus (VSV) glycoprotein-G as described in supplemental methods.
5. Micro-Injection
- Dispense 8 µL of M2 medium in the center of a depression slide and cover with light paraffin oil (embryo tested) to avoid evaporation.
- Place 20 eggs into the drop as least dispersed as possible.
CAUTION: Do not make bubbles when depositing the embryos. - Make sure that the tip of the injection pipette is open. If not, tap the injection pipette with the holding pipette.
- Set the microinjector for an injection time of 20 s.
NOTE: The viscosity of the viral suspension allows clear visualization of the dispersion of the viral vector in the perivitelline space. The injection pressure should be adjusted to fill the entire space within 20 s of injection, which represents a volume of 10 to 100 pL. Injection pressure should not exceed 600 hPa. - Aspirate one fertilized egg that contains 2 pronuclei and 2 polar bodies with the holding pipette under the stereomicroscope.
- Inject the egg with the microinjector in the perivitelline space.
CAUTION: Do not touch the plasma membrane with the injection pipet. - Inject all fertilized eggs available in batches of 20 eggs and place the injected eggs immediately in pre-heated M16 medium into the humidified 37 °C incubator with an atmosphere of 5% CO2.
NOTE: Incubate the injected eggs for a minimum of 30 min after injection before embryo transfers.
結果

Figure 1: Preparing the microinjection pipettes and genotyping.
(A) Schematic drawings of microinjection pipettes to highlight main differences between pipets used for DNA or lentiviral vector injections. Left panel: the overall shape of both pipette types is drawn. The dashed circle highlights the enlarged area of the pipet tip. Pictures of the p...
開示事項
資料
| Name | Company | Catalog Number | Comments |
| Insulin syringe | VWR | 613-3867 | Terumo Myjector |
| Aspirator tube assemblies for calibrated microcapillary pipettes | Sigma | A5177-5EA | |
| Hyaluronidase Enzyme 30mg | Sigma | H4272 | mouse embryo tested |
| Borosilicate glass capillaries | Harvard apparatus | GC 100-10 | |
| Inverted microscope | Nikon | Transferman NK2 5188 | Hoffman modulation contrast illumination is required |
| Micromanipulator | Eppendorf | Celltram air |
This article has been published
Video Coming Soon
Source: Dussaud, S. et al., Lentiviral Mediated Production of Transgenic Mice: A Simple and Highly Efficient Method for Direct Study of Founders. J. Vis. Exp. (2018).
Copyright © 2023 MyJoVE Corporation. All rights reserved