
Aby wyświetlić tę treść, wymagana jest subskrypcja JoVE. Zaloguj się lub rozpocznij bezpłatny okres próbny.
Method Article
Procurement and Perfusion-Decellularization of Porcine Vascularized Flaps in a Customized Perfusion Bioreactor
W tym Artykule
Podsumowanie
The protocol describes the surgical procurement and subsequent decellularization of vascularized porcine flaps by the perfusion of sodium dodecyl sulfate detergent through the flap vasculature in a customized perfusion bioreactor.
Streszczenie
Large volume soft tissue defects lead to functional deficits and can greatly impact the patient's quality of life. Although surgical reconstruction can be performed using autologous free flap transfer or vascularized composite allotransplantation (VCA), such methods also have disadvantages. Issues such as donor site morbidity and tissue availability limit autologous free flap transfer, while immunosuppression is a significant limitation of VCA. Engineered tissues in reconstructive surgery using decellularization/recellularization methods represent a possible solution. Decellularized tissues are generated using methods that remove native cellular material while preserving the underlying extracellular matrix (ECM) microarchitecture. These acellular scaffolds can then be subsequently recellularized with recipient-specific cells.
This protocol details the procurement and decellularization methods used to achieve acellular scaffolds in a pig model. In addition, it also provides a description of the perfusion bioreactor design and setup. The flaps include the porcine omentum, tensor fascia lata, and the radial forearm. Decellularization is performed via ex vivo perfusion of low concentration sodium dodecyl sulfate (SDS) detergent followed by DNase enzyme treatment and peracetic acid sterilization in a customized perfusion bioreactor.
Successful tissue decellularization is characterized by a white-opaque appearance of flaps macroscopically. Acellular flaps show the absence of nuclei on histological staining and a significant reduction in DNA content. This protocol can be used efficiently to generate decellularized soft tissue scaffolds with preserved ECM and vascular microarchitecture. Such scaffolds can be used in subsequent recellularization studies and have the potential for clinical translation in reconstructive surgery.
Wprowadzenie
Traumatic injury and tumor removal can lead to large and complex soft tissue defects. These defects can impair patient quality of life, cause loss of function, and result in permanent disability. While techniques such as autologous tissue flap transfer have been commonly practiced, issues with flap availability and donor site morbidity are major limitations1,2,3. Vascularized composite allotransplantation (VCA) is a promising alternative that transfers composite tissues, e.g., muscle, skin, vasculature, as a single unit to recipients. However, VCA requires long-term immunosuppression, which leads to drug toxicity, opportunistic infections, and malignancies4,5,6.
Tissue-engineered acellular scaffolds are a potential solution to these limitations7. Acellular tissue scaffolds can be obtained using decellularization methods, which remove cellular material from native tissues while preserving the underlying extracellular matrix (ECM) microarchitecture. In contrast to the use of synthetic materials in tissue engineering, the use of biologically derived scaffolds offers a biomimetic ECM substrate that allows biocompatibility and the potential for clinical translation8. Following decellularization, the subsequent recellularization of scaffolds with recipient-specific cells can then generate functional, vascularized tissues with little to no immunogenicity9,10,11. By developing an effective protocol to obtain acellular tissues using perfusion decellularization techniques, a broad range of tissue types can be engineered. In turn, building on this technique allows the application to more complex tissues. To date, perfusion decellularization of vascularized soft tissues has been investigated using simple vascularized tissues such as a full thickness fasciocutaneous flap in rodent12, porcine13, and human models14, as well as porcine rectus abdominis skeletal muscle15. Additionally, complex vascularized tissues have also been perfusion decellularized as demonstrated in porcine and human ear16,17 models and human full-face graft models18.
Here, the protocol describes the decellularization of vascularized free flaps using biologically derived ECM scaffolds. We present the decellularization of three clinically relevant flaps: 1) the omentum, 2) the tensor fascia lata, and 3) the radial forearm, all of which are representative of workhorse flaps used routinely in reconstructive surgery and have not been previously examined in animal studies within the context of tissue decellularization. These bioengineered flaps offer a versatile and readily available platform that has the potential for clinical applications for use in the field of large soft tissue defect repair and reconstruction.
Access restricted. Please log in or start a trial to view this content.
Protokół
All procedures involving animal subjects have been approved by the University Health Network Institutional Animal Care and Use Committee (IACUC) and are performed in accordance with University Health Network Animal Resource Centre protocol and procedures and Canadian Council on Animal Care Guidelines. Five Yorkshire pigs (35-50 kg; age approximately 12 weeks old) were used for all experiments.
1. Perfusion bioreactor fabrication
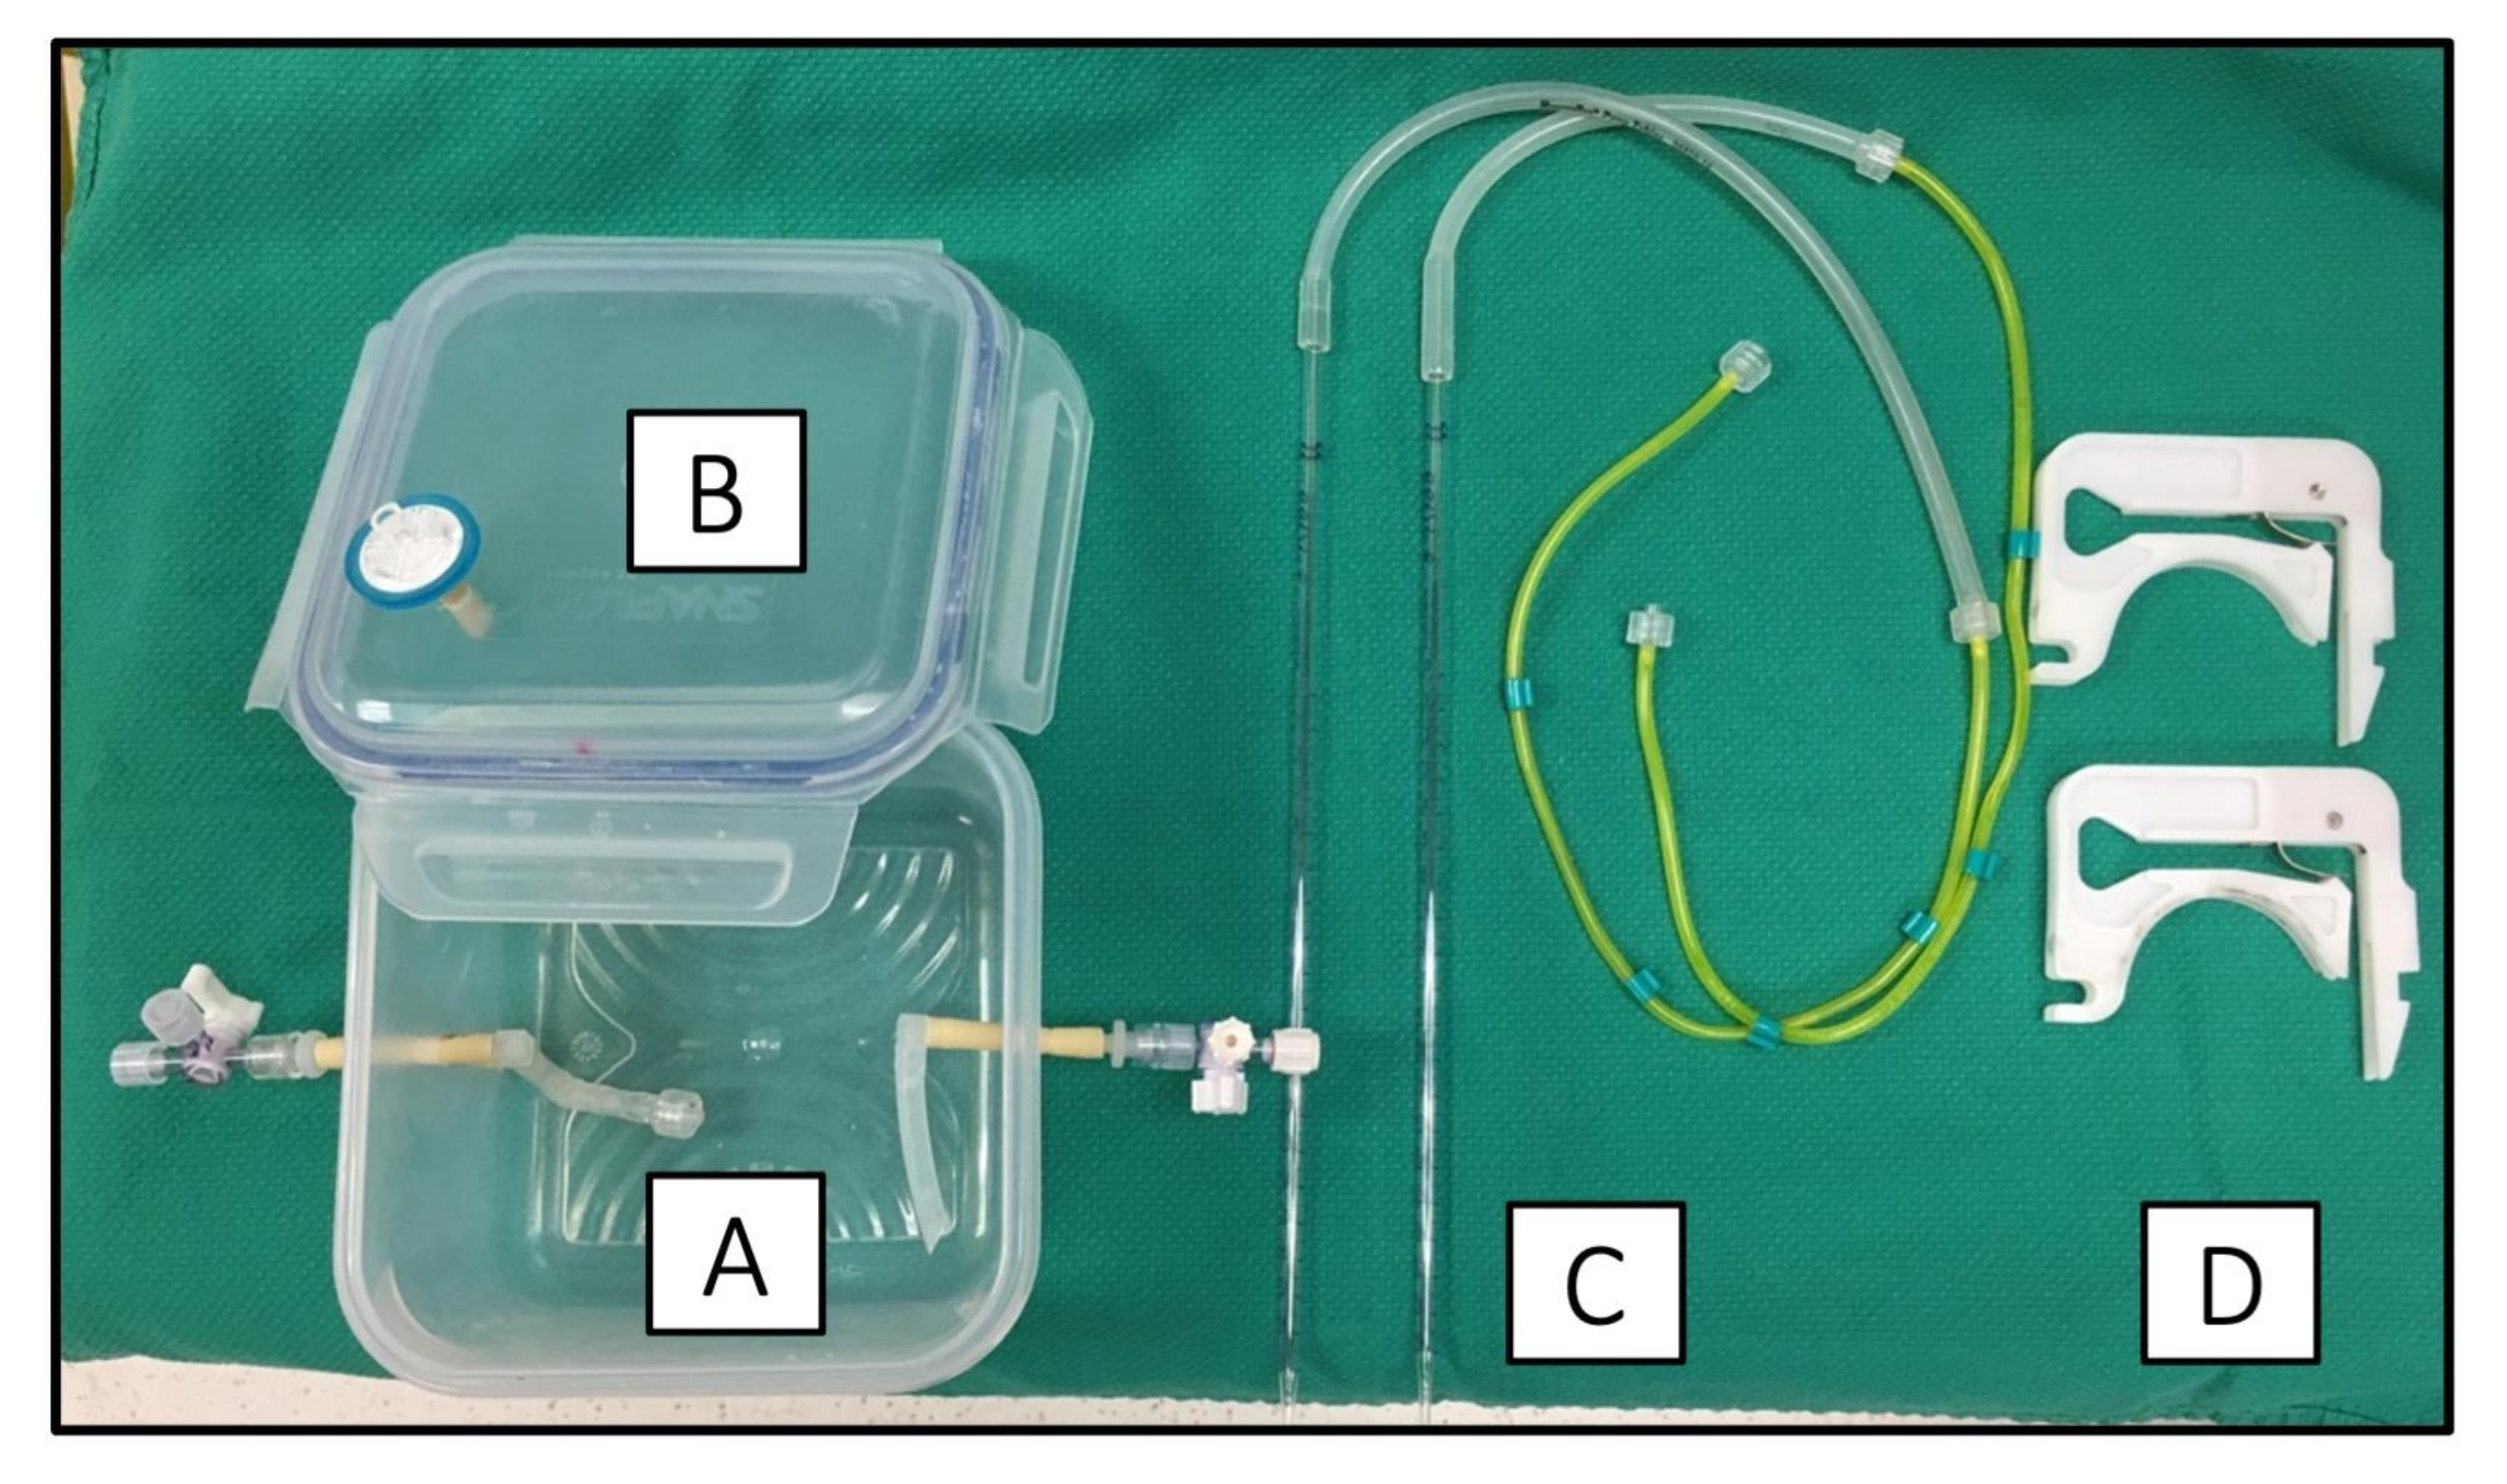
- See Figure 1 for all the components used in the perfusion bioreactor. For fabrication of the tissue chamber, use commercially available polypropylene snap-lock containers with watertight and airtight lids containing a silicone seal lining. Ensure the containers are autoclave compatible.
- Drill two 1/4 in holes along the sides of the container and thread a short segment of L/S-16 platinum-coated silicone tubing. One tubing will carry the inflow perfusate and the other is for the outflow.
- For the inflow tubing, attach a male Luer connector at the internal portion that will be used to connect to the tissue cannula. Attach a female Luer connector at the external end of the inflow tubing that will be used to connect to a three-way stopcock.
- Drill a single 1/4 in hole on the chamber lid and thread another short segment of L/S-16 platinum-coated silicone tubing. This tubing will serve as the air vent.
- Make the inflow and outflow tubing by measuring approximately 50 cm of L/S-16 platinum-coated silicone tubing. Connect one end to a yellow three-stop pump tubing and the other end to a sterile 2 mL serological pipette to carry perfusate from the detergent reservoirs into the bioreactor chamber.
- Autoclave all components (chamber and tubing) in individually wrapped sterile packaging.

Figure 1: Fabrication of the perfusion bioreactor. The perfusion bioreactor consists of (A) a plastic polypropylene tissue chamber (B) with side holes drilled to accommodate perfusion tubing with air-and water-tight lid. (C) Stopcocks are attached to tubing to allow for the attachment of the perfusion tubing that carries decellularization agents from the detergent reservoir to waste in a single-pass fashion. (D) Compatible pump cassettes are used to connect the three-stop tubing to the peristaltic pump. Please click here to view a larger version of this figure.
2. Preparation of decellularization solutions
- Prepare heparinized normal saline solution (15 IU/mL) by diluting 1.5 mL of 1000 I.U./mL heparin stock solution in 100 mL of normal saline.
- Prepare 0.05% w/v sodium dodecyl sulfate (SDS) solution by slowly adding 9 g of SDS powder to 18 L of autoclaved distilled-deionized water. Use a large volume polypropylene (PP) carboy to accommodate the SDS solution. The solution is ready for use when fully dissolved. Store at room temperature.
- Prepare DNase I working solution. First, reconstitute lyophilized DNase I to a stock concentration of 10 mg/mL with 5 mM CaCl2 in sterile dH2O. Store the reconstituted stock DNase I solution as aliquots in a −20 °C freezer until ready for use. On the day of usage, dilute DNase I stock 1:100 with Mg++(1.29 mM) and Ca++(1.98 mM) in sterile dH2O to a final concentration of 0.1 mg/mL.
NOTE: DNase activity will degrade unless stored frozen. Only fresh working DNase solution should be used for the enzymatic digestion of DNA at room temperature. - Prepare 1x PBS solution by diluting 10x PBS stock 1:10 with sterile autoclaved water in a 5 L final volume in a PP carboy. Store at room temperature.
- Prepare 1% antibiotics/antimycotics (A/A) in PBS. Dilute 100x antibiotics/antimycotics 1:100 with sterile 1x PBS solution to a final volume of 1 L. Store at room temperature.
- Prepare 0.1% (v/v) peracetic acid (PAA)/4% (v/v) ethanol (EtOH) by adding 3.13 mL of PAA + 40 mL of 100 % ethanol + 956 mL of sterile dH2O. Bring the final volume to 1,000 mL and store at room temperature.
3. Procurement of porcine flaps
NOTE: This is a terminal procedure. One pig was used to procure all three flaps. Humanely euthanize the animal following the procurement of all flaps.
- Preoperative care
- Fast pigs at least 12 h prior to surgery. Sedate the animals with ketamine (20 mg/kg intramuscular, IM), atropine (0.04 mg/kg IM), and midazolam (0.3 mg/kg IM).
- Induce anesthesia by inhalation of 5% isoflurane through a mask at a flow rate of 22-44 mL/kg/min for peripheral line insertion and intubation. Maintain anesthesia with 0.5%-2% isoflurane at 22-44 mL/kg/min. Ensure an adequate depth of anesthesia by checking hemodynamic stability and note absent palpebral/pedal withdrawal reflexes or jaw muscle tone to denote an appropriate level of anesthetic administered. Administer intravenous remifentanil (10-20 µg/kg/h) continuous rate infusion during surgery for analgesia.
- Intubate the pig with an appropriate endotracheal tube (7-8 mm) and connect the tube to a ventilator set to a tidal volume of 8 mL/kg, PEEP of 5 cm H20, FiO2 of 0.5, and respiratory rate of 14.
- Insert a 22 G angiocath catheter into the ear vein. Once intravenous (IV) access is obtained, infuse warm 0.9% normal saline at 5-10 mL/kg/h throughout the procedure to maintain mean arterial pressure between 60 mmHg and 90 mmHg.
- Continuously monitor the heart rate, pulse oximetry, and end-tidal CO2. Assess blood pressure and body temperature every 5 min.
- Apply eye ointment to prevent ocular dryness while under anesthesia. Prepare the entire surgical field with povidone-iodine. Drape the surgical field with sterile towels.
- Omental flap
- Place the pig in the supine position and perform a xypho-umbilical laparotomy.
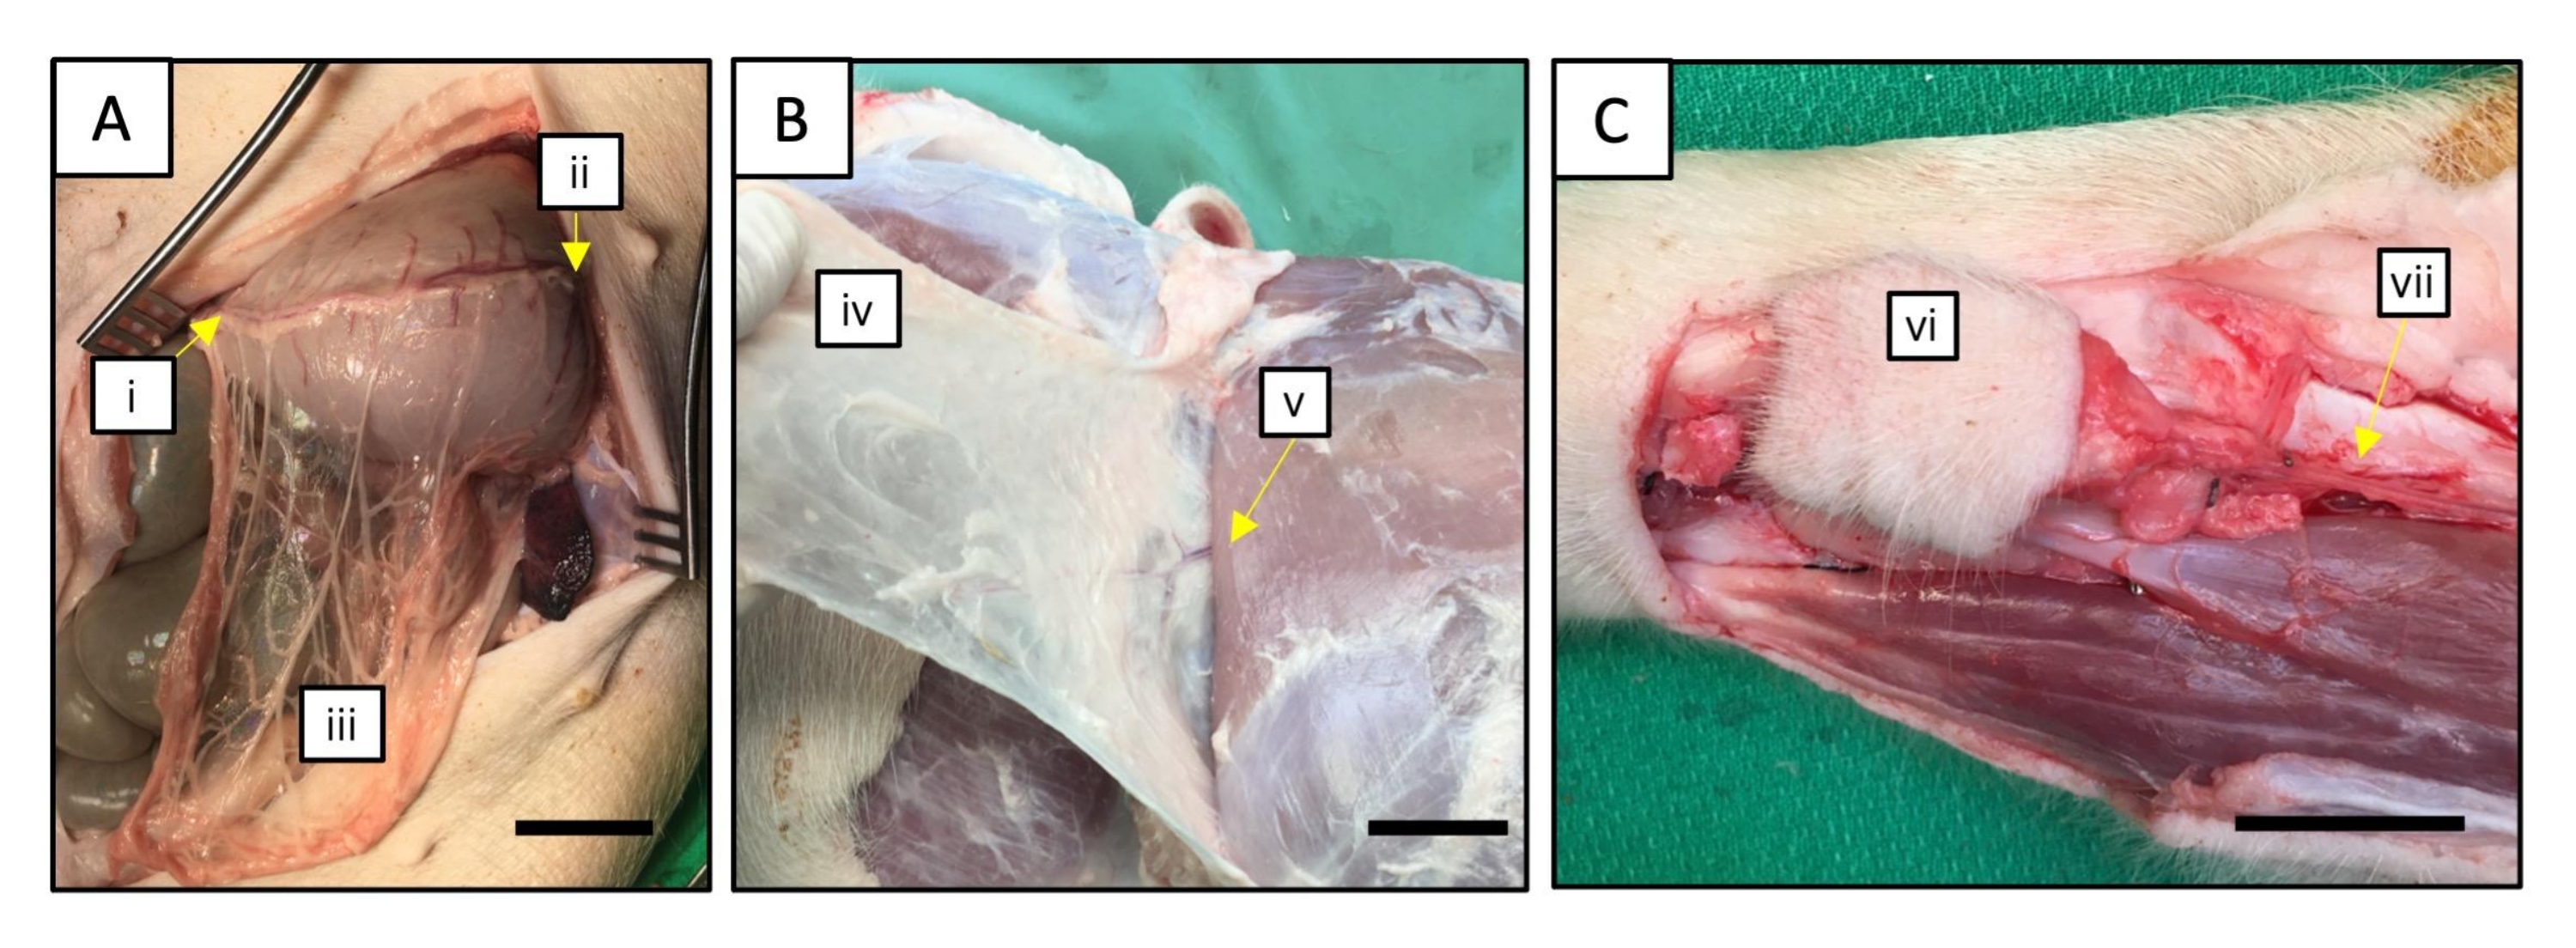
- Upon entering the abdomen, mobilize the stomach cephalad to visualize the greater omentum. Carefully place the omentum into the operative field and identify the gastro-epiploic vessels running along the greater curvature of the stomach (Figure 2A).
- Begin at the left aspect of the greater curvature where the left gastro-epiploic artery joins the splenic artery. Using straight Stevens tenotomy scissors, skeletonize both the left gastro-epiploic artery and vein. Ligate then divide both separately using surgical ties or clips.
- Proceed along the greater curvature of the stomach from left to right. Ligate and divide the short vascular branches arising from the omentum supplying the greater curvature of the stomach. Take care not to injure the main gastroepiploic pedicle of the omentum during this step.
- Continue the mobilization of the greater omentum until the junction of the right gastro-epiploic vessels and the gastroduodenal artery is encountered. With clips or ties, ligate then divide the right gastroepiploic artery and veins separately to free the omental flap.
- Once freed, the omentum can be divided along the middle into two halves, with each half accompanied by a respective gastro-epiploic artery and vein. This allows the procurement of two omental free flaps from one animal operation. Individually cannulate the gastro-epiploic vessels with a 20-22 G cannula then secure with 3-0 silk ties.
- Flush heparinized saline (15 I.U./mL) into the gastro-epiploic arterial cannula until a clear venous outflow is observed.
- Tensor fascia lata flap
NOTE: The protocol is based on a previous description of the porcine tensor fascia lata flap by Haughey et al.19. Modification is made to isolate only the fascial portion of the tensor fascia lata flap.- Place the pig in the lateral decubitus position and shave the entire upper hindlimb bilaterally. Prepare and drape using the usual sterile procedures.
- Mark the anterior boundary of the flap with a line extending from the anterior superior iliac spine (ASIS) toward the lateral patella. The location of the pedicle is approximately 6-8 cm from the ASIS along this line.
- Mark a parallel posterior line approximately 8 cm to 10 cm from the anterior incision along the axis of the femur to include the width of the flap. Mark the distal edge of the flap at the lateral patella.
- Begin the dissection at the distal margin at the patella with a sharp incision of the skin using a scalpel. Deepen the skin incision with cautery through the subcutaneous tissue until the fascia overlying the rectus femoris is encountered.
- Continue the skin incisions toward the ASIS along the marked anterior and posterior boundaries described above. To isolate the fascial flap alone, remove the overlying skin component from the underlying fascial layer. Ligate or cauterize any small perforator vessels to the skin.
- Return to the distal border of the flap and incise the deep fascia to allow mobilization of the underlying vastus lateralis muscle. Mobilize the fascia toward the ASIS.
- During mobilization, identify the vascular pedicle emerging from between the vastus lateralis and rectus femoris muscles (Figure 2B). Take care to avoid excessive traction so as to not to injure the pedicle vessels.
- Dissect the proximal aspect off the ASIS while protecting the vascular pedicle. Dissect until the flap is sufficiently mobilized about its pedicle.
- Trace the pedicle toward the deep femoral vessels. Skeletonize both the lateral circumflex femoral artery and vein supplying the fascial flap. Ligate then divide both vessels proximally where they join the deep femoral vessels.
- Cannulate the pedicle vessels individually with 20 G to 24 G angiocatheters, secured with 3-0 silk ties. Flush heparinized saline (15 I.U./mL) into the flap arterial cannula until a clear venous outflow is observed.
- Radial forearm flap
NOTE: The protocol below is based on a published description of the porcine radial forearm flap model by Khachatryan et al.20.- Place the pig on the operating table in the lateral decubitus position. Position the dependent forelimb within the operative field.
- Mark an approximate 3 cm x 3 cm skin flap square on the radial forearm. Draw a line between the midpoint of the proximal flap margin and the antecubital fossa to denote the approximate course of the radial artery pedicle. Confirm the arterial course with palpation.
NOTE: In the porcine model, the radial vessels are located relatively deeper than in humans. Their location is between the flexor carpi radialis and brachioradialis. - Incise the skin using a scalpel at the distal aspect with a depth up to the antebrachial fascia. Blunt dissect with tenotomy scissors until the distal radial artery and its two venae comitantes are encountered. Ligate the artery and veins with surgical ties individually and divide.
- Continue the skin incisions on the radial and ulnar margins of the marked skin square. Mobilize the flap off the underlying radial bone with a surgical blade proceeding from a radial to ulnar direction while also raising the skin flap proximally toward the antecubital fossa.
NOTE: Maintain a subfascial dissection plane in order to ensure the radial artery pedicle remains associated with the overlying cutaneous layer. - At the proximal margin, retract the space between the brachioradialis and flexor carpi radialis with a self-retaining retractor to expose the proximal radial artery and its venae comitantes (Figure 2C).
- Using tenotomy scissors, skeletonize the radial artery and venae comitantes proximally at the antecubital fossa where they join the brachial artery and veins, respectively. Dissect the vessels from the surrounding fibrofatty tissues to achieve a sufficient pedicle length of approximately 5-6 cm. Ligate and divide the artery and venae separately to free the radial forearm flap.
- Cannulate the pedicle vessels with 20 G to 24 G angiocatheters, secured with 3-0 silk ties. Flush heparinized saline (15 IU/mL) into the flap arterial cannula until a clear venous outflow is observed.
- Following flap procurement, keep flaps in cold saline at 4 °C until ready for decellularization. Under deep isoflurane anesthesia, euthanize the animals with an intravenous injection of potassium chloride (100 mg/kg IV). Confirm death by the absence of vital signs.

Figure 2: Procurement of three porcine vascularized flaps. (A) Omentum. The right (i) and left (ii) gastroepiploic arteries are cannulated in the omental flap (iii). (B) Tensor fascia lata. The pedicle of the flap (iv) is the ascending branch of the lateral femoral circumflex artery (v). (C) Radial forearm flap. Procurement of the radial forearm flap (vi) is based on the radial artery and the vena comitantes (vii) as the vascular pedicle (NOTE: Drapes were omitted for demonstration purposes). Scale bars: 3 cm. Please click here to view a larger version of this figure.
4. Setup of the decellularization system
- Assemble the tissue chamber with flaps under sterile conditions in a laminar flow biosafety cabinet.
- Attach a three-way stopcock to both the inflow and outflow ports of the bioreactor. Attach a 0.2 µm filter to the air vent port on the tissue chamber lid. Prime the inflow tubing with sterile heparinized saline to eliminate air bubbles.
- Place the flaps in the chamber. Using sterile hemostats, connect the flaps to the inflow tubing using the male Luer connector. Screw the respective arterial cannula of each flap onto the male Luer and ensure a tight seal.
- Flush heparinized saline through the stopcock to check that the Luer connection is without leaks and that the flaps can be perfused with evidence of venous outflow. Close the tissue chamber lid.
- Connect the inflow tubing with a yellow three-stop pump tubing to the inflow stopcock of the tissue chamber. Also, attach an inline pressure sensor transducer to the inflow three-way stopcock to allow for perfusion pressure monitoring.
- Turn on the inflow peristaltic pump. On the initial screen, proceed to the third tab using the arrow key to set the tubing ID to 1.85 mm. Next, proceed to the second tab to set the perfusion rate. Input rate as the mode of delivery and set to 2 mL/min. Ensure the direction of flow is correct as displayed on the screen. Load the three-stop pump tubing to the peristaltic pump with a compatible cassette.
- Repeat the procedure for the outflow peristaltic pump similar to above. Set the outflow pump setting to rate at 4 mL/min. Connect the outflow tubing with a yellow three-stop pump tubing to the outflow stopcock of the tissue chamber. Load the three-stop pump tubing to the peristaltic pump with a compatible cassette. Start the flow for both pumps by pressing the Power button.
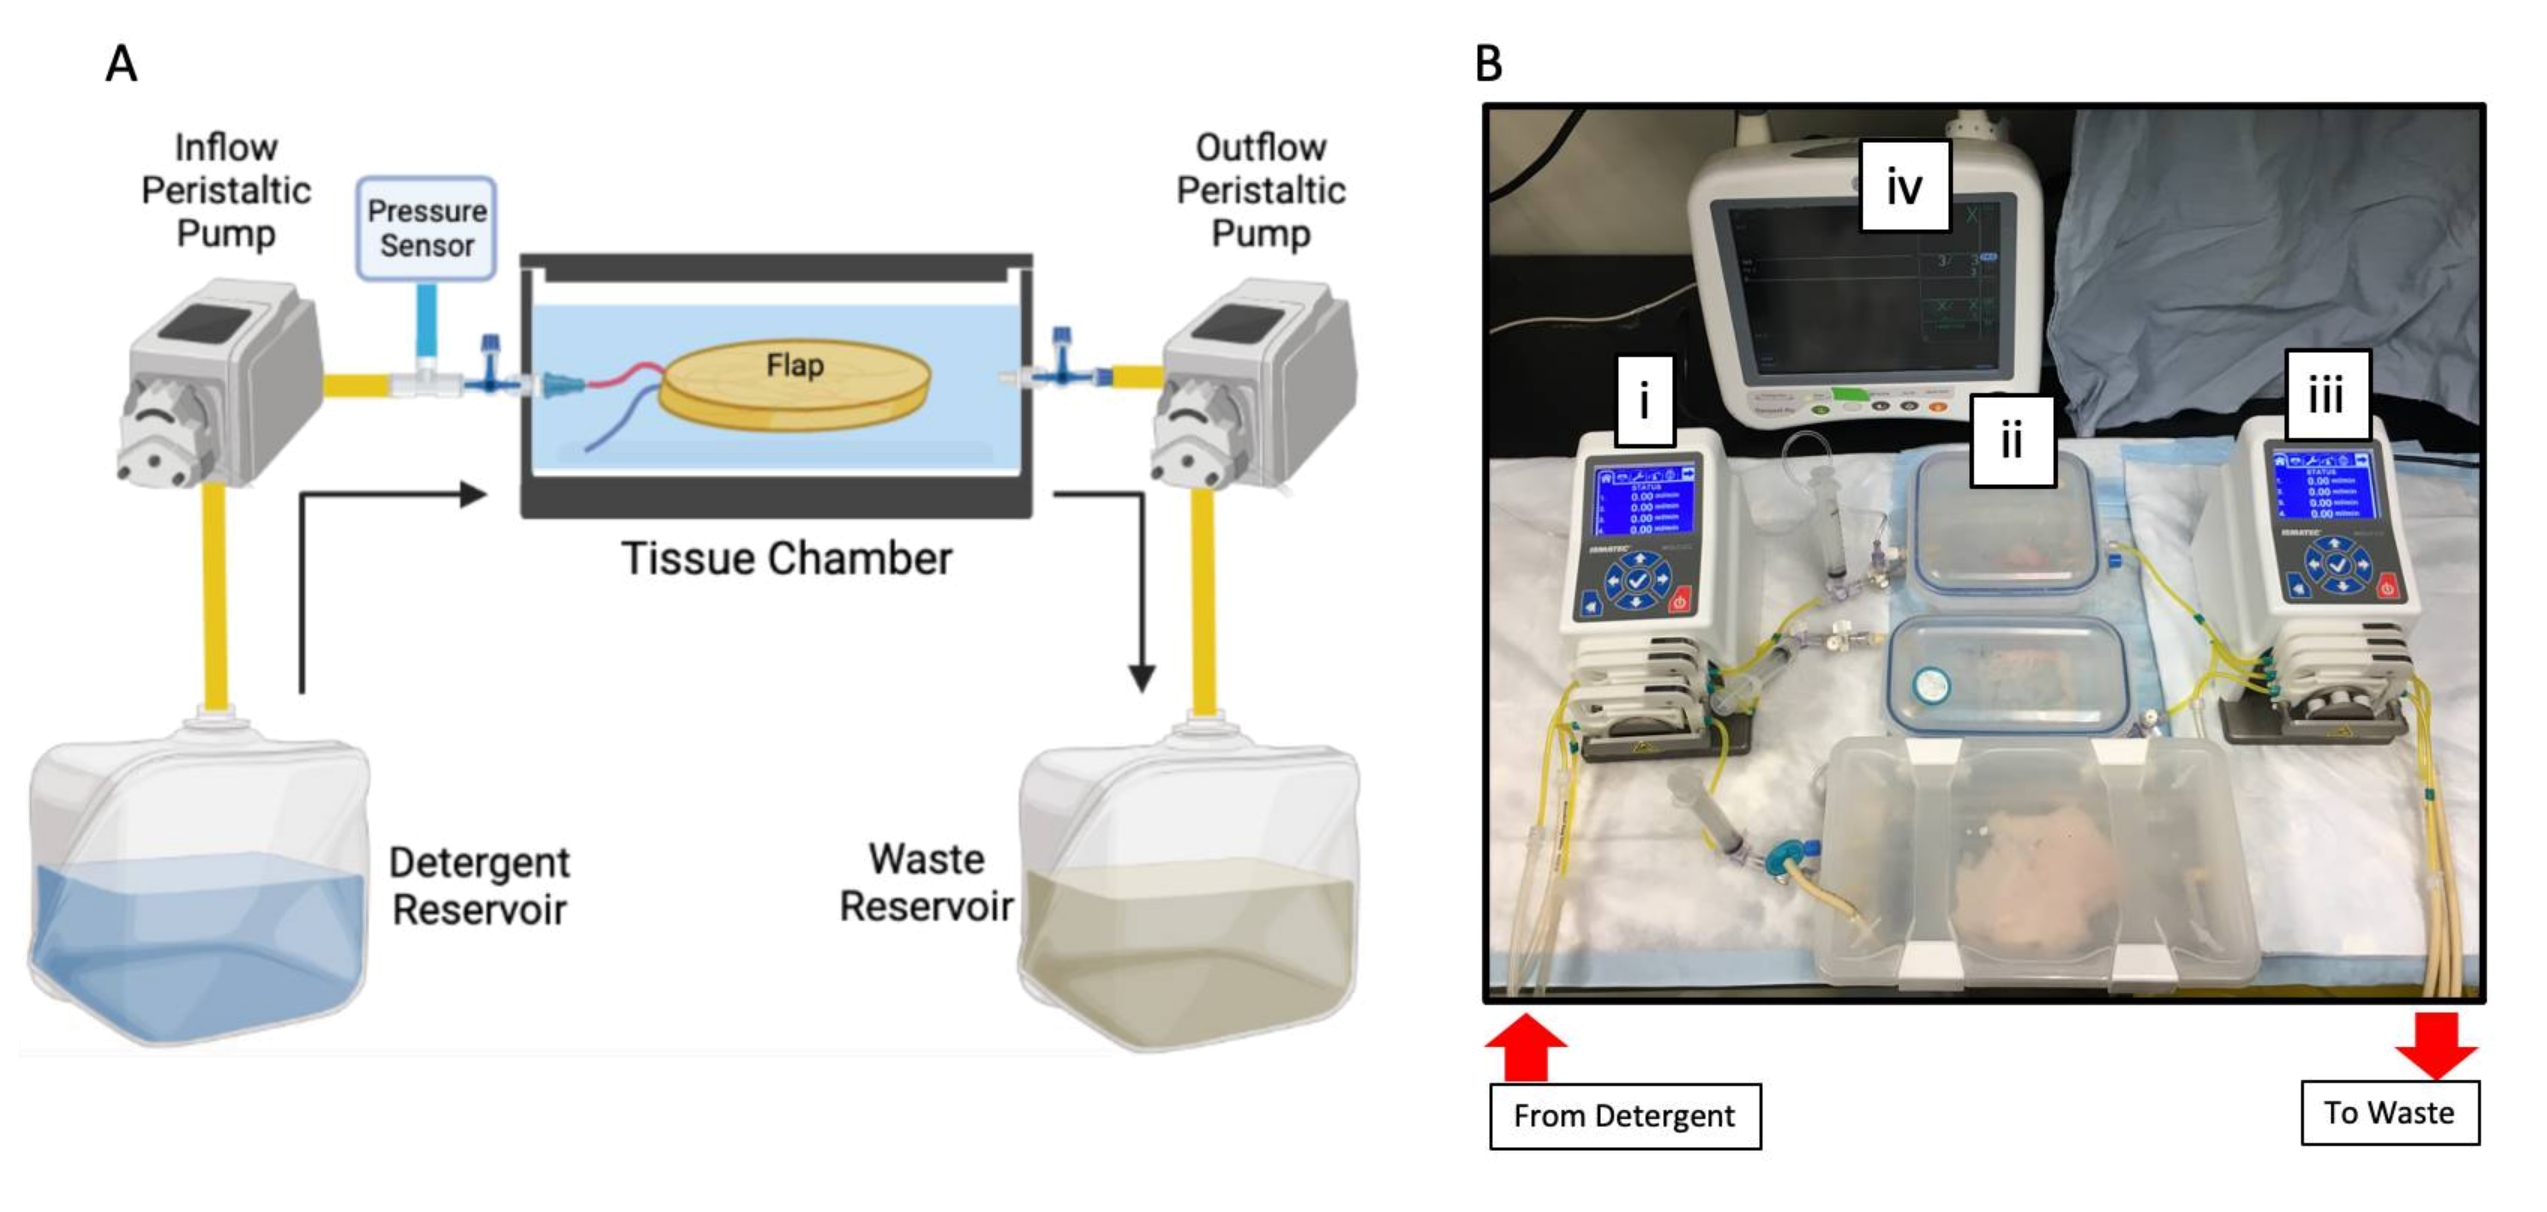
NOTE: The higher rate of the outflow pump is a crucial safety measure to prevent overflow of the tissue chamber, ensuring the chamber outflow always exceeds inflow during the course of decellularization. The entire assembled decellularization setup is depicted in Figure 3.

Figure 3: Assembled perfusion decellularization system. (A) Schematic of the perfusion decellularization system. The inflow tubing carries perfusate from the detergent reservoir into the tissue chamber in a single-pass fashion with pressure sensor monitoring. The outflow tubing removes perfusate actively from the tissue chamber into the waste container. Black arrows denote the direction of perfusion flow. A peristaltic pump is used with the left pump to control inflow. Outflow is actively removed using a second peristaltic pump through the respective tubing. Figure created with BioRender.com. (B) Photograph of the perfusion decellularization system assembled on the benchtop with the inflow peristaltic pump (i) connected to the tissue chambers (ii) and then the outflow peristaltic pump (iii). The inflow perfusate pressure is monitored with an in-line pressure sensor (iv) prior to entering the tissue chamber. Here, three flaps are decellularized in parallel. Both the detergent and waste reservoirs are below the benchtop and not photographed. Please click here to view a larger version of this figure.
5. Decellularization of porcine flaps
- Carry out all of the following steps for perfusion decellularization at room temperature. For a summary of the perfusion rates and durations, see Table 1. Begin the perfusion of heparinized saline at 2 mL/min using a peristaltic pump and perfuse the flaps with heparinized saline in the tissue chamber for 15 min to remove any retained blood clots.
- Upon completion of heparinized saline perfusion, aspirate residual saline in the tissue chamber. Fill the tissue chamber with approximately 500 mL of SDS decellularization solution to sufficiently submerge the flap.
- Transfer the inflow tubing to the SDS decellularization solution and perfuse the tissue at 2 mL/min. The duration of perfusion varies depending on the flap; perfuse SDS for 2 days for omentum, 3 days for tensor fascia, and 5 days for radial forearm fascio-cutaneous flap.
- Upon completion of SDS decellularization, aspirate the existing SDS perfusate contained within the tissue chamber. Transfer the inflow tubing into 1x PBS solution and perfuse the flaps for 1 day at 2 mL/min.
- Remove the previous PBS solution and transfer the inflow tubing into DNase working solution. Perfuse for 2 h at 2 mL/min. Remove the DNase solution from the tissue chamber and place the inflow tubing in 1x PBS solution. Submerge the tissues with 1x PBS solution in the chamber and perfuse 1x PBS solution for 1 day at 2 mL/min.
- Sterilize the flaps with PAA/EtOH solution. Transfer the inflow tubing into PAA/EtOH in dH2O solution and submerge the tissues in the same solution. Perfuse PAA/EtOH at 2 mL/min for 3 h. Once PAA/EtOH sterilization is complete, disconnect the tubing from the three-way stopcocks.
- Remove the flaps using aseptic technique and place the sterile instruments into PBS containing 1% antibiotics/antimycotics (A/A). Immerse the flaps with PBS + 1% A/A for 15 min in two separate washes to fully neutralize residual acid. Keep the flaps in PBS + 1% A/A at 4 °C until ready for recellularization.
- Verify the sterility of the scaffolds by performing a swab culture on agar plates and examine for microbial growth. Inoculate agar plates with swabs taken from each flap surface. Culture the agar plates at 37 °C for up to 2 weeks. Sterility is demonstrated by the absence of microbial colony growth.
Table 1: Summary of perfusion-decellularization protocol parameters. Please click here to download this Table.
6. Evaluation of decellularization
- Using a punch biopsy, procure samples 3 mm to 10 mm in thickness from the flaps.
- For histology, fix biopsies in histological cassettes in normal buffered formalin for 24 h at room temperature.
- Wash the biopsy cassettes in water or PBS for 15 min then place them in 70% ethanol until ready for tissue processing. Process the cassettes in a tissue processor according to standard protocols.
- Embed the biopsies in paraffin, allowing the wax to solidify for 10-15 min on a cold plate. Section paraffin blocks on a microtome to 5 µm thickness. Stain the slides with hematoxylin and eosin (H&E) according to standard protocols. Image the tissue slides with light microscopy.
- For DNA content quantification, obtain the dry weight of the tissue biopsies following overnight tissue drying in an oven at 60 °C. Digest the samples in a papain extraction buffer at 65 °C overnight. Centrifuge the digested samples at 10,000 x g and transfer the supernatant to a fresh microcentrifuge tube. Assay the DNA content with a commercial DNA extraction kit as per the manufacturer's instructions.
Access restricted. Please log in or start a trial to view this content.
Wyniki
This protocol to decellularize vascularized porcine flaps relies on the perfusion of an ionic-based detergent, SDS, through the flap vasculature in a customized perfusion bioreactor. Prior to decellularization, three vascularized flaps in a porcine model were procured and cannulated according to their main supplying vessels. The flaps were immediately flushed after procurement in order to maintain a patent, perfusable vasculature to allow for successful decellularization. Using airtight snap-lid containers, a customized ...
Access restricted. Please log in or start a trial to view this content.
Dyskusje
The proposed protocol uses the perfusion of low concentration SDS to decellularize a range of porcine-derived flaps. With this procedure, acellular omentum, tensor fascia lata, and radial forearm flaps can be successfully decellularized using a protocol that favors low concentration SDS. Preliminary optimization experiments have determined that SDS at a low concentration (0.05%) between 2 days to 5 days is capable of removing cellular material for the omentum, tensor fascia lata, and radial forearm flap when analyzed wit...
Access restricted. Please log in or start a trial to view this content.
Ujawnienia
The authors have no conflicts of interest to disclose.
Podziękowania
None
Access restricted. Please log in or start a trial to view this content.
Materiały
| Name | Company | Catalog Number | Comments |
| 0.2 µm pore Acrodisk Filter | VWR | CA28143-310 | |
| 0.9 % Sodium Chloride Solution (Normal Saline) | Baxter | JF7123 | |
| 20 L Polypropylene Carboy | Cole-Parmer | RK-62507-20 | |
| 3-0 Sofsilk Nonabsorbable Surgical Tie | Covidien | LS639 | |
| 3-way Stopcock | Cole-Parmer | UZ-30600-04 | |
| Adson Forceps | Fine Science Tools | 11027-12 | |
| Antibiotic-Antimycotic Solution, 100X | Wisent | 450-115-EL | |
| Atropine Sulphate 15 mg/30ml | Rafter 8 Products | 238481 | |
| BD Angiocath 20-Gauge | VWR | BD381134 | |
| BD Angiocath 22-Gauge | VWR | BD381123 | |
| BD Angiocath 24-Gauge | VWR | BD381112 | |
| Calcium Chloride | Sigma-Aldrich | C4901 | DNAse Co-factor |
| DNase I from bovine pancreas | Sigma-Aldrich | DN25 | |
| DNA assay (Quant-iT PicoGreen dsDNA Assay Kit) | Invitrogen | P7589 | |
| DPBS, 10X | Wisent | 311-415-CL | without Ca++/Mg++ |
| Halsted-Mosquito Hemostat | Fine Science Tools | 13008-12 | |
| Heparin, 1000 I.U./mL | Leo Pharma A/S | 453811 | |
| Ketamine Hydrochloride 5000 mg/50 ml | Bimeda-MTC Animal Health Inc. | 612316 | |
| Ismatec Pump Tygon 3-Stop Tubing | Cole-Parmer | RK-96450-40 | Internal Diameter: 1.85 mm |
| Ismatec REGLO 4-Channel Pump | Cole-Parmer | 78001-78 | |
| Ismatec Tubing Cassettes | Cole-Parmer | RK-78016-98 | |
| Isoflurane 99.9%, 250 ml | Pharmaceutical Partners of Canada Inc. | 2231929 | |
| LB Agar Lennox | Bioshop Canada | LBL406.500 | Sterility testing agar plates |
| Magnesium Sulfate | Sigma-Aldrich | M7506 | DNAse Co-factor |
| Masterflex L/S 16 Tubing | Cole-Parmer | RK-96410-16 | |
| Midazolam 50 mg/10 ml | Pharmaceutical Partners of Canada Inc. | 2242905 | |
| Monopolar Cautery Pencil | Valleylab | E2100 | |
| Normal Buffered Formalin, 10% | Sigma-Aldrich | HT501128 | |
| N°11 scalpel blade | Swann Morton | 303 | |
| Papain from papaya latex | Sigma-Aldrich | P3125 | |
| Peracetic Acid | Sigma-Aldrich | 269336 | |
| Plastic Barbed Connector for 1/4" to 1/8" Tube ID | McMaster-Carr | 5117K61 | |
| Plastic Barbed Tube 90° Elbow Connectors | McMaster-Carr | 5117K76 | |
| Plastic Quick-Turn Tube Plugs | McMaster-Carr | 51525K143 | Male Luer |
| Plastic Quick-Turn Tube Sockets | McMaster-Carr | 51525K293 | Female Luer |
| Punch Biopsy Tool | Integra Miltex | 3332 | |
| Potassium Chloride 40 mEq/20 ml | Hospira Healthcare Corporation | 37869 | |
| Povidone-Iodine, 10% | Rougier | 833133 | |
| Serological Pipet, 2mL | Fisher Science | 13-678-27D | |
| Snap Lid Airtight Containers | SnapLock | 142-3941-4 | |
| Sodium Dodecyl Sulfate Powder | Sigma-Aldrich | L4509 | |
| Surgical Metal Ligation Clips, Small | Teleflex | 001200 | |
| Stevens Tenotomy Scissors, 115 mm, straight | B. Braun | BC004R | |
| TruWave Pressure Monitoring Set | Edwards Lifesciences | PX260 |
Odniesienia
- Richardson, D., Fisher, S. E., Vaughan, D. E., Brown, J. S. Radial Forearm Flap Donor-Site Complications and Morbidity: A Prospective Study. Plastic and Reconstructive Surgery. 99 (1), 109-115 (1997).
- Edsander-Nord, Å, Jurell, G., Wickman, M. Donor-site morbidity after pedicled or free TRAM flap surgery: A prospective and objective study. Plastic and Reconstructive Surgery. 102 (5), 1508-1516 (1998).
- Qian, Y., et al. A systematic review and meta-analysis of free-style flaps: Risk analysis of complications. Plastic and Reconstructive Surgery. Global Open. 6 (2), 1651(2018).
- Issa, F. Vascularized composite allograft-specific characteristics of immune responses. Transplant International. 29 (6), 672-681 (2016).
- Kueckelhaus, M., et al. Vascularized composite allotransplantation: Current standards and novel approaches to prevent acute rejection and chronic allograft deterioration. Transplant International. 29 (6), 655-662 (2016).
- Iske, J., et al. Composite tissue allotransplantation: Opportunities and challenges. Cellular and Molecular Immunology. 16 (4), 343-349 (2019).
- Londono, R., Gorantla, V. S., Badylak, S. F. Emerging implications for extracellular matrix-based technologies in vascularized composite allotransplantation. Stem Cells International. 2016, 1541823(2016).
- Crapo, P. M., Gilbert, T. W., Badylak, S. F. An overview of tissue and whole organ decellularization processes. Biomaterials. 32 (12), 3233-3243 (2011).
- Hussey, G. S., Dziki, J. L., Badylak, S. F. Extracellular matrix-based materials for regenerative medicine. Nature Reviews Materials. 3, 159-173 (2018).
- Colazo, J. M., et al. Applied bioengineering in tissue reconstruction, replacement, and regeneration. Tissue Engineering. Part B Reviews. 25 (4), 259-290 (2019).
- Rouwkema, J., Rivron, N. C., van Blitterswijk, C. A. Vascularization in tissue engineering. Trends in Biotechnology. 26 (8), 434-441 (2008).
- Zhang, Q., et al. Decellularized skin/adipose tissue flap matrix for engineering vascularized composite soft tissue flaps. Acta Biomaterialia. 35, 166-184 (2016).
- Jank, B. J., et al. Creation of a bioengineered skin flap scaffold with a perfusable vascular pedicle. Tissue Engineering - Part A. 23 (13-14), 696-707 (2017).
- Giatsidis, G., Guyette, J. P., Ott, H. C., Orgill, D. P. Development of a large-volume human-derived adipose acellular allogenic flap by perfusion decellularization. Wound Repair and Regeneration. 26 (2), 245-250 (2018).
- Zhang, J., et al. Perfusion-decellularized skeletal muscle as a three-dimensional scaffold with a vascular network template. Biomaterials. 89, 114-126 (2016).
- Duisit, J., et al. Decellularization of the porcine ear generates a biocompatible, nonimmunogenic extracellular matrix platform for face subunit bioengineering. Annals of Surgery. 267 (6), 1191-1201 (2018).
- Duisit, J., et al. Perfusion-decellularization of human ear grafts enables ECM-based scaffolds for auricular vascularized composite tissue engineering. Acta Biomaterialia. 73, 339-354 (2018).
- Duisit, J., et al. Bioengineering a human face graft: The matrix of identity. Annals of Surgery. 266 (5), 754-764 (2017).
- Haughey, B. H., Panje, W. R. A porcine model for multiple musculocutaneous flaps. The Laryngoscope. 99 (2), 204-212 (1989).
- Khachatryan, A., et al. Radial Forearm Flap. Microsurgery Manual for Medical Students and Residents: A Step-by-Step Approach. , Springer. Denmark. 177-181 (2021).
- Hammouda, B. Temperature effect on the nanostructure of SDS micelles in water. Journal of Research of the National Institute of Standards and Technology. 118, 151-167 (2013).
- Qu, J., Van Hogezand, R. M., Zhao, C., Kuo, B. J., Carlsen, B. T. Decellularization of a fasciocutaneous flap for use as a perfusable scaffold. Annals of Plastic Surgery. 75 (1), 112-116 (2015).
- Keane, T. J., Swinehart, I. T., Badylak, S. F. Methods of tissue decellularization used for preparation of biologic scaffolds and in vivo relevance. Methods. 84, 25-34 (2015).
- Mendibil, U., et al. Tissue-specific decellularization methods: Rationale and strategies to achieve regenerative compounds. International Journal of Molecular Sciences. 21 (15), 5447(2020).
- Lupon, E., et al. Engineering vascularized composite allografts using natural scaffolds: A systematic review. Tissue Engineering. Part B Reviews. 28 (3), 677-693 (2022).
- Duisit, J., Maistriaux, L., Bertheuil, N., Lellouch, A. G. Engineering vascularized composite tissues by perfusion decellularization/recellularization: Review. Current Transplantation Reports. 8, 44-56 (2021).
- Adil, A., Xu, M., Haykal, S. Recellularization of bioengineered scaffolds for vascular composite allotransplantation. Frontiers in Surgery. 9, 843677(2022).
- Phelps, E. A., García, A. J. Engineering more than a cell: Vascularization strategies in tissue engineering. Current Opinion in Biotechnology. 21 (5), 704-709 (2010).
- Pozzo, V., et al. A reliable porcine fascio-cutaneous flap model for vascularized composite allografts bioengineering studies. Journal of Visualized Experiments. (181), e63557(2022).
- Uygun, B. E., et al. Decellularization and recellularization of whole livers. Journal of Visualized Experiments. (48), e2394(2011).
- Uzarski, J. S., et al. Epithelial cell repopulation and preparation of rodent extracellular matrix scaffolds for renal tissue development. Journal of Visualized Experiments. (102), e53271(2015).
- Sullivan, D. C., et al. Decellularization methods of porcine kidneys for whole organ engineering using a high-throughput system. Biomaterials. 33 (31), 7756-7764 (2012).
- Choudhury, D., Yee, M., Sheng, Z. L. J., Amirul, A., Naing, M. W. Decellularization systems and devices: State-of-the-art. Acta Biomaterialia. 115, 51-59 (2020).
- Schilling, B. K., et al. Design and fabrication of an automatable, 3D printed perfusion device for tissue infusion and perfusion engineering. Tissue Engineering. Part A. 26 (5-6), 253-264 (2020).
Access restricted. Please log in or start a trial to view this content.
Przedruki i uprawnienia
Zapytaj o uprawnienia na użycie tekstu lub obrazów z tego artykułu JoVE
Zapytaj o uprawnieniaThis article has been published
Video Coming Soon
Copyright © 2025 MyJoVE Corporation. Wszelkie prawa zastrzeżone