需要订阅 JoVE 才能查看此. 登录或开始免费试用。
Larval Fillet Preparation: A Method to Visualize Intact Sensory Neurons and Associated Epidermal Cells
Overview
This video describes how to prepare larval fillets used to visualize sensory dendritic arborization (da) neurons and their associated epidermal cells. The featured protocol shows in detail how to remove muscle tissue from the body wall while preserving the cells' morphology, which improves immunostaining and visualization of the otherwise obscured da neurons and epidermal cells.
研究方案
This protocol is an excerpt from Tenenbaum and Gavis, Removal of Drosophila Muscle Tissue from Larval Fillets for Immunofluorescence Analysis of Sensory Neurons and Epidermal Cells, J. Vis. Exp. (2016).
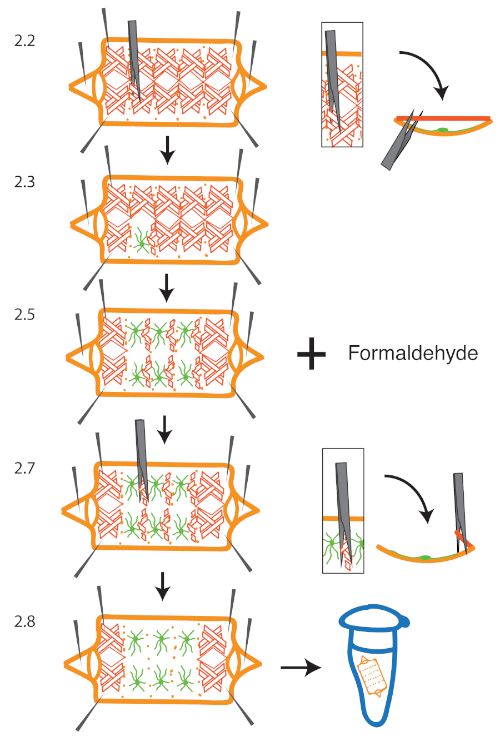
NOTE: The procedure for muscle removal (Figure 1) is a modification of previously described methods for preparing larval fillets. The steps that precede and follow muscle removal are outlined briefly and the reader is referred to previous work in Brent, et al., J. Vis. Exp. (2009) and Karim and Moore, J. Vis. Exp. (2011) for more detailed descriptions.
1. Dissect Larva in Cold Saline
- Prepare a working dilution of cold HL3.1 saline or cold Ca2+-free HL3.1 saline (Table 1). Place the larva in a silicone elastomer dish with just enough cold saline to cover the bottom of the dish.
NOTE: We recommend experimenting with the use of Ca2+-free HL3.1 saline versus standard HL3.1 saline during larval dissection. In the absence of calcium, larval muscle contractions are greatly reduced. Thus, larval fillets may be easier to manipulate when dissected in Ca2+-free HL3.1 saline. However, we find that muscle contraction creates space between the muscle and epidermis and this can facilitate the insertion of forceps between these tissues while minimizing risk of damage to the epidermis. As a result, standard HL3.1 may be preferable for preserving the integrity of the epidermis and da neurons. We obtain good results with either saline and the choice is left to the user. - Position the larva with the ventral side up. The ventral surface of the larva can be identified by the abdominal dentical belts and the dorsal side by the primary larval tracheal tubes running from anterior to posterior. Stretch the larva in the anterior-posterior direction and pin the head and tail to a silicone elastomer dissecting dish using insect pins. Use fine dissecting scissors to cut along the ventral midline, beginning at one end and progressing toward the other.
NOTE: This orientation preserves the commonly studied dorsal cluster of da neurons. - After the larva is cut open, pin the four corners to the dissecting dish as though opening a book. Use forceps to grab and remove internal organs including the CNS, gut, and trachea. Adjust insect pins so that the fillet is taut but not maximally stretched.
NOTE: Muscles are anchored to the body wall at segmental boundaries. Although muscles cover most of the body wall, they are absent in a narrow region near the dorsal midline.
2. Muscle Removal
- Locate the dorsal midline of the larva, where muscle tissue is absent. Position a single forceps prong such that it can be inserted underneath the muscle tissue in the flattest possible orientation.
- Starting at the dorsal midline, near the anterior boundary of the segment, carefully slide the forceps prong between the muscle and epidermis, taking care to minimize contact between the forceps and epidermis.
- Pull the forceps upwards to break the attachment of the muscle to the body wall at one anchor point. Repeat this process for the remaining hemi-segment(s) of interest.
NOTE: This protocol optimizes preservation of the posterior of each da neuron dendrite field. To preserve the anterior part of the dendrite field, it is best to insert the forceps prong at the posterior end of each segment. - Re-adjust insect pins such that the larval fillet is maximally stretched in all directions.
- Fix the fillet while it is still pinned to the dissecting dish using cold, freshly prepared 4% formaldehyde in PBS for 25 min.
- Rinse 5 times in PBS.
- Use forceps to carefully pull away muscle tissue from the remaining anchor points, taking care to minimize contact with the epidermis.
- Unpin and remove the fillet from the dissecting dish to a 1.5 ml microcentrifuge tube. Perform all subsequent washing, blocking, and immunofluorescence staining steps, as previously described in Karim and Moore, J. Vis. Exp. (2011).
结果

Figure 1: Overview of Muscle Removal Procedure. A larva is dissected and pinned to a silicone elastomer dissecting dish. To remove muscle tissue, one forceps prong is inserted between the muscle and epidermal cell layer, starting from the dorsal midline near a segment boundary (2.2). The forceps is pulled upwards to break the attachment between the muscle and body wall (2.3). This is repeated for segments of interest...
材料
| Name | Company | Catalog Number | Comments |
| Dumont #5 tweezers | Electron Microscopy Sciences | 72701-D | |
| Micro Scissors, 8 cm, straight, 5 mm blades, 0.1 mm tips | World Precision Instruments | 14003 | |
| Sylgard 184 silicone elastomer kit | Dow Corning | 3097358-1004 | for dissecting plates |
| Austerlitz insect pins, 0.1 mm | Fine Science Tools | 26002-10 | |
| Fostec 8375 light source | Artisan Technology Group | 62792-4 |
This article has been published
Video Coming Soon
Source: Tenenbaum, C. M., Gavis, E. R. Removal of Drosophila Muscle Tissue from Larval Fillets for Immunofluorescence Analysis of Sensory Neurons and Epidermal Cells. J. Vis. Exp. (2016).
版权所属 © 2025 MyJoVE 公司版权所有,本公司不涉及任何医疗业务和医疗服务。