A subscription to JoVE is required to view this content. Sign in or start your free trial.
Implanting an Electrode into the Subthalamic Nucleus of a Rat
In This Article
Overview
The video demonstrates a procedure for implanting an electrode into the subthalamic nucleus of a rat to deliver electrical stimuli.
Protocol
All procedures involving animal models have been reviewed by the local institutional animal care committee and the JoVE veterinary review board.
1. Anesthesia
- Check the anesthetic system to ensure adequate supply of gas (oxygen) and isoflurane for the duration of the procedure. Connect the nosecone with the incisor bar of the stereotaxic instrument and set the incisor bar at -3.3 mm.
- Turn on the supply gas (2 L/min). Place the rat into a box and seal the top. Turn on the isoflurane vaporizer to 3.5%.
- When the rat is recumbent, switch the system so that the anesthetic gas flows to the nosecone, which is fixed to the incisor bar.
- Remove the rat from the box chamber and shave the area between the ears and the eyes; using a cotton bud soaked with Jodosept PVP, swab the shaved area to remove any loose hair.
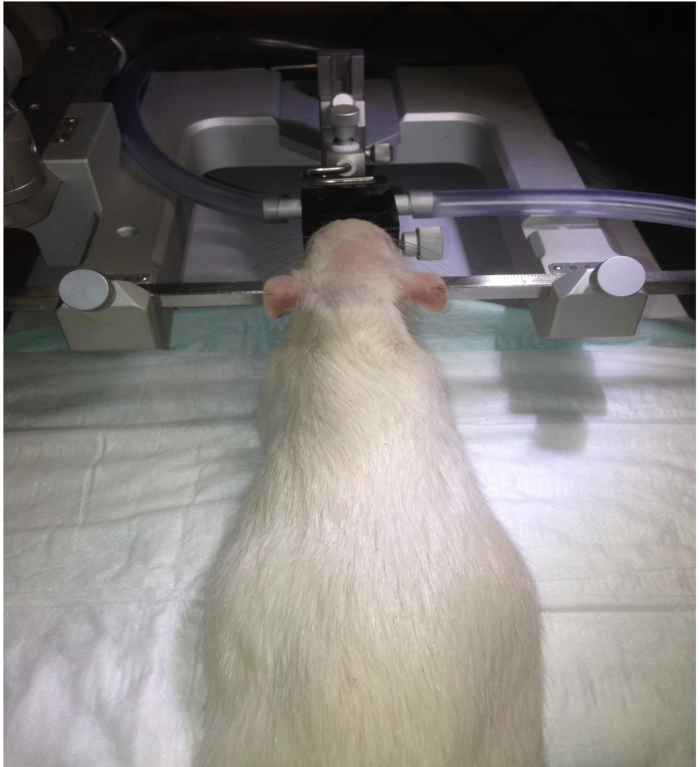
- Position the rat in the nosecone (Figure 1) and continue the anesthesia with isoflurane 2.5% in O2 (1 L/min). Check the level of anesthesia by pinching the interdigital area. If the rat is anesthetized adequately, the defensive reflexes (i.e., withdrawal of the foot) are abolished.
- Monitor respiration and response to stimulation during the procedure and adjust the vaporizer as needed.
- Apply vet ointment to the eyes to prevent dryness while under anesthesia. A feedback-controlled heating system monitors and maintains body temperature at 37 ± 0.5 °C.
2. Surgery
- Keep the surgical field sterile during the whole surgery. Once the surgeon´s hands and the operating field are sterile, move only carefully and remember not to break sterility. This includes having a sterile field (e.g., sterile waterproof drapes) on which one may set down instruments.
- Inject 0.2 ml mepivacaine subcutaneously into the center of the shaved area. Mepivacaine is a local anesthetic that has a duration of action of up to 3 hr. It will further anesthetize the surgical area.
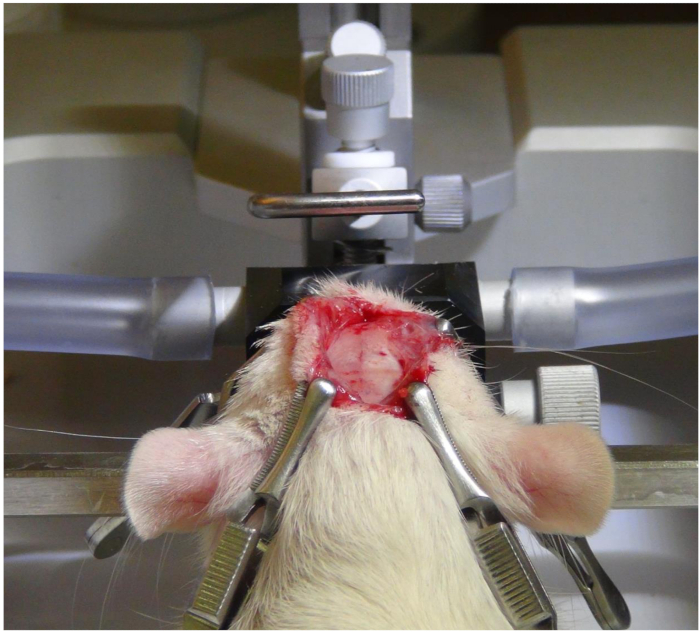
- Using a scalpel, make a midline incision starting between the ears and extending towards 2 cm. Ensure that the periosteum (shiny membrane under the skin) is also incised. Expose the skull with four clamps (Figure 2).
- Using a cotton bud, gently remove the periosteum until the coronal and sagittal sutures are exposed; thereafter, stanch the blood with cotton wool.
- Determine the coordinates of the bregma using a needle fixed at a probe holder, and then mark the tip of the needle with a black felt-tip pen. Using the anterior/posterior (AP), midline/lateral (ML) and dorsoventral (DV) drive screws, position the tip of the needle directly over the bregma.
- Take the AP and ML vernier scale readings: subtract 3.6 mm from the AP reading and 2.5 mm from the ML reading for electrode implantation into the right STN, or add 2.5 mm for electrode implantation into the left STN. This position will be marked by the dye of the felt-tip pen after lowering the tip of the needle to the surface of the skull.
- Clamp the dental drill onto the large probe holder of the stereotaxic instrument. Move the dental drill to the calculated area – i.e., the marked point on the skull. Looking through the microscope, drill a hole (diameter about 1 mm) through the skull until the dura is visible (the skull is about 1 mm thick). Retract the dura using micro-dissection forceps or a sterile needle. The dura is tough enough to destroy the tip of the electrode.
- Drill a hole with the dental drill in each frontal squama and in the interparietal squama opposite the electrode hole. Disconnect the probe holder from the stereotaxic instrument. Do not drill on a skull suture, as venous vessels follow the sutures under the skull.
- Screw a bone screw into each of the five holes. Avoid threading the screws in too deep. For stainless-steel screws (M1.6), 2–3 turns of the screw will adequately hold the screw without putting pressure on the brain. The number of turns will depend on the pitch of the screw. Clamp the probe holder with the electrode in the micromanipulator (Figure 3).
- Using the AP, ML, and DV drive screws, move the probe holder with the electrode until the tip is almost touching the bregma. Note the AP, ML, and DV vernier scale readings at the bregma. When the readings are made, raise the electrode a few millimeters to prevent the electrode from scraping the skull during movement. To determine the coordinates of the position where the electrode has to be inserted into the hole, add 3.6 mm to the AP reading and add (or subtract) 2.5 mm to the ML reading.
- Using the AP and ML drive screws, move the electrode to the calculated position. At this point, the electrode tip should be situated directly over the drilled electrode hole. Then, by looking through the microscope, lower the electrode to the level of the dura (Figure 4). This level serves as a zero-level in the DV direction. Thereafter, gently insert the tip of the electrode into the brain by looking through the microscope.
- Connect the electrode pin to the recording system connector. Place a Faraday cage (or substitute it with aluminum foil) over the rat in the stereotaxic instrument (Figure 5). Ground the stereotaxic instrument with the counterpoise of the room being worked in.
- Start the recording system. If available, also use a loudspeaker to obtain an acoustic signal of discharges/salves of single units while advancing the electrode.
- Slowly insert the electrode into the brain by recording the electric activity while advancing the electrode. At a depth of between 7.5 and 8.1 mm from the dura, the specific electric activity of the STN is usually detectable (Figure 6). The typical activity of neurons in the STN is characterized by an irregular firing pattern and a high firing rate (mean frequency: 40.9 ± 12.9 Hz).
- During the recording, reduce anesthesia as much as possible (e.g., to 0.8–1.0%); low-anesthetized animals show clearer electric brain activity.
- Swab away any blood or cerebrospinal fluid that was displaced from the surface of the skull when the electrode was lowered.
- Mix up a small amount of dental cement and apply it around the electrode and around four of the five screws using a small spatula (Figure 7). The fifth screw will be used to fix the ground wire of the plug.
- Disconnect the electrode pin from the electrode holder and connect the recording system when the dental cement is fixed.
- Unscrew the screw that was not fixed by dental cement. Put the plug on the electrode pin. Fix the ground wire of the plug with the fifth screw (Figure 8).
- Mix up dental cement and apply it around the plug. As the cement thickens, mold it around the plug to form a cap. Avoid sharp edges of the dental cement that may harm the animal and remove them during hardening (Figure 9A and B).
- Debride the wound edges and close them with a suture at the front and behind the cap. Then, disinfect the wound edges.
- Connect the head plug to the wire that is fixed on a swivel. Remove the rat from the stereotaxic instrument.
- Apply tramadol (12.5 mg/kg, intraperitoneally) at the end of the intervention and then once daily for 2-3 days. Place the rat in a clean cage with thermal support, fix the swivel on this cage (Figure 10), and inspect it carefully for 1 hr.
- Do not leave an animal unattended until it has regained sufficient consciousness to maintain sternal recumbency.
תוצאות

Figure 1. Fixation of the head in the stereotaxic instrument. The rat is fixed by the ear bars of the stereotaxic frame, as well as by the gas anesthesia mask.

Figure 2. Exposing the skull. After a midline inci...
Disclosures
Materials
| Name | Company | Catalog Number | Comments |
| Pt/Ir electrode | FHC Inc. | UE | Custom-made: Specification: UEPSEGSECN1M |
| Plugs | GT Labortechnik (Arnstein/Germany) | ||
| Pin header | DISTRELEC | 143-95-324 | single-row, 90° 1x3 datamate, Type M80-8420342 |
| Socket | DISTRELEC | 143-95-621 | single-row,straight 2 mm pole no.1x3 datamate, Type M80-8400342 |
| Stainless steel spring | Plastics ONE | SS0102 | Part-#: .120 X .156 Spring ID (mm): 3.0 Spring OD (mm): 4.0 |
| Dental cement/Paladur | Heraeus Kulzer | 64707938 | Liquid, 500 ml |
| Dental cement/Paladur | Heraeus Kulzer | 64707954 | Powder, rose, 500g |
| Head screw | Hummer & Reiss | V2ADIN84 M1.6x3 | |
| Jodosept PVP | Vetoquinol | 435678/E04 | |
| Mepivacain 1% | AstraZeneca | PZN03338515 | |
| Epinephrine | Sanofi-Aventis | PZN00176118 | |
| Tramadolhydrochloride | Rotexmedica | 38449.00.00 |
This article has been published
Video Coming Soon
Source: Fluri, F., et al., Microelectrode Guided Implantation of Electrodes into the Subthalamic Nucleus of Rats for Long-term Deep Brain Stimulation. J. Vis. Exp. (2015)
Copyright © 2025 MyJoVE Corporation. All rights reserved