1。 スクラッフィング
マウスが最もよくスクラッフィング テクニックを使用して拘束されたが、幼若ラットは、この方法でも拘束されたことができます。ラットはより多くの筋肉の首、たるんだ皮膚の減少量とこのメソッドへの嫌悪感のためこの手法で抑制するため難しく
。
- 片手の拘束方法は、無胸腺のヌード、SCID, といくつかの宝石の系統など、非常に穏やかなマウス系統において最も頻繁に利用されています。ただし、この方法でかまれることの大きなリスクがあります。初心者動物ハンドラーは、片手でメソッドを実行する前に両手拘束技術と快適になります。
- ワイヤ バー ケージ上部など、マタイ、彼らが握ることができる表面に動物の場所
- は、利き手の 3 番目と 4 番目の指の間尾をホールドし、穏やかな後方牽引力を適用します。これは、表面上に保持するために動物が発生し、拡大され、細長い体の結果します
。
- 手のひらが動物の体に直面しているので、手を有効にします
。
- 人差し指と親指、肩に齧歯類をピンします
。
- ゆっくり親指と人差し指を前方と頭蓋底にそれらを配置します。首のたるんだ皮膚を持って、動物を取り出します
。
- 中指を固定して、親指の根元に対して背側皮膚背面に沿って動物を安定させるために使用します
。
- 両手拘束
- ことができますグリップ表面に動物を配置します
。
- は支配的な手で (体の 1-2 cm) 内基地で尾を押し穏やかな後方牽引力を適用します。これは、表面上に保持するために動物が発生し、拡大され、細長い体の結果します
。
- その他の手の親指と人差し指で肩に齧歯類をピンします
。
- ゆっくり親指と人差し指を前方と頭蓋底にそれらを配置します。首のたるんだ皮膚を持って、動物を取り出します
。
- 残りの指を固定して、親指の根元に対して背側皮膚背面に沿って動物を安定させるために使用します
。
- 第四指と手のひらに尻尾を固定することによってまたは後肢固体表面で休むことを許可することで、後半部をセキュリティで保護します
。
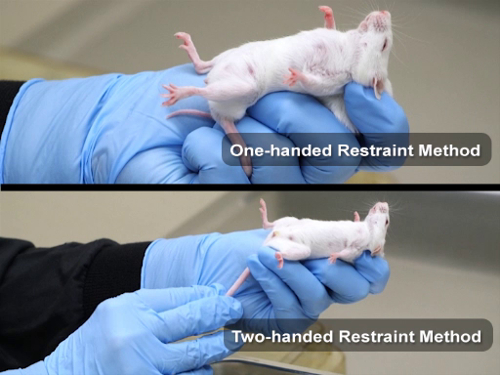
図 1: マウスの片手と両手の拘束方法
2 です。 手袋
ラットのかみ傷からの保護のために着用するためのハンドラーに使用できるさまざまな手袋があります。彼らは一般的に器用さの喪失によるマウスでの作業に適しています。多くの場合、多くのグローブ型の欠点が利点を上回るです
。
- コットン キャンバスの作業用手袋はかみ傷耐性、ありませんが、少量の歯や爪からの保護を提供します。彼らは、便利で簡単にスライド、良いグリップを提供しない
- 質の良い革手袋かみ傷耐性があります。しかし、その剛性は、器用さの減少を引き起こします。革の厚さも保護、削減触覚の視力と手の移動
。
- チェーン メールの手袋は、動物のハンドラーの心理的な安心感を提供します。しかし、彼らは重いとほとんどのラット ' 歯のリンク間に浸透することができます。さらに、これらの手袋は手先の器用さを減少、不適切に使用される場合はより危険な動物のハンドラー
。
- ゴム-齧歯動物の毛にセキュリティで保護されたグリップのためテクスチャの掌を提供でき、お皿を洗うための家庭で一般的に使用される絶縁手袋。伸縮性のあるラテックス表面は齧歯動物の門歯が穿刺に抵抗、薄いを感じるし、動物を制御することができるのに十分に十分な厚さです。主要な不利な点は、ラテックス アレルギーを持つ人のための関心事であるラテックスから成っていることです。さらに、これらの手袋光で悪化し、定期的に交換する必要があります
。
3。体拘束
- 、" t. レックス グリップ " ラット用両手拘束方法です。
- 握ることができる表面にラットを配置します
。
- 一方を持参し、人差し指と中指の分割と背中に片方の手で尾の根元を保持します
。
- は、index finger 頭の片側と反対側に中指で肩に手を置きます。頭の両側に指は頭のサイド ・ ツー ・ サイド動きを制限します
。
- は、第三指、第四指と親指で前足の後ろに本体を取り囲みます。胸を圧縮して、呼吸を損なうことを避けるために注意する必要があります。このグリップは手の前後の移動からネズミを防ぐことができます
。
- または後部のフィートの上に保持することがなく尾の根元をつかんで尾と後半部を安定させる
。
- 作品と大きいラットは、よく頭にアクセスするとこの拘束が必要です
。
- 前肢交差メソッドは両手拘束メソッドです。
- ことができますグリップ表面に動物を配置します
。
- は支配的な手で (体の 1-2 cm) 内基地で尾を押し穏やかな後方牽引力を適用します。これは、表面上にグリップする動物が発生し、拡大され、細長い体の結果します
。
- 背中にもう一方の手を後ろからもたらす
。
- 1 つの側面の指と胸の反対側の親指で、肩の後ろに直接ラットをつかんで、手の前方、招き、前足を前方にスライドです
。
- ラットの下で前足が交差 ' s あご、物理的な障壁を作成し、に向かって指その頭からラットを防止します
。
- 胸を圧縮して、呼吸を損なうことを避けるために注意してください
。
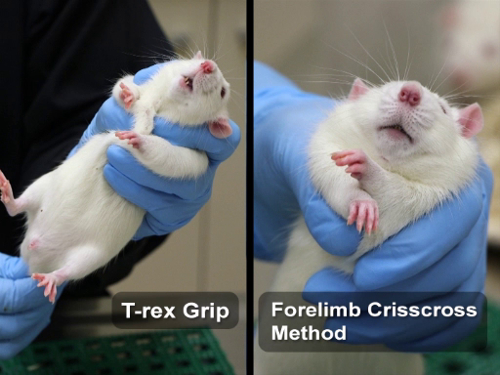
図 2: T-レックス グリップと前肢にラットを抑制するための方法が十字模様
4。拘束デバイス
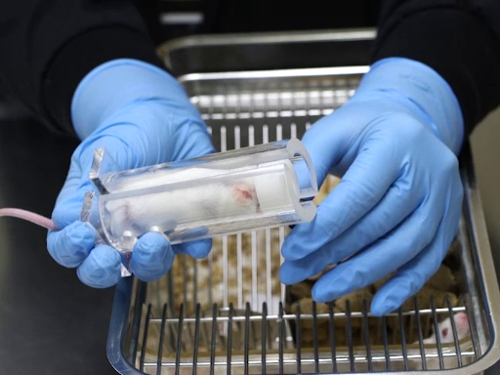
図 3: ブルーム スタイル拘束デバイス

図 4: 平底齧歯動物落
- リジッド デバイスは、さまざまな種類と簡単に消毒は無孔材料の作られて一般に。
- ブルーム スタイル拘束は、静脈注射の尾へのアクセスを提供するために設計されています。まず落後半部に引き出される動物を可能にするデバイスのフルの長さに沿って実行されるスロットで構築されます。代わりに動物を保持するプラスチック製のノーズピースが挿入されます。
- 拘束管体からネジをゆるめてレボルバを削除します
。
- 、尾の基部に動物をつかんで拘束チューブを向きスリット チューブの長さを実行するが向いています。優しく動物に引っ張る拘束デバイス後半部最初
。
- チューブへの配置を容易にする滑らかな表面に動物を配置すると効果的です
。
- 動物が完全に管に- されている描画クローズド エンド スライドする開口部を閉塞し管にプラスチック製のノーズピース
。
- ノーズピース アセンブリに置きますので、動物 ' s 鼻は、中央の開口部。レボルバを動物が呼吸できないので、しっかりと配置できません
。
- 平底の齧歯動物の落は制止装置の上下からアクセスできる開口を有する半円筒。硬質プラスチックのゲートは、1 つのデバイス内の動物を保持するためにいくつかの卒業スロットに挿入されます。
- 滑らかな表面またはケージの上の支配的な手で尾のベースで動物を保持します
。
- 他方、平底拘束チューブを押しながらそれを開放端は、動物、角度 ' テーブル/ケージ上面角度 45 ° s 頭
。
- 他の消極的とチューブにそれらを操縦するためにハンドラーを必要とする間、いくつかの動物は、チューブを入力すぐにします
。
- チューブに動物かぶせます ' s 頭。すぐに動物をタップ ' s 尻中をバックアップから動物を防ぐために圧力を維持して
- 動物が拘束デバイス、制止装置で動物を保持するために適切なスロットにプラスチック製のゲートをスライドです
。
- チューブ拘束、プレキシ ガラス シリンダーの穴や空気の循環のためのスリットを含む 1 つのクローズ エンド。いくつかは、cylinderto の長、筋肉内注射、伏在大腿採血の後肢の露出に対応または皮下注射のため背側表面へのアクセス幅 slothalf で変更されます。
- 動物の滑らかな表面またはケージの上の支配的な手で尾の根元をつかんでいます
。
- その他の手で拘束チューブを握り、それを開放端は、動物、角度 ' テーブル/ケージ上面角度 45 ° s 頭
。
- いくつかの動物はすぐにチューブを入力します。他の動物は、消極的であるとチューブにそれらを操縦するためにハンドラーを必要とします
。
- チューブに動物かぶせます ' s 頭。すぐに動物をタップ ' s 尻中をバックアップから動物を防ぐために圧力を維持して
- 首筋と手動ガイド手に負えない動物チューブ、チューブにスリットまでスライドして開催されている皮膚を可能にします
。
- 動物は拘束デバイスでバックアップ中から動物を防ぐために開口部を閉塞する必要が
- に応じて、いくつかの指がオープニングを越え配置されます
。
- は、開口部に大型のラテックス手袋を詰め込みます。手袋テクスチャです通常、プレキシ ガラス表面をグリップします
。
- いくつかの拘束チューブが閉鎖スタイルまたはサイズを特定します
。
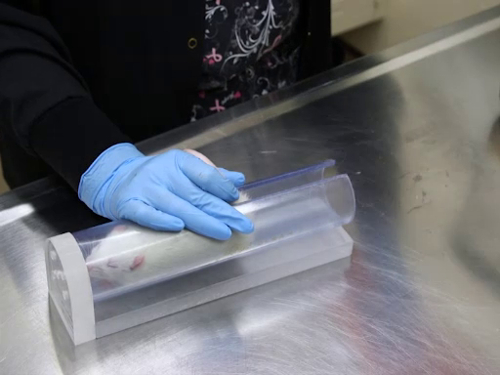
図 5: チューブ拘束デバイス
- 柔軟な restrainers は、使い捨ての柔軟なプラスチック コーンです。透明または不透明のプラスチックがあります。プラスチック製のため拘束デバイスから動物を削除せずに注射針によって浸透を許可するのに十分に薄いです。彼らは、マウスやラット、大人と幼に合わせてサイズの変化入って来します。
- 手足、尾、そして注入の他のサイトへのアクセスを許可するようにハサミでプラスチックをカットします
。
- は、動物の適切なコーンのサイズを選択します。円錐であるべき動物を越える 2 3 インチを拡張するのに十分な長さ ' s 臀部
。
コーンに動物を挿入 - コーンを開き、上半分の周り把握します
。
- 動物の滑らかな表面やケージの上にそれを置くこと、支配的な手で尾の根元をつかんでいます
。
- その他の手拘束コーンを押しながらそれを開放端は、動物、角度 ' テーブル/ケージ上面角度 45 ° s 頭
。
- いくつかの動物はすぐに円錐形を入力します。他の動物は、消極的であると拘束コーンにそれらを操縦するためにハンドラーを必要とします
。
- コーンに動物かぶせます ' s 頭。すぐに動物をタップ ' s 尻のバックアップから動物を防ぐために圧力を維持し、。動物は、コーンの出口に好転する可能性が高く、円錐の開口部の大きい直径のため
。
- 動物に入るコーンと、すぐに開放端をつかみ、最後に動物を強制的にそれを密封します
。
- は、尾と 2 つ折りのプラスチックにバインダー クリップを適用する、尾や皮膚をクランプに注意しながらの 1 つの側面にプラスチックを折ることによって開口部を保護します。また、均等に、尾の周りのプラスチックを収集し、開口部を確保するためできるだけ体の近くにねじれタイを配置します
。

図 6: 柔軟な落
5。特定の技術的な手順の拘束方法
- 腹露出の腹腔内注射のため必要です。
- スクラッフィング
- 動物の首筋、腹部を露出するように手を回すと
。
- 頭が 30 ° の角度で下方に指すように動物を傾ける
。
- 4 番目の指を使用して手のひらに尻尾を固定することで後半部をセキュリティで保護します
。
- 指と親指の根元の背面に沿って余分な皮膚を固定することによってまた、後半部がすることができます固定化した
。
- T. レックス グリップと前肢を東奔西走拘束方法
- 動物 (ラットのみ) を把握上記のテクニックのいずれかを使用します
。
- フリーハンド、ホック、上記両方の後ろ足を把握して尾拡張します
。
- 背面に手の手のひらで動物の重量をサポートしています
。
- 頭が 30 ° の角度で下方に指すように動物を傾ける
。
- 2 番目の人が、インジェクションを実行する
。
- 硬質落
- 最も厳格な制限装置は、思わず直立を維持する圧延から動物を防ぐことはできません
。
- 剛体落を採用する場合に動物、その頭が下に指して、卓上に垂直です
。
- 柔軟な落
- 動物は上や周りを有効にすることで柔軟なプラスチック製のコーンで適切に配置されて、.
- 後肢は腹部へのアクセスを許可するように十分に区切られているような動物を配置する注意する必要があります
。
- 動物を圧縮すると、それは注入される脾臓、肝臓、腎臓、胃の穿刺を避けるために腹側の表面に十分に低く不可欠です
。
- 背露出が皮下組織に注射のため必要。
- スクラッフィング
- 首筋動物ができ、固体、平らな表面上に後ろ足
。
- 首と肩の上の皮膚のテントを作成する首筋を持ち上げています
。
- の場所上の手の重量注入するとマウス テーブル。窒息を引き起こすことができますマウスの重量を配置します
。
- 、後半部が、決して胸に重みのある場所でラットを保持します
。
- 物質を動物の体に指の下のスペースに挿入します
。
- 硬質 restrainers
- 開口部皮膚の中を引くのに十分な大きさをもつチャイルドの動物を配置
- 鉗子を使用して肌を把握する必要があります
。
- 拘束を回転させない限り、ほとんどの動物が適切な姿勢に残ります
。
- 皮膚の注射が完了したら、開口部から後退を防ぐボリュームを挿入しません
。
- の後肢の拘束が筋肉注射に必要な大伏在静脈、大腿静脈、大腿動脈からの血液の撤退や足蹠に注入。
- マウスおよびラット (200 g 未満) のスクラッフィング
- 動物の首筋、腹部を露出するように手を回すと
。
- 後肢足指の間足を配置することによってアクセスします
。
- 最高足蹠注射にのみ用いられます
。
- T. レックス グリップや前肢十字模様
- このメソッドには 2 人が必要です: 拘束体のための 1 つと 1 つの四肢の拘束と射出のパフォーマンス
。
- ラットを拡張 ' 大伏在静脈、大腿静脈または動脈へのアクセス徒歩または注入のために筋肉をつかんで s 後ろ足
。
- 足蹠注射用ホックのすぐ上を保持します
。
- 硬質 restrainers
- 最初拘束管頭の動物を配置します
。
- 注意深く引いてチューブから下位で尻尾と後半部を公開します
。
- は、側面の皮をつかんで、膝をまっすぐにロック脚を固定します。これはマウスやラット、インジェクションの大腿四頭筋へのアクセスを提供し、拘束デバイスを終了できない動物
。
- 大規模なスロットを持つ機器でサンプリングまたは足蹠注射用血管アクセス用チューブの外側の足を配置します
。
- フラット エンド部分とそれらの拘束チューブ許可テーブルの残りの部分に、処理中にデバイスを安定させる管
。
- 動物がこの方法で保護されているためそれは注射を行ったり、血の単一の技術者によるラットのサンプリングすることが可能です
。
- 柔軟な拘束
- 手足の露出に合わせて開口部を切り取ることで柔軟なプラスチック製の拘束を変更できます
。
- 作った開口部は、各動物のまたは具体的な手順についてカスタマイズできます
。
- 動物がこの方法で保護されている、またはラットのサンプリングを血液を注射を実行する単一の技術者のため不可能だ
。
齧歯動物は多様な科学的な質問を調査するため広く使用されているモデル生物とも最小の処理はこれらの動物のためのストレスが実証されています
。
ケージを変更するなどの単純なタスクの処理は、血清コルチコステロン濃度、血圧、心拍数の増加を引き起こす可能性があります、これらの変動は数時間続けることができます。一般的な注入に必要な拘束の法と血脱退手続きは、科学的データに影響を与える可能性のある生理学的な変更を引き起こすことができます。したがって、トレーニング動物でこれらの効果を最小化するマウスおよびラットの適切な処理が必要です
。
このビデオでまず齧歯動物、そして私たちを処理するための基本的なテクニックを確認します ' 説明マニュアルのテクニックと拘束装置の使用を含むメソッドを含む齧歯動物の拘束手段
。
let ' s 齧歯動物の処理の基本を討議を開始。アダルト マウスまたはラットを移動するための最も一般的な方法の 1 つは尻尾で動物を持ち上げることによってです。これを行うには、尾が臀部に近い基地で把握することが不可欠です。動物はその尾末リフト、皮膚は体重のため引っ張ることができるし、尻尾切断の傷害につながる可能性があります。重要なは、1 つの場所から別の動物を移動を迅速かつ着実にで行ってください。任意の長さの時間の空気に動物を中断、だけでなく、苦痛の原因がまた原因ツイストするかおそらく尾に害を引き起こして闘争動物。また、ハンドラーは置かないでください動物、下手それはセキュリティを把握しようとして可能性がありますので一口で結果します
。
アダルト齧歯動物を処理するための別の方法は、鉗子を使用することです。一般的に使用される鉗子の種類は、長いドレッシング鉗子やゴム、プラスチック、クッションを提供するために端に置かれるシリコン チューブに舌鉗子です。鉗子は、首の首筋で、尾の基部にマウスを把握できます。鉗子の使用最小化交差汚染動物から動物へと速くて各動物のケージと手袋を変更するよりも安価です。初心者は、しっかりとそれは呼吸を妨げることができる、特に首筋にピンセットでマウスを把握する方法に関するトレーニングを受ける必要があります。尾で鉗子を使用して、けがを防ぐための尾の根元近く鉗子を配置する注意が必要です。動物の異なるグループの間の 70% エタノールで下向きを保存してください
。
非多孔性の素材で作られた管を使用して、動物を譲渡いずれかも、です。これらのチューブは、避難所や安全な避難場所を求めるには、動物のための場所として、ケージに追加できます。ほとんどのマウスやラットは、彼らのケージが開かれる、またはチューブに簡単に誘導できるとき、チューブを入力喜んででしょう。動物は、内部は、手のひらと指の開いた端部をカバーします。次に、動物を残すことを奨励し、新しいケージに上方管優しくヒントします。これの 1 つの場所から別の動物を移動するための迅速で簡単なプロセスを作る動物が簡単にケージを変更する、このメソッドを調節します
。
いくつかの機関を好むある動物特にラット-ルーチンの処理中であっても、自分の体で解除されます。ラットがそっと胸部周りを把握、解除とすぐに別のケージに入れます。幼い頃から、動物が処理のこの方法に慣れていることが重要です。幼若ラットを使用するときは、手を置くこと、ラットに ' s バックはそれ把握することができますハンドラーの手のひらにジャンプする原因となります。A 2 番目の手の把握からわらわらからネズミを防ぐために必要ことがあります
。
新生児マウスやラットとケージを変更するとき、巣をそのままに保ちながらそれらを削除する必要は多くの場合です。2 つの手を使用して、新しいケージに巣とケージの下から子犬をスクープします。子犬を削除を避けるために近く一緒にあなたの指を保持します。一度巣すべての子犬が存在していることを確認することが重要です新しいケージに移動されました。また、巣の新生児の齧歯動物を移動するプラスチック スコップを使用可能性があります。これを行うには、ぴくぴく動くことまたは飛び出しから新生児を防ぐためにスクープの上にあなたの手を置くことが重要です。子犬の個別処理と比較して、全体の巣をすくいは子犬とダムにより少なく悲惨
。
齧歯動物の処理の基本について説明したように ' s が齧歯動物の拘束の詳細な手順を掘り下げます。まず、我々 は手動でこれらの動物を抑制する方法を概説します。マウスおよび若いラットは、1 つの手または両手のテクニックを使用して拘束できます。ただし、ラット、全身拘束の T-レックス グリップや前肢交差メソッドを使用して、最寄りのテクニック
。
Let ' s は両手拘束方法の学習を始めます。まず、ワイヤー バー蓋など、彼らが握ることができる表面に動物を配置します。支配的な手で、基部に尾を保持、そっと後方マウスを引っ張る。これは表面を保持し、拡大するためにボディを許可するのには、動物が発生します。次に、優しく非利き手の人差し指と親指、頭蓋底に位置している齧歯動物をピン留めし、動物を持ち上げて首のたるんだ皮膚を把握します。親指のベースに対して背部が動物を安定させるために、残りの指を使用します。あなたの手の手のひらにあなたのリング指と尾を固定することで後半部を保護できます
。
片手の拘束方法を再度ことができますグリップ表面に動物を配置。非利き手の 3 番目と 4 番目の指の間尾をホールドし、穏やかな後方牽引力を適用します。人差し指と親指の同じ手、肩に齧歯類をピンします。そっと親指と人差し指を前方にスライドし首のたるんだ皮膚をつかみ、動物を持ち上げます。中指を固定して、親指の根元に対して背側皮膚背面に沿って動物を安定させるために使用します
。
について説明します 3 番目の拘束方法は、T-レックス グリップ - ラットの両手拘束方法。まず、それを掴むことができるマットのような固体の表面にラットを配置します。片方の手で尾の根元を押しながらラットをもう一方の手を置く ' s 肩人差し指と中指を両側に分割します。これ、左右に頭の動きを制限します。頭が安定すると、一度は、中間およびリング指と親指で前足の後ろに本体を取り囲みます。動物が損なわれないように胸の圧縮を避けるため ' s 呼吸。最後に、経口; を管理する場合、後部のフィートの上に保持することがなく、尾の根元をつかんで尾と後半部を安定します。または意図して動物を注入する場合に後部のフィートを保持しています
。
最後に、前肢の交差法を用いたラットを抑制するための
は、動物がそれを握ることができる表面に配置します。その後、支配的な手で、ベースで尾を保持し、穏やかな後方牽引力を適用、動物 ' s ボディを延長します。次に、もう片方の手、1 つの側面で指と胸の反対側の親指で、肩の後ろに直接動物を把握し、手の前方にスライドさせます。この動きが強制的に動物 ' 動物がその頭を下へ移動することを防ぐ物理的な障壁を作成する、そのあごの下を横断する s 前足。呼吸困難につながる胸を圧縮するように注意してください
。
マニュアル抑制技術については、今、' s は、専用端末を使用しての齧歯動物を抑制する方法を学ぶ.
最初デバイス、我々 は ' を学びますブルーム スタイル拘束デバイスです。それはデバイスとの場所で動物を保持するために挿入されているプラスチック製のノーズピースの全長に沿って実行されるスロットがあります。レボルバを削除するネジを緩めることにより開始します。その後、スリットを向いているように拘束チューブを向けます。尾の基部に動物をつかんで軽く制止装置、後半部にまず動物を引いてください。動物は、内部が、オープニングからそれを防ぐために管にプラスチック製のノーズピースをスライドさせます。レボルバを配置するよう動物 ' の開口部に鼻を中心します。動物が呼吸できないので、しっかりとそれを配置しないようにします
。
拘束デバイスの別の例はデバイスの上下からアクセスできる開口を有する半円筒は、平底の齧歯動物落。スロットの場所で動物を保持する硬質プラスチックのゲートを挿入ことができますしています。この落を使用するには、あなたの支配的な手で尾の根元で齧歯類をつかみ、滑らかな表面の上に置きます。オープン エンドは、動物、平底拘束チューブを保持するあなたの他の手を使用して ' 表面角度 45 ° s 頭。動物かぶせます管 ' s 頭とすぐにバックアップから動物を防ぐために尻をタップします。デバイスでは、一度動物を確保するための適切なスロットにプラスチック製のゲートをスライド ' s 位置
。
3 デバイスのタイプ、私たち ' 説明チューブ拘束です。これらは空気の循環のための穴とオープン エンドのスリットを含む 1 つのクローズ エンド プレキシ ガラス シリンダーです。チューブ拘束を使用して、動物をつかみ、滑らかな表面の上に置きます。次に、動物に管の開放端を配置 ' 45 ° の角度で s 頭。齧歯類に入るチューブと、すぐにバックアップからそれを防ぐために尻をタップします。最後に、プレキシ ガラス表面をグリップし、動物がチューブを終了しないように、大型のラテックス手袋を詰めることによって開口部を閉塞
。
最後に、使い捨ての柔軟なプラスチック円錐形の異なるサイズで利用可能である柔軟な restrainers を使用する方法を説明します。円錐形の選択は、動物のサイズに依存します。理想的には、それは動物を越える 2 3 インチを拡張するのに十分なする必要があります ' s 尻。以前の方法のような 45 ° の角度で滑らかな表面および場所拘束のコーンの動物上の動物を配置する. ' s 頭。動物に入るコーンと、開放端をつかみ、最後に動物を強制的にそれを封印します。開口部を安全な折り畳み式の尾の 1 つの側面にプラスチックと尻尾や皮膚をクランプに注意しながら折り畳まれたプラスチック バインダー クリップを適用します
。
処理と異なる基礎解説抑制技術後、' s レビュー手順の理解を持っているが、生体内で 科学者の必要な理由です
。
知識と基本的な処理手順の背後にある理論的根拠は、動物を維持するためのコア ' s の健康。シンプルで日常的な行動の動物は生まれた時から処理されます。計量、検査とケージを変更するのような科学的な目的に関係なく実行されるべき ivities
。
差し止めの手続きまた目的をマークするために便利です。たとえば、パンチング、動物の耳のようなプロシージャを実行するためにスクラッフィングによって抑制される必要があります。完全にタグ付けすることができますようにラットにマイクロ チップを挿入するときの拘束装置の使用、他の一方で、.
皮下および腹腔内の管理のような一般的な注入手順のマニュアルの処分方法を使用する最後に。抑制デバイスの知識は、注入中に最小限の動物の動きを要求する静脈内投与を行う場合に便利です
。
あなた ' ve を見たゼウス ' 齧歯動物の基本的な取り扱いと拘束テクニックを紹介します。これらの手順は、自信を持って、しっかりした、穏やかなタッチを必要とします。積極的な処理は齧歯類に損傷を引き起こすことができる間、仮のアプローチはハンドラーに刺されで起因できます。したがって、これらの技術を徹底的に学ぶ、自己主張がまだ穏やかなグリップのバランスを見つけることが重要です。いつも、見てくれてありがとうとして!


