Respiratory Exam II: Percussion and Auscultation
Source: Suneel Dhand, MD, Attending Physician, Internal Medicine, Beth Israel Deaconess Medical Center
Learning the proper technique for percussion and auscultation of the respiratory system is vital and comes with practice on real patients. Percussion is a useful skill that is often skipped during everyday clinical practice, but if performed correctly, it can help the physician to identify underlying lung pathology. Auscultation can provide an almost immediate diagnosis for a number of acute pulmonary conditions, including chronic obstructive pulmonary disease (COPD), asthma, pneumonia, and pneumothorax.
The areas for auscultating the lungs correspond to the lung zones. Each lung lobe can be pictured underneath the chest wall during percussion and auscultation (Figure 1). The right lung has three lobes: the superior, middle, and inferior lobes. The left lung has two lobes: the superior and inferior lobes. The superior lobe of the left lung also has a separate projection known as the lingual.
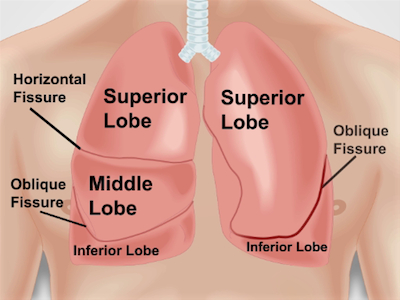
Figure 1. Anatomy of lungs with respect to the chest wall. An approximate projection of lungs and their fissures and lobes to the chest wall anteriorly. RUL - right upper lobe; RML - right middle lobe; RLL - right lower lobe; LUL - left upper lobe; LLL - left lower lobe.
1. Positioning
- Make sure the patient is undressed down to the waist.
- Position the patient on the examination table at a 30- to 45-degree angle and approach from the right side. Examining the posterior of the lung requires the patient to be leaning forward or sitting on the edge of the bed.
2. Percussion
- Percuss both posteriorly and anteriorly, starting on the back.
- Place non-dominant hand with middle finger (pleximeter finger) pressed and hyperextended firmly on the patient's right or left mid-back area (lower levels of lungs posteriorly). The firmer the finger is pressed to the chest wall, the louder the percussion note tends to be.
- Make sure the other fingers and palm are not pressed against the patient's chest.
- Use the tip of the middle finger (plexor finger) of the dominant hand to tap firmly on the top third (middle or distal phalanx) of the pleximeter finger of the non-dominant hand at least twice (it is advisable to keep fingernails short). The sound should be hollow, representing an air-filled lung.
- Repeat the percussion at four and five levels, comparing each lung level side by side, working up to the chest wall, starting at the inferior lung borders. On expiration, the lower border of the lungs is at the level of the sixth rib at the midclavicular line and the eighth rib at the midaxiallary line anteriorly, approximately at the level of the T10 spinous process posteriorly.
- Percuss anteriorly and posteriorly, placing the finger on the chest in the intercostal spaces.
- Appreciate the quality of percussion sounds. The normal findings on the chest percussion are:
- Resonant percussion note: heard over a normal air-filled lung.
- Dull percussion note (the sound heard over solid tissues): over the liver in the right lower anterior chest and over the heart in the left anterior chest. When percussion of the lungs elicits this sound, it is indicative of consolidation.
- Tympanic percussion note (a drum-like sound when percussing over hollow organs): over the Traube's space, an area overlying the gastric bubble and bordered by the sixth rib, anterior axillary line, and left costal margin. Left pleural effusion produces a dull percussion sound over Traube's space.
- Note the presence of pathological percussion sounds. A "stony dull" or flat percussion note sounds duller than the "standard" dull sound. It resembles the percussion note heard over the thigh and is indicative of a pleural effusion. A hyper-resonant percussion note is a pathological percussion sound indicative of hyper-inflated lungs from advanced COPD, emphysema, or a pneumothorax.
3. Auscultation
- Position the patient: ask the patient to lean forward or sit upright in order to examine posteriorly. Asking the patient to fold arms or place hands on opposing shoulders also helps to get maximal exposure to the lung fields.
- Place the diaphragm of the stethoscope on the patient's chest, and ask the patient to take deep breaths in and out through the mouth.
- Auscultate at five levels posteriorly and anteriorly, comparing side by side.
- Normal breath sounds are called vesicular breath sounds, which are low-pitched sounds louder on inspiration and softer on expiration. They should be symmetrical posteriorly.
- Note the presence and location of abnormal (adventitious) extra breath sounds, such as crackles, wheezing, rhonchi, stridor, or pleural friction rub (Table 1).
- Note the following characteristics of any abnormal breath sounds (if present): loudness, quality, duration, and whether they occur during inspiration or expiration (i.e., timing in the respiratory cycle). Many abnormal breath sounds are best heard after asking the patient to cough.
- Assess for bronchophony, an increased sound transmission over the consolidated lung, when asking the patient to say "99" or "1-2-1." Egophony is when an "E" sound changes to an "A" over consolidated lung.
- Assess for whispering pectoriloquy. While auscultating with the stethoscope, ask the patient to whisper "99" or "1-2-1." In the consolidated lung, the sound will actually be heard better and more clearly with the stethoscope.
| Breath sounds | Description | ||
| Bronchial | Harsh or hollow breath sounds, similar to what you would hear if you placed your stethoscope over the trachea or main bronchi. In other areas they can be a sign of underlying consolidation | ||
| Bronchovesicular | Normal over the large airways and sternum, abnormal in other areas | ||
| Crackles or Crepitations or Rales | Caused by fluid in the airways and are more commonly heard during inspiration at the bases of the lungs. They can be classified as fine; which are soft, brief high-pitched sounds or "pops", or coarse; which are louder and lower pitched than fine crackles. Fine crackles can be heard in pulmonary fibrosis and course crackles in COPD and pneumonia. Note the timing of the crackles. Congestive heart failure typically produces late crackles | ||
| Wheeze | Distinctive high-pitched continuous sound heard in asthma and COPD | ||
| Rhonchi | Low-pitched "snoring" sound that can be auscultated in any condition causing reactive airways disease, including pneumonia, COPD, and CHF | ||
| Stridor | An abnormal high-pitched sound generated from the upper airways, usually during inspiration (this is often a medical emergency) | ||
| Rub | Caused by pleural surfaces rubbing against each other (pleural friction rub), and heard more in pleurisy as well as other conditions, such as pericarditis | ||
Table 1. A table summarizing potential findings during auscultation of the lungs.
Percussion and auscultation should always be done in sequence whenever performing a full respiratory examination. Learning how to percuss correctly takes time and practice (practice can be done on yourself or other surfaces, such as a table). Note how the percussion note changes naturally over air-filled lung, ribs, and solid organs, such as the heart.
Auscultation must be performed over each lung zone to give the physician the best chance of identifying the focus of any lung pathology. Abnormal breath sounds should be easily recognizable when occurring in a patient. Allow enough time to classify the breath sounds. Listen for several breathing cycles in one area, if necessary, to hear the exact nature of the crackles, wheezes, rhonchi, or other pathological findings. Distinguishing between certain breath sounds can occasionally seem subjective, but will become easier with practice, leading to a "spot diagnosis" for many pulmonary conditions.
Skip to...
Videos from this collection:

Now Playing
Respiratory Exam II: Percussion and Auscultation
Physical Examinations I
206.7K Views

General Approach to the Physical Exam
Physical Examinations I
112.8K Views

Observation and Inspection
Physical Examinations I
91.4K Views

Palpation
Physical Examinations I
81.3K Views

Percussion
Physical Examinations I
97.5K Views

Auscultation
Physical Examinations I
58.6K Views

Proper Adjustment of Patient Attire during the Physical Exam
Physical Examinations I
82.1K Views

Blood Pressure Measurement
Physical Examinations I
105.3K Views

Measuring Vital Signs
Physical Examinations I
112.5K Views

Respiratory Exam I: Inspection and Palpation
Physical Examinations I
151.1K Views

Cardiac Exam I: Inspection and Palpation
Physical Examinations I
172.1K Views

Cardiac Exam II: Auscultation
Physical Examinations I
137.2K Views

Cardiac Exam III: Abnormal Heart Sounds
Physical Examinations I
89.3K Views

Peripheral Vascular Exam
Physical Examinations I
66.8K Views

Peripheral Vascular Exam Using a Continuous Wave Doppler
Physical Examinations I
37.9K Views
ABOUT JoVE
Copyright © 2025 MyJoVE Corporation. All rights reserved