
0:00
Overview
0:58
Surface Landmarks, Anatomy, and Topography
2:26
Preparatory Steps
3:42
Abdominal Inspection Procedure
5:19
Abdominal Auscultation Procedure
7:19
Summary
Abdominal Exam I: Inspection and Auscultation
Source: Alexander Goldfarb, MD, Assistant Professor of Medicine, Beth Israel Deaconess Medical Center, MA
Gastrointestinal disease accounts for millions of office visits and hospital admissions annually. Physical examination of the abdomen is a crucial tool in diagnosing diseases of the gastrointestinal tract; in addition, it can help identify pathological processes in cardiovascular, urinary, and other systems. As physical examination in general, the examination of the abdominal region is important for establishing physician-patient contact, for reaching the preliminary diagnosis and selecting subsequent laboratory and imaging tests, and determining the urgency of care.
As with the other parts of a physical examination, visual inspection and auscultation of the abdomen are done in a systematic fashion so that no potential findings are missed. Special attention should be paid to potential problems already identified by the patient's history. Here we assume that the patient has already been identified, and has had history taken, symptoms discussed, and areas of potential concern identified. In this video we will not review the patient's history; instead, we will go directly to the physical examination.
Before we get to the examination, let's briefly review surface landmarks of the abdominal region, abdominal anatomy, and topography. Here is a list of useful landmarks: costal margins, xiphoid process, rectus abdominal muscle, linea alba, umbilicus, iliac crest, inguinal ligament, and symphysis pubis. The abdominal exam covers the area down from the xiphoid and costal margins superiorly to the symphysis pubis inferiorly.
For diagnostic and descriptive purposes, the abdomen is subdivided into four quadrants: right upper quadrant (often designated as RUQ), left upper quadrant (LUQ), right lower quadrant (RLQ), and left lower quadrant (LLQ) (Figure 1). The more detailed topography of the abdomen divides it into 9 regions: right and left hypochondriac, right and left lumbar, right and left iliac, and also epigastric, umbilical, and hypogastric regions in the middle (Figure 2).
Remember which organs typically project into each abdominal region (Figure 3). It is essential to know the region's anatomy and topography well to adequately document and interpret a patient's complaints and symptoms, as well as physical findings during the examination.
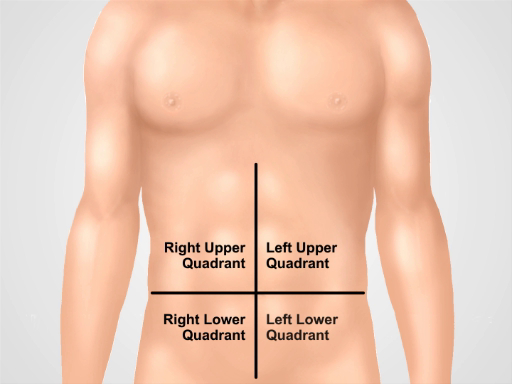
Figure 1. Four abdominal quadrants. The abdomen can be divided into four regions by two imaginary lines intersecting at the umbilicus: right upper quadrant (often designated as RUQ), left upper quadrant (LUQ), right lower quadrant (RLQ), and left lower quadrant (LLQ) are shown.
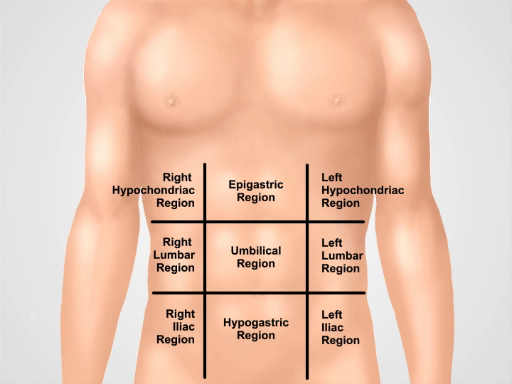
Figure 2. Nine abdominal regions. Midclavicular lines and subcostal and intertubercular planes separate the abdomen into nine regions: epigastric region, right hypochondriac region, left hypochondriac region, umbilical region, right lumbar region, left lumbar region, hypogastric region, right inguinal region, and left inguinal region. Terms for epigastric, umbilical, and hypogastric and suprapubic regions are the most commonly used in clinical practice.
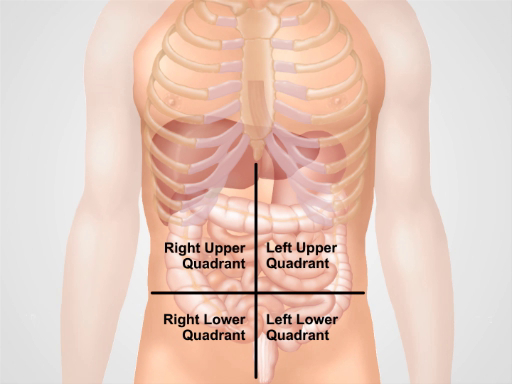
Figure 3. Location of different organs in the four abdominal regions. Organs in the abdominal cavity and their location with respect to four abdominal quadrants.
1. Preparation
- Before you start the physical exam of the abdomen, make sure that the patient is comfortable and has emptied his/her bladder.
- Comfortably place the patient in the supine position, possibly with the patient's head supported by a pillow and knees slightly flexed. The patient's arms should be at the side and not folded behind the head, as this tenses the abdominal wall.
- Ask for permission to expose the patient's abdominal area ("Is it ok if I move the sheet to i
In this video we reviewed the anatomy of the abdomen and learned how to perform the first two steps of the abdominal examination: inspection and auscultation. Before starting the exam, make sure that the patient is comfortable, well positioned, and adequately draped. Never examine a patient through a gown. Make sure that your hands are washed and warm. Always ask a patient for permission to perform the examination and explain every step of the procedure. Start with a visual inspection of the abdomen. Make note of abdomin
ABOUT JoVE
Copyright © 2024 MyJoVE Corporation. All rights reserved