
브런튼 컴퍼스를 사용한 암석 층의 공간 방향 결정
Overview
출처: 앨런 레스터 연구소 - 콜로라도 볼더 대학교
대부분의 암석 유닛은 일종의 평면 표면 또는 선형 피쳐를 나타낸다. 예를 들어 침구, 고장, 골절 및 조인트 표면 및 다양한 형태의 단풍 및 미네랄 정렬이 있습니다. 이러한 피쳐의 공간 방향은 록 유닛의 원점 및 후속 변형을 해결하는 모델을 제한하는 데 사용되는 중요한 원시 데이터를 형성합니다.
비록 지금 이상 100 발명 및 도입 이후 년, 브런턴 나침반(그림 1)필드 장비의 현대 지질학자의 무기고에 중앙 도구 남아. 그것은 여전히 평면 바위 표면 또는 선형 바위 피처의 기하학적 방향에 관한 필드 데이터를 생성하는 데 사용되는 기본 도구입니다. 이러한 방향 측정을 스트라이크 및 딥이라고 하며 지질지도를 만들기 위한 기본 데이터를 제공합니다. 또한, 브런턴 나침반은 위치 운동과 삼각 측량에 대한 전통적인 나침반으로 작동 할 수 있습니다. 마지막으로 각도 고도를 측정하기 위한 포켓 트랜짓역할을 할 수도 있습니다.

그림 1. 브런턴 나침반.
Principles
대부분의 암석 층(퇴적층, 무지 레이어링 또는 변형 밴딩/단풍)은 공간의 평면 표면으로 설명할 수 있다. 따라서 표면은 0°에서 90°사이의 수평에서 각도 편차가 있습니다. 이 각도 편차는 "딥"(그림2)이라고합니다. 0° 딥보다 큰 모든 암석 표면은 가상의 수평 평면과 선형 교차점을 가지며, 그 선형 교차점(바위 층과 수평 평면의 교차점에 의해 형성된 선)의 나침반 방향은 "스트라이크"(도3)라고합니다.
암석 표면의 타격과 딥을 확인하려면 브런턴 나침반을 적절하게 준비한 다음 평가중인 표면과 정렬해야 합니다.
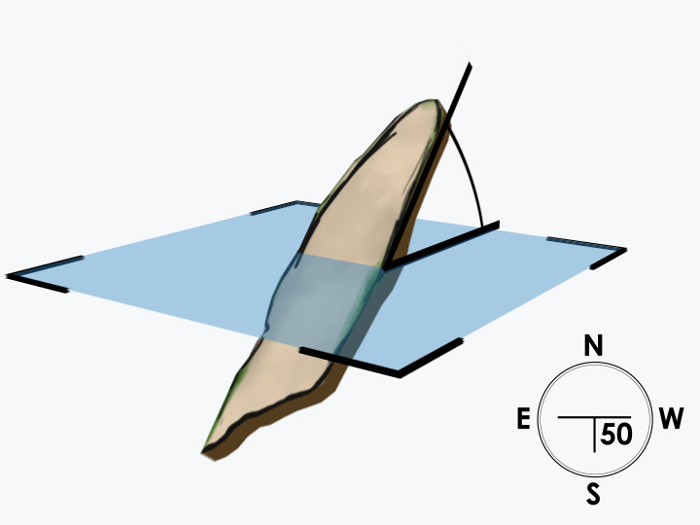
그림 2. 지질 학적 피쳐의 수평에서 딥 또는 편차.
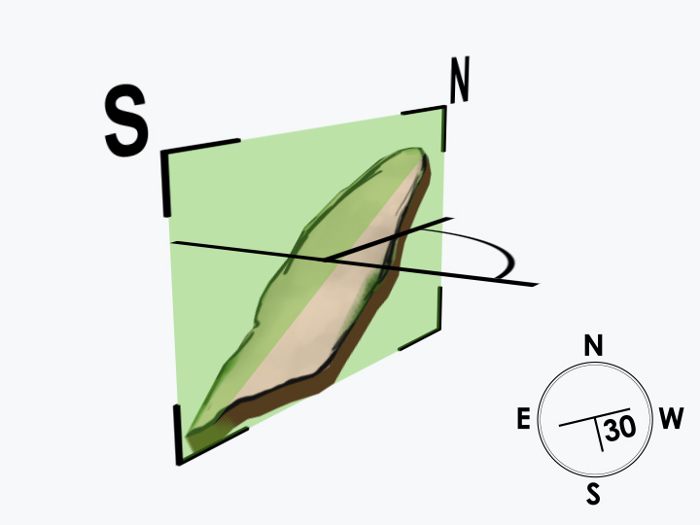
그림 3. 지질학적 특징의 파업, 즉 북쪽에서의 편차.
Procedure
1. 준비
- 무료 바늘 움직임을 확인하십시오. 수평 평면에 보관할 때 바늘이 방해받지 않는지 확인합니다. 일부 나침반은 바늘을 제자리에 고정시키는 제한 버튼이 있으며, 존재하는 경우 제한기를 밀어 붙이는 것이 바늘을 움직이지 않는지 확인합니다.
- "황소의 눈 거품"중심과 연속성을 확인합니다. 이 거품은 두 개의 레벨링 버블 중 하나이며 나침반의 수평도를 결정하는 데 사용됩니다. 다른 기포는 경사 측정에 사용됩니다.
- 올바른 자기 침엽 수 설정을 확인합니다. 지구의 자기 및 지리적 극은 일치하지 않기 때문에 나침반 방향 (실제 북쪽에 비해)을 정확하게 평가하기 위해 데시네이션 핀을 사용 위치에 대한 올바른 자기 적각으로 설정해야합니다.
2. 측정에 적합한 대표 표면 설정
- 현장에서 지질학자는 측정에 적합한 대표 표면을 설정해야 합니다. 이 특정 위치에서 평가되는 기능(침구, 조인트, 단풍 등)의 전체 방향을 대략적인 것으로 생각합니다. 이 작업을 수행하는 가장 간단한 방법 중 하나는 이 평균 및 대표 방향에서 노트북이나 클립보드를 바위에 배치하는 것입니다.
실험실 데모에서 평평한 표면은 대표 표면(책상의 보드/모델 또는 건물의 아키텍처 요소)으로 사용할 수 있습니다.
3. 표면에 나침반 설정
- 다음으로 브런턴 나침반의 아래쪽 가장자리가 표면에 설정되어 전체 모서리가 표면과 플러시됩니다.
4. "황소의 눈 거품"을 센터
- 브런턴 나침반은 표면에서이 가장자리의 일부를 복용하지 않고 (일반적인 실수) 브런턴 나침반은 "황소의 눈 거품"이 중심이 될 때까지 회전된다.
5. 아지미스 오리엔테이션 을 읽거나 스트라이크 측정
- 황소의 눈 거품을 중심으로, 브런턴 나침반은 수평 평면에 정렬되고, 이것은 바위 표면과 수평의 교차점에 의해 형성 된 라인의 아지미스 방향을 읽을 수 있습니다 ,즉, "스트라이크"의 정의.
참고: 컨벤션 스트라이크는 북부 사분면에서 측정됩니다. 예를 들어 S30degE(남쪽으로 인해 동쪽으로 30°)의 방향이 N30W로 보고됩니다.
6. 측정 딥
- 마지막 단계는 딥을 측정하는 것입니다. 이는 스트라이크 방향에 수직으로 측정되며 수평에서 표면의 각 편차로 정의됩니다. 예를 들어 거의 수직 방향의 암석 층은 85SE의 딥 크기를 가질 수 있으며, 이는 표면이 수평에서 85° 찍어 남동쪽 방향으로 떨어지고 있음을 나타냅니다.
참고: 딥 방향은 정확한 방향이 항상 스트라이크에서 90°이기 때문에 일반적인 의미(NE, SE, SW, NW)로 제공됩니다.
Results
비침지 암석 레이어에 대한 스트라이크 및 딥 데이터 집합에는 다양한 값이 있습니다. 물론 단일 측정의 정밀도는 기계적 나침반 오류 및 나침반 사용자의 경험과 관련이 있습니다. 최종 분석의 정확도는 자연 표면의 균일성(많은 명목상 "평평한 거짓말" 암석 층은 어느 정도의 고유표면 기복을 가지고 있음)과 총 측정 횟수에 따라 달라집니다.
스트라이크 및 딥 데이터는 처음에 필드 노트북에 기록된 다음 표고된 형태로 전송된 다음 궁극적으로 지질지도(그림 4)로전송됩니다. 모든 지질지도는 바위 단위 사이의 경계를 표시하고, 스트라이크 및 딥 데이터 (막대 및 스틱 기호)는 각 바위 단위의 공간 방향을 설명하는 3 차원 구성 요소를 제공합니다.
가장 일반적인 종류의 암석 방향 데이터인 침구의 스트라이크 와 딥은 아래와 같은 기호가 있는 특정 위치에 표시됩니다.
침구의 스트라이크와 딥 외에도, 스트라이크와 딥이 있는 평면 및/또는 선형 암석 특징의 다른 많은 종류가 있으며, 이들 중 일부는 그림 5에표시됩니다.
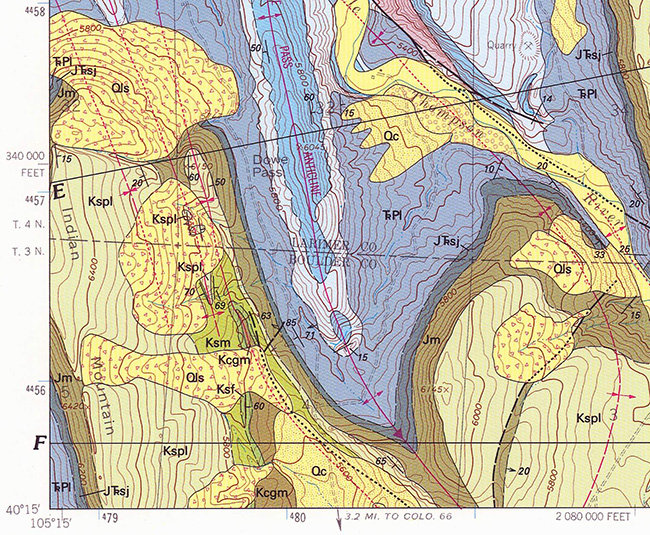
그림 4. 지도에 침구의 스트라이크와 딥. 가장 일반적인 종류의 암석 방향 데이터인 침구의 스트라이크 와 딥은 아래와 같은 기호가 있는 특정 위치에 표시됩니다.
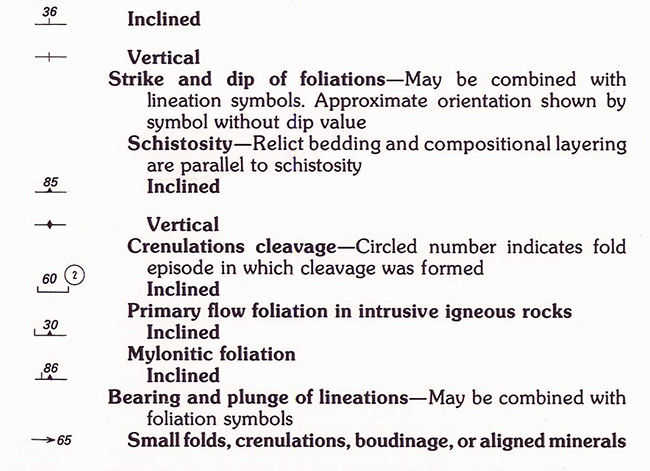
그림 5. 스트라이크 및 딥 맵 키. 평면 및/또는 바위 기능의 경우 스트라이크 및 딥을 시연할 수 있는 키를 매핑합니다.
Application and Summary
지질학자들은 지구를 4차원으로 이해하려고 노력합니다. 목표는 표면, 지하및 시간을 통해 바위의 구조를 해석하는 것입니다. 브런턴 나침반에 의해 생성 된 스트라이크 및 딥 정보는 지질학자가 지질지도를 만드는 출발점이며, 그지도는 지하에 구조를 보여주는 단면 다이어그램을 만드는 데 사용할 수 있습니다(그림 6).
세 가지 공간 차원과 시간을 통해 암석 구조를 이해하면 지구의 물리적 진화에 대한 창이 제공됩니다. 또한 이러한 종류의 지식은 많은 산업 및 경제 응용 프로그램의 중심입니다. 한 가지 예는 층이 돔이나 판들 구조에서 구부러져 있고 석유와 가스가 자주 수집하는 구조의 정점에 있는 바위 업 워프를 식별하는 것입니다.
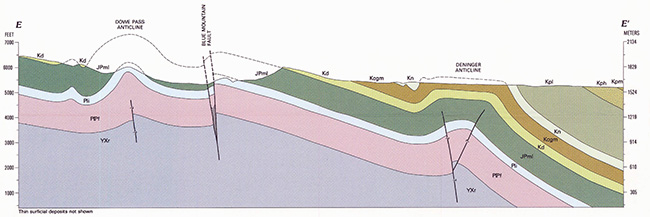
그림 6. 지질학적 단면. 지질학적 단면은 지하 지질학의 표현이다. 맵의 선(D-D')은 단면이 그려진 선입니다. 단면에서는 Anticlines, 동기화 선 및 오류를 볼 수 있습니다.
Tags
건너뛰기...
이 컬렉션의 비디오:

Now Playing
브런튼 컴퍼스를 사용한 암석 층의 공간 방향 결정
Earth Science
25.9K Views

지형 맵을 사용한 지형 프로파일 생성
Earth Science
32.2K Views

지질 횡단면 만들기
Earth Science
47.3K Views

광물의 물리적 특성 I: 결정 및 벽개
Earth Science
51.8K Views

광물의 물리적 특성 II: 다광물 분석
Earth Science
38.2K Views

화성 화산암
Earth Science
39.9K Views

화성 관입암
Earth Science
32.4K Views

고기후학을 위한 bGDGT 바이오마커 분석 개요
Earth Science
5.4K Views

고수온계 알케논 생물지표 분석의 개요
Earth Science
7.2K Views

침전물에서 지질 생물지표의 초음파 추출
Earth Science
9.9K Views

침전물에서 지질 생물지표 속슬레 추출
Earth Science
18.6K Views

침전물에서 생물지표 추출-가속 용매 추출
Earth Science
10.1K Views

Uk'37 고수온계의 비누화에 의한 지방산 메틸 에스테르의 전환
Earth Science
10.1K Views

컬럼 크로마토그래피를 이용한 총 지질 추출물의 정제
Earth Science
12.6K Views

Uk'37 고수온계의 요소 내전에 의한 분지 및 고리 화합물의 제거
Earth Science
6.4K Views
Copyright © 2025 MyJoVE Corporation. 판권 소유