1. Tail tattoo
Tail tattoos are easily read without the need to handle the animal.
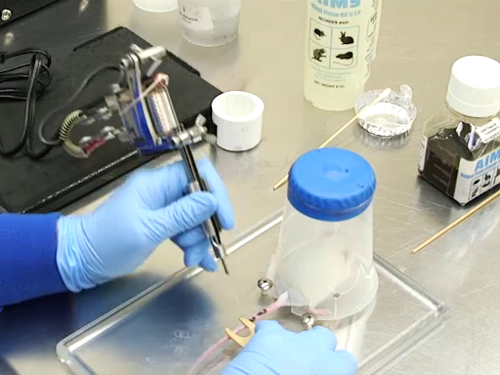
Figure 1. Tail tattooing on adult mice
- Prepare the tattoo equipment according to the manufacturer's instructions. A small amount of ink is required. Black dye should be used for albino mice or rats, and green dye for pigmented mice or rats.
- Prepare the animals for identification.
NOTE: To minimize apprehension or distress, tail tattooing should be performed in a procedure room rather than in an animal housing area.
- Appropriately restrain the animal for tattooing so that movement is minimal.
- Weanling rats are restrained using a plastic-notched cup, with the lip of the cup secured under the bolts on the tattoo platform, and the tail extending through the notch.
- Adult mice can be restrained by means of a cup restrainer, with the tail pulled taut from the opening and the flange of the cup held in place via a platform or other device.
- Clean the tail with a small amount of diluted tissue cleaner applied with a cotton-tipped swab. Adult rats generally have a buildup of scale and debris on the tail that must be cleaned prior to applying the tattoo. A soap and water scrub of the tail will remove the majority of the dirt and debris. Dry the tail well before proceeding.
- Apply tissue oil to the skin with a cotton-tipped swab just prior to tattooing. The tissue oil is necessary to minimize tissue damage by softening the skin and lubricating the tattoo needle. In addition, the oil dissolves any dirt not removed by the cleaning process and prevents ink staining of nontattooed skin.
- Apply the tattoo.
- Dip the tip of the needle into the pigment with the machine off.
- Bring the tip of the needle to the tattoo site with the gun activated by the foot pedal.
- Make short, even strokes in one direction. Numerals and letters should be tattooed in such a way so that they are constructed in segments with minimal angles and curves (when possible).
- Penetrate deeply enough into the dermis with the needle for permanent pigment deposition. A change in the sound of the activated needle can help discern the depth.
- Approach the skin with the needle at a 90o angle for adequate deposition of pigment.
- Post-tattoo cleanup and care
- Blot (do not wipe) the completed tattoo of excess pigment with a paper towel.
- The presence of blood on the tattoo or the paper towel indicates that the tattoo was made too deep, and is therefore unlikely to be permanent.
- Reinforce thin areas of tattoo characters with additional pigment. Characters are reinforced with pigment deposited parallel to, but not on top of, already-deposited pigment.
- To add additional pigment, dip the tip of the needle into the dye reservoir for every two characters for mice and every one character for rats.
- Reasons for fading tattoos include inadequate amounts of pigment, tattoos made too shallow, tattoos made too deeply, an inappropriate angle of the needle to the skin, blunt or hooked needles being used, or the tattoo being made too quickly.
- Thoroughly clean the tattoo equipment after each use according to the manufacturer's instructions.
2. Toe tattooing of neonates
Experimental protocols can require the genotyping of neonates as early as day one, which makes it essential that these pups be permanently identified. The use of toe tattooing allows the animals to be identified until they are large enough for ear tagging or ear punching.
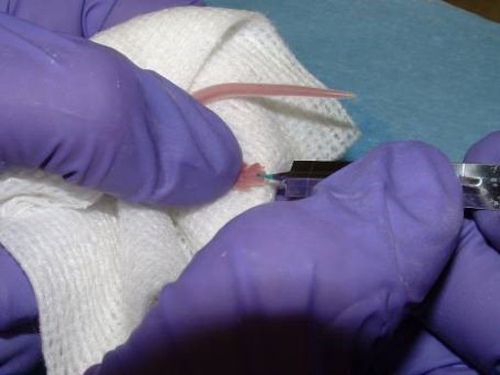
Figure 2. The proper restraint technique for tattooing a neonate mouse. The lancet has the green dye on the tip.
- Restrain preweaned pups.
- Cup the neonate in the hand on a gauze pad. Position the foot between the thumb and crook of the index finger to expose the chosen toe, or toes, for tattooing.
- Hold the foot close to the toes so that the toe has a solid surface behind it, preventing it from bending away.
- Do not overtwist the leg when positioning the foot. Pups that are restrained may wiggle, but no vocalization is necessarily heard.
- Prepare the equipment.
- Select a 4.5 mm Goldenrod animal lancet.
- Place a small spot of green tattoo paste on a nonporous surface; aluminum foil works well.
- Dip only the tip of the lancet in the tattoo paste.
- Use only a small amount of paste.
- Apply the tattoo.
- Poke the desired toe with the Goldenrod lancet according to an identification code.
- Puncture the skin to introduce the paste into the skin, leaving a mark.
- Poke the same spot three times to insure proper penetration.
- Avoid poking so deeply that the toe bleeds; this can result in a fainter tattoo.
- Post-tattoo cleanup and care
- Gently blot the spot with an absorbent wipe/towel to remove excess paste.
- Do not attempt to clean excess paste from the foot or body.
- Return the animal to its cage.
- When nursing pups are tattooed, it is advisable to also tattoo the dam. This may prevent her from overreacting to the paste on the pups, which could lead to excessive grooming of the tattoo.
- Use a new lancet for each litter.
- The tattoos should be verified on the day after the procedure. Redo the tattoo if the dots are faint or not visible. If the dots are visible the day after tattooing, they should remain visible for the lifetime of the animal.
3. Toe tattooing of adult rats and mice
When a litter of neonates is tattooed, it is suggested that the mother also be tattooed so that the paste on her pups is not foreign to her.
- Restraint of the animal.
- Restrain the animal using either a plastic cone or a Plexiglass restrainer that allows access to the hind feet.
- Extend the foot from the restraint device.
- Position the foot between the thumb and crook of the index finger to expose the chosen toe, or toes, for tattooing
- Hold the foot close to the toes so that the toe has a solid surface behind it, preventing the toe from bending away.
- Do not overtwist the leg when positioning the foot. Adults that are restrained may try to withdraw the foot.
- Prepare the equipment.
- Select a 5 mm Goldenrod animal lancet.
- Place a small spot of green tattoo paste on a nonporous surface; aluminum foil works well.
- Dip only the tip of the lancet in the tattoo paste.
- Use only a small amount of paste.
- Apply the tattoo.
- Poke the desired toe with the Goldenrod lancet according to an identification code.
- Puncture the skin to introduce the paste into the skin, leaving a mark.
- Poke the same spot three times to insure proper penetration.
- Avoid poking so deeply that the toe bleeds; this can result in a fainter tattoo.
- Post-tattoo cleanup and care
- Gently blot the spot on an absorbent wipe/towel to remove excess paste.
- Do not attempt to clean excess paste from the foot or body.
- Return the animal to its cage.
- Use a new lancet for each animal.
- The tattoos should be verified on the day after the procedure. Redo the tattoo if the dots are faint or not visible. If the dots are visible the day after tattooing, they should remain visible for the lifetime of the animal.
4. Microchipping
The implantation of an RFID chip is a commonly used method for identifying animals.
- Load the microchip into the applier, or select a preloaded syringe.
- Restrain the animal using a Plexiglass restraint tube that allows grasping of the skin over the shoulders.
- Tent the skin, creating a pocket.
- Place the needle through the skin, bevel up and parallel to the spine, and directed it toward the tail.
- Eject the microchip subcutaneously.
- Withdraw the needle and pinch the skin closed at the point of injection. This prevents the microchip from following the needle out of the skin. Continue to apply pressure to provide hemostasis for any skin bleeding.
- Remove the animal from the restraint device and scan the chip to confirm the identification code.
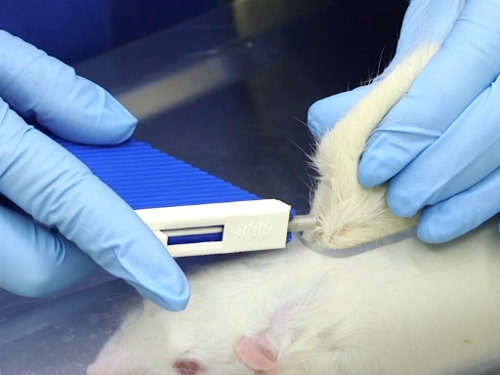
Figure 3. Microchip placement in adult rats.
5. Temporary identification for mice
Nontoxic dyes and animal markers can be used for temporary identification of mice.
- Restrain the mouse such that the area between the scapulae is accessible for markings on the fur.
- Place a marker, spot, or streak of dye on the fur in this area. This region is used to prevent the animal from removing the marking while grooming.
- Check the marking periodically if using it as the sole identifier for more than a few days.
- The tail can also be used for short durations. However, the animal may remove a mark from it while grooming.
6. Temporary identification for rats
- Restrain the rat so that the area for dye or marker application is easily accessible. In some cases, when only a stripe or dot is needed, the animal will not need to be restrained but is allowed to move freely in the cage.
- Manual restraint by grasping the tail and holding it taut while applying the identification is commonly done.
- Temporary immobilization using inhalant anesthetics can be done for fractious animals.
- Check the marking periodically if using this method as the sole identifier for more than a few days.


