Method Article
Mechanoluminescent Visualization of Crack Propagation for Joint Evaluation
In This Article
Summary
In this study, a protocol is presented that describes the use of mechanoluminescent (ML) visualization for monitoring crack propagation and mechanical behavior during adhesive joint evaluation testing.
Abstract
In this study, methods for the mechanoluminescent (ML) visualization of crack propagation and mechanical behavior to evaluate adhesive joints are demonstrated and explained. The first step involved sample preparation; an air spray was used to apply ML paint to the surface of the adhesive joint specimens. The performance of the ML sensor was described to examine the measurement conditions. The results of ML sensing during a double cantilever beam (DCB) test and a lap-shear (LS) test are demonstrated as these are the most frequently and widely used methods for evaluating adhesives. Originally, it was difficult to directly quantify the crack tip and strain/stress distribution and concentration because the crack tip was too small, and the effects of the strain could not be observed. The mechanoluminescence, crack propagation, and mechanical behavior during mechanical testing can be visualized via the ML pattern during the adhesive evaluation. This allows for the recognition of the precise position of the crack tips and other mechanical behaviors related to structural failure.
Introduction
Mechanoluminescent (ML) sensing materials are functional ceramic powders that emit intense light repeatedly under mechanical stimuli. This phenomenon is observed even within regions of elastic deformation1,2,3,4. When dispersed onto the surface of a structure, individual ML particles function as sensitive mechanical sensors, and the two-dimensional (2D) ML pattern reflects the dynamic strain distribution. The ML emission pattern presents a mechanical simulation of the strain distribution2,3,4,5,6,7,8,9,10,11,12 (Figure 1A).
As shown in Figure 1B, ML sensors have been applied to visualize two-dimensional (2D) and three-dimensional (3D) dynamic mechanical behaviors in elastic, plastic, and destruction processes using coupon test specimens comprising recent advanced lightweight structural materials (e.g., high-tensile strength steel5,6, aluminum, carbon fiber-reinforced plastic [CFRP]7), the adhesive joint for damage tolerance design8,9,10,11, and product components (e.g., gear and flexible electronics file for foldable phones12, and complicated adhesive and/or welding joints used for validating computer-aided engineering [CAE] results in laboratory-level testing2,8,9,10,11). Additionally, ML sensors have been successfully used in practical applications, such as the structural health monitoring (SHM) of buildings and bridges for detecting crack propagation or the probability of a strain concentration leading to structural degradation2,6,13, the monitoring of the inner crack propagation in interlaminar layers7,9, the prediction of the lifespan of high-pressure hydrogen vessels9, impact tests of mobility for visualizing the impact wave propagation or excitation in vibration mode14, and visual sensing of sports tools to determine the appropriate physical settings to increase the chances of winning. In the protocol, ML visualization was selected for monitoring crack propagation and the subsequent changes in mechanical behavior during adhesive joint evaluation testing.
There are several reasons for selecting this theme. The first reason is the significant increase in the importance of adhesive joints in recent years. Recently, due to the need for significant CO2 reduction and energy saving, various types of lightweight materials have been developed and applied in the mobility and transportation industries, such as for automobiles, aircraft, and trains. As part of this trend, adhesive technology has gained importance as a key technology for freely joining different lightweight materials (dissimilar material joints) in a multi-material strategy15. Furthermore, the ML visualization method for determining adhesive strength, especially in dissimilar materials, has been suggested by various international standards16,17,18,19,20. The evaluation of adhesive strength is essentially destructive testing, and the obtained adhesive strength can be mainly classified into two types: (1) fracture toughness energy (Gc), which is determined using the position of crack propagation during the load application, and (2) adhesive strength, which is determined using the load at the rupture of the adhesive joint. Although the double cantilever beam (DCB) test and single lap-shear (LS) test are representative evaluation methods of fracture toughness and adhesive strength, respectively, and represent the most frequently used adhesive testing methods worldwide15,16,17,18,19,20, the crack tip is too small to distinguish the stress/strain distribution. Hence, the fracture toughness energy (Gc) value is highly scattered. As a result of recommendations from researchers examining adhesives and other individuals in the industry, mechanoluminescent (ML) visualization has been investigated for monitoring crack propagation and the subsequent changes in mechanical behavior during adhesive joint evaluation testing8,9,10,11,21. The second reason for selecting this theme in this protocol is that stress/strain is highly concentrated at the crack tip, which generates intense mechanoluminescence at the ML point during crack propagation, and this is potentially the most user-friendly methodology among various ML testing applications. Additionally, this method can be utilized without advanced experience in sample preparation and highly efficient ML materials.
Therefore, in this study, the protocol of ML visualization is explained for monitoring crack propagation and the subsequent changes in the mechanical behavior during adhesive joint evaluation testing, as shown in Figure 2.
Protocol
The present study was conducted using DCB specimens. DCB is a standard test specimen that is often used for studying crack growth and fracture mechanics16,17,18.
1. Preparation of the test specimen
- Perform surface pretreatment before the application of the ML paint (see Table of Materials). Wipe the test specimen surface (on which the user wants to spray the ML paint) with a solvent such as isopropyl alcohol (IPA) or ethanol for surface degreasing.
- Prepare and apply the ML paint following the steps below.
- Weigh 20 g of the main epoxy reagent for the ML paint (see the Table of Materials), including SrAl2O4:Eu2+ ML material, and 3.1 g of the curing reagent, and mix them with an organic solvent such as toluene and ethyl acetate in a measuring cup to obtain a viscosity of 100 mPa·s.
- Apply the ML paint on the surface of the DCB specimen by spraying using an air spray or spray can (Figure 3).
- Dry the specimen gradually overnight at room temperature.
NOTE: The ML paint was prepared by mixing ML and polymer resins. ML materials1,2,3,4 and polymer materials can be used as opposed to commercial ML paints. However, the protocol in this study is described using commercial ML paint or spray cans (as shown in Figure 3) to ensure good performance. Although the content rate of the ML material depends on the efficiency, 25 wt% or over 50 wt% of the ML material was selected as the content rate in the ML paint22. The viscosity described in step 1.2.1 was evaluated using a viscometer8,9 (see the Table of Materials).
- Post treatment, cure the specimen by heating the ML paint sprayed on the specimen at 80 °C for 1 h.
NOTE: The conditions of the post-treatment must be within the range of conditions that are appropriate for curing the resin of the ML paint and that do not affect the test piece and bonding performance. - Perform quality confirmation.
- Confirm that the sprayed ML paint is roughly uniform on the surface.
- Ensure a thickness of approximately 50-100 µm using a microscope or coating thickness gauge8 (Figure 4).
NOTE: Low thickness is appropriate for preventing load distribution in the ML epoxy reagent. The uniformity of the sprayed ML paint is necessary for utilizing ML visualization for adhesive testing because intense mechanoluminescence can be observed at the crack tip owing to the high stress concentration. Therefore, the sprayed ML paint is expressed as being "roughly uniform" in step 1.4.1.
2. ML measurement for the DCB test
- For the experimental setup for the ML measurement, perform the following steps.
- Mount the ML paint-sprayed specimen onto the mechanical testing machine using a special zig (see the Table of Materials) for the DCB test16,17,18, as shown in Figure 5A.
NOTE: The DCB test specimens must comply with international standards for DCB tests16,17,18. - Place cameras (a CCD, charge-coupled device, or a CMOS, complementary metal oxide semiconductor; see the Table of Materials) in front of each surface of the test specimen such that they face the position of the crack tip to be monitored8,9,10,11,12 (Figure 5B). Check the camera conditions to ensure that it can record the afterglow (AG) during the estimated measurement time of the mechanical testing.
NOTE: Although a four-way camera system is not mandatory for all the directions of the specimen, the number of cameras is dependent on the face of the specimen that the user wants to focus on and record.
- Mount the ML paint-sprayed specimen onto the mechanical testing machine using a special zig (see the Table of Materials) for the DCB test16,17,18, as shown in Figure 5A.
- Perform ML observation in the DCB test.
- Set the surroundings to ensure dark conditions.
- Set the camera recording conditions: recording rate = 1 or 2 frames per second (fps); exposure time = 0.5 s or 1 s; and gain = maximum.
- Irradiate the ML paint-sprayed DCB specimen with 470 nm blue light for excitation using a blue LED (see the Table of Materials) from every camera direction for 1 min.
- Start the camera recording 5 s before finishing the blue light irradiation.
- Wait in the dark condition for 1 min to ensure that the afterglow settles down.
NOTE: The settle-down time can be changed according to the type of ML sensing material and camera, especially in relation to the balance of the mechanoluminescence and afterglow intensities in the recorded movies. - Apply a mechanical load16,17,18 using a mechanical testing machine with a loading rate of 1 mm/min to obtain the ML image (Figure 5C and Movie 1).
- Calculate the crack length (a) by using the information on the crack tip position, which is determined from the ML point during crack propagation in the ML paint-sprayed specimen (Movie 1), to obtain the fracture toughness, G1c (kJ/m2), value using Equation 18,9,16,17,18.
NOTE: (Equation 1)
where 2H denotes the thickness (mm) of the DCB specimen, B denotes the width of the specimen, λ denotes the crack opening displacement (COD) compliance (mm/N), Pc denotes the load (N), and α1 denotes the slope of (a/2H) and (B/λ)1/3.
3. ML measurement for the lap-shear (LS) test
- For the experimental setup for the ML measurements, mount the ML paint-sprayed LS specimen on a mechanical testing machine19,20, as shown in Figure 6A.
- Place cameras (a CCD or CMOS camera) in front of each surface of the test specimen such that they face the position of the crack tip to be monitored (Figure 6A).
NOTE: The LS test specimens must comply with international standards for the LS test19,20. In the case of dissimilar material joints, different strain distributions will appear on each of the four surfaces of the LS specimens. Thus, a four-way camera system or at least a two-way camera system is recommended for use on each of the four surfaces, as shown in Figure 6A, to capture two surfaces with each camera at a 45° angle to each surface. - Perform the ML observation in the lap-shear (LS) test.
- Maintain dark conditions.
- Set the camera recording conditions: recording rate = 10-50 fps; exposure time = 0.02 s or 0.1 s; gain = maximum.
- Irradiate the ML paint-sprayed DCB specimen with 470 nm blue light for excitation using a blue LED from every camera direction for 1 min.
- Start the camera recording 5 s before finishing the blue light irradiation.
- Wait in the dark condition for 30 s for the afterglow to settle down.
NOTE: The settle-down time can be changed according to the ML sensing material and camera used, especially in relation to the balance of the mechanoluminescence and afterglow intensities in the recorded movies. - Apply a mechanical load19,20 using a mechanical testing machine with a loading rate of 1-5 mm/min to obtain the ML images (Figure 6B and Movie 2).
4. Information for the ML measurement and data analysis
- Perform excitation before the ML test.
- Although the ML intensity is proportional to the strain energy, the ML intensity gradually decreases according to the load cycles2,3,6,12, as shown in Figure 7A. Therefore, perform excitation before the ML test to generate reproducible ML results, as mentioned in step 2.2.3 and step 3.2.3.
- Choose the waiting time for a high ML/AG ratio.
NOTE: The ML sensor shows the afterglow (AG) after excitation as a long persistent phosphor and shows the mechanoluminescence at the moment of the load application, as shown in Figure 7B.- Select the waiting time after excitation and the camera conditions to ensure that the ratio of ML/AG (the so-called ML index) is sufficiently high (as mentioned in step 2.2.4 and step 3.2.4) because the afterglow functions as base noise against the ML pattern (i.e., the measurement signal)2,3,4.
- Determine the highest ML point.
- Determine the position of the crack tip by recognizing the position with the highest ML point as the crack tip8,9.
NOTE: The highest ML point can be determined via visual inspection, image processing software, an auto-monitoring system, and an ML movie, as shown in Supplementary Figure 1.
- Determine the position of the crack tip by recognizing the position with the highest ML point as the crack tip8,9.
- Create an ML contour image.
- If the ML points and patterns are difficult to distinguish, then create an ML contour image and use ML patterns by converting the ML raw images using an image processing software, such as ImageJ (see the Table of Materials), as shown in Figure 8.
Results
ML images and movies during the DCB and LS test were collected using two-way and four-way cameras, respectively.
Figure 5C shows the ML images and movies in the side view, which can be used to recognize the crack tip. Furthermore, the top view is shown to reflect the failure front at the crack propagation time during the DCB test. In this case, the adherends were sand-blasted aluminum (A5052, see the Table of Materials), the adhesive was composed of two components of epoxy adhesive, and the geometry complied with international standards. Regarding the ML behaviors in the side view, intense mechanoluminescence was observed at the position of the initial crack owing to the strain concentration at this point. Subsequently, movement of the ML point, which reflects the crack tip, was observed on the adhesive layer at the crack propagation time. Using ML images in the DCB test, the position of the crack tip during crack propagation was defined and used to calculate the crack propagation length (a) and the associated fracture toughness, G1c, value, as explained in step 2.2.7.
Figure 6B shows the ML contour images and movies during the LS test. The images and movies were recorded using a four-way camera system. In this case, the adherends were sand-blasted aluminum (A5052), and the adhesive was a two-component epoxy adhesive. Figure 6B clearly provides information on the mechanical behavior during the destruction process of the single-lap adhesive joint. In brief, intense mechanoluminescence was first observed at the edges of the adhesively bonded and lapped areas. Second, the ML points moved from the adhesive edges to the center along the adhesive layer to appear together in the left and right views of the ML image. Finally, after combining the two ML points at the center, intense mechanoluminescence was observed at the center point in the adhesive layer. ML images in the LS test can be used to understand the mechanical behavior of adhesive joints during the destruction process, which is difficult to simulate.
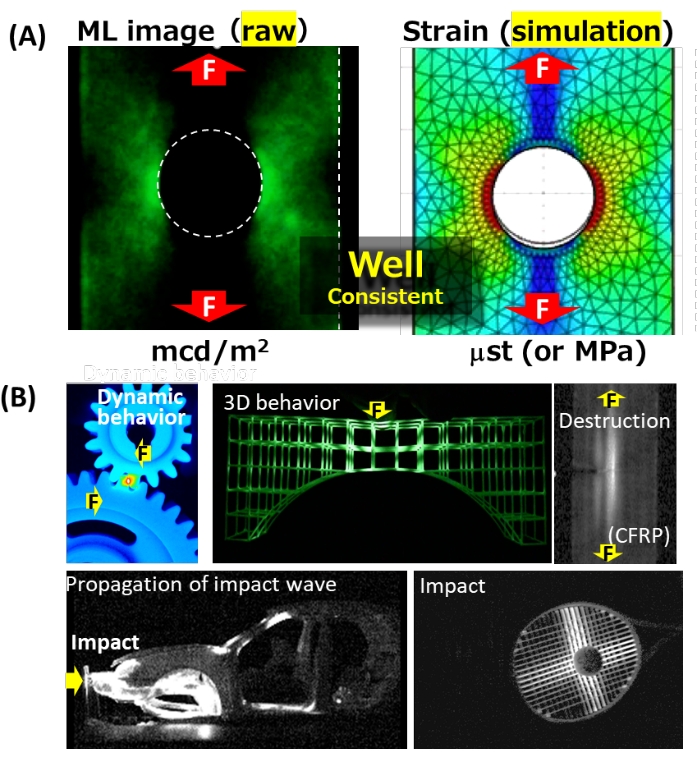
Figure 1: Properties of the ML sensor. (A) Mechanoluminescence under tensile load for a stainless steel plate with a hole and numerical analysis (simulation) of the Mises strain distribution. (B) Examples of ML visual sensing to visualize the dynamic 2D/3D mechanical behavior of products, structural materials, and 3D printing materials under the application of mechanical load, vibration, and impact. The arrows with an "F" indicate the direction of the force under mechanical load. Please click here to view a larger version of this figure.
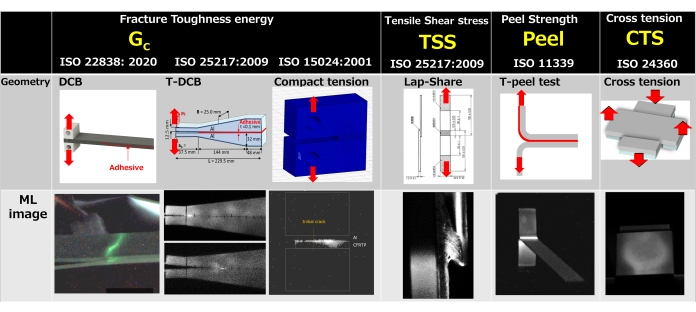
Figure 2: ML visual sensing for various internationally standardized adhesive evaluation tests. These standards describe the methods to obtain various indexes of adhesive strength, such as fracture toughness energy (Gc), tensile shear strength (TSS), peel strength, and cross tension strength (CTS). The arrows indicate the direction of the force under mechanical load. Please click here to view a larger version of this figure.
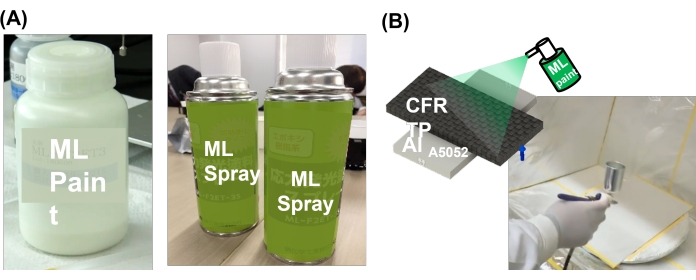
Figure 3: Applying ML sensor paint. (A) Examples of ML paint and spray cans and (B) a photograph of spraying. Please click here to view a larger version of this figure.
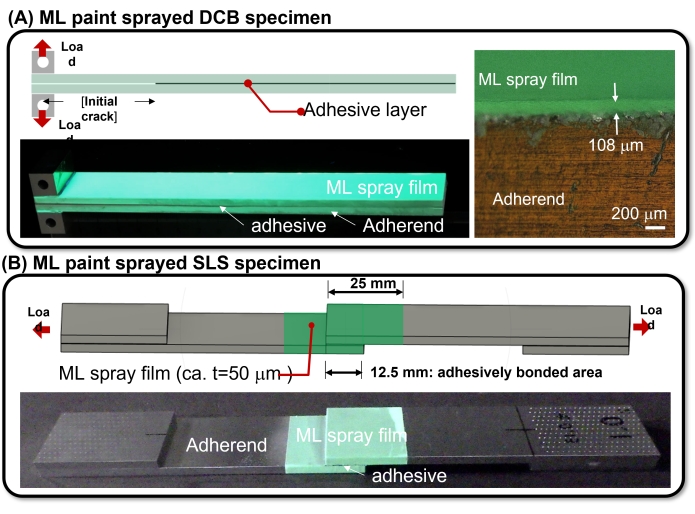
Figure 4: Illustration of ML paint-sprayed specimens. (A) A DCB specimen and (B) an LS specimen. Please click here to view a larger version of this figure.
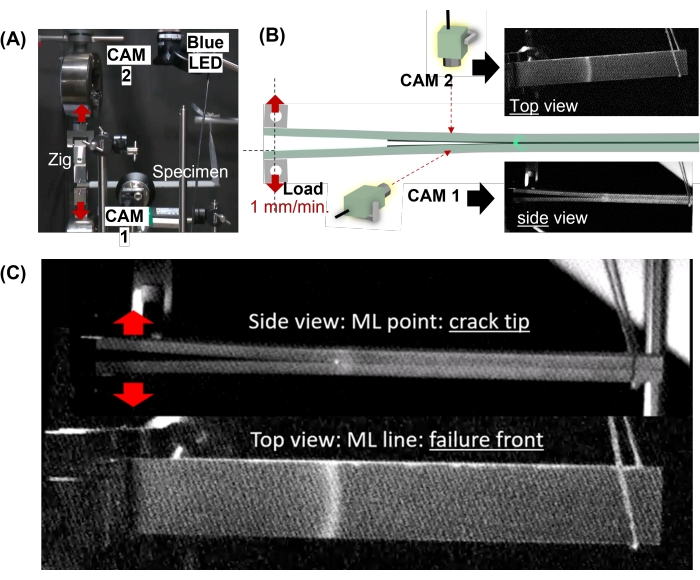
Figure 5: ML measurement during the DCB test. (A) Photograph of the experimental setup and (B) illustration of the camera positions. (C) ML measurement during the DCB test. CAM 1 and CAM 2 denote the CCD camera described in step 2.1.2. The arrows indicate the direction of the force under mechanical load. Please click here to view a larger version of this figure.
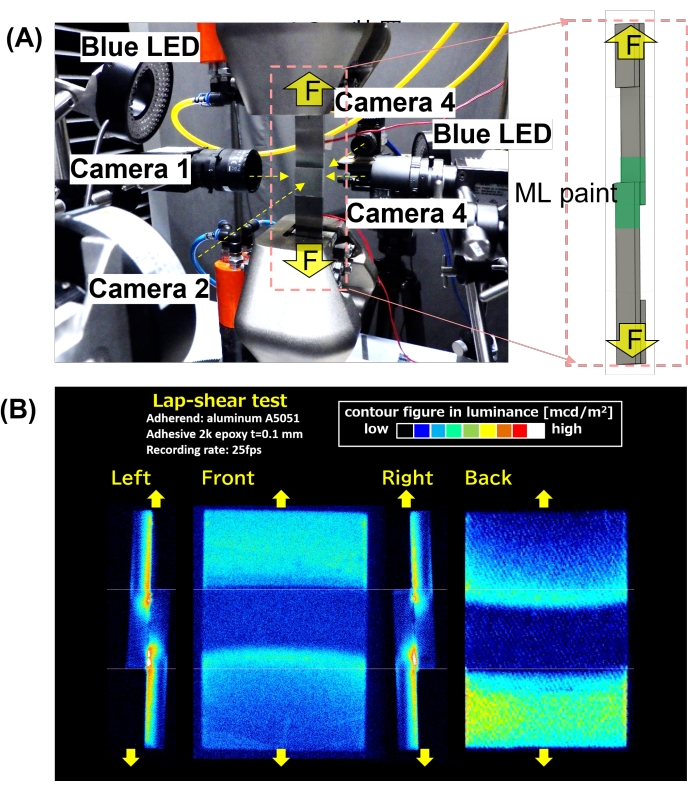
Figure 6: ML measurement during the LS test. (A) The experimental setup and (B) ML measurement during the LS test using a four-way camera system. The arrows indicate the direction of the force under mechanical load. Please click here to view a larger version of this figure.
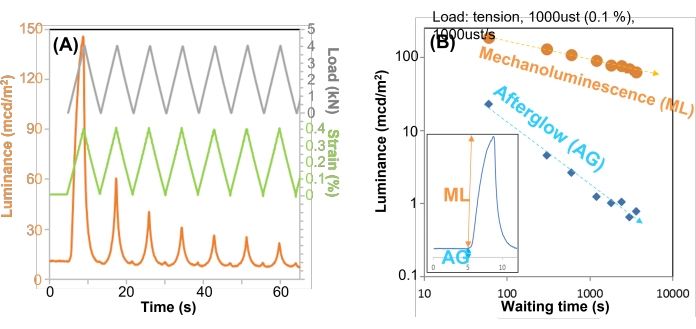
Figure 7: Basic properties of the employed ML sensor. (A) The ML intensity across load cycles and (B) the relationship between the ML and AG intensities and waiting time after excitation using a blue LED. The inset illustrates the definition of the ML and AG intensities in the time-luminance curve. Please click here to view a larger version of this figure.
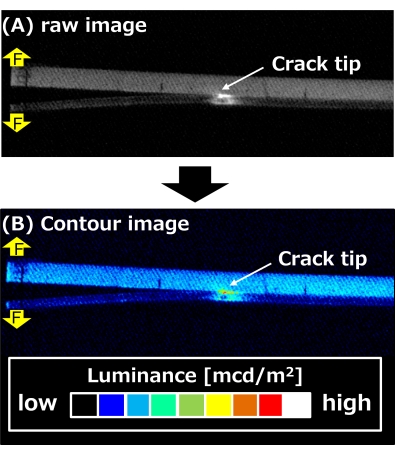
Figure 8: Comparison of ML expression in the ML images. (A) The raw image in 12-bit grayscale and (B) the contour image. The arrows with "F" indicate the direction of the force under mechanical load. Please click here to view a larger version of this figure.
Movie 1: ML movie during the DCB test. Recording rate: 1 fps. Please click here to download this Movie.
Movie 2: ML movie during the LS test. Recording rate: 25 fps. Please click here to download this Movie.
Supplementary Figure 1: Methods to distinguish the position of the point of highest ML intensity. (A) Visual inspection, (B) image processing software, and (C) auto monitoring system. Please click here to download this File.
Discussion
In terms of the ML behavior observed from the side view, intense mechanoluminescence originating from the strain concentration was recorded at the tip of the initial crack (Figure 5C). Subsequently, movement of the ML point was observed along the adhesive layer at the crack propagation time, reflecting the crack tip. In previous studies, microscopic observations showed that the highest ML point was only 0-20 μm ahead of the crack tip and could be adopted as the reference for the crack tip position8. In the conventional method, the crack tip is identified via visual inspection, but this leads to a significant amount of human error due to the small size of the crack tip, even when using a magnifying glass. Specifically, patience is required to mark the position of the crack tip during the DCB test, which, in turn, requires several minutes, particularly for structural adhesive joints16,17,18. Therefore, ML visualization in the DCB test is important for identifying the position of the crack tip automatically and with higher precision. Previously, the position and shape of the ML line on the top view were shown to synchronize with the crack failure front line in the adhesive layer9. Therefore, ML sensing in the top view of the adherend was utilized as an indicator of the inner cracks from the outside surface of the adherend.
However, the limitations of this method include the dark test environment and the decrease in ML and AG intensity during the DCB test over several minutes, as shown in Figure 7B. This leads to an unclear ML point and AG pattern, which reflect the crack tip and specimen geometry, respectively. To overcome this limitation, infrared light, such as light at a wavelength of 850 nm that does not influence SrAl2O4:Eu2+ ML material, was used to irradiate the DCB specimen during the DCB test to clarify the condition of the specimen9. Alternatively, blue light at 470 nm used to illuminate the specimen for 1 s every 5 min or 10 min to recover the ML and AG intensities even during the DCB testing2,9, as explained in Figure 7A.
ML contour images and movies during the LS test were recorded using a four-way camera system (Figure 6C). In this case, the adherends were sand-blasted aluminum (A5052), and the adhesive was a two-component epoxy adhesive. The tensile shear strength (TSS) value was 23 MPa, which was calculated using the load value (N) at rupture under tensile load and the adhesive bonded area (mm2). Furthermore, the TSS value can be considered as an indicator of the strength of a structural adhesive joint18. Although the TSS value is usually used as an index of adhesive strength, the background physical properties, such as mechanical behavior, which are crucial for improving the joint design, were not investigated.
The ML images clearly provided information on the mechanical behavior during the destruction process of the single-lap adhesive joint (Figure 6C). In brief, intense mechanoluminescence was first observed at the edge of the adhesively bonded and lapped area, which shows the strain concentration at the early stage of the LS test. Second, the ML points moved from both adhesive edges to the center along the adhesive layer to appear together in the left and right views of the ML images. This indicates shear strain and crack propagation along the adhesive layer, which denotes cohesive failure (CF) in this case.
Additionally, the ML lines in the front and back views indicated the occurrence of crack propagation, which is the same phenomenon as in the DCB test. Finally, after the two ML points combined at the center, intense mechanoluminescence was observed at the center point in the adhesive layer. This indicated the strain concentration in the adhesive layer and the subsequent generation of a transverse crack across the adhesive layer, similar to in a previous work11. This information is useful to determine the location of the stress/strain concentration. Hence, it implies that improvement in stress dispersion is required to achieve a strong and reliable joint design.
Unlike the DCB test, the LS test causes the high-speed rupture of adhesive joints. The LS test generates a high strain rate in the adhesive layer, which is followed by highly intense mechanoluminescence that saturates in the recorded ML image, accumulates many events in one image, and produces an unclear ML image. In these cases, a smart choice of recording rate can be used for troubleshooting (e.g., selecting a high recording rate, such as 25 fps, which fits the speed of the event in the LS test)11.
Disclosures
The authors have nothing to disclose.
Acknowledgements
This research was supported by a pioneering project commissioned by the New Energy and Industrial Technology Development Organization (NEDO) and the Research and Development Program for Promoting Innovative Clean Energy Technologies through International Collaboration (JPNP20005) commissioned by NEDO. N. T. is grateful to Shimadzu Co. for providing the auto-monitoring software for distinguishing the points of highest ML intensity in Supplementary Figure 1. N. T. is grateful to Ms. Y. Nogami and Ms. H. Kawahara for spraying the ML paint for ML testing. Additionally, N. T. is grateful to Ms. Y. Kato, Ms. M. Iseki, Ms. Y. Sugawa, Ms. C. Hirakawa, Ms. Y. Sakamoto, and Ms. S. Sano for assisting with the ML measurements and analysis in the 4D visual sensing team (AIST).
Materials
| Name | Company | Catalog Number | Comments |
| Aluminum plate | Engineering Test Service Co.,Ltd. | A5052 | A5052 is defined name as quality of aluminum in standards. |
| Blue LED | MORITEX Co. | MBRL-CB13015 | |
| Camera | Baumer | TXG04 or VLU-12 | CCD or CMOS |
| Coating thickness gauge | KETT | LZ-373 | |
| Epoxy adhesive | Nagase ChemteX Co. | Denatite2202 | structual adehsive |
| ImageJ | National Institutes of Health | Image J 1.53K | Image processing software |
| Mechanical testing machine | SHIMADZU Co. | EZ Test EZ-LX | |
| Mechanoluminescnet (ML) paint | Sakai Chemical Industry Co. Ltd. | ML-F2ET3 | The ML paint in 1.1 is 2 components epoxy paint , and consisting of epoxy main reagent and curing reagent as described in 1.2.1. SrAl2O4:Eu2+ ML ceramic perticle is including in main epoxy reagent. |
| Microscope | keyence | VHX-6000 | |
| Stainless steel plate | Engineering Test Service Co.,Ltd. | SUS631 | A631 is defined name as quality of stainless steel in standards. |
| Viscometer | Sekonic. Co. | Viscomate VM-10A |
References
- Xu, C. -. N., Watanabe, T., Akiyama, M., Zheng, X. -. G. Direct view of stress distribution in solid by mechanoluminescence. Applied Physics Letters. 74 (17), 2414-2417 (1999).
- Xu, C. -. N., Ueno, N., Terasaki, N., Yamada, H. Mechanoluminescence and Novel Structural Health Diagnosis. NTS Inc. , (2012).
- Terasaki, N. Innovative first step toward mechanoluminescent ubiquitous light source for trillion sensors. Sensors and Materials. 28 (8), 827-836 (2016).
- Feng, A., Smet, P. F. A review of mechanoluminescence in inorganic solids: Compounds, mechanisms, models and applications. Materials. 11 (4), 484 (2018).
- Terasaki, N., Xu, C. -. N. Mechanoluminescence recording device integrated with photosensitive material and europium-doped SrAl2O4. Japanese Journal of Applied Physics. 48, (2009).
- Terasaki, N., Xu, C. -. N. Historical-log recording system for crack opening and growth based on mechanoluminescent flexible sensor. IEEE Sensors Journal. 13 (10), 3999-4004 (2013).
- Terasaki, N., Fujio, Y., Sakata, Y. Visualization of strain distribution and portent of destruction in structural material through mechanoluminescence. 35th International Committee on Aeronautical Fatigue and Structural Integrity (ICAF) Conference and 29th ICAF Symposium (ICAF. 75, 1961-1967 (2017).
- Terasaki, N., Fujio, Y., Sakata, Y., Horiuchi, S., Akiyama, H. Visualization of crack propagation for assisting double cantilever beam test through mechanoluminescence). The Journal of Adhesion. 94 (11), 867-879 (2018).
- Terasaki, N., Fujio, Y., Horiuchi, S., Akiyama, H. Mechanoluminescent studies of failure line on double cantilever beam (DCB) and tapered-DCB (TDCB) test with similar and dissimilar material joints. International Journal of Adhesion and Adhesives. 93, 40-46 (2019).
- Terasaki, N., Fujio, Y., Horiuchi, S., Akiyama, H., Itabashi, M. Mechanoluminescent study for optimization of joint design on cross tension test. The Journal of Adhesion. 98 (6), 637-646 (2022).
- Terasaki, N., Fujio, Y., Sakata, Y., Uehara, M., Tabaru, T. Direct visualization of stress distribution related to adhesive through mechanoluminescence. ECS Transactions. 75 (45), 9-16 (2017).
- Terasaki, N., Ando, N., Hyodo, K. Mechanoluminescence visual inspection of micro-crack generation through fatigue process in flexible electronics film. Japanese Journal of Applied Physics. 61, (2022).
- Terasaki, N., Xu, C. -. N., Yasuda, K., Ichinose, L. Fatigue crack detection of steel truss bridge by using mechanoluminescent sensor. Proceedings of Sixth International Conference on Bridge Maintenance, Safety and Management (IABMAS). 6, 2542-2549 (2012).
- Fujio, Y., et al. Sheet sensor using SrAl2O4: Eu mechanoluminescent material for visualizing inner crack of high-pressure hydrogen vessel). International Journal of Hydrogen Energy. 41 (2), 1333-1340 (2015).
- Da Silva, L. F. M., Öchsner, A., Adams, R. . Handbook of Adhesion Technology., 2nd edition. , (2018).
- International Organization for Standardization. ISO 22838:2020. Composites and reinforcements fibres - Determination of the fracture energy of bonded plates of carbon fibre reinforced plastics (CFRPs) and metal using double cantilever beam specimens. International Organization for Standardization. , (2020).
- International Organization for Standardization. ISO 25217:2009. Adhesives - Determination of the mode 1 adhesive fracture energy of structural adhesive joints using double cantilever beam and tapered double cantilever beam specimens. International Organization for Standardization. , (2009).
- International Organization for Standardization. ISO 15024:2001. Fibre-reinforced plastic composites - Determination of mode I interlaminar fracture toughness, GIC, for unidirectionally reinforced materials. International Organization for Standardization. , (2001).
- International Organization for Standardization. ISO 4587:2003. Adhesives-Determination of tensile lap-shear strength of rigid-to-rigid bonded assemblies. International Organization for Standardization. , (2003).
- International Organization for Standardization. ISO 22841:2021. Composites and reinforcements fibres-Carbon fibre reinforced plastics(CFRPs) and metal assemblies-Determination of the tensile lap-shear strength. International Organization for Standardization. , (2021).
- International Organization for Standardization. ISO/CD 8065. Composites and reinforcements fibres - Mechanoluminescent visualization method of crack propagation for joint evaluation. International Organization for Standardization. , (2022).
- Azad, A. I., Rahimi, M. R., Yun, G. J. Quantitative full-field strain measurements by SAOED (SrAl2O4:Eu2+,Dy3+) mechanoluminescent materials. Smart Material Structure. 25 (9), 095032 (2016).
Reprints and Permissions
Request permission to reuse the text or figures of this JoVE article
Request PermissionThis article has been published
Video Coming Soon
Copyright © 2025 MyJoVE Corporation. All rights reserved