Ophthalmoscopic Examination
Source: Richard Glickman-Simon, MD, Assistant Professor, Department of Public Health and Community Medicine, Tufts University School of Medicine, MA
The simplest ophthalmoscopes consist of an aperture to look through, a diopter indicator, and a disc for selecting lenses. The ophthalmoscope is primarily used to examine the fundus, or the inner wall of the posterior eye, which consists of the choroid, retina, fovea, macula, optic disc, and retinal vessels (Figure 1). The spherical eyeball collects and focuses light on the neurosensory cells of the retina. Light is refracted as it passes sequentially through the cornea, the lens, and the vitreous body.
The first landmark observed during the funduscopic exam is the optic disc, which is where the optic nerve and retinal vessels enter the back of the eye (Figure 2). The disc usually contains a central whitish physiologic cup where the vessels enter; it normally occupies less than half the diameter of the entire disc. Just lateral and slightly inferior is the fovea, a darkened circular area that demarcates the point of central vision. Around this is the macula. A blind spot approximately 15° temporal to the line of gaze results from a lack of photoreceptor cells at the optic disc.
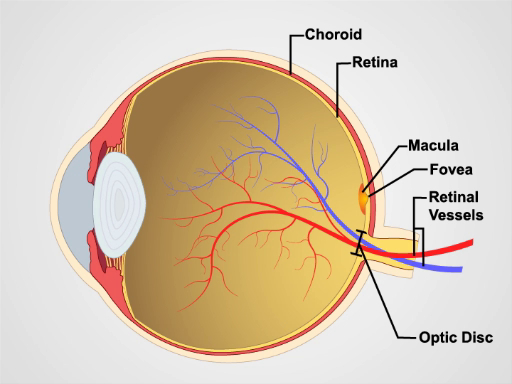
Figure 1. Anatomy of the eye. A diagram showing a sagittal view of the human eye with the structures labeled.

Figure 2: Normal retina. A photograph showing an ophthalmoscopic view on the normal retina.
Since mydriatic eye drops are typically not used in general practice, the view of the fundus is limited to only a section of the posterior retina. Be familiar with these features before attempting to examine the patient.
- Unless the patient's refractive errors make it difficult to focus on the retina, it is usually best to remove your own eyeglasses for the exam.
- After darkening the room, turn on the ophthalmoscope and shine the light on your hand or on the wall.
- Turn the lens disc until the largest white circle of light can be seen, and the diopter indicator reads 0, meaning the ophthalmoscope lens is neither converging nor dispersing the light.
- Keep your index finger on the lens disc during the exam, so the diopters can be adjusted as necessary to focus in on the retinal structures.
- To examine the patient's right eye, hold the ophthalmoscope in your right hand and look through the aperture with your right eye; to exam the patient's left eye, hold the ophthalmoscope in your left hand and look through the aperture with your left eye. This avoids bumping noses with the patient.
- Position yourself about a foot from the patient at eye level, and ask the patient to stare at a spot on the wall just over your shoulder.
- As you peer through the aperture, keep both eyes opened, press the ophthalmoscope firmly against your bony orbit, and hold the handle at a slight angle away from the patient's face.
- Position the ophthalmoscope about 15° lateral to the patient's line of vision. Direct the light to the pupil and look for an orange-red glow. This is the red reflex. Note any opacity that seems to interfere.
- Stay focused on the red reflex, and move the ophthalmoscope inward along the 15° line until you are almost on top of the patient's eye. While doing this, the optic disc and retinal vessels should come into sharp focus. The disc appears as a yellow, orange, or pinkish oval that largely fills the field of view.
- If the disc isn't seen right away, identify a blood vessel and follow it toward the disc. It appears to get wider if you are going in the right direction. The light may need to be dimmed in order to keep the patient comfortable and to avoid spasmodic constriction of the pupil.
- If the disc appears out of focus, try adjusting the diopters by rotating the lens disc one or two settings in the positive or negative direction. The retina only appears perfectly sharp if neither you nor the patient have refractive errors.
- Carefully examine the disc for outline clarity, color, relative size of the yellowish-white central cup, and symmetry with the contralateral eye. White or darkly pigmented rings and crescents are often seen around the disc and have no pathologic significance.
- Follow the retinal vessels as they extend away from the disc in all four directions. Veins appear redder and wider than arteries.
- Look for spontaneous venous pulsations, which appear as subtle variations in the width of the veins with each heartbeat. It's possible to discern subtle pulsations of the veins.
- Make special note of arteriovenous (AV) crossings. Since the walls of the normal retinal arteries are transparent, only the column of blood is visible within. Veins crossing behind arteries, therefore, are normally seen right up to the column on either side.
- Look for any lesions elsewhere in the retina, noting their size.
- Examine the fovea and surrounding macula by asking the patient to look directly into the light. The macula often appears to shimmer.
- Finally, look for opacities in the lens by adjusting the diopters between 10+ and 12+.
- If the image is lost while searching the retina, it means the light fell out of the pupil as the ophthalmoscope was moved. It takes some practice to keep it inside.
The ophthalmologic exam is probably the most challenging for students to master. With time, however, it becomes routine. It is also one of the most productive parts of the physical exam, as it not only offers a window into the condition of the eye, but also provides evidence of disease elsewhere in the body. Elevated intracranial pressure from a variety of causes may lead to swelling of the optic nerve, which appears as papilledema on a funduscopic exam. In papilledema, the optic disc is swollen, its margins are blurred, the central cup is lost, and venous pulsations are absent. Papilledema signals a serious, life-threatening condition. Death of optic nerve fibers, which can occur in disorders such as optic neuritis, multiple sclerosis, and temporal arteritis, causes the disc to atrophy and lose its smaller blood vessels. Uncontrolled hypertension leads to "copper wiring" of thickened arterial walls in the retina, causing them to appear less transparent. Veins crossing these arteries seem to stop abruptly before reaching either side, a condition called AV nicking. Other signs to look for in hypertensive retinopathy are hard exudates and cotton-wool patches, which result from infarcted nerve fibers. In patients with diabetes, the retina may reveal microaneurysms, hemorrhages, and neovascularization.
Common eye diseases observable on a funduscopic exam include glaucoma and macular degeneration. In glaucoma, increased intraocular pressure may cause the central cup of optic disc to deepen and widen, so it occupies greater than half of the disc diameter. In age-related macular degeneration (AMD), patches of hyperpigmentation and deposits composed of cellular debris, called drusen, can be seen scattered throughout the retina (particularly in the macula). In more severe stages, choroidal neovascularization is visible in the neovascular ("wet") form of AMD, whereas depigmentation and loss of the choriocapillaris are visible in the advanced atropic ("dry") form of AMD (also known as geographic atrophy). Cataracts can be more thoroughly examined by focusing the ophthalmoscope on opacified lenses.
Atla...
Bu koleksiyondaki videolar:

Now Playing
Ophthalmoscopic Examination
Physical Examinations II
66.7K Görüntüleme Sayısı

Eye Exam
Physical Examinations II
75.9K Görüntüleme Sayısı

Ear Exam
Physical Examinations II
53.7K Görüntüleme Sayısı

Nose, Sinuses, Oral Cavity and Pharynx Exam
Physical Examinations II
64.6K Görüntüleme Sayısı

Thyroid Exam
Physical Examinations II
103.5K Görüntüleme Sayısı

Lymph Node Exam
Physical Examinations II
381.4K Görüntüleme Sayısı

Abdominal Exam I: Inspection and Auscultation
Physical Examinations II
200.7K Görüntüleme Sayısı

Abdominal Exam II: Percussion
Physical Examinations II
245.6K Görüntüleme Sayısı

Abdominal Exam III: Palpation
Physical Examinations II
137.5K Görüntüleme Sayısı

Abdominal Exam IV: Acute Abdominal Pain Assessment
Physical Examinations II
66.5K Görüntüleme Sayısı

Male Rectal Exam
Physical Examinations II
112.6K Görüntüleme Sayısı

Comprehensive Breast Exam
Physical Examinations II
85.7K Görüntüleme Sayısı

Pelvic Exam I: Assessment of the External Genitalia
Physical Examinations II
300.1K Görüntüleme Sayısı

Pelvic Exam II: Speculum Exam
Physical Examinations II
148.3K Görüntüleme Sayısı

Pelvic Exam III: Bimanual and Rectovaginal Exam
Physical Examinations II
145.5K Görüntüleme Sayısı
JoVE Hakkında
Telif Hakkı © 2020 MyJove Corporation. Tüm hakları saklıdır