
X-ray Fluorescence (XRF)
Overview
Source: Laboratory of Dr. Lydia Finney — Argonne National Laboratory
X-ray fluorescence is an induced, emitted radiation that can be used to generate spectroscopic information. X-ray fluorescence microscopy is a non-destructive imaging technique that uses the induced fluorescence emission of metals to identify and quantify their spatial distribution.
Procedure
1. Preparing the Silicon Nitride Windows
- Use reverse tweezers to pick up a window (silicon nitride windows will shatter if dropped).
- Place window onto a glass slide, flat side up.
- Adhere small pieces of Scotch tape to the sides of the window, and use these to adhere the windows to the bottom of the culture dish.
- Sterilize the windows in culture dishes with UV radiation. This can be accomplished with the auto-crosslink setting on a UV-crosslinking cabinet, followed by further UV i
Results
The X-ray fluorescence map of an adherent cell is shown in Figure 1. Each panel shows the distribution of a particular element (e.g., copper, iron, zinc, etc) over the cell. The panel labeled 's_a' shows the absorption of X-rays.
Log in or to access full content. Learn more about your institution’s access to JoVE content here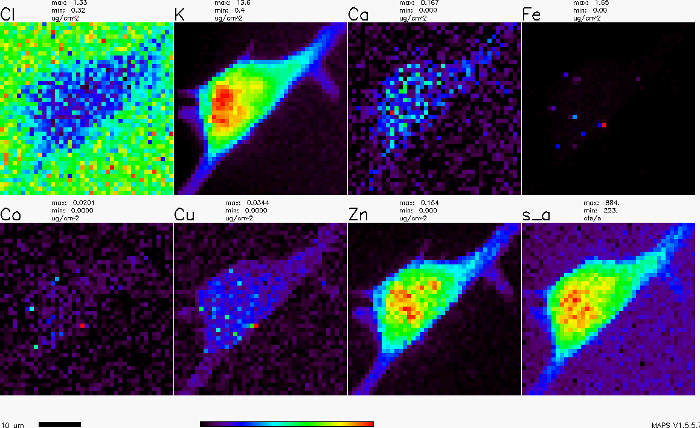
Figure 1. X-ray fluorescence map of an adherent cell.
Application and Summary
X-ray fluorescence imaging can be a useful tool in many fields including geosciences, forensic science, materials science, biology, and even in studying our cultural heritage. In materials science, it can help find defects in chips and catalysts made with metals. In cultural heritage work, it has been used to identify poisonous metals in the hair of famous dead people (e.g., Beethoven), and to identify the source of paints used in art. In biology, it is used to study the natural metals that perform important biochemistry
Tags
Skip to...
Videos from this collection:

Now Playing
X-ray Fluorescence (XRF)
Analytical Chemistry
25.4K Views

Sample Preparation for Analytical Characterization
Analytical Chemistry
84.7K Views

Internal Standards
Analytical Chemistry
204.8K Views

Method of Standard Addition
Analytical Chemistry
320.0K Views

Calibration Curves
Analytical Chemistry
796.6K Views

Ultraviolet-Visible (UV-Vis) Spectroscopy
Analytical Chemistry
623.3K Views

Raman Spectroscopy for Chemical Analysis
Analytical Chemistry
51.2K Views

Gas Chromatography (GC) with Flame-Ionization Detection
Analytical Chemistry
282.0K Views

High-Performance Liquid Chromatography (HPLC)
Analytical Chemistry
384.4K Views

Ion-Exchange Chromatography
Analytical Chemistry
264.5K Views

Capillary Electrophoresis (CE)
Analytical Chemistry
93.9K Views

Introduction to Mass Spectrometry
Analytical Chemistry
112.2K Views

Scanning Electron Microscopy (SEM)
Analytical Chemistry
87.2K Views

Electrochemical Measurements of Supported Catalysts Using a Potentiostat/Galvanostat
Analytical Chemistry
51.4K Views

Cyclic Voltammetry (CV)
Analytical Chemistry
125.1K Views
Copyright © 2025 MyJoVE Corporation. All rights reserved