
Ear Exam
Overview
Source: Richard Glickman-Simon, MD, Assistant Professor, Department of Public Health and Community Medicine, Tufts University School of Medicine, MA
This video describes the examination of the ear, beginning with a review of its surface and interior anatomy (Figure 1). The cartilaginous auricle consists of the helix, antihelix, earlobe, and tragus. The mastoid process is positioned just behind the earlobe. The slightly curving auditory canal ends at the tympanic membrane, which transmits sound waves collected by the external ear to the air-filled middle ear. The Eustachian tube connects to the middle ear with the nasopharynx. Vibrations of the tympanic membrane transmit to the three connected ossicles of the middle ear (the malleus, incus, and stapes). The vibrations are transformed into electrical signals in the inner ear, and then carried to the brain by the cochlear nerve. Hearing, therefore, comprises a conductive phase that involves the external and middle ear, and a sensorineural phase that involves the inner ear and cochlear nerve.
The auditory canal and the tympanic membrane are examined with the otoscope, a handheld instrument with a light source, a magnifier, and a disposable cone-shaped speculum. It is important to be familiar with the tympanic membrane landmarks (Figure 2). Only two of the three ossicles - the malleus and incus - can normally be seen; the malleus is near the center, and the uncus is just posterior. A cone of light can be seen emanating downward and anteriorly from the umbo, or point of contact between the membrane and the tip of the malleus. The short process roughly demarcates the boundary between the two regions of the tympanic membrane: the pars flaccida, lying superior and posterior, and the far larger pars tensa, lying anterior and inferior. Normally, the tympanic membrane is pink-gray in color and readily reflects the light of the otoscope.
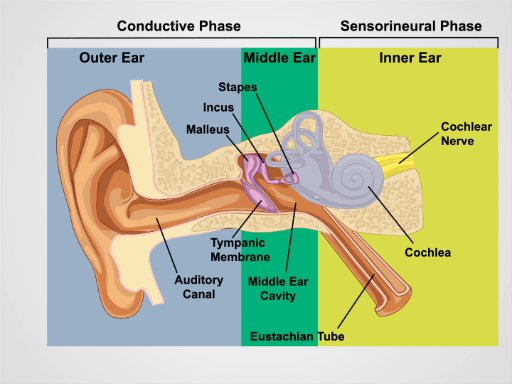
Figure 1. Anatomy of the Ear. A schematic drawing of the human ear in frontal section with outer, middle, and inner ear structures labeled.
Procedure
1. Ear Exam and Hearing
- Inspect the auricles and the surrounding tissue for skin changes, nodules, and deformities.
- Grasp the helix superiorly between the thumb and forefinger one at a time and gently pull up and backward to check for discomfort anywhere in the external ear.
- Palpate the tragus and mastoid process for tenderness.
- Perform the whispered voice test for auditory acuity.
- Make certain that the room is quiet.
- Stand 2 ft behind the seated patient so
Application and Summary
Proper evaluation of the ear requires a hearing check and otoscopic exam. Conductive hearing loss results from disorders of the external and middle ear. Cerumen impaction, otitis externa, trauma, foreign bodies, and (less commonly) exostoses can lead to hearing loss by obstructing the auditory canal. Middle ear causes of hearing loss include otitis media, Eustachian tube dysfunction, barotrauma, and otosclerosis. Neurosensory hearing loss is due to disorders of the inner ear. Presbycusis and noise trauma are most common;
Skip to...
Videos from this collection:

Now Playing
Ear Exam
Physical Examinations II
55.1K Views

Eye Exam
Physical Examinations II
77.1K Views

Ophthalmoscopic Examination
Physical Examinations II
67.9K Views

Nose, Sinuses, Oral Cavity and Pharynx Exam
Physical Examinations II
65.7K Views

Thyroid Exam
Physical Examinations II
105.0K Views

Lymph Node Exam
Physical Examinations II
387.3K Views

Abdominal Exam I: Inspection and Auscultation
Physical Examinations II
202.6K Views

Abdominal Exam II: Percussion
Physical Examinations II
248.2K Views

Abdominal Exam III: Palpation
Physical Examinations II
138.5K Views

Abdominal Exam IV: Acute Abdominal Pain Assessment
Physical Examinations II
67.3K Views

Male Rectal Exam
Physical Examinations II
114.4K Views

Comprehensive Breast Exam
Physical Examinations II
87.6K Views

Pelvic Exam I: Assessment of the External Genitalia
Physical Examinations II
306.9K Views

Pelvic Exam II: Speculum Exam
Physical Examinations II
150.4K Views

Pelvic Exam III: Bimanual and Rectovaginal Exam
Physical Examinations II
147.7K Views
Copyright © 2025 MyJoVE Corporation. All rights reserved