
骨盆 II: 窥镜考试成绩
Overview
资料来源:
亚历山德拉 · 邓肯,GTA,实践临床,纽黑文康涅狄格
蒂凡尼库克,GTA,实践临床,纽黑文康涅狄格
Jaideep S.Talwalkar,MD、 内科、 儿科,耶鲁大学医学院,纽黑文,康涅狄格
提供舒适的窥镜安置是供应商,因为窥器是一个必要的工具,在很多妇科程序开发的重要技巧。病人和提供者往往担心窥镜考试,但它是完全有可能放置反射镜没有病人不适。它是重要为临床医师要注意语言的作用发挥到创造一个舒适的环境;例如,供应商应参考窥镜"账单"而不是"刀片",以免触怒病人。
有两种类型的 speculums: 金属和塑料 (图 1)。此演示利用塑料,塑料 speculums 均为最常用在诊所的例行检测。当使用金属反射镜,它已建议使用如果病人经阴道分娩,产下的坟墓窥镜和佩德森窥镜,如果病人不。佩德森和坟墓 speculums 有不同的形状,和两个进来许多不同大小 (介质最常用)。之前放在金属反射镜,它有利于执行数字的宫颈考试,以评估为适当窥器大小。通过将一个手指放进阴道估计的深度和方向的子宫颈。如果患者的宫颈可以位于病人坐,,很可能病人,具有浅的阴道,因此应该与短的金属反射镜最舒适。
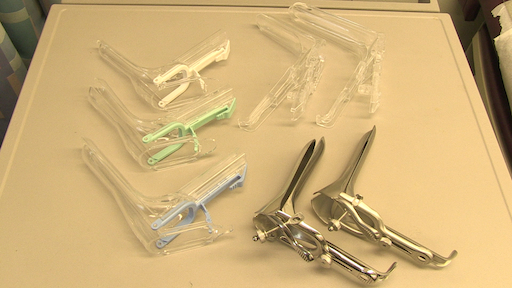
图 1。商业上可用 speculums 在不同大小的一张照片。
塑料 speculums 是所有形状像佩德森金属 speculums 和在不同的尺寸。为了评估塑料窥镜的适当大小,考官将两个手指放在病人的阴道,掌心向下,并试图把手指分开了: 如果在手指之间就没有空间,应使用小的塑料镜;如果在手指之间还有空间,应使用一种媒介之一。考试应永远不会执行与大窥器 (因为它是明显更长的时间) 无首先确定阴道管的长度。
窥器用于执行巴氏试验作为宫颈癌筛查考试的一部分。宫颈癌曾经在美国,妇女的癌症死亡的主要原因,但近几十年来的病例和死亡病例数已显著下降1。这种变化归功于拉脱落细胞巴氏染色法在 1928 年,可以通过阴道和子宫颈涂片诊断宫颈癌的发现。巴氏试验,它是现在被称为,在宫颈癌和癌前检测到异常细胞。目前的指南建议的筛查间隔可以发现通过美国预防服务工作组 (USPSTF) 网站2。
可以使用任一 1) 常规玻璃幻灯片执行测试和固色剂用锅铲和宫颈刷 (传统的"子宫颈抹片") 或 2) 比较普遍利用液基细胞学检查与宫颈的扫帚或铲和宫颈刷 (图 2)。无论使用哪种工具,这些样本是从内外部 os 和 squamocolumnar 交界处或过渡区周围 os (图 3)。该视频演示了锅铲和宫颈液基细胞学检查,作为液体制剂与画笔是宫颈病变检测更有效的方法和铲和宫颈刷提高标本采集。
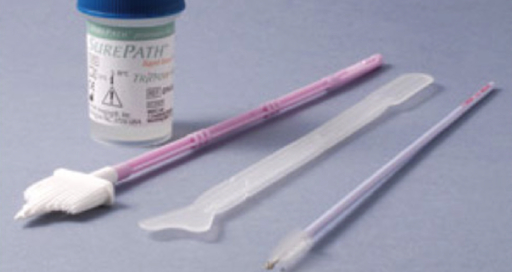
图 2。巴氏涂片工具。序列中所示是: 液体细胞学罐、 宫颈刷的宫颈扫帚、 压舌板。

图 3。子宫颈图标记的有关结构。
Procedure
窥镜考试外生殖器考试; 结束后立即开始因此,病人已经提供了历史,在改良截石位。确保病人坐在表的末尾,窥器不能完全插入任何其他方式。
1.编制
- 版式为巴氏试验用品。
- 标签液细胞学罐与病人的信息。
- 直到它在顶上休息,便可升空,拧开罐的盖子。
- 将窥器放在你的非惯用手,食指上方的账单,你的中指下面条例草案,并将拇指背面的窥器 (图 4) 的位置。
- 使用您的惯用手传播-水基润滑剂 (或温暖的水中,否则为) 外面的条例草案。
- 介绍窥阴器,让病人知道该期待什么:"这是窥器。这些都是账单,我将放入你的阴道,查看你的子宫颈和带一些样品。这是句柄,而不会插入。

Application and Summary
References
- Cervical Cancer Statistics. U.S. Preventive Services Task Force. Centers for Disease Control and Prevention (2014).
- Cervical Cancer: Screening. Recommendation Summary. U.S. Preventive Services Task Force (2012).
- Wright, D., Fenwick, J., Stephenson, P., Monterosso, L. Speculum 'self-insertion': a pilot study. Journal of Clinical Nursing. 14(9): 1098-1111 (2005).
Tags
跳至...
此集合中的视频:

Now Playing
骨盆 II: 窥镜考试成绩
Physical Examinations II
150.4K Views

眼科检查
Physical Examinations II
77.2K Views

眼底检查
Physical Examinations II
68.0K Views

耳朵考试
Physical Examinations II
55.1K Views

鼻子、 鼻窦、 口腔和咽部考试
Physical Examinations II
65.8K Views

甲状腺考试
Physical Examinations II
105.0K Views

淋巴结考试
Physical Examinations II
387.4K Views

腹部考试 i: 检查和听诊
Physical Examinations II
202.6K Views

腹部考试 II: 打击乐
Physical Examinations II
248.2K Views

腹部考试 III: 触诊
Physical Examinations II
138.5K Views

腹部考试四: 急性腹痛评估
Physical Examinations II
67.3K Views

男性直肠检查
Physical Examinations II
114.5K Views

全面的乳房检查
Physical Examinations II
87.6K Views

外生殖器的盆腔检查 i: 评估
Physical Examinations II
307.1K Views

盆腔检查三: 双手和直肠阴道考试
Physical Examinations II
147.7K Views
版权所属 © 2025 MyJoVE 公司版权所有,本公司不涉及任何医疗业务和医疗服务。