
腹部考试 i: 检查和听诊
Overview
资料来源: 亚历山大 · 戈德法布,MD,助理医学教授,贝斯以色列女执事医疗中心,马
胃肠道疾病每年占了数百万的门诊和住院治疗。腹部体检是在胃肠道; 疾病诊断中的重要工具此外,它可以帮助确定病理过程中心血管、 泌尿、 和其他系统。一般情况下,作为体检腹部地区的考试是重要的建立医患接触,达到初步的诊断和选择随后实验室和影像检查,确定治疗的紧迫性。
与其他部分一样的体格检查,目测和听诊腹部都以系统的方式,没有潜在的结果错过了。应特别注意潜在的问题,已经确定的病人的历史。在这里,我们假定病人已经确定,并已有采取的历史,讨论了,症状和潜在关注领域。在这个视频中,我们不会检查病人的历史;相反,我们会直接去体检。
我们到达考试之前,让我们简要回顾一下腹部、 腹部解剖及地形的表面地标。这里是一个列表的有用的地标: 肋边距、 剑突、 腹直肌、 linea alba、 脐、 髂嵴,腹股沟韧带和耻骨联合。腹部的考试面积下来从 xiphoid 和肋边距优至耻骨相接。
用于诊断和描述性,腹部被细分成四个象限: 右上象限 (通常指定为 RUQ),离开上象限 (呵呵)、 右下象限 (RLQ) 和左的下腹 (时延) (图 1)。腹部的更详细的地形划分为 9 区: 左、 右的忧郁症患者、 左、 右腰、 右和左髂骨,和上腹部,脐,和下腹部区域 (图 2) 中的。
记得哪个器官通常项目进每个腹部区域(图 3)。有必要知道该区域的解剖学和地形好充分记录和解释病人的投诉和症状,以及物理结果在考试期间。
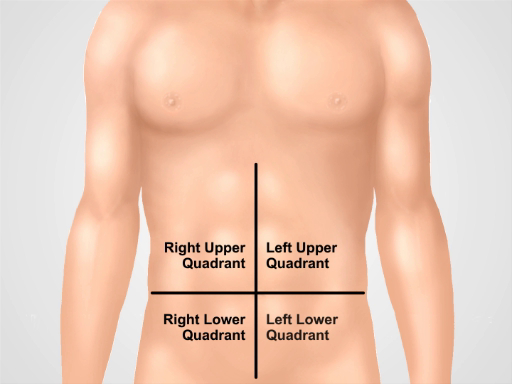
图 1。四个腹部象限。腹部可以分为四个区域,由两个假想线相交,脐: 右上象限 (通常指定为 RUQ),离开上象限 (呵呵)、 右下象限 (RLQ) 和左下腹 (时延) 显示。
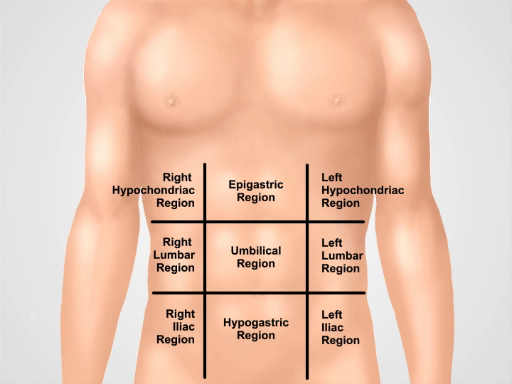
图 2。九的腹部地区。锁骨线和肋和结节间面分成九个区域的腹部: 上腹部的区域、 右胁、 左胁区域、 脐区、 腰椎右侧区域、 左的腰部,下腹、 右腹股沟和左腹股沟区。上腹部,脐,和腹下术语和耻骨上区最常用在临床实践中。
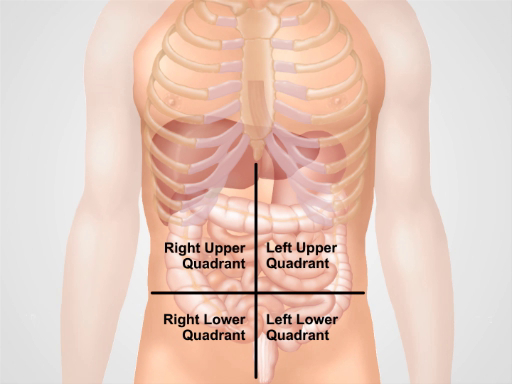
图 3。不同器官中的四个腹部区域的位置。在腹腔内和它们的位置在四个象限,腹部器官。
Procedure
1.编制
- 你开始的腹部体检之前,请确保病人舒适,清空他/她的膀胱。
- 舒适地置于病人仰卧位,可能与病人的头部支持由一个枕头和膝盖稍微弯曲。病人的武器应该在身边,这时态腹壁的背后的头部,不折叠。
- 请求允许暴露病人的腹部地区 ("是好的如果我移动的工作表来检查你的胃?")。披上病人的方式,一方面,保持谦虚但不妥协另一方面考试。腹部暴露从剑到耻骨上区;腹股沟以及暴露。
- 请确保有足够的光线和噪音最小化 (通过关闭电视或收音机在房间里)。
- 在接近前病人,确定是否需要接触的预防措施。
- 洗你的手 (或或者使用外用抗菌制剂),然后,充满温暖你的手和听诊器。与其他地区的一次体检,定位自己在病人的右侧,并向病人解释这次考试的每一步,随着它的发展。
- 请记住: 应在结构化的方式,遵循特定的程序进行检查。初始的综合考试是第一次,和一些病理结果确定后,更详细地审查这些具体结果如下。应该最后审查领域的疼痛或压痛。一旦病人定位,准备好了要检查,程序的序列如下: 检查、 听诊、 打击乐和触诊。依次检查其他地区相比差异是基于事实触诊
Application and Summary
Tags
跳至...
此集合中的视频:

Now Playing
腹部考试 i: 检查和听诊
Physical Examinations II
202.6K Views

眼科检查
Physical Examinations II
77.2K Views

眼底检查
Physical Examinations II
68.0K Views

耳朵考试
Physical Examinations II
55.1K Views

鼻子、 鼻窦、 口腔和咽部考试
Physical Examinations II
65.8K Views

甲状腺考试
Physical Examinations II
105.0K Views

淋巴结考试
Physical Examinations II
387.4K Views

腹部考试 II: 打击乐
Physical Examinations II
248.2K Views

腹部考试 III: 触诊
Physical Examinations II
138.5K Views

腹部考试四: 急性腹痛评估
Physical Examinations II
67.3K Views

男性直肠检查
Physical Examinations II
114.5K Views

全面的乳房检查
Physical Examinations II
87.6K Views

外生殖器的盆腔检查 i: 评估
Physical Examinations II
307.1K Views

骨盆 II: 窥镜考试成绩
Physical Examinations II
150.4K Views

盆腔检查三: 双手和直肠阴道考试
Physical Examinations II
147.7K Views
版权所属 © 2025 MyJoVE 公司版权所有,本公司不涉及任何医疗业务和医疗服务。