Microscopie à fluorescence : coloration par immunofluorescence des sections de tissus inclus en paraffine
Source : Thomas Chaffee1, Thomas S. Griffith2,3,4, et Kathryn L. Schwertfeger1,3,4
1 Département de médecine de laboratoire et de pathologie, Université du Minnesota, Minneapolis, MN 55455
2 Département d'urologie, Université du Minnesota, Minneapolis, MN 55455
3 Centre du cancer maçonnique, Université du Minnesota, Minneapolis, MN 55455
4 Center for Immunology, Université du Minnesota, Minneapolis, MN 55455
Les analyses pathologiques des sections de tissu peuvent être employées pour obtenir une meilleure compréhension de la structure normale de tissu et pour contribuer à notre compréhension des mécanismes de la maladie. Les biopsies tissulaires, provenant de patients ou de modèles in vivo expérimentaux, sont souvent conservées en fixant dans la formaline ou le paraformaldéhyde et en s'intégrant dans la cire de paraffine. Cela permet un stockage à long terme et la section des tissus. Les tissus sont coupés en fines sections (5 m) à l'aide d'un microtome et les sections sont adhérences à des lames de verre. Les sections de tissus peuvent être tachées avec des anticorps, qui permettent la détection de protéines spécifiques dans les sections de tissu. La coloration avec des anticorps conjugués aux fluorophores (également connu sous le nom de fluorochromes) - composés qui émettent de la lumière à des longueurs d'onde spécifiques lorsqu'il est excité par un laser - est connu sous le nom d'immunofluorescence. La capacité de détecter des protéines dans une section peut fournir des informations telles que l'hétérogénéité de type cellulaire dans le tissu, l'activation de voies de signalisation spécifiques, et l'expression des biomarqueurs. Selon les fluorophores utilisés et le type de microscope disponible pour l'analyse, plusieurs couleurs peuvent être utilisées, ce qui permet l'analyse multiplexée des cibles.
Le protocole suivant décrit les étapes de base impliquées dans la coloration d'immunofluorescence des sections incorporées de tissu de paraffine. Il est important de noter que ce protocole n'inclura aucun détail sur la fixation du tissu, le processus d'enracinement de paraffine, ou la section des tissus. Une fois que les tissus ont été sectionnés et placés sur des lames de verre, ils sont réhydratés par une série d'incubations d'éthanol gradué (EtOH). Les sections sont incubées avec un réactif de blocage pour réduire la liaison non spécifique de l'anticorps à la section tissulaire. Les sections sont ensuite incubées avec un anticorps primaire qui peut ou non être directement étiqueté avec un fluorophore. Si l'anticorps primaire n'est pas étiqueté directement, les sections sont ensuite incubées avec un anticorps secondaire étiqueté avec un fluorophore. Différents anticorps peuvent exiger des conditions de coloration différentes, de ce fait, des suggestions pour l'optimisation des anticorps sont incluses. Après le lavage pour enlever tous les anticorps non liés, les diapositives sont montées avec des supports contenant DAPI pour étiqueter fluorescentement le noyau. Une fois que le support de montage a séché, les diapositives peuvent être imaginées à l'aide d'un microscope avec des lasers qui peuvent détecter les différents fluorophores.
1. Mise en place
- Le protocole de coloration typique comporte les étapes suivantes :
- Réhydrater les sections de tissu sur les diapositives à l'aide d'une série d'éthanols classés.
- Incuber les sections tissulaires à l'aide d'un tampon de blocage, ce qui aidera à bloquer la liaison non spécifique de l'anticorps au tissu et à réduire la fluorescence de fond.
- Suppression du tampon de blocage et incubation de la section dans l'anticorps primaire, au moment où l'anticorps
Log in or to access full content. Learn more about your institution’s access to JoVE content here
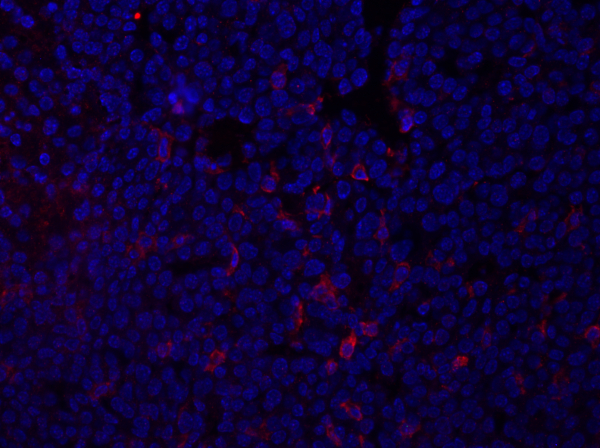
Figure 1: coloration F4/80 d'une section de tumeur mammaire. Après fixation, une tumeur mammaire de souris a été sectionnée et souillée avec anti-F4/80 et monté utilisant un support de montage DAPI-contenant. La coloration est montrée par la surface de la cellule F4/80 coloration en rouge.
L'immunofluorescence permet d'enquêter sur l'expression et la localisation des protéines dans le contexte d'une section tissulaire. Cette technique peut être utilisée pour comprendre comment les tissus changent dans le contexte de la maladie en examinant la localisation des protéines ou le nombre de cellules dans les tissus normaux et malades. Les changements dans la localisation ou dans les modèles d'expression peuvent être déterminés et liés à des attributs spécifiques des échantillons.
- Im K, Mareninov S., Diaz MFP, Yong WH. An Introduction to Performing Immunofluorescence Staining. Yong W. (eds) Biobanking. Methods in Molecular Biology. 1897, Humana Press, New York, NY (2019)
- Ramos-Vara JA. Principles and Methods of Immunohistochemistry. Gautier JC. (eds) Drug Safety Evaluation. Methods in Molecular Biology. 1641, Humana Press, New York, NY (2017)
- Donaldson JG. Immunofluorescence Staining. Current protocols in Cell Biology. 69 (1):1 4.3.1-4.3.7. (2015)
Passer à...
Vidéos de cette collection:

Now Playing
Microscopie à fluorescence : coloration par immunofluorescence des sections de tissus inclus en paraffine
Immunology
52.7K Vues

Cytométrie en flux et tri cellulaire activé par fluorescence (FACS) : isolement des lymphocytes B spléniques
Immunology
91.4K Vues

Tri cellulaire magnétique (MACS) : isolement des lymphocytes T thymiques
Immunology
22.2K Vues

Tests ELISA : Indirect, en sandwich et par compétition
Immunology
233.0K Vues

Test ELISPOT : Détection des splénocytes sécrétants l'IFNgamma
Immunology
27.8K Vues

Immunohistochimie et immunocytochimie : Imagerie tissulaire par microscopie optique
Immunology
77.3K Vues

Génération d'anticorps monoclonaux à l'aide d'hybridomes
Immunology
42.6K Vues

Microscopie confocale à fluorescence : une technique pour localiser les protéines dans les fibroblastes de souris
Immunology
42.4K Vues

Techniques basées sur l'immunoprécipitation : purification des protéines endogènes à l'aide de billes d'agarose
Immunology
86.7K Vues

Analyse du cycle cellulaire : utilisation de la coloration CFSE et de la cytométrie de flux pour évaluer la prolifération des lymphocytes T CD4 et CD8 après stimulation
Immunology
23.7K Vues

Transfert adoptif de cellules : introduction de splénocytes d'une souris donneuse vers une souris hôte et évaluation du taux de succès au FACS
Immunology
21.6K Vues

Test de mort cellulaire : libération du chromium pour mesurer la cytotoxicité
Immunology
151.1K Vues