Method Article
の軸索再生を研究するために、低予算レーザー軸索切断システムの構築 C.エレガンス
要約
Laser axotomy followed by time-lapse imaging is a sensitive way to assay the effects of mutations in C. elegans on axon regeneration. A high quality, but inexpensive, laser ablation system can be easily added to most microscopes. Time lapse imaging over 15 hours requires careful immobilization of the worm.
要約
タイムラプス顕微鏡に続くレーザー軸索切断はCの軸索再生の表現型の高感度アッセイであるエレガンス1。このアッセイの主要な難しさは認知コスト($ 25 - 100K)とレーザーアブレーションシステム2,3を実装するために必要な技術的専門知識です。しかし、控えめなコスト(<$ 10K)の固体パルスレーザーは、ターゲットの軸索は、組織の表面に"近い"透明な製剤中のレーザーアブレーションのための堅牢な性能を提供することができます。システムの構築と配置は一日で達成することができます。アブレーションレーザーに焦点を当てたコンデンサーからの光が提供する光路は、便利な位置合わせガイドを提供します。削除されたすべての光学系との中間モジュールがアブレーションレーザーに専念しない光学素子は、レーザーアブレーションのセッション中に移動する必要はありませんことを保証することができます。中間モジュールのダイクロイックは同時イメージングとレーザーアブレーションすることができます。レーザービームtをセンタリングOは、焦点を絞った顕微鏡の集光レンズからの出射ビームは、システムの初期配置をガイドします。レンズの様々な条件に使用され、選択された対物レンズの背面に開口部を埋めるためにレーザービームを展開されています。最終的なアラインメントとテストは、フロント面のミラー化ガラスのスライドのターゲットで実行されます。レーザパワーは、最小サイズのアブレーションのスポット(<1um)を与えるために調整されます。アブレーションのスポットは、イメージングのウィンドウで修正が十字カーソルに最後の運動学的にマウントされているミラーの微調整で中央に配置されます。軸索切断用レーザパワーは、ターゲットのスライド上の最小アブレーションスポット(これは、使用するターゲットと異なる場合があります)に必要なより高い約10倍になります。ワームは、アガロースパッド(またはマイクロ流体室4内)に取り付けてレーザー軸索切断とタイムラプスイメージングのために固定化することができる。アガロースパッドは簡単に電子レンジで溶かしたバランスのとれた食塩水で10%アガロースで作られています。溶融アガロースの液滴をガラススライド上に配置され、別の平坦化されパッドにスライドガラスは、厚さ約200ミクロン(隣接したスライド上に時間のテープの単層は、スペーサとして使用されます)。 "シャーピー"キャップは13mmの均一な直径の円形パッドを切り出すために使用されます。彼らは、その左側に横たわっているように、麻酔薬(1ULムシモール20mMの)とミクロスフェア(クリス牙 - 円私信)(1UL 2.65パーセントポリスチレン水中0.1 UM)は指向3月5日ワームに続いてパッドの中央に追加されます。ガラスのカバースリップが適用され、その後ワセリンはカバーを密封し、試料の蒸発を防ぐために使用されます。
プロトコル
1。レーザーアブレーションシステムの構築
レーザーの安全ゴーグルを着用し、初期アライメント時に適切なレーザーの安全対策を使用してください。レーザーがオンのときに接眼レンズに目を通してみてはいけません。
- 図に示すようにブレッドボード上のコンポーネントを配置します。 1(また、例2を参照)。レーザーをかき込む(ライザープレートと必要に応じて)、ペリスコープのポスト、そして高架鉄道がサポートしています。
- レールの軸に合わせてお使いの顕微鏡を置きます。顕微鏡の集光レンズからの透過光のビームを合わせます。レールの高さ(レベルを使用する)、調節可能な開口部またはレールに固定されたレンズとの位置を合わせます。絞り値やレンズは集光ビームのレールの両端に揃える必要があります。ラボジャックは、レールの高さ調整を支援することができます。
- グラントムソン偏光子とレーザービームの半波長板の位置を合わせます。この位置合わせを行うためのレーザーを必要としません。 BEAMは、ちょうど彼らの端を押すことなく両方を通過する必要があります。ビームダンプ(図1)のための便利な方向と位置を提供するために、偏光板を回転させる。あなたは、レーザパワーを調整するために半波長板を回転します。ブレッドボードに部品を固定します。
- 、100パルスの周波数を設定し、レーザーで連続モードをオンにして、半波長板を使用して、最小の電力を節約。レーザービームを可視化するためにポストイットノートやレンズペーパーを使用してください。
- 高架レールの端にマウントされているミラーに光をもたらすレーザーから順番に運動学的にマウントされたミラーを調整し、修正。レーザービームは、ミラーの中心にほぼ揃っている必要があります。ミラーはレーザービームの軸(図1)にほぼ45度向きでなければなりません。
- 粗く潜望鏡の上、顕微鏡からの透過光ビームの中心にレーザービームを合わせてレールの端に運動学的にマウントされているミラーを調節する。レーザービームとtの両方彼は顕微鏡からの光ビームを送信ビーム経路に紙を挿入することによって、同時に可視化することができる。中間モジュール内の任意のNDフィルターと開口部が出たり、完全に開いていることを確認してください。
- 細かくトップ潜望鏡とレールのミラーで微調整して透過光ビームの中心にレーザービームの位置を合わせます。近くに鉄道のミラーに紙を押さえ、トップ潜望鏡の鏡と透過光ビームの中心にレーザービームの位置を合わせます。顕微鏡のポートの近くに紙を持って、レールのミラーの調整(図2)と透過光ビームの中心にレーザービームの位置を合わせます。
- 投稿、それは置いて整列コンデンサーレンズとオープン客観のタレットとの間のビーム経路に注意してください。あなたが中心に近づくほど小さく、レーザービームと透過光のビームが表示されるはずです。中央レーザービームへのレールのミラーで微調整を使用してください。クランプで固定顕微鏡を修正。
手順10.9から1.12はオプションですが、それはビームの拡大レンズを追加する前に整列し、レーザーアブレーションを評価するための簡単で便利です。
- レーザーの電源をオフにし、機械的な安全シャッタを従事する。ビームのパスから50%のダイクロイックを回転させる。直接的なレーザー光が接眼レンズに渡さなくなったにもかかわらず、反射光は非常に激しいことができます。 60Xの石油を目的とした微細な位置合わせや画像のターゲットスライドをマウントします。スライド上の傷に焦点を当てる。中間モジュールのND4とND8フィルターに入れ。
- イメージターゲットのあなたのCLSMによるスライド、回転するディスク、またはCCDカメラシステム。レーザーのパスに50%のダイクロイックを回転させる。 アブレーションのレーザーがオンになっている間はこの時点から、接眼レンズに目を通すことはありません 。 10にアブレーションレーザーをオンにして、トリガモードを設定し、100〜周波数、およびパルス数。電源がまだ半波長板と最小値に設定し、機械的な安全シャッタを開いていることを確認してください。あなたがsimultaneouできます画像スライとアブレーションレーザーを使用してください。
- イメージング対象のスライドをしながら、アブレーションレーザーをトリガします。直径アブレーションスポット10から10 UMのターゲットスライドを確認してください。アブレーションのスポットが現れるまで連続してNDフィルタを削除します。レールの鏡と画像の中心にアブレーションのスポットを調整します。あなたが細かく<1 UMアブレーションのスポットを与えるために半波長板とレーザパワーを高めるために部屋を持つようにNDフィルタを再び追加することになるでしょう。 0.2ミクロン/ピクセル以下と細かく画像の中心(512 × 512の画像との位置256256)にアブレーションスポットを調整する時のイメージ。
- レーザービームの焦点と軸の深さを確認してください。上焦点と上下1〜2 UMをし、アブレーションの位置とアブレーションのスポットサイズを確認してください。レーザービームが軸方向に整列されている場合はアブレーションのスポットは移動しません。未調整レーザービームは、数μm(焦点の上から下まで約3-5 UM)を支配する力を配布します。
2。客観的なバックを埋めるためにレーザービームを拡大するためレンズを追加絞りとフォーカスを制御するための収束を調整する
- このシステムは、客観的な(10 mm)の背面開口部を埋めるためにレーザービームを拡大するデュアルガリレイビームエクスパンダを使用しています。キャリアへ4レンズをマウントし(L1f1 + L2f2とL3f1'+ L4f2')レールに取り付けます。レーザービーム(図2)ので、すべてのレンズが同じ光軸でいることと正確に直交する位置を調整します。
- レーザーの電源をオンにして最小電力と連続モードにそれを調整する。ほぼレーザービームと顕微鏡のコンデンサーからの透過光ビームを参照する紙を使用して、各レンズを介してビームのアライメントを調整します。オフにするとシャッターレーザーを。
- 顕微鏡の一方の側からクランプを取り外し、レーザービームのパスから顕微鏡を引き出します。レーザーをオンにして、安全シャッターを削除します。
- レンズとレーザビームの微細な位置合わせは、近くの壁に展開されたレーザービームを表示することによって行うことができます。時ルビームは対称的に展開し、縮小すべきnsesが移動されます。ビーム(図3)を合わせて最後の二つの運動学的にマウントされたミラーを調整します。
- 整列および拡大ビームプロファイルが円形および均一な明るさ(図3)のはずです。ビームの大きさと均一性は、ポストイットは、客観的なバック開口部の推定位置に注意して見ることができます。
- ビームは無限光学系にゼロ収束に調整する必要があります。あなたが投稿、それは移動すると、レンズから遠くに注意して収束がどのようにビームサイズの変化に注目することによって推定することができます。レーザーの電源をオフにし、メカニカルシャッターを従事する。
- 正しいアラインメントを定義するために、固定クランプを使用してレーザービームのパスに再び顕微鏡をスライドさせて。顕微鏡のフリー側のクランプを取り付けますが、下に締めないでください。
- レーザーをオンにして、安全シャッターを削除します。開いた位置に客観的なタレットを回転させる。投稿 - それは、ステージ上に配置に注意してください。あなたは、透過光のBを中心に拡張し、均一なレーザービームが表示されるはずですコンデンサーからのEAM(図4)。あなたは、顕微鏡のクランプを緩めて慎重に顕微鏡を少しずつ動かして、中心に調整が必要になることがあります。
- 安全シャッタをかけます、そしてモードをトリガするためにレーザーを設定します。場所とイメージターゲットのスライド上の表面の傷の60X目的を回転させる。
- 、安全シャッタを削除するアブレーションレーザーをトリガし、最小アブレーションのスポットのためのレーザパワーを調整します。アブレーションのスポットは円形と画像中心の5-10 UM内でなければなりません。
- センター運動学的にマウントされているレールのミラーの微調整とアブレーションのスポット。あなたが繰り返しアブレーションのスポットの両方中央にレールマウントとトップ潜望鏡のミラーを調整し、均一なビームプロファイルを維持する必要があります。
- 1μMのステップで上下に体系的にフォーカスを移動させるとアブレーションレーザーをトリガすることによって、レーザーのZフォーカスを評価します。 、拡大して整列、およびコンバージェンス調整ビームは、すべて1のUM ABで弱いかどうか、画像の焦点に最大限に切除してくださいオベまたは下の焦点(図5)。
- ガリレオ望遠鏡のレンズL3(図2)を移動することによって展開されたビームのZフォーカスを調整します。
3。レーザー軸索切断と軸索再生のタイムラプス顕微鏡
- 完全に溶けたまで平衡塩類溶液にマイクロ波10パーセントアガロース(RPI分子生物学グレードEEO 0.1 A20090)。取付けのための使用中にそれが溶融保つためにホットプレート上で設定します。
- 溶融アガロースの液滴をガラススライド上に配置され、厚さ約200ミクロン(隣接したスライド上に時間のテープの単層をスペーサとして使用されている)パッドへの別のスライドガラスでフラット化されます。
- "シャーピー"マーカーのキャップは、13mmの均一な直径の円形パッドを切り出すために使用されます。
- 彼らは、その左側に横たわっているように、麻酔薬(1ULムシモール20mMの)とミクロスフェア(クリス牙 - 円、私信)は(1UL 2.65パーセントポリスチレン水中0.1 UM)指向の3月5日ワームに続いてパッドの中央に追加されます。ガラスのカバースリップが適用され、その後Vaselさ伊根は、カバーガラスを密封し、試料(図6)の蒸発を防ぐために使用されます。
- アブレーションレーザーは、各セッションの開始時に、上記のように、十字線に整列されます。レーザーの安全性のシャッターをかけます。
- ターゲットニューロンの適切な蛍光マーカーを用いてレーザのアライメントターゲットとイメージマウント大人のワームを削除します。同様の倍率(0.2ミクロン/ピクセルまたは高倍率)と十字(図7)の下の位置で画像の軸索。
- レーザーの安全性のシャッターを開き、イメージングしながらアブレーションレーザーを誘発する。レーザーをトリガした後、軸索を評価し、軸索が切断されるまで徐々にレーザーパワーを増加させる。あなたは、アライメントターゲットのスライド(1uJ / nsパルス程度)でアブレーションのスポットを形成するよりも軸索を切断するために10倍以上のレーザーパワーについては必要になります。我々は、典型的には約0.27mW(2500 Hzでの連続に設定されたコヒーレントFieldMaxIIのパワーメータとレーザーで試料で測定された平均電力)に設定さ2.5 kHzのと、電源投入時100パルスで切断。アブレーションレーザパワーの設定は、将来の実験(図7)に軸索を切断するための一貫性が維持されます。
- うまくカット軸索は、2つの切断端部(図7)で明るさを失うことなく、0.5から1まで約UMの休憩が表示されます。明るさや大きなギャップ(2-10 UM)の大規模な損失がしばしばキャビテーション気泡による軸索を超える甚大な被害を意味する。近位と遠位軸索は、(図8およびムービー)の横を30分かけて後退電球を分離して形成されます。
- あなたの時間の経過の記録を開始する前に30分間あなたの顕微鏡のステージを使用してマウントされているワームを平衡化させます。これにより、温度差とアガロースの収縮に起因するドリフトを最小限に抑えることができます。
- )タイムラプスイメージングパラメータは、システムに関連付けられているイメージングソフトウェアを使用して設定されます。ゲイン、ピンホール、スキャン速度、および必要な空間分解能を与えながら露出を最小限に抑えるためのイメージングレーザパワーの設定を使用して0.1から0.2ミクロン/ピクセルで我々は通常、イメージ10-20 Z手順(1um/step)。サンプリング間隔が一般的です希望の時間分解能(図8およびムービー)に応じて15時間以上1〜5分LY。
- 時間経過の画像データは、NISの要素またはImageJを使ってムービーに変換されます。
4。代表的な結果:
このシステムを用いてレーザー軸索切断は信頼できるとルーチンです。図7に示す結果が典型的である。軸索再生のタイムラプスイメージングは、このプロトコルを使用して、非常に堅牢です。我々は日常的に電動ステージを使用して、単一のスライド上の5つのワームの5軸索にまでカットして画像。唯一の制限は、それはあなたが180秒ごとにサンプリングしている場合は、ほとんどで、9軸索(9スタック)を試すことができますして軸索のためのスタックを収集するために20秒かかる場合には、例えば、それぞれの軸索の画像を収集するために要する時間です。図8と図9に示す例では、良い代表的な結果です。実験の約10%は、この品質の結果を与える。残りの実験は、再生の表現型の良いデータを提供しますが、審美unappealですINGのため、一般的に固定化の5-8時間後に開始するワームの小さなジッタリング運動の。
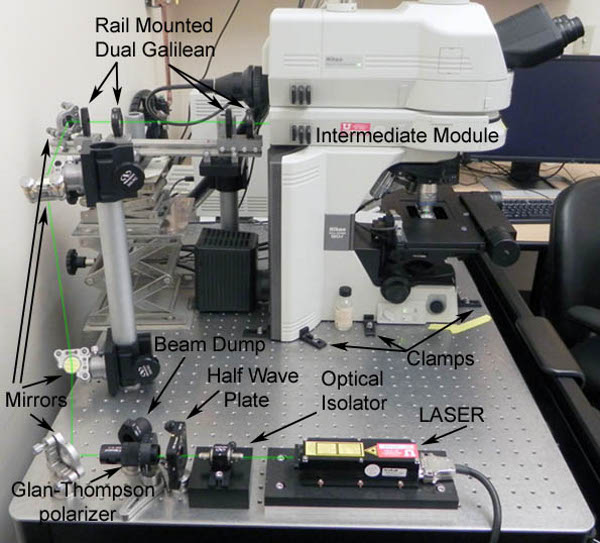
1レーザーアブレーションシステムを示します 。 532nmのNd:YAGレーザーは、他のコンポーネントの高さにそれを持って来るためにライザープレート上にマウントし、ブレッドボードにボルトで固定されています。 (光アイソレータはオプションであり、おそらく必要はない)。グラントムソン偏光板と半波長板は、細かくレーザパワーを制御するために使用されます。彼らは、細かく校正された回転マウントになります。ビームダンプの設定を注意してください。コーナーミラーは、下のペリスコープのミラーにレーザービームを指示します。上部のペリスコープのミラーは、レールのミラーに光を送ります。レールは、2つのロッドサポートされるプラットフォームに搭載されている。デュアルガリレイレンズはスライディングレールマウントに取り付けられている。アブレーションレーザーに特化した付加中間モジュールを注意してください。システムは、光アイソレを削除することで、よりコンパクトにすることができるTorとコーナーミラー、およびブレッドボードの背面の端にレーザー、グラントムソン偏光板と半波板の再配置。
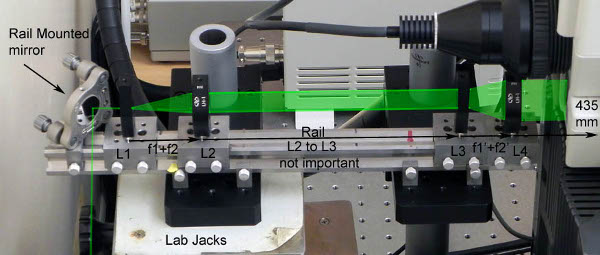
図2デュアルガリレオコンディショニングレンズはゼロ収束の一様な10 mmのサイズに300 UM TEMooレーザービームを拡大するために使用されます。ラボジャッキは、レールを保持しているプラットフォームのいずれかの下に配置されている。これは、アライメントの手順中にレールの高さを調整するのに役立ちます。粗雑にレールにL1のレンズを装着し、位置合わせガイドとコンデンサーのビームを使用してレールの高さを調整します。コンデンサーのビームは、レールの両端にレンズの中央に揃うようにレールを調整します。これは、レールが、顕微鏡の光軸に平行に整列されていることを確認します。あなたはレールの光軸と一致する最初の顕微鏡を調整する必要があります。顕微鏡の位置を固定するクランプを使用してください(図1参照)。目を削除します。Eレールマウントレンズ。今はレールの両端のコンデンサーのビームの中心にレーザービームの位置を合わせます。ビームのパス内のホワイトペーパーでは、同時に両方のビームを参照する便利な方法です。レールマウントのミラーに近いコンデンサーのビームにレーザービームを整列するトップ潜望鏡のミラーを使用してください。レールは、レールの遠端(顕微鏡に近い)でコンデンサーのビームにレーザービームを揃えるためにミラーをマウント使用。図に示すように、今レールにすべての4つのレンズをマウントします。レールの長さ、レンズの焦点距離、そしてレンズの手配はご顕微鏡と物理的なセットアップに応じて異なります。重要なパラメータは、レーザビーム径と選択した目的の背面開口部の大きさです。無限光学系は完全に平行にレーザビームを(ゼロコンバージェンス)を当てます。 L1とL2の間の距離は、レンズの焦点距離は、F1 + F2の合計である必要があります、とL3とL4の間の距離は、それに応じてF1'+ F2'でなければなりません。目間の距離電子デュアルガリレオのペアは重要ではない。 L3の位置を微ビームの収束を制御するために調整することができます。<1mmの調整は、画像のフォーカスへレーザーの焦点を調整するために必要とされる。ビームのパス(または彼らは何をすべきかを認識し、それに応じてシステムを調整する)にあるかもしれない中間のモジュールからすべてのレンズ、フィルタ、開口部等を必ず削除してください。
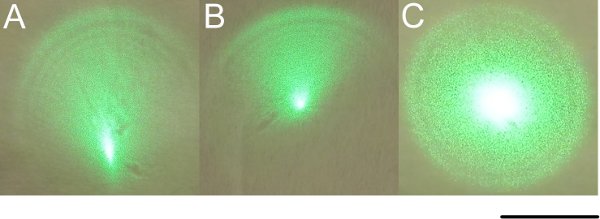
デュアルガリレイレンズを通してレーザビームの3位置図 。顕微鏡は、光パスの外に移動することができますが、残りのクランプは、顕微鏡を正確に再配置できるようになるので、顕微鏡の一方の側から顕微鏡のクランプを外します。 レーザーの安全性を考える 。レーザパワーはグラントムソン偏光板と最小値に調整されていることを確認します。レーザーの電源を入れ、壁にレーザーのビームパターンを表示します。あなたが壁にテープで紙はレーザーを表示するのに役立つかもしれませんスポット。体系的に彼らはビームの大きさや外観に何の感触を得るためにレンズの位置を調整します。あなたは強烈なスポットが偏心調光器のプロファイルに格納されているパネル、のようなものが表示されるはずです。今すぐトップ潜望鏡を使用するパネルBに示すように中心に強烈なスポットを調整するためにレールマウントのミラーを使用するには、均一な周辺機器のプロファイルを与えるためにミラーを装着。すべてが正しく整列されている場合はこの時点でレンズを移動すると、ビームは対称的に拡大および縮小するために引き起こすことを見つける必要があります。図2に示すように開始位置に戻ってレンズを移動する。今客観的なバック開口部の距離でビームを傍受。それはあなたの背部開口部を埋めるのに十分な大きさは、少なくとも、均一な明るさで、円形でなければなりません。それが大きい場合、それは、あなたの切除のための十分なレーザーパワーを持っている限り、OKです。客観的なバックの開口部と壁の距離でビーム径を比較することによって収束を評価する。ビーム径すべきゼロ収束ビームに対して同一である。スケールバーは10mmです。
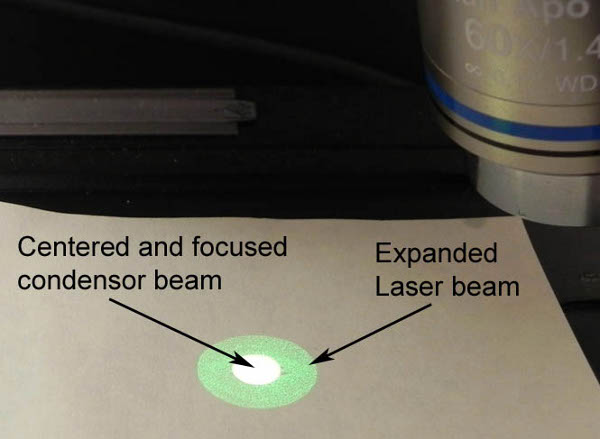
コンデンサーのビームに拡張されたレーザービームの4位置図 。シャッターレーザーをし、アライメントが停止としてクランプを使用してレーザービームのパスに再び顕微鏡を移動する。 、オンに合わせて、 強烈な反射されたレーザ光 が参照されるのを防ぐために、接眼レンズを介して対物レンズ。 テープの紙を使用してコンデンサーのビームを当てる。開いた位置に客観的なタレットを回転させる。コンデンサーのビームを閉塞するためにステージ上で一枚の紙を置く。連続モードへのレーザーの電源を入れ、機械的な安全シャッタを削除します。あなたには、いくつかのレーザー光は顕微鏡も来るはずです。顕微鏡のクランプを緩め、ゆっくりとコンデンサーのビームとレーザービームを揃えるために顕微鏡を微調整する。レーザービームは円形および均一な明るさのはずです。それは時々adjuに便利です。レールマウントレンズST。あなたは、アライメントが正しいかどうか一様にレーザービームを拡大および縮小することができるはずです。あなたはレールマウントのミラーを持つ最小の中心のコンデンサーのビームにセンター契約レーザービームをしてから、目的のサイズに拡張することができます。いったんレールのミラーと契約ビームの位置を調整すると、拡張されたビームの均一な輝度を維持するためにトップマウントされている潜望鏡の鏡を再調整する必要があります。あなたが円形の中心のレーザービームを得ることができない場合、あなたは以前の位置合わせ手順を戻る必要があります。

図5センターアブレーションのスポットをし、最適なフォーカスのレーザービームの収束を調整する。オフにするとシャッターレーザーを。用紙を取り除いて、ミラー化されたターゲットのスライドを(また、ターゲット2とカバースリップ上恒久的なマーカーのインクを使用することができます)をマウント。 60と鏡面上の画像の傷今すぐX 1.4na油のレンズ)焦点またはCCDと画像面は、 レーザがオンになっている間は接眼レンズから目をしないでください 。電源をオンにして、レーザーをシャッターを開ける。モード、低い消費電力、および100Hzのをトリガするためにレーザーを設定します。 10パルスについては、トリガ。あなたは、ビューの中央の10 UM内の直径の1から5μmのアブレーションのスポットが表示されるはずです。あなたがアブレーションのスポットが表示されない場合には、5〜10%のステップでレーザパワーを増やすことができます。一度アブレーションスポット、ビューのフィールドに中心、それを識別する。 512x512の画像を表示する場合256、256の座標に十字カーソルを置きます。あなたが中心にレーザースポットを調整する場合、それはズームの位置を変更しません。中央の十字線にアブレーションのスポットを移動するレールマウントミラーを使用してください。図4で説明したように除去する目的でビームを見ることによって、レーザビームの均一性を再評価。トップ潜望鏡マウントされたミラーとビームの均一性を調整します。アブレーションのスポット位置の評価を繰り返します。これは、pを繰り返しているアブレーションのスポットが中心と拡張されたビームが均一になるまで繰り返されるべきrocess。行っている場合、正しくアブレーションのスポットは、図中のフォーカスでのアブレーションのスポットに見られるように円形になる。次のZ軸にレーザビームの焦点を評価する。中央に約1μmのアブレーションのスポットを生成するためにレーザーを誘発する。今すぐ横方向に5μmの約スライドを移動し、ターゲットのスライドの表面下に1μMの焦点を合わせる。最初にアブレーションのスポットのために使用されているのと同じレーザーの設定を使用してレーザーを誘発する。対象となるスライドの表面上に1μMのを中心にした後、繰り返します。レーザービームは、画像の焦点に集束されている場合、あなたはこの図に示されているようなパターンが表示されるはずです。最大のアブレーションのスポットは対称的に小さくなるはず下の画像のフォーカスと、上記のアブレーションのスポットやフォーカスに対応している必要があります。焦点面を合わせるためにレンズL3を調整します。顕微鏡からのレンズL3を移動すると、ビームはより収束になりますし、アブレーションのスポットが近づくに移動します客観的。小<1mmの調整が焦点の近くに必要となります。これで、軸索を切断する準備が整いました。スケールバーは1ミクロンです。
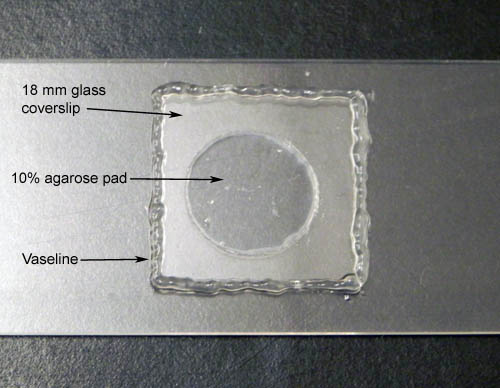
レーザー軸索切断とタイムラプスイメージングについては、 図6装着ワーム。生理食塩水でアガロース10%が完全に溶融まで加熱される。小滴をガラス顕微鏡スライド上に配置し、フラットパッドを形成するために別のスライドで平坦化される。パッドの厚さは、隣接する2つのスライドにテープによって設定されます。パッドは、約1分間に設定することが許可され、その後スライドが分離されている。 "シャーピー"トップは13ミリメートル程度の均一なサイズのパッドを形成するために、クッキーのカッターとして使用されます。 10mMのムシモールおよびマイクロスフェアの1μlの1 ULは、パッドの中心(ファング - 円私信)に追加されます。ワームは、カバーガラスに置く前に、2 uL程度の低下と指向に追加されます。ワセリンは、それを密封するカバースリップの端にシリンジ(20-25 GA。ニードル)から適用されます。

線虫 C. elegansにおけるレーザー軸索切断の7典型的な結果を示しています。にはまもなくレーザー軸索切断前後で無傷の軸索を見ることができます。ギャップは0.5 - 1um程度、通常です。 Bは、約1μm離れて近くの軸索を損傷することなく、ある軸索のレーザー軸索切断を示しています。レーザーは約10%の電力(2500 Hzで0.3 mWの平均値)、および100パルスに設定されていました。スケールバーは5μmのです。

図8。代表的な野生型L4再生。これは、軸索再生のアブレーションとタイムラプス録画を示す時系列です。まもなくレーザー軸索切断後0分であなたは、撤回の電球を見ることができます。 138分によって後退電球は、その最も遠い範囲に引き戻され、現在は改造に着手。散発的な膜の突起(mircospikesまたは糸状仮足)が軸索のシャフト(矢印138と324)に沿って見ることができます。市販右の切り株は、360分で整形式のコンパクトな成長円錐を拡張します。 414分の時点で、両方の切り株は、成長円錐を拡張しました。彼らは背側神経索(414、519、597分)に向かって延びるように、初期胚のような成長円錐は、ジストロフィーとなる。背部神経索(960分)の短いジストロフィー成長円錐のストール。矢頭は、近位断端と成長円錐を指摘する。矢印は、近位軸索の軸に沿って膜の突起を指摘する。スケールバーは20um。
ムービー1。野生型の軸索再生のムービー。この映画は、図8に示す時間点と一緒に行く。ワームプロトコルと軸索で説明するようにマウントされていたが、約10時間3分ごとに画像化した。 Zスタックは(20 × 1um)各時点で採取し、最大射影アルゴリズム(NISの要素)によって、単一の画像にマージされました。 映画を見て、ここをクリックしてください。
ディスカッション
There are several good discussions of laser microsurgery with different laser systems3,5-11. Femtosecond IR lasers are the "gold standard" for subcellular laser ablation12 and convenient if associated with an imaging facility, but they are often too costly for individual users. If you require a femtosecond IR laser for imaging your sample because of depth of imaging then you will probably need one for laser axotomy. Transparent tissues with target axons within 30-50 um of the surface are probably feasible with blue and green pulse lasers in the 20 uJ/pulse range targeted through a high na immersion lens. There will be more collateral damage with the nano and pico second lasers compared with the femtosecond laser, especially as the depth of the target axon increases. C. elegans is transparent and all axons are within 20-30 um of the surface. We routinely cut motor axons that are within 5 um of the surface. We have also easily cut axons within the nerve ring that are about 20 um from the cuticle surface. We found the limit for cutting axons to be about 30-50 um through the diameter of an adult worm. It is likely that the laser ablation system described here would work well with many different preparations that fit the criteria of transparency and depth of target axons. Still, it is a bit surprising, given the theoretical advantages of the femtosecond IR lasers, that nano and picosecond 355 nm and 532 nm lasers perform so well for laser axotomy in C. elegans6,13. We see no differences in axon regeneration in response to laser axotomy with nanosecond 440 nm, nanosecond 532 nm, and femtosecond IR lasers.
Solid state 355 nm UV lasers are about the same cost as the 532 nm diode pumped passively Q-Switched solid state laser, but require either higher powers or optics that efficiently pass these shorter wavelengths. Most optics are designed to perform well with visible 400-700 nm light. 355 nm lasers would offer some advantages6 such as reduced plasma threshold, smaller spot size, and a long pass dichroic would efficiently direct 100% of the ablation laser to the target and allow simultaneous imaging of GFP without loss of sample signal. Blue 440 nm lasers would retain the advantages of working with a visible light laser (good performance with standard optics and safety). Unfortunately, the cost of a DPP Q-switched solid state 440 nm laser is 3 times the cost of a 355nm or 532 nm laser of similar power at this time. If we were designing a new system for C. elegans , where target depth is minimal, we would opt for a UV transparent lens (cost about $3,000 for a 40X 1.3na oil lens with 50-70% transmittance at 355nm) and a 355 nm laser producing 5-10 uJ/pulse at 1-20 kHz.
Axon ablation is thought to be due to plasma formation. Shorter pulses will produce plasma thresholds at lower power and the plasma volumes will be smaller6. The goal is to produce the smallest and shortest-lived plasma by adjusting the pulse energy to the lowest power. Larger long-lived plasmas will generate cavitation bubbles that damage surrounding cells. We have generally found that ablation using about 50-100 pulses at the highest frequency (i.e. 2.5kHz) gives the best results. This suggests that damage can be gradually integrated over a series of pulses to better control the extent of damage. The laser ablation system described here is very forgiving if the beam is aligned and expanded accurately. We start cutting axons in adult worms at 10% laser power (average of 0.3 mW measured at 2500 Hz and estimated 1 uJ/pulse) and can cut with limited localized damage through 14% power. You can observe larger areas of damage from 15-39% laser power, but only above 40% power (about 1 mW average measured at 2500 Hz) do the worms explode due to large cavitation bubbles and damage to the worm's cuticle.
The Steinmeyer et al. 20102 paper is an excellent resource for constructing a laser ablation system. Leon Avery also has a nice practical description of a laser ablation system based on an inexpensive N2 gas 337 nm laser and he provides some great practical advice (elegans.swmed.edu/Worm_labs/Avery/). When designing your own system you should first talk with your microscope representative to determine how to target the ablation laser to the microscope objective. Your microscope should be mounted on a vibration isolation table (Newport, TMI, Thor). A breadboard top is optimal, but a solid steel top can still be used with magnetic positioners. A dedicated intermediate module on an upright scope is nice because all optical elements can be left in place. However, it may be less expensive and more convenient to use a camera port (inverted) or a "combiner" attached to an epi-fluorescent port. You need to know the size of the back aperture and the transmittance (at the ablation laser wavelength) of the objective lens you intend to use. Once you decide on a laser (e.g., Crylas, TEEM, Crystal, or CRC) you should contact Thor or Newport for help with selecting the correct optical elements, hardware and safety equipment. We decided on a dual Galilean beam expander to save space, but a simpler Keplerian expander is an option (f2/f1=expansion factor). A custom beam expander will be the least expensive, but Newport, Thor, and several of the laser manufacturers offer excellent quality commercial beam expanders. Some laser manufacturers also offer manual and electronically controlled attenuators that may be cost effective and space saving, but not as versatile as the Glan-Thompson polarizer and half wave plate. You will also need to decide how to control the laser. You can design a LabView based controller, use a commercial TTL generator, or software provided by the laser company. Discuss the options with the specific laser manufacturer.
We have provided a list of the hardware we have used only as a general guide. The system described here cost about $15,000 when added to our existing imaging system. Your local Physics department will often have someone willing to provide a practical introduction to safely working with free beam lasers.
Alternative methods for immobilization and time lapse imaging of C. elegans have been recently described.14
Troubleshooting
The most difficult and critical step is alignment of the centered expanded beam to the optical axis of the microscope. Once you have the beam centered and expanded through the Galilean lenses you should work hard to get it aligned to within 5 um of the microscope's optical axis BEFORE using the steering mirrors for the final alignment to the center. Excessive use of the steering mirrors to align the beam to the microscope will move it off axis through the beam expander. USING EXTREME CAUTION you can attenuate the laser beam with the appropriate ND filter and directly view the laser beam profile on a reflective target (front surface mirror). You can gently nudge the microscope to precisely center the beam in the 60X objective field of view (if it can't be centered in the up/down range you need to adjust the rail height). The beam profile can be used to precisely align the microscope optical axis to give a centered beam that is circular and "flares" symmetrically. An asymmetric flare is an indication that the microscope axis is not perfectly aligned (or the rail is not level). Finally, you should adjust L3 and see an even and symmetrical expansion and contraction of the beam. Focus the microscope precisely on the target surface and then adjust L3 to focus the laser beam to the smallest spot. You should now find that the laser beam is within 5 um of the center when imaged via LSCM or CCD system and the ablation spot is within 1um of Z focus.
If you find you are "blowing up" worms or consistently generating large cavitation bubbles to cut axons your problem is most likely the fine alignment of the ablation laser. Make sure the minimum (<500nm) ablation spot is localized to the Z focus (adjust convergence with L3 lens) and to the XY fiduciary spot (adjust with last kinematically mounted mirror).
Targeting axons closer to the surface will require less laser power. Similarly, smaller animals (L1 and L2) will require less laser power for axotomy compared to targeting the same axons in adults.
If your wild type axons do not regenerate or the axons bleach you should try reducing imaging laser power or decreasing the sampling rate. If your worms die or become sickly try reducing the percent Agarose in 1% steps. Make sure you are not moving the coverslip after mounting worms as this will often cause them to die when using high percentage agarose and microspheres.
If your worms burst or die during a time-lapse session it is due to: 1. Percentage agarose is too high. 2. Damage to cuticle by ablation laser. 3. Movement of coverslip after mounting. If damage to the cuticle is at fault it will only affect mounted worms that have been targeted with the ablation laser.
If your worm moves too much during a time-lapse session try increasing the percentage agarose in 0.5% steps. Healthy axons in healthy worms are always "active" and display a consistent level of fluorescence. If you see a sudden decrease in fluorescence or activity the worm is dying or dead. Multiple beaded or fragmented axons are a sure sign of a dying or dead worm.
If you have trouble keeping your axons in focus during the entire time lapse session there may be several different problems. First check your stage drift by imaging an inert sample on a glass slide over 10 hrs. A few microns drift may be due to thermal instability, but greater than 5 um is probably due to mechanical issues with your microscope. Problems with mounting are more common. Let your mounted worms equilibrate with your microscope stage for 30 minutes before starting your time lapse. Check that your Vaseline seal did not develop leaks during the course of your time lapse session.
開示事項
利害の衝突は宣言されません。
謝辞
This research was supported by the National Science Foundation, the McKnight Endowment Fund for Neuroscience, the Christopher and Dana Reeve Foundation and Amerisure Charitable Foundation.
資料
| Name | Company | Catalog Number | Comments |
| Name of the reagent | Company | Catalogue number | Comments (optional) |
| 535 nm Laser | Crylas | FDSS532Q3 | (TEEM, Crystal, and CRC also offer comparable lasers) |
| All optics and hardware | (Thor offers comparable optics and hardware) | ||
| SUPREMA Optical Mount, 1.0-in diameter | Newport Corp. | SS100-F2KN | 2 |
| 1" diameter post, 1" height | Newport Corp. | PS-1 | 1 |
| 1" diameter post fork | Newport Corp. | PS-F | 1 |
| Achromatic Zero-Order Wavel Plate, ½ Wave Retardation, 400-700nm | Newport Corp. | 10RP52-1 | 1 |
| Rotation Stage, 1" Aperature | Newport Corp. | RSP-1T | 1 |
| 1" diameter post, 1" height | Newport Corp. | PS-1 | 1 |
| 1" diameter post fork | Newport Corp. | PS-F | 1 |
| Glan-Laser Calcite Polarizer, 430-700nm | Newport Corp. | 10GL08AR.14 | 1 |
| Polarizer Rotation Mount | Newport Corp. | RM25A | 1 |
| ¼" spacer for 1" diameter post | Newport Corp. | PS-0.25 | 1 |
| ½" height, 1"diameter post | Newport Corp. | PS-0.5 | 1 |
| Fork, 1" diameter post | Newport Corp. | PS-F | 1 |
| Beam Dump | Newport Corp. | PL15 | 1 |
| Microscope Objective Lens Mount | Newport Corp. | LH-OBJ1 | 1 |
| 1" diameter post, 1" height | Newport Corp. | PS-1 | 1 |
| 1" diameter post fork | Newport Corp. | PS-F | 1 |
| High-Energy Nd:YAG Laser Mirror, 25.4 mm Diameter, 45°, 532 nm | Newport Corp. | 10Q20HE.2 | 4 |
| SUPREMA Optical Mount, 1.0 inch diameter, clearance mounting hole | Newport Corp. | SN100C-F | 2 |
| High Precision Knob Adjustment Screw, 12.7mm travel, 100TPI | Newport Corp. | AJS100-0.5K | 4 |
| Thread adaptor, ¼-20 male, 8-32 female | Newport Corp. | SS-1-B | 2 |
| Rod Clamp for 1.5 inch diameter rod | Newport Corp. | 340-RC | 2 |
| Rod, 14 inch (35.5 cm) tall | Newport Corp. | 40 | 1 |
| Rail carrier for X26, square 40mm length | Newport Corp. | CN26-40 | 4 |
| Steel Rail, 384mm (15") length | Newport Corp. | X26-384 | 1 |
| Rod Platform for 1.5 inch diameter rod | Newport Corp. | 300-P | 2 |
| Rod, 14 inch (35.5 cm) tall | Newport Corp. | 40 | 2 |
| Plano-Concave Lens, 12.7mm diameter, -25mm EFL, 430-700nm | Newport Corp. | KPC025AR.14 | 2 |
| Plano-Convex Lens, 25.4mm diameter, 50.2mm EFL, 430-700nm | Newport Corp. | KPX082AR.14 | 1 |
| Plano-Convex Lens, 25.4mm diameter, 62.9mm EFL, 430-700nm | Newport Corp. | KPX085AR.14 | 1 |
| Fixed Lens Mount, 0.5" diameter, 1.0" Axis height | Newport Corp. | LH-0.5 | 2 |
| Fixed Lens Mount, 1.0" diameter, 1.0" Axis height | Newport Corp. | LH-1 | 2 |
| Microspheres 0.1um | Polysciences, Inc. | 00876 | |
| Agarose | Research Products International Corp. | A20090 | EEO matters |
| Muscimol | Sigma-Aldrich | M1523 |
参考文献
- Hammarlund, M., Nix, P., Hauth, L., Jorgensen, E. M., Bastiani, M. Axon regeneration requires a conserved MAP kinase pathway. Science. 323, 802-806 (2009).
- Steinmeyer, J. D. Construction of a femtosecond laser microsurgery system. Nature protocols. 5, 395-407 (2010).
- Wu, Z. Caenorhabditis elegans neuronal regeneration is influenced by life stage, ephrin signaling, and synaptic branching. Proc Natl Acad. 104, 15132-15137 (2007).
- Gilleland, C. L., Rohde, C. B., Zeng, F., Yanik, M. F. Microfluidic immobilization of physiologically active Caenorhabditis elegans. Nature protocols. 5, 1888-1902 (2010).
- Raabe, I., Vogel, S. K., Peychl, J., Tolic-Norrelykke, I. M. Intracellular nanosurgery and cell enucleation using a picosecond laser. J. Microsc. 234, 1-8 (2009).
- Hutson, M. S., Ma, X. Plasma and cavitation dynamics during pulsed laser microsurgery in vivo. Physical review letters. 99, 158104-158104 (2007).
- Venugopalan, V., Guerra, A. 3rd, Nahen, K., Vogel, A. Role of laser-induced plasma formation in pulsed cellular microsurgery and micromanipulation. Physical review letters. 88, 078103-078103 (2002).
- Bourgeois, F., Ben-Yakar, A. Femtosecond laser nanoaxotomy properties and their effect on axonal recovery in C. elegans. Opt Express. 16, 5963-5963 (2008).
- O'Brien, G. S., Rieger, S., Martin, S. M., Cavanaugh, A. M., Portera-Cailliau, C., Sagasti, A. Two-photon axotomy and time-lapse confocal imaging in live zebrafish embryos. J. Vis. Exp. (24), e1129-e1129 (2009).
- Tsai, P. S. Plasma-mediated ablation: an optical tool for submicrometer surgery on neuronal and vascular systems. Curr. Opin. Biotechnol. 20, 90-99 (2009).
- Chung, S. H., Clark, D. A., Gabel, C. V., Mazur, E., Samuel, A. D. The role of the AFD neuron in C. elegans thermotaxis analyzed using femtosecond laser ablation. BMC Neurosci. 7, 30-30 (2006).
- Shen, N. Ablation of cytoskeletal filaments and mitochondria in live cells using a femtosecond laser nanoscissor. Mech. Chem. Biosyst. 2, 17-25 (2005).
- Rao, G. N., Kulkarni, S. S., Koushika, S. P., Rau, K. R. In vivo nanosecond laser axotomy: cavitation dynamics and vesicle transport. Opt. Express. 16, 9884-9894 (2008).
- Rohde, C. B., Yanik, M. F. Subcellular in vivo time-lapse imaging and optical manipulation of Caenorhabditis elegans in standard multiwell plates. Nat. Commun. 2, 271-271 (2011).
転載および許可
このJoVE論文のテキスト又は図を再利用するための許可を申請します
許可を申請さらに記事を探す
This article has been published
Video Coming Soon
Copyright © 2023 MyJoVE Corporation. All rights reserved