
Aby wyświetlić tę treść, wymagana jest subskrypcja JoVE. Zaloguj się lub rozpocznij bezpłatny okres próbny.
Method Article
Preparation and Morphological Analysis of Chick Cranial Neural Crest Cell Cultures
W tym Artykule
Podsumowanie
This versatile protocol describes the isolation of premigratory neural crest cells (NCCs) through the excision of cranial neural folds from chick embryos. Upon plating and incubation, migratory NCCs emerge from neural fold explants, allowing for assessment of cell morphology and migration in a simplified 2D environment.
Streszczenie
During vertebrate development, neural crest cells (NCCs) migrate extensively and differentiate into various cell types that contribute to structures like the craniofacial skeleton and the peripheral nervous system. While it is critical to understand NCC migration in the context of a 3D embryo, isolating migratory cells in 2D culture facilitates visualization and functional characterization, complementing embryonic studies. The present protocol demonstrates a method for isolating chick cranial neural folds to generate primary NCC cultures. Migratory NCCs emerge from neural fold explants plated onto a fibronectin-coated substrate. This results in dispersed, adherent NCC populations that can be assessed by staining and quantitative morphological analyses. This simplified culture approach is highly adaptable and can be combined with other techniques. For example, NCC emigration and migratory behaviors can be evaluated by time-lapse imaging or functionally queried by including inhibitors or experimental manipulations of gene expression (e.g., DNA, morpholino, or CRISPR electroporation). Because of its versatility, this method provides a powerful system for investigating cranial NCC development.
Wprowadzenie
Neural crest cells (NCCs) are a transient cell population in vertebrate embryos. NCCs are specified at the borders of the neural plate and undergo an epithelial-to-mesenchymal transition (EMT) to migrate from the dorsal neural tube1. After EMT, NCCs disperse extensively throughout the embryo, ultimately differentiating and contributing to various structures, including the craniofacial skeleton, outflow tract of the heart, and the majority of the peripheral nervous system2. Changes in cell polarity, the cytoskeleton, and adhesion properties underly this shift from a premigratory to a migratory cell population3. Studying NCC EMT and migration provides insights into fundamental mechanisms of cell motility and informs efforts to prevent and treat birth defects and cancer metastasis.
While in vivo analysis is vital for understanding NCC developmental processes in an embryonic context, in vitro methods offer visual and physical accessibility that facilitate additional experimental avenues. In a simplified 2D environment, NCC morphology, cytoskeletal structures, and distance migrated can be evaluated. Moreover, the effects of genetic or soluble factor perturbation on migratory behaviors of motile NCCs can be analyzed4,5,6,7,8,9,10. In addition, isolated premigratory or migratory NCCs can be collected, pooled, and used for high-throughput methodologies to study the developmental regulation of NCCs through proteomic, transcriptomic, and epigenomic profiling7,11. While methods are available for preparing cranial NCCs from various developmental model organisms12,13,14, this article demonstrates the mechanics of the approach for those first learning to culture cranial NCC from chick embryos.
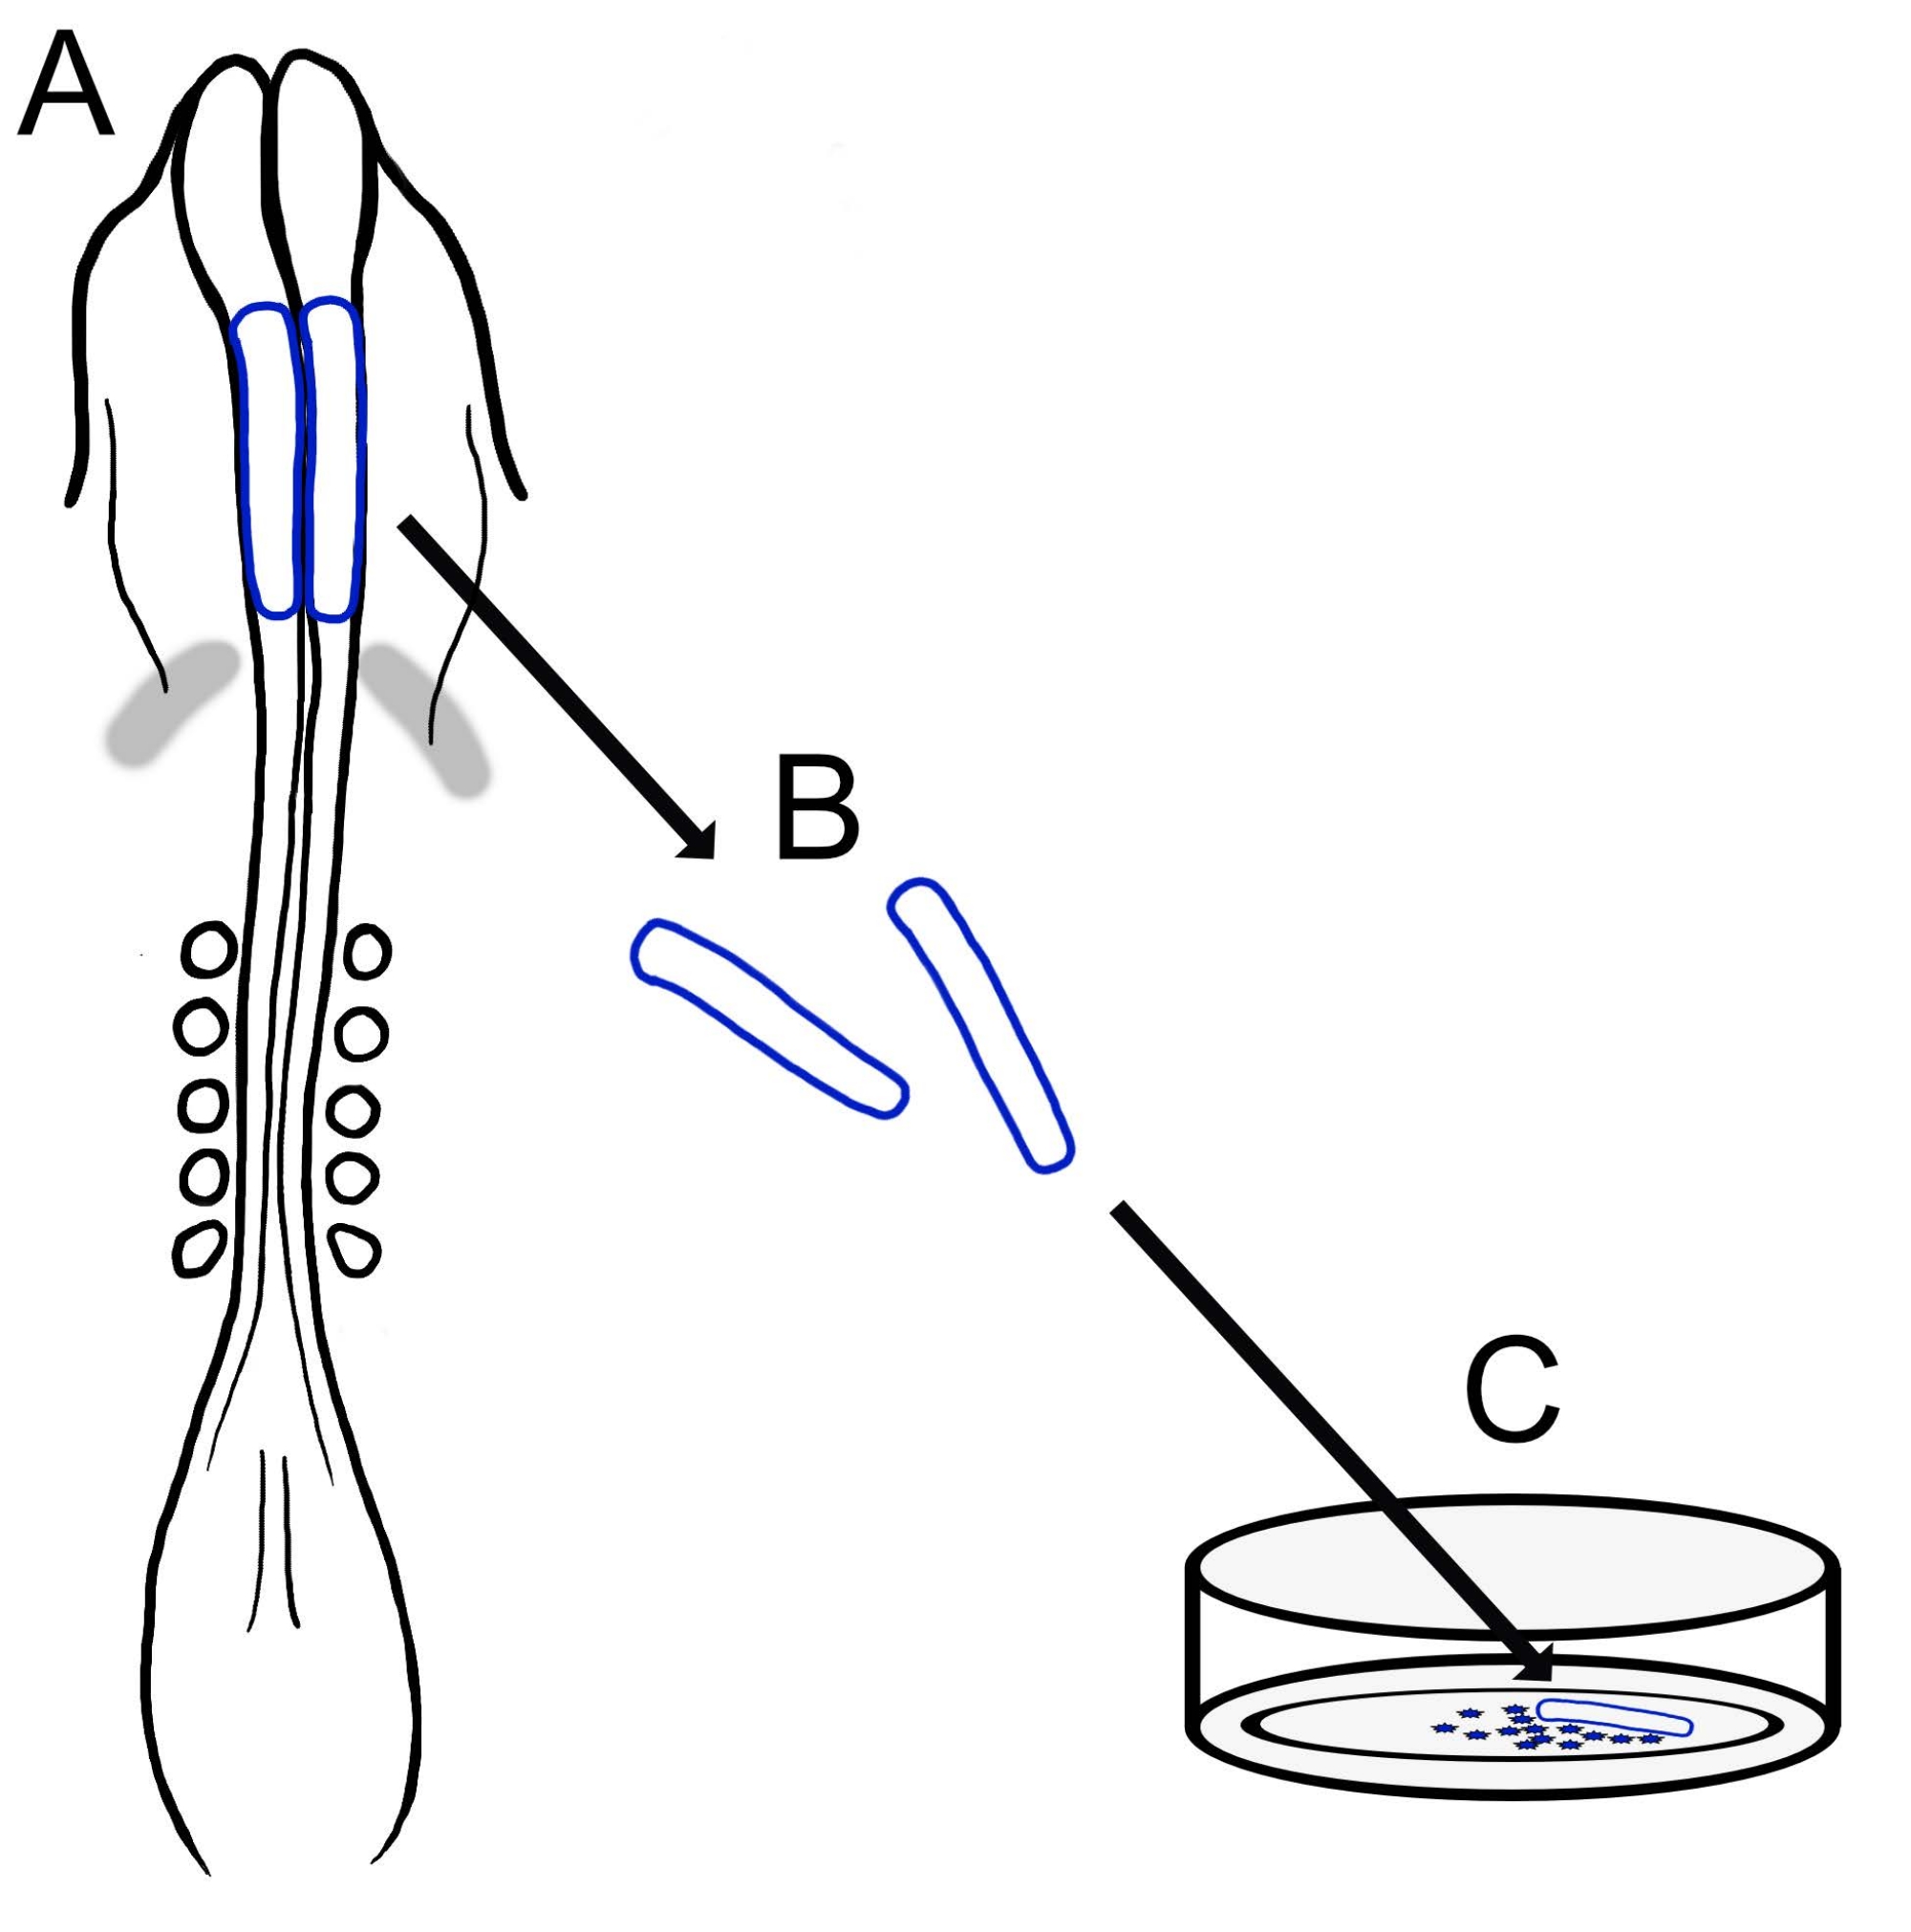
The current protocol describes a versatile technique for preparing chick cranial NCC cultures (Figure 1). Because NCCs migrate readily from explanted neural folds onto a culture substrate, chick NCCs naturally segregate from embryonic tissue, and primary cultures are easily generated. As midbrain NCCs migrate en masse from the cranial neural folds (in contrast to the protracted, cell-by-cell delamination in the trunk15), these cultures consist mainly of migratory cranial neural crest cells, with initial neural fold excision providing a collection method for premigratory NCCs. A basic method for dissecting and culturing chick cranial neural folds is detailed, and suggestions for different applications and variations on this method are offered.

Figure 1: Schematic overview of the chick cranial neural fold culture protocol. (A,B) Cranial neural folds (outlined in blue) are excised from a chick embryo with five somites (shown in dorsal view in A). Grey bands, cardiac crescent. (C) When plated on fibronectin, migratory neural crest cells emerge from the neural folds and disperse onto the substrate. Please click here to view a larger version of this figure.
Protokół
Any variety of Gallus gallus breeds may be used, including White Leghorn, Golden Sex Link, or Rhode Island Red. The chicken eggs used in the present study were of various breeds and obtained from multiple sources, including local farms and hatcheries.
1. Preparation of solutions and materials
- Prepare Ringer's solution by mixing 123.3 mM NaCl, 1.53 mM CaCl2, 4.96 mM KCl, 0.809 mM Na2HPO4, and 0.147 mM KH2PO4 (see Table of Materials). Adjust pH to 7.4 and filter sterilize into 100 mL bottles. Store in a clean, dry location. Do not wash bottles with soap (treat as tissue culture glassware).
- Prepare 1 mg/mL stock solution fibronectin (FN) (see Table of Materials) by dissolving FN in sterile Ringer's solution and store in 100 µL aliquots at -80 °C (stable for at least 4 years).
- Prepare complete culture media by supplementing L15 media with 0.8% L-glutamine, 0.08% penicillin/streptomycin, 10% FBS, and 10% chick embryo extract12. Create 3 mL aliquots and store at -20 °C or -80 °C.
NOTE: If cultures are incubated in a CO2 incubator, DMEM/F12 needs to be substituted for L15, which is buffered for air. - Prepare 4% paraformaldehyde solution in 1x PBS. Adjust pH to 7.4. Create 10 mL aliquots and store them at -20 °C.
CAUTION: Paraformaldehyde must be handled in a fume hood. - Prepare filter paper support frames (approximately 1 cm x 1.5 cm rectangles of paper with two or three punched holes overlapping on the long axis).
- Punch holes along the edge of a large piece of filter paper using a standard three-hole punch, cut/trim the punched edge into a strip, and then cut the strip between the holes into rectangles ~ 1.5 cm in length. Autoclave filter papers before use (optional).
- Gather dissection tools, including fine forceps (#5), blunt forceps, dissection scissors, spring scissors, and sharpened tungsten needles16.
2. Embryo incubation
- Obtain fertilized eggs from any of the sources mentioned above.
- Place the fertilized eggs in an upright position (long axis of the egg vertical with the pointed end down/blunt side up) inside a humidified incubator at 38 °C (100 °F).
- Incubate until four to seven somites have formed (stages 8+-9)17, which takes approximately 35 h.
NOTE: Incubation time can vary significantly depending on the strain, age of hens, season, etc., and must be experimentally determined. Programmable outlet timers are useful for initiating incubation during the night to obtain desired timing. - After removing from the incubator, thoroughly spray the eggs with 70% ethanol and let them dry to disinfect the shells.
NOTE: Embryos can be collected immediately, but letting eggs cool to room temperature decreases the fragility of the yolks and embryo loss during collection.
3. Preparation of culture dishes
- Select neural fold culture dishes (see Table of Materials) appropriate for the downstream application.
- For cultures that will be fixed and stained, use glass coverslips placed into multi-well tissue culture dishes.
NOTE: Coverslips that match the well size will move less with fluid mixing, making explants less likely to shift and more likely to adhere to the coverslip rather than the dish bottom. - Select glass-bottom single chamber or divided chamber dishes (see Table of Materials) for live imaging with an inverted microscope.
- For live imaging on an upright or stereo microscope, use 6-, 12-, or 24-well optically appropriate tissue culture plates.
- Select plastic tissue culture dishes for the mass collection of migratory neural crest cells for high-throughput analyses.
- For cultures that will be fixed and stained, use glass coverslips placed into multi-well tissue culture dishes.
- Add 10 U/mL of penicillin and 10 µg/mL of streptomycin to a 100 mL bottle of sterile Ringer's solution (for example, 100 µL of 10,000 U/mL penicillin and 10,000 µg/mL streptomycin, to make Ringer's P/S). Use Ringer's P/S within 1 week.
- Thaw an aliquot of 1 mg/mL of FN on ice. Dilute with Ringer's P/S to a concentration of 10-100 µg/mL of FN.
- Pipet enough FN solution to cover the bottom of the well or dish. For example, 100 µL per well in a 24-well plate, 500 µL for a 35 mm dish.
- Replace the lid and incubate dishes or plates with FN solution in a humidified incubator (or a covered tray with distilled water-soaked paper towels) at 38 °C (100 °F) for at least 1 h while dissecting neural folds.
4. Isolation of chick embryos
- Take care to maintain the orientation of the egg (the embryo floats to the top of the yolk during incubation). Use scissors or blunt forceps to poke a small hole in the shell, about 1/4-1/3 of the way down the length of the egg.
- Carefully insert the tip of scissors or blunt forceps into the small hole, ensuring not to disrupt the yolk, and cut through the eggshell around the egg, removing the top of the eggshell (Figure 2A).
- Position the embryo for isolation.
NOTE: If the embryo is not ideally located in the shell cup, use blunt forceps to carefully turn the yolk, so the embryo is on the top. Alternatively, pour the yolk into a gloved, cupped hand, being careful not to break the yolk and allowing the albumin to drain away (Figure 2B). Then, the embryo can be positioned by moving the yolk from hand to hand. - Prepare the embryo by gently using the flat edge of closed blunt forceps to wipe away any excess albumin that remains on the yolk's surface covering the embryo (Figure 2C). Excess albumin can also be removed using gentle pressure with a delicate task wiper.
NOTE: Once albumin is cleared away, the yolk's surface should appear textured instead of smooth. Failure to wipe away sufficient albumin will inhibit the adhesion of the filter paper support in section 4, step 4. - Use forceps to place a filter paper support frame over the embryo, with the embryo in the frame's window. Gently press down on the filter paper to adhere it onto the yolk.
- Cut around the outside of the filter paper frame with dissection scissors (Figure 2D). Use forceps or scissor tips to grasp the edge of the frame and gently lift the embryo away from the yolk (Figure 2E). Lifting away at an angle will help remove the embryo cleanly from the yolk.
- Place the embryo with the paper frame side down (embryo ventral side up) into a 60 mm or 100 mm Petri dish filled with Ringer's P/S (Figure 2F). Keep the dish of embryos on ice if collecting for an RNA- or protein-sensitive downstream application.
NOTE: Failure to place embryos ventral side up risks detaching them from their paper frames. Multiple embryos can be collected and stored in Ringer's P/S for up to 1 h before moving to the neural fold dissection steps.
5. Dissecting neural folds
- Transfer an embryo to a clean dish containing Ringer's P/S solution and rinse the embryo by holding the filter paper frame with forceps and gently swishing back and forth to clear away any yolk that obscures the view of the embryo. Exchange the Ringer's P/S or transfer to a fresh dish if it becomes cloudy.
- Position the embryo dorsal/frame side up under a dissecting microscope. Leaving the embryo on the paper frame to keep it stretched taut and held in place, remove the vitelline membrane using forceps to expose the neural folds.
NOTE: If the embryo falls off the paper frame, it can be laid out flat in the dish or pinned to a sylgard coated dish18 for dissection. - Using spring scissors or a sharpened tungsten needle, carefully excise the midbrain neural folds. Include tissue caudal to the expanding optic vesicles and rostral to the hindbrain, where rhombomere constrictions are just beginning to appear (the cardiac crescent is also a useful indicator, Figure 3B,C). Take care to excise the dorsal-most aspect of the neural fold with minimal contaminating neural tube and non-neural ectoderm (Figure 3C).
- Transfer the neural folds to a clean dish containing Ringer's P/S using a P20 pipettor or a sterile, glass Pasteur pipette rinsed with yolky Ringer's P/S (this blocks the plastic or glass to prevent the tissue from sticking). Store collected folds on ice while dissecting additional folds.
6. Plating neural folds
- Thaw an aliquot of complete culture media (section 1, step 3). Add 100 U/mL of penicillin and 100 µg/mL of streptomycin and filter sterilize. Keep prepared media at 37-38 °C while performing other steps.
- Remove culture dishes from the incubator (section 3, step 5). Using a pipettor or Pasteur pipette, remove the FN solution from coverslips, dishes, or wells. After rinsing the FN-coated substrate with Ringer's P/S, add an appropriate volume of complete culture media to the dishes or wells (500 µL for wells in a 24-well plate, 2 mL for a 35 mm dish or a six-well plate).
NOTE: Smaller volumes can preserve expensive reagents (e.g., as low as 200 µL for a 24-well plate) but ensure that the dish is sufficiently humidified to avoid evaporation. - Using a p20 or p200 pipettor, first, rinse the pipette tip with yolky Ringer's P/S to block the plastic and prevent the tissue from sticking. Then, transfer the isolated neural folds onto the FN coated coverslips, taking care to transfer as little Ringer's P/S as possible. Place the fold(s) toward the center of the FN-coated coverslip.
NOTE: One or a few neural folds can be plated on a 12 mm coverslip in a 19 mm well, up to 50 on a 35 mm plate. - After allowing the explants to settle for 10-15 min, place them into a humidified chamber at 38 °C (100 °F) by slowly and carefully carrying the culture dishes with plated neural folds. This will minimize the shifting of neural folds in the wells, ensuring they remain dispersed and adhere to any coverslips.
NOTE: When using L15 (not DMEM), explant culture dishes can also be incubated in an egg incubator using a covered tray with moistened paper towels. - Incubate neural fold cultures in the humidified incubator for the duration of active migration (about 16-20 h total, Figure 4).
7. Fixing and staining of cultured migratory NCCs for morphological analysis
- Remove the culture media with a Pasteur pipette and rinse the wells with filter-sterilized 1x PBS.
- Add 4% paraformaldehyde for 15 min at room temperature.
NOTE: Fixation time may need to be experimentally determined. It is also possible to add paraformaldehyde directly to media for 10 min (50:50), remove, and replace with undiluted 4% paraformaldehyde for 10 min to retain more delicate cellular structures. - Remove paraformaldehyde and rinse three times with 1x PBS.
- Stain fixed NCCs with an appropriate dye for morphological assessment. As an example, staining with Oregon Green conjugated phalloidin is detailed here.
NOTE: Visualizing the actin cytoskeleton with phalloidin19 reveals the structural complexity of migratory NCC with relatively uniform staining intensity; however, phalloidin may not highlight all cell areas. Dyes that label the plasma membrane (e.g., wheat germ agglutinin or DiI) or cytoplasm can also be used, but complicate the imaging of fine protrusions relative to the brightly staining cell body. In addition, immunofluorescence can be performed concurrently to label neural crest cells with HNK-1 or to determine the subcellular localization of a protein of interest7,20.- Remove the final PBS rinse and add PBS + 0.5% Triton X-100 (PBST) + 5% serum (FBS or from another animal appropriate for costaining with an antibody) to cover the coverslips and incubate for 10 min on a platform shaker at room temperature.
- Pipet 200 nM of Oregon Green conjugated phalloidin (diluted in PBST + 5% serum) onto a smooth surface (such as flexible paraffin sealing film) for each coverslip. For a 12 mm coverslip, pipette a 30 µL volume.
- Using a pair of forceps, remove the coverslip from the PBST + 5% serum, ensuring to maintain the orientation of the cells facing upward. Briefly touch the edge of the coverslip to a delicate task wiper to wick off excess liquid.
- Gently place each coverslip cell side down onto the drop of diluted phalloidin. Incubate for 30 min at room temperature. Keep the coverslips in the dark during staining (cover with an aluminum foil-covered dish or place in a drawer).
- During the incubation, add PBST to the wells of the culture dish (750 µL of PBST for each well of a 24-well plate).
- After the incubation period, lift coverslips off of the staining solution and place them back into the culture dish, flipping the coverslip over so the cell side is up. Ensure the coverslip is covered with PBST and place on a platform shaker for 10 min, keeping the coverslips covered and in the dark. Remove PBST and repeat this step two times, for a total of three 10 min washes.
- Place one drop (per coverslip) of mounting media (see Table of Materials) onto a microscope slide. 25 µL volume works well for a 12 mm coverslip.
- After the final wash with PBST, touch the edge of the coverslip to a delicate task wiper to remove excess liquid, keeping track of the cell side of the coverslip.
- Mount the coverslip cell side down by slowly lowering the coverslip at an angle onto the mounting media to avoid creating bubbles. Allow the media to set before imaging.
8. Morphological assessment of cultured migratory NCCs
- Image stained cells and export as .tiff files.
NOTE: A 40x objective works well for imaging cultures, but objectives ranging from 10x (to capture a whole field of migratory NCCs) to 100x (single NCCs) can be used to collect images for morphological assessment. Images in the present study were captured using an inverted multimodal imaging platform (see Table of Materials). - Upload the images into an image analysis software (ImageJ21, see Table of Materials). Click on Image > Duplicate to create a second copy of each image to use for analysis, thus leaving the original unedited, as most image processing cannot be reversed.
- Click on Image > Adjust > Brightness/Contrast and use sliding bars to adjust the brightness or contrast of the images.
- Convert the images to grayscale following the steps below.
- If images are exported in RGB, they will upload in RGB as a merged channel. To separate the images, click on Image > Color > Split Channels to acquire single-channel grayscale images.
- If images are already separated, go to Image > Type > 8-bit to convert file to grayscale.
- Click on Image > Adjust > Threshold to convert to a binary image where pixels are identified as cells (foreground; black) or background (white). Use the sliding bar and/or click on Auto to select the Threshold setting that clearly defines cells from the background.
- If cells are overlapping or staining is not continuous, it may be necessary to process further using the Watershed or Fill Holes functions22. This will separate cells from one another or fill in gaps within cells to be analyzed. Click on Process > Binary > Make Binary to first convert the image into an 8-bit binary format. Then click on Process > Binary > Watershed or Fill Holes.
NOTE: The software will make its best fit for where signals need to be separated or filled in, which can be adjusted further using plug-ins if necessary.
- If cells are overlapping or staining is not continuous, it may be necessary to process further using the Watershed or Fill Holes functions22. This will separate cells from one another or fill in gaps within cells to be analyzed. Click on Process > Binary > Make Binary to first convert the image into an 8-bit binary format. Then click on Process > Binary > Watershed or Fill Holes.
- Select the measurements to be captured. Click on Analyze > Set Measurements and check the Shape Descriptors boxes for analysis of Circularity (Circ.), Aspect Ratio (AR), Roundness (Round), and Solidity.
NOTE: Other measurements may also be included, like Area and Perimeter, depending on the type of analysis needed. - Click on Analyze > Analyze Particles, and set the parameters from the "Analyze Particles" menu.
- Under "Size", roughly estimate how large the cells or particles of interest are in pixels, as background signal or smaller cell debris will also be included if the Size parameter remains set at 0-Infinity (for example, set as 500-Infinity in Figure 5).
NOTE: Adjusting the Size to a tighter range can exclude smaller or larger particles than the ones needed for analysis. - Under "Circularity", leave at 0-1.0 to measure all cell shapes in the image.
- Under "Show", select Bare Outlines from the drop-down menu to inspect the cell outlines selected with the "Analyze Particles" function. Scan the outlines to ensure that overlapping cells are distinguished, but cells are not divided unnecessarily. Also, check the menu boxes for "Display Results", "Summarize", and "Add to Manager".
- Under "Size", roughly estimate how large the cells or particles of interest are in pixels, as background signal or smaller cell debris will also be included if the Size parameter remains set at 0-Infinity (for example, set as 500-Infinity in Figure 5).
- Once all the parameters have been set, click on Ok.
NOTE: Four separate windows will pop up, showing (1) the bare outlines of the cells identified in the image, (2) the cells counted in the image, (3) the results of each cell's measurements, and (4) a summary of the total number of cells counted and their averaged measurements.- If debris was counted, overlapping cells were counted as one, single cells were counted as multiples, or many cells were omitted from the count, go back to the original, unedited image, make another duplicate, and adjust "Threshold" or other parameters.
Wyniki
An overview of the present protocol is shown in Figure 1. The incubated eggs were opened, and the yolk, with the embryo on the surface, was isolated by gently pouring into the palm of a gloved hand (Figure 2A,B). After clearing away the albumin (Figure 2C), filter paper frames were applied to the yolk membrane surrounding the embryo to facilitate cutting and lifting the embryo from the yolk, which begins to spill aw...
Dyskusje
The technique described here provides an adaptable method of isolating chick neural folds and plating them to create cultures of migratory cranial NCCs. These cultures provide simplified 2D conditions for easy analysis of chick NCC migration and morphology that can supplement more technically challenging in ovo imaging methods24,25,26. While this in vitro method is relatively simple, consistent results depend o...
Ujawnienia
The authors have no conflicts of interest.
Podziękowania
We thank Corinne A. Fairchild and Katie L. Vermillion, who participated in developing our version of the chick cranial neural fold culture protocol.
Materiały
| Name | Company | Catalog Number | Comments |
| AxioObserver equipped with an LSM710 confocal scan head controlled by ZEN 3.0 SR software | Zeiss | Used alpha Plan-Apochromat 100x/1.46 Oil DIC M27 objective | |
| CaCl2 | Sigma-Aldrich | C3306 | |
| Chamber dishes (glass bottom, single or divided) | MatTek; Cell Vis | P35G-1.5-14-C (MatTek) X000NOJQGX (Cellvis) X000NOK1OJ (Cellvis) | Single chamber 35 mm or 4 chamber 35 mm |
| Cover glass | Carolina Biological Supply Company | 633029, 633031, 633033, 633035, 633037 | circles, 0.13–0.17 mm thickness, available in 12-25 mm diameter |
| DMEM/F12 | ThermoFisher Scientific | 11320033 | Alternative for L15 media |
| Egg incubator | Sportsman | 1502 | |
| FBS | Life Technologies | 10437-028 | |
| Fibronectin | Fisher Scientific | CB-40008A | |
| Filter paper | Whatman | grade 3MM chromatography | |
| Forceps (blunt) | Fisher Scientific; Thomas Scientific | 08-890 (Fisher);1141W97 (Thomas) | |
| Forceps (fine) | Fine Science Tools | 11252-20 | Dumont #5 |
| Image J | https://fiji.sc/ | Free image analysis software | |
| KCl | Sigma-Aldrich | P3911 | |
| KH2PO4 | Sigma-Aldrich | P0662 | |
| L15 media | Invitrogen | 11415064 | |
| L-glutamine | Invitrogen | 25030 | |
| Mounting Media (Vectashield or ProLong Gold) | Vector Laboratories; Thermofisher Scientific | H-1700 (Vectashield); P36930 (ProLong Gold) | |
| Na2HPO4 | Sigma-Aldrich | S9638 | |
| NaCl | Sigma-Aldrich | S9888 | |
| Paraformaldehyde | Sigma-Aldrich | P6148 | |
| Penicillin/streptomycin | Life Technologies | 15140-148 | 10,000 Units/mL Penicillin; 10,000 mg/mL Streptomycin |
| Petri Dishes | VWR (or similar) | 60 mm, 100 mm | |
| Phalloidin | Sigma-Aldrich | P1951 | multiple flurophores available |
| Pin holder | Fine Science Tools | 26016-12 | For tungsten needle (alternative for spring scissors) |
| Scissors (dissection) | Fine Science Tools | 14061-10 | |
| Spring Scissors | Fine Science Tools | 15000-08 | 2.5 mm cutting edge (alternative for tungsten needle) |
| Sylgard | Krayden | Sylgard 184 | |
| Syringe Filters | Sigma-Aldrich | SLGVM33RS | Millex-GV Syringe Filter Unit, 0.22 µm, PVDF, 33 mm, gamma sterilized |
| Tissue culture dishes | Sarstedt | 83-3900 | 35 mm culture dishes for bulk neural fold cultures |
| Triton X-100 | Sigma-Aldrich | X100 | |
| Tungsten wire | Variety of sources | 0.01" diameter for tungsten needle (alternative for spring scissors) |
Odniesienia
- Pla, P., Monsoro-Burq, A. H. The neural border: Induction, specification and maturation of the territory that generates neural crest cells. Developmental Biology. 444, 36-46 (2018).
- Tang, W., Bronner, M. E. Neural crest lineage analysis: From past to future trajectory. Development. 147 (20), (2021).
- Piacentino, M. L., Li, Y., Bronner, M. E. Epithelial-to-mesenchymal transition and different migration strategies as viewed from the neural crest. Current Opinion in Cell Biology. 66, 43-50 (2020).
- McLennan, R., et al. Neural crest cells bulldoze through the microenvironment using Aquaporin 1 to stabilize filopodia. Development. 147 (1), 185231 (2020).
- Carmona-Fontaine, C., et al. Complement fragment C3a controls mutual cell attraction during collective cell migration. Developmental Cell. 21 (6), 1026-1037 (2011).
- Giovannone, D., et al. Slits affect the timely migration of neural crest cells via robo receptor. Developmental Dynamics. 241 (8), 1274-1288 (2012).
- Vermillion, K. L., Lidberg, K. A., Gammill, L. S. Cytoplasmic protein methylation is essential for neural crest migration. Journal of Cell Biology. 204 (1), 95-109 (2014).
- Yang, X., Li, J., Zeng, W., Li, C., Mao, B. Elongator Protein 3 (Elp3) stabilizes Snail1 and regulates neural crest migration in Xenopus. Scientific Reports. 6 (1), 1-9 (2016).
- Gonzalez Malagon, S. G., et al. Glycogen synthase kinase 3 controls migration of the neural crest lineage in mouse and Xenopus. Nature Communications. 9 (1), 1-15 (2018).
- Bhattacharya, D., Azambuja, A. P., Simoes-Costa, M. Metabolic reprogramming promotes neural crest migration via yap/tead signaling. Developmental Cell. 53 (2), 199-211 (2020).
- Jacques-Fricke, B. T., et al. Profiling NSD3-dependent neural crest gene expression reveals known and novel candidate regulatory factors. Developmental Biology. 475, 118-130 (2021).
- Bronner-Fraser, M., García-Castro, M. Chapter 4 manipulations of neural crest cells or their migratory pathways. Methods in Cell Biology. 87, 75-96 (2008).
- Milet, C., Monsoro-Burq, A. H. Dissection of xenopus laevis neural crest for in vitro explant culture or in vivo transplantation. Journal of Visualized Experiments. (85), e51118 (2014).
- Malagon, S. G. G., et al. Dissection, culture and analysis of primary cranial neural crest cells from mouse for the study of neural crest cell delamination and migration. Journal of Visualized Experiments. (152), e60051 (2019).
- Theveneau, E., Mayor, R. Neural crest delamination and migration: From epithelium-to-mesenchyme transition to collective cell migration. Developmental Biology. 366 (1), 34-54 (2012).
- Conrad, G. W., Bee, J. A., Roche, S. M., Teillet, M. A. Fabrication of microscalpels by electrolysis of tungsten wire in a meniscus. Journal of Neuroscience Methods. 50 (1), 123-127 (1993).
- Hamburger, V., Hamilton, H. L. A series of normal stages in the development of the chick embryo. Journal of Morphology. 88 (1), 49-92 (1951).
- Gammill, L. S., Jacques-Fricke, B., Roffers-Agarwal, J. Embryological and genetic manipulation of chick development. Methods in Molecular Biology. 1920, 75-97 (2019).
- Vandekerckhove, J., Deboben, A., Nassal, M., Wieland, T. The phalloidin binding site of F-actin. The EMBO Journal. 4 (11), 2815-2818 (1985).
- Bronner-Fraser, M. Analysis of the early stages of trunk neural crest migration in avian embryos using monoclonal antibody HNK-1. Developmental Biology. 115 (1), 44-55 (1986).
- Schindelin, J., et al. Fiji: An open-source platform for biological-image analysis. Nature Methods. 9 (7), 676-682 (2012).
- Soille, P., Vincent, L. Determining watersheds in digital pictures via flooding simulations. Visual Communications and Image Processing '90: Fifth in a Series. (1360), 240-250 (1990).
- Haupt, A., Minc, N. How cells sense their own shape - mechanisms to probe cell geometry and their implications in cellular organization and function. Journal of Cell Science. 131 (6), (2018).
- Ezin, M., Fraser, S. Chapter 11 time-lapse imaging of the early avian embryo. Methods in Cell Biology. 87, 211-236 (2008).
- Kulesa, P. M., Bailey, C. M., Cooper, C., Fraser, S. E. In ovo live imaging of avian embryos. Cold Spring Harbor Protocols. 5 (6), (2010).
- McKinney, M. C., Kulesa, P. M. Live imaging of the neural crest cell epithelial-to-mesenchymal transition in the chick embryo. Methods in Molecular Biology. 2179, 107-114 (2021).
- Gustafson, C. M., Roffers-Agarwal, J., Gammill, L. S. Chick cranial neural crest cells release extracellular vesicles that are critical for their migration. Journal of Cell Science. , (2022).
- Williams, R., Sauka-Spengler, T. Ex ovo electroporation of early chicken embryos. STAR Protocols. 2 (2), 100424 (2021).
- Moulton, J. D. Using morpholinos to control gene expression. Current Protocols in Nucleic Acid Chemistry. 68 (1), 4-30 (2017).
- Gandhi, S., et al. A single-plasmid approach for genome editing coupled with long-term lineage analysis in chick embryos. Development. 148 (7), (2021).
- Williams, R. M., et al. Reconstruction of the Global Neural Crest Gene Regulatory Network In Vivo. Developmental Cell. 51 (2), 255-267 (2019).
Przedruki i uprawnienia
Zapytaj o uprawnienia na użycie tekstu lub obrazów z tego artykułu JoVE
Zapytaj o uprawnieniaThis article has been published
Video Coming Soon
Copyright © 2025 MyJoVE Corporation. Wszelkie prawa zastrzeżone