
Abdominal Exam I: Inspection and Auscultation
Overview
Source: Alexander Goldfarb, MD, Assistant Professor of Medicine, Beth Israel Deaconess Medical Center, MA
Gastrointestinal disease accounts for millions of office visits and hospital admissions annually. Physical examination of the abdomen is a crucial tool in diagnosing diseases of the gastrointestinal tract; in addition, it can help identify pathological processes in cardiovascular, urinary, and other systems. As physical examination in general, the examination of the abdominal region is important for establishing physician-patient contact, for reaching the preliminary diagnosis and selecting subsequent laboratory and imaging tests, and determining the urgency of care.
As with the other parts of a physical examination, visual inspection and auscultation of the abdomen are done in a systematic fashion so that no potential findings are missed. Special attention should be paid to potential problems already identified by the patient's history. Here we assume that the patient has already been identified, and has had history taken, symptoms discussed, and areas of potential concern identified. In this video we will not review the patient's history; instead, we will go directly to the physical examination.
Before we get to the examination, let's briefly review surface landmarks of the abdominal region, abdominal anatomy, and topography. Here is a list of useful landmarks: costal margins, xiphoid process, rectus abdominal muscle, linea alba, umbilicus, iliac crest, inguinal ligament, and symphysis pubis. The abdominal exam covers the area down from the xiphoid and costal margins superiorly to the symphysis pubis inferiorly.
For diagnostic and descriptive purposes, the abdomen is subdivided into four quadrants: right upper quadrant (often designated as RUQ), left upper quadrant (LUQ), right lower quadrant (RLQ), and left lower quadrant (LLQ) (Figure 1). The more detailed topography of the abdomen divides it into 9 regions: right and left hypochondriac, right and left lumbar, right and left iliac, and also epigastric, umbilical, and hypogastric regions in the middle (Figure 2).
Remember which organs typically project into each abdominal region (Figure 3). It is essential to know the region's anatomy and topography well to adequately document and interpret a patient's complaints and symptoms, as well as physical findings during the examination.
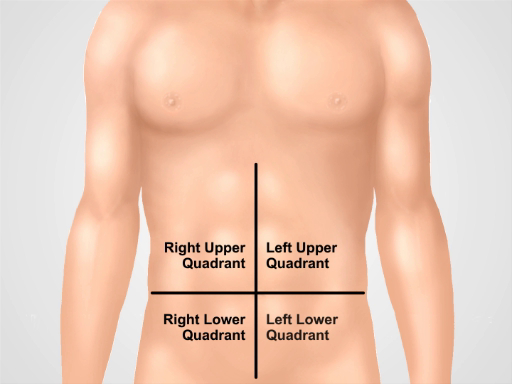
Figure 1. Four abdominal quadrants. The abdomen can be divided into four regions by two imaginary lines intersecting at the umbilicus: right upper quadrant (often designated as RUQ), left upper quadrant (LUQ), right lower quadrant (RLQ), and left lower quadrant (LLQ) are shown.
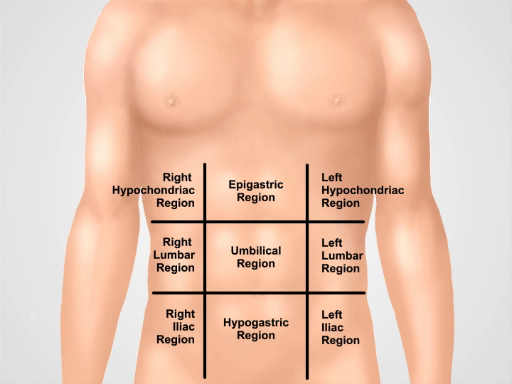
Figure 2. Nine abdominal regions. Midclavicular lines and subcostal and intertubercular planes separate the abdomen into nine regions: epigastric region, right hypochondriac region, left hypochondriac region, umbilical region, right lumbar region, left lumbar region, hypogastric region, right inguinal region, and left inguinal region. Terms for epigastric, umbilical, and hypogastric and suprapubic regions are the most commonly used in clinical practice.
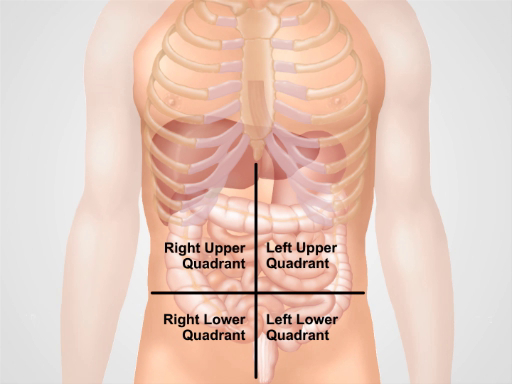
Figure 3. Location of different organs in the four abdominal regions. Organs in the abdominal cavity and their location with respect to four abdominal quadrants.
Procedure
1. Preparation
- Before you start the physical exam of the abdomen, make sure that the patient is comfortable and has emptied his/her bladder.
- Comfortably place the patient in the supine position, possibly with the patient's head supported by a pillow and knees slightly flexed. The patient's arms should be at the side and not folded behind the head, as this tenses the abdominal wall.
- Ask for permission to expose the patient's abdominal area ("Is it ok if I move the sheet to inspect your stomach?"). Drape the patient in a way that maintains modesty on the one hand, but doesn't compromise the exam on the other. The abdomen is exposed from above the xiphoid to the suprapubic region; the groin is exposed as well.
- Make sure there is enough light and that noise is minimized (by turning off TV or radio in the room).
- Before approaching the patient, determine if there is a need for contact precautions.
- Wash your hands (or alternatively use topical antibacterial preparations), and then warm your hands and the stethoscope. As with other parts of a physical examination, position yourself on the patient's right side, and explain to the patient each step of the exam as it progresses.
- Remember: The examination should be performed in a structured fashion, following a particular procedure. The initial comprehensive exam is first, and once some pathological findings are identified, a more detailed examination of those specific findings follows. The areas of pain or tenderness should be examined last. Once the patient is positioned and ready to be examined, the sequence of the procedure is as follows: inspection, auscultation, percussion and palpation. The difference in sequence compared to other parts of examination is based on the fact that palpation can affect bowel sounds, and therefore is done last.
2. Inspection
- Before starting the examination, explain that the patient's abdomen is going to be inspected. ("I need to inspect your stomach now").
- Visually inspect the skin for rashes/ecchymoses, jaundice, dilated veins, striae, lesions, bruises, and scars. If scars are present, ask the patient about them and document them in the patient's history.
- Examine the shape of the abdomen.
- Is it flat, scaphoid, or protuberant? Scaphoid abdomens can be seen in cachectic patients. Global abdominal protuberances can result from gas, fluid, or fat
- Does the abdomen look symmetric or not? Asymmetry is a warning sign and can suggest masses or organomegaly.
- Are parts of the abdomen bulging? Bulging flanks are a sign of accumulation of fluid in the abdomen (ascites).
- Check for visible hernias and abdominal masses
- Pay attention to the presence of visible pulsation or peristalsis, which usually represent a serious problem. Sometimes visible peristalsis can be seen in intestinal obstruction.
- Note the presence of tubes, catheters, and other devices.
- Pay special attention to the umbilical area. Examine for protuberances, inflammation, hernias, shifts along the vertical line, and purplish skin discoloration. Purplish skin discoloration indicates a subcutaneous intraperitoneal bleed and is associated with acute hemorrhagic pancreatitis.
3. Auscultation
Abdominal sounds are typically generated by peristalsis and blood flow, and sometimes friction rubs. Auscultation is performed in two or three cycles, each time listening for a particular sound, rather than trying to listen for all the sounds at the same time. Initially listen to bowel sounds, then focus on vascular sounds or bruits. Finally, while rare, check to see if there are any friction rubs.
- Explain the procedure to the patient ("I am going to listen to your stomach/belly now")
- Pre-warm the stethoscope.
- Using the diaphragm of the stethoscope, listen for bowel sounds over each of the four abdominal quadrants for 30-40 s; note their frequency and character. Gurgling sounds occurring at frequency of 5-34 per min should be heard.
- Bowel sounds are variable, so in an asymptomatic patient absence of bowel sounds requires listening longer. The absence of bowel sounds in a patient with abdominal pain is a warning sign and might indicate paralytic ileus. If bowel sounds appear to be absent, auscultate for up to 3 min in the right lower quadrant. Hyperactive bowel sounds are also abnormal. Increased and high-pitched bowel sounds may be associated with initial stages of bowel obstruction.
- Listen to different vascular structures at 7 different locations (above right renal artery, aorta, left renal artery, iliac arteries, and femoral arteries) for at least 5 s each.
- Audible vascular sounds are called bruits and are caused by turbulent flow in large arteries (e.g., aorta, iliac, renal arteries). During auscultation bruits produce a "swishing" sound. Their presence can indicate renal artery stenosis, abdominal aortic aneurism, and iliac and femoral artery stenosis. Vascular sounds can be heard in 4-20% of healthy individuals, but a systolic-diastolic bruit over renal arteries in a patient with hypertension strongly suggests renovascular disease.
- Listen for friction rubs over the liver and spleen using the bell of the stethoscope. Friction rub is a rare finding that indicates inflammation of the peritoneal surface of the organ from infection, tumor, or infarct.
Application and Summary
In this video we reviewed the anatomy of the abdomen and learned how to perform the first two steps of the abdominal examination: inspection and auscultation. Before starting the exam, make sure that the patient is comfortable, well positioned, and adequately draped. Never examine a patient through a gown. Make sure that your hands are washed and warm. Always ask a patient for permission to perform the examination and explain every step of the procedure. Start with a visual inspection of the abdomen. Make note of abdominal contour and symmetry, skin rashes, scars from previous surgeries and injuries, distended veins, and visible peristalses and pulsations. If the presence of ascites, hernias, or masses are suspected, confirm these findings via additional maneuvers that are addressed later on in this video collection.
Omitting visual inspection and/or auscultation steps are common mistakes during an abdominal examination, and can negatively affect a physician's ability to reach a correct diagnosis. Careful inspection of the abdominal area is especially important. Often times an experienced physician can make a preliminary diagnosis based on a patient's history and inspection alone. A combination of different pathological signs is of particular diagnostic value. For example, jaundice, ascites, spider angiomas, and caput medusae (distended veins surrounding the umbilicus) can be simultaneously present in a patient with liver cirrhosis.
Once visual inspection is completed, auscultation follows. Auscultate separately for bowel sounds and for bruits. Always perform auscultation before abdominal percussion and palpation. Abdominal auscultation is of clinical significance, especially in a symptomatic patient. The findings should be interpreted in the context of the patient's history: for example, the absence of bowel sounds in a patient with abdominal pain suggests an abdominal catastrophe (such as peritonitis or the later stages of an intestinal obstruction), but is normal in postoperative patients for a few days following abdominal surgery.
Tags
Skip to...
Videos from this collection:

Now Playing
Abdominal Exam I: Inspection and Auscultation
Physical Examinations II
202.6K Views

Eye Exam
Physical Examinations II
77.1K Views

Ophthalmoscopic Examination
Physical Examinations II
67.9K Views

Ear Exam
Physical Examinations II
55.1K Views

Nose, Sinuses, Oral Cavity and Pharynx Exam
Physical Examinations II
65.7K Views

Thyroid Exam
Physical Examinations II
105.0K Views

Lymph Node Exam
Physical Examinations II
387.3K Views

Abdominal Exam II: Percussion
Physical Examinations II
248.2K Views

Abdominal Exam III: Palpation
Physical Examinations II
138.5K Views

Abdominal Exam IV: Acute Abdominal Pain Assessment
Physical Examinations II
67.3K Views

Male Rectal Exam
Physical Examinations II
114.4K Views

Comprehensive Breast Exam
Physical Examinations II
87.6K Views

Pelvic Exam I: Assessment of the External Genitalia
Physical Examinations II
306.9K Views

Pelvic Exam II: Speculum Exam
Physical Examinations II
150.4K Views

Pelvic Exam III: Bimanual and Rectovaginal Exam
Physical Examinations II
147.7K Views
Copyright © 2025 MyJoVE Corporation. All rights reserved