복부 시험 I: 검사 및 Auscultation
Overview
출처: 알렉산더 골드파브, MD, 의학 조교수, 베스 이스라엘 Deaconess 의료 센터, MA
위장병은 매년 수백만 명의 사무실 방문과 입원을 차지합니다. 복부의 신체 검사는 위장관의 질병을 진단하는 데 중요한 도구입니다. 또한 심혈관, 오줌 및 기타 시스템에서 병리학 적 과정을 식별하는 데 도움이 될 수 있습니다. 일반적으로 신체 검사로서, 복부 지역의 검사는 의사-환자 접촉을 확립하고, 예비 진단에 도달하고, 후속 실험실 및 화상 진찰 시험을 선택하고, 배려의 긴급성을 결정하기 위한 중요합니다.
신체 검사의 다른 부분과 마찬가지로, 복부의 육안 검사 및 유도는 잠재적 인 발견을 놓치지 않도록 체계적인 방식으로 수행됩니다. 환자의 역사에 의해 이미 확인된 잠재적인 문제에 특별한 주의를 기울여야 합니다. 여기에서 우리는 환자가 이미 확인되었다는 것을 가정하고, 기록을 취했다, 현상 토론, 및 잠재적인 관심사의 지역이 확인되었습니다. 이 비디오에서 우리는 환자의 역사를 검토하지 않습니다. 대신, 우리는 신체 검사에 직접 갈 것입니다.
시험에 응시하기 전에 복부 부위의 표면 랜드마크, 복부 해부학 및 지형을 간략하게 검토해 보겠습니다. 여기에 유용한 랜드 마크의 목록입니다 : 비용 마진, xiphoid 과정, 정류 복근, 리나 알바, 움빌리쿠스, 일악 문장, 잉구인대, 심칭 음모. 복부 검사는 심포시스 pubis보다 열등하게 시포이드와 비용 마진에서 아래로 영역을 다룹니다.
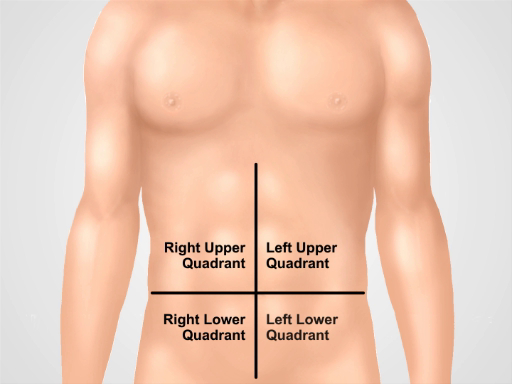
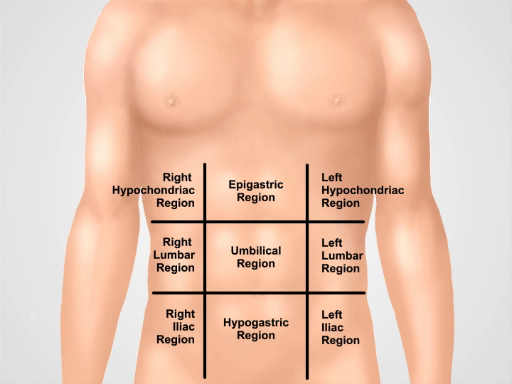
진단 및 설명 목적을 위해 복부는 오른쪽 위 사분면(종종 RUQ로 지정됨), 왼쪽 상부 사분면(LUQ), 오른쪽 하단 사분면(RLQ), 왼쪽 하부 사분면(LLQ)(그림 1)의네 개의 사분면으로 세분화됩니다. 복부의 더 상세한 지형은 9개의 지역으로 분할합니다: 오른쪽및 좌측 히포콘드리아, 좌우 요추, 좌우 요추, 및 또한 상피위, 탯줄 및 중간위부위(그림 2).
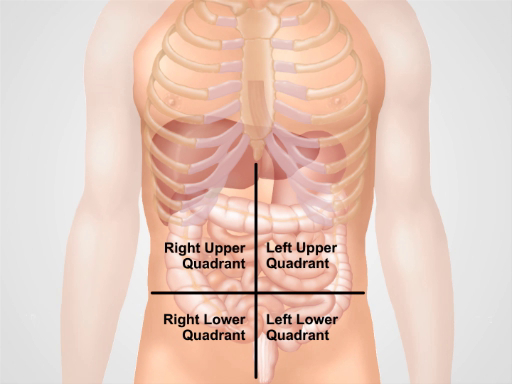
일반적으로 각 복부 부위로 투영되는 장기를 기억하십시오(그림3). 환자의 불만과 증상뿐만 아니라 검사 중 신체적 발견을 적절하게 문서화하고 해석하기 위해 이 지역의 해부학 과 지형을 잘 아는 것이 필수적입니다.

그림 1. 4개의 복부 사분면. 복부는 배빌리쿠스에서 교차하는 두 개의 가상 선으로 나눌 수 있습니다: 오른쪽 상부 사분면(종종 RUQ로 지정), 왼쪽 상부 사분면(LUQ), 오른쪽 하부 사분면(RLQ), 왼쪽 하부 사분면(LLQ)이 표시됩니다.

그림 2. 9개의 복부 지역. 중구 선과 하부 및 중구 평면은 복부를 9개의 지역으로 분리합니다: 상복부 지역, 오른쪽 hypochondriac 지역, 좌측 hypochondriac 지역, 탯줄 지역, 오른쪽 요추 지역, 왼쪽 요추 지역, 저위지역, 오른쪽 인기구 지역 및 좌식 인구 부위. 상복부, 배꼽, 저위 및 수부부류 부위에 대한 용어는 임상 실습에서 가장 일반적으로 사용됩니다.

그림 3. 4개의 복부 지구에 있는 다른 기관의 위치. 복강내 의 장기와 4 개의 복부 사분면에 관하여 그들의 위치.
Procedure
1. 준비
- 복부의 신체 검사를 시작하기 전에 환자가 편안하고 방광을 비우는지 확인하십시오.
- 환자를 척추 위치에 편안하게 배치하면 베개와 무릎이 약간 구부러져 환자의 머리를 지지할 수 있습니다. 환자의 팔은 측면에 있어야하고 머리 뒤에 접히지 않아야합니다.
- 환자의 복부 부위를 노출할 수 있는 허가를 요청하십시오("시트를 움직여 위를 검사하면 괜찮습니까?"). 한편으로는 단정함을 유지하는 방식으로 환자를 드레이프하지만 다른 한편으로는 시험을 손상시키지 않습니다. 복부는 시포이드 위에서 슈프라푸빅 부위에 노출된다; 사타구니도 노출됩니다.
- 충분한 조명이 있고 소음이 최소화되는지 확인하십시오(룸에서 TV 나 라디오를 끄면).
- 환자에게 접근하기 전에 접촉 예방 조치가 필요한지 확인하십시오.
- 손을 씻거나 (또는 국소 항균 제제를 사용) 손과 청진기를 따뜻하게하십시오. 신체 검사의 다른 부분과 마찬가지로 환자의 오른쪽에 자신을 배치하고
Application and Summary
이 비디오에서 우리는 복부의 해부학을 검토하고 복부 검사의 처음 두 단계를 수행하는 방법을 배웠습니다: 검사 및 auscultation. 시험을 시작하기 전에 환자가 편안하고 잘 배치되고 적절하게 드레이프되었는지 확인하십시오. 가운을 통해 환자를 검사하지 마십시오. 손이 씻고 따뜻해졌는지 확인하십시오. 항상 환자에게 검사를 수행하고 절차의 모든 단계를 설명 할 수있는 권한을 요청하십시오. ?...
Tags
건너뛰기...
이 컬렉션의 비디오:

Now Playing
복부 시험 I: 검사 및 Auscultation
Physical Examinations II
202.6K Views

눈 검사
Physical Examinations II
77.0K Views

안과 검사
Physical Examinations II
67.8K Views

귀 시험
Physical Examinations II
55.0K Views

코, 부비동, 구강 및 인두 검사
Physical Examinations II
65.6K Views

갑상선 검사
Physical Examinations II
104.9K Views

림프절 시험
Physical Examinations II
387.1K Views

복부 시험 II: 타악기
Physical Examinations II
248.1K Views

복부 시험 III: 심포지엄
Physical Examinations II
138.5K Views

복부 시험 IV: 급성 복부 통증 평가
Physical Examinations II
67.2K Views

남성 직장 시험
Physical Examinations II
114.3K Views

종합 유방 시험
Physical Examinations II
87.5K Views

골반 시험 I: 외부 생식기의 평가
Physical Examinations II
306.6K Views

골반 시험 II: 스펙큘럼 시험
Physical Examinations II
150.3K Views

골반 시험 III: 양수동 및 교구 시험
Physical Examinations II
147.6K Views
Copyright © 2025 MyJoVE Corporation. 판권 소유