
בדיקה עיניים
Overview
מקור: ריצ'רד גליקמן-סיימון, MD, פרופסור עוזר, המחלקה לבריאות הציבור ורפואת הקהילה, בית הספר לרפואה של אוניברסיטת טאפטס, תואר שני
האופטלמוסקופים הפשוטים ביותר מורכבים מפתם להסתכל דרכו, מחוון דיופטר ודיסק לבחירת עדשות. האופטלמוסקופ משמש בעיקר לבחינת הפונדוס, או הקיר הפנימי של העין האחורית, המורכבת מהכורואיד, הרשתית, הגומה, המקולה, הדיסק האופטי וכלי הרשתית (איור1). גלגל העין הכדורי אוסף וממקד אור בתאים הנוירו-חושיים של הרשתית. האור נשבר כשהוא עובר ברצף דרך הקרנית, העדשה והגוף הזגוגות.
נקודת הציון הראשונה שנצפתה במהלך הבדיקה ההולכת וגוית היא הדיסק האופטי, שם נכנסים עצב הראייה וכלי הרשתית לחלק האחורי של העין(איור 2). הדיסק מכיל בדרך כלל פיזיולוגית לבנבנית מרכזית שאליה נכנסים כלי הדם; זה בדרך כלל תופס פחות ממחצית הקוטר של הדיסק כולו. רק לרוחב וקצת נחות הוא הגומה, אזור מעגלי כהה המתויר את נקודת הראייה המרכזית. סביב זה יש את המקולה. נקודה עיוורת הטמפורלית של כ-15° לקו המבט נובעת ממחסור בתאי קולטני אור בדיסק האופטי.
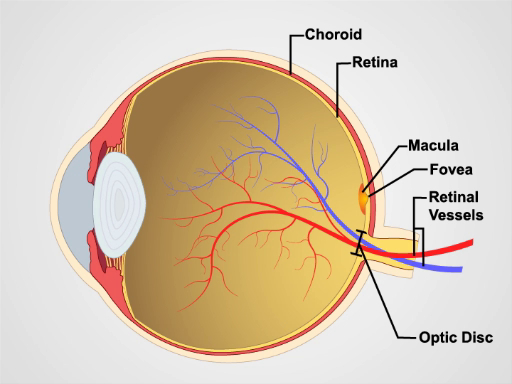
איור 1. אנטומיה של העין. תרשים המציג מבט קשתי של העין האנושית עם המבנים המסומנים.

איור 2: רשתית רגילה. תמונה המציגה מבט אופטלמוסקופי על הרשתית הרגילה.
Procedure
מאז טיפות עיניים mydriatic בדרך כלל לא משמשים בפועל כללי, הנוף של fundus מוגבל רק חלק של הרשתית האחורית. להכיר תכונות אלה לפני שתנסה לבדוק את המטופל.
- אלא אם כן שגיאות השבירה של המטופל מקשות על התמקדות ברשתית, בדרך כלל עדיף להסיר את המשקפיים שלך לבדיקה.
- לאחר החשכת החדר, הפעל את האופטלמוסקופ והאיר את האור על ידך או על הקיר.
- סובבו את דיסק העדשה עד שניתן יהיה לראות את עיגול האור הלבן הגדול ביותר, ומחוון הדיופטר קורא 0, כלומר עדשת אופטלמוסקופ אינה מתכנסת ואינה מפזרת את האור.
- שמור את האצבע המורה על דיסק הע
Application and Summary
הבחינה הרפטלמולוגית היא כנראה המאתגרת ביותר עבור התלמידים לשלוט. עם הזמן, עם זאת, זה הופך לשגרה. זהו גם אחד החלקים הפוריים ביותר של הבדיקה הגופנית, שכן הוא לא רק מציע חלון למצב העין, אלא גם מספק ראיות למחלה במקומות אחרים בגוף. לחץ תוך גולגולתי גבוה ממגוון סיבות עלול להוביל לנפיחות של עצב הרא?...
Skip to...
Videos from this collection:

Now Playing
בדיקה עיניים
Physical Examinations II
67.9K Views

בדיקת עיניים
Physical Examinations II
77.1K Views

בדיקת אוזניים
Physical Examinations II
55.1K Views

אף, סינוסים, חור הפה ובדיקת הלוע
Physical Examinations II
65.7K Views

בדיקת בלוטת התריס
Physical Examinations II
105.0K Views

בדיקת בלוטות לימפה
Physical Examinations II
387.3K Views

בדיקת בטן I: בדיקה ואוסטרליציה
Physical Examinations II
202.6K Views

בדיקת בטן II: כלי הקשה
Physical Examinations II
248.2K Views

בדיקת בטן III: מישוש
Physical Examinations II
138.5K Views

בדיקת בטן 4: הערכת כאבי בטן חריפה
Physical Examinations II
67.3K Views

מבחן רקטלי גברי
Physical Examinations II
114.4K Views

בדיקת חזה מקיפה
Physical Examinations II
87.6K Views

בדיקת אגן I: הערכת איברי המין החיצוניים
Physical Examinations II
306.9K Views

בדיקת אגן II: בדיקת ספקולום
Physical Examinations II
150.4K Views

בדיקת אגן III: מבחן דו-מנלי וריקטווגינלי
Physical Examinations II
147.7K Views
Copyright © 2025 MyJoVE Corporation. All rights reserved