
Células solares sensibilizadas por corante
Visão Geral
Fonte: Tamara M. Powers, Departamento de Química da Texas A&M University
O mundo moderno de hoje requer o uso de uma grande quantidade de energia. Enquanto aproveitamos a energia de combustíveis fósseis, como carvão e petróleo, essas fontes não são renováveis e, portanto, o fornecimento é limitado. Para manter nosso estilo de vida global, devemos extrair energia de fontes renováveis. A fonte renovável mais promissora, em termos de abundância, é o Sol, que nos fornece energia solar mais do que suficiente para abastecer totalmente nosso planeta muitas vezes.
Então, como extraimos energia do sol? A natureza foi a primeira a descobrir: a fotossíntese é o processo pelo qual as plantas convertem água e dióxido de carbono em carboidratos e oxigênio. Esse processo ocorre nas folhas das plantas, e conta com os pigmentos de clorofila que colorem as folhas verdes. São essas moléculas coloridas que absorvem a energia da luz solar, e essa energia absorvida que impulsiona as reações químicas.
Em 1839, Edmond Becquerel, então um físico francês de 19 anos experimentando no laboratório de seu pai, criou a primeira célula fotovoltaica. Ele iluminou uma solução ácida de cloreto de prata que estava ligada a eletrodos de platina que geravam uma tensão e corrente. 1 Muitas descobertas e avanços foram feitos no final do séculoXIX e primeiro semestre do séculoXX, e foi apenas em 1954 que a primeira célula solar prática foi construída pela Bell Laboratories. A partir da década de 1950, as células solares eram usadas para alimentar satélites no espaço. 2
Células solares são dispositivos elétricos que utilizam a luz para criar uma corrente. Este vídeo demonstra a preparação e o teste de um desses tipos de célula, a célula solar sensibilizada por corante (DSSC). Inventado pela primeira vez na UC Berkeley por Brian O'Regan e Michael Grätzel, Grätzel prosseguiu este trabalho na École Polytechnique Fédérale de Lausanne, na Suíça, culminando no primeiro DSSC altamente eficiente em 1991. 3 Essas células solares, como as plantas, usam um corante para ajudar a aproveitar a energia do sol.
Procedimento
1. Preparação da pasta TiO2
- Masse 6 g de pó de TiO2 coloidal, e coloque-o em uma argamassa.
- Adicione cuidadosamente 2-3 mL de vinagre ao TiO2, e comece a moer a suspensão com o pilão até que uma pasta uniforme seja obtida. A moagem serve para quebrar aglomerados agregados no pó.
- Continue adicionando vinagre, em ~ incrementos de 1 mL durante a moagem, até ~ 9 mL de volume total. Antes de cada adição, a consistência da pasta deve ser uniforme e livre de caroços
Resultados
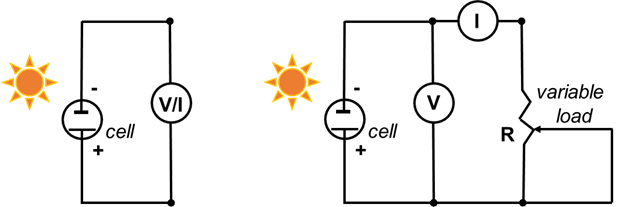
Para cada ponto de dados coletado nas etapas 6.5.3-6.5.4, calcule a densidade atual (mA/cm2) e a densidade de energia (mW/cm2). Para calcular a densidade atual, divida a corrente pela área superficial do filme que foi determinada na etapa 2.7. Para calcular a densidade de energia, multiplique a tensão por densidade de corrente. Plote a corrente (mA) versus tensão (mV) para os dados coletados nas etapas 6.3, 6.4 e 6.5.3-6.5.4. Plote a densidade atual versus volts p...
Aplicação e Resumo
Este vídeo mostrou a preparação e análise de um simples DSSC.
As células solares estão se tornando mais comuns, e há muita pesquisa sendo feita para avançar suas performances. Células solares tradicionais baseadas em semicondutores de silício são usadas para fazer painéis solares que são usados no espaço e na Terra. O Aeroporto Internacional de Denver faz uso do clima ensolarado do Colorado e tem quatro matrizes solares que fornecem 6% das necessidades energétic...
Referências
- Williams, R. Becquerel Photovoltaic Effect in Binary Compounds. J Chem Phys, 32 (5), 1505-1514 (1960).
- Perlin (2005), Late 1950s - Saved by the Space Race", Solar Evolution - The history of Solar Energy. The Rahus Institute. Retrieved 28 June 2016.
- Regan, B., Gratzel, M. Nature, 353, 737-740 (1991).
- Miessler, G. L., Fischer, P. J., Tarr, D. A. Inorganic Chemistry, Pearson, 2014.
- Wikipedia page: Dye-sensitized solar cell,
- Smestad, G. P., Grätzel, M. Demonstrating Electron Transfer and Nanotechnology: A Natural Dye-Sensitized Nanocrystalline Energy Converter. J Chem Ed. 75 (6), 752 (1998).
- Burschka, J., Pellet, N., Moon, S.-J., Humphry-Baker, R., Nazeeruddin, M. K., Grätzel, M. Sequential deposition as a route to high-performance perovskite-sensitized solar cells. Nature, 499 (7458), 316-9 (2013).
Tags
Pular para...
Vídeos desta coleção:

Now Playing
Células solares sensibilizadas por corante
Inorganic Chemistry
15.8K Visualizações

Síntese de um metaloceno de Ti(III) usando a técnica da linha de Schlenk
Inorganic Chemistry
31.6K Visualizações

GloveBox e Sensores de Impurezas
Inorganic Chemistry
18.6K Visualizações

Purificação do ferroceno por sublimação
Inorganic Chemistry
54.7K Visualizações

O Método Evans
Inorganic Chemistry
68.6K Visualizações

Difração de Raios-X de Monocristais e de Pó
Inorganic Chemistry
104.7K Visualizações

Espectroscopia de ressonância paramagnética eletrônica (EPR)
Inorganic Chemistry
25.5K Visualizações

Espectroscopia Mössbauer
Inorganic Chemistry
22.0K Visualizações

Interação Ácido-Base de Lewis em Ph3P-BH3
Inorganic Chemistry
38.9K Visualizações

Estrutura do ferroceno
Inorganic Chemistry
79.6K Visualizações

Aplicação da Teoria dos Grupos à Espectroscopia de IV
Inorganic Chemistry
45.5K Visualizações

Teoria do Orbital Molecular (TOM)
Inorganic Chemistry
35.4K Visualizações

Pás de Roda Quádrupla com Ligação Metal-Metal
Inorganic Chemistry
15.3K Visualizações

Síntese de um Complexo de Cobalto(II) Transportador de Oxigênio
Inorganic Chemistry
51.7K Visualizações

Iniciação fotoquímica de reações de polimerização radical
Inorganic Chemistry
16.8K Visualizações
Copyright © 2025 MyJoVE Corporation. Todos os direitos reservados