A subscription to JoVE is required to view this content. Sign in or start your free trial.
Method Article
Cultivation of Green Microalgae in Bubble Column Photobioreactors and an Assay for Neutral Lipids
In This Article
Summary
Here, we present a protocol to construct lab-scale bubble column photobioreactors and use them to culture microalgae. It also provides a method for the determination of the culture growth rate and neutral lipid content.
Abstract
There is significant interest in the study of microalgae for engineering applications such as the production of biofuels, high value products, and for the treatment of wastes. As most new research efforts begin at laboratory scale, there is a need for cost-effective methods for culturing microalgae in a reproducible manner. Here, we communicate an effective approach to culture microalgae in laboratory-scale photobioreactors, and to measure the growth and neutral lipid content of that algae. Instructions are also included on how to set up the photobioreactor system. Although the example organisms are species of Chlorella and Auxenochlorella, this system can be adapted to cultivate a wide range of microalgae, including co-cultures of algae with non-algae species. Stock cultures are first grown in bottles to produce inoculum for the photobioreactor system. Algae inoculum is concentrated and transferred to photobioreactors for cultivation in batch mode. Samples are collected daily for the optical density readings. At the end of the batch culture, cells are harvested by centrifuge, washed, and freeze dried to obtain a final dry weight concentration. The final dry weight concentration is used to create a correlation between the optical density and the dry weight concentration. A modified Folch method is subsequently used to extract total lipids from the freeze-dried biomass and the extract is assayed for its neutral lipid content using a microplate assay. This assay has been published previously but protocol steps were included here to highlight critical steps in the procedure where errors frequently occur. The bioreactor system described here fills a niche between simple flask cultivation and fully-controlled commercial bioreactors. Even with only 3-4 biological replicates per treatment, our approach to culturing algae leads to tight standard deviations in the growth and lipid assays.
Introduction
The application of microalgae in engineering and biotechnology has attracted great interest in recent years. Microalgae are being studied for use in wastewater treatment1,2,3,4, biofuel production5,6,7,8, and the production of nutraceuticals and other high value products9,10. Algae are also being genetically modified at greater rates in an effort to improve their fitness for specific engineering applications11,12. Consequently, there is great interest in experimentation with industrially relevant organisms in controlled settings. The purpose of this method is to communicate an effective approach to culture microalgae in a controlled laboratory environment, and to measure the growth and neutral lipid content of that algae. Improving growth rates and neutral lipid content of microalgae have been identified as two key bottlenecks toward commercialization of algal biofuels13.
A wide range of approaches have been used to culture algae for experimental purposes. In general, these approaches can be divided between large-scale outdoor cultivation and small-scale indoor cultivation. Outdoor cultivation in photobioreactors and open ponds is appropriate for experimentation aimed at scaling up processes that have already been proven at laboratory scale (e.g., to test scale-up of a new high-lipid strain of algae)14. However, indoor small-scale cultivation is appropriate when developing new or improved algae strains or performing experiments aimed at understanding biological mechanisms. In these latter cases, a high-degree of experimental control is required to tease out subtle changes in biological behavior. To that end, axenic cultures are often required in order to minimize the complex biotic factors associated with other organisms (e.g. bacteria, other algae) that inevitably grow in large-scale outdoor systems. Even when studying interactions among algae and other organisms, we have found that use of highly-controlled experimental conditions is helpful when examining molecular exchange among organisms15,16,17.
Within the category of small-scale indoor algae cultivation, a range of approaches have been used. Perhaps the most common approach is to grow algae in Erlenmeyer flasks on a shaker table beneath a light bank18,19. Exchange of oxygen and CO2 takes place by passive diffusion through a foam plug in the top of the flask. Some researchers have improved this set-up through active aeration of the flasks20. Another approach is to cultivate algae in bottles, mixed by stir bar and active aeration. Despite their simplicity, we have found that the use of flasks and bottles often leads to inconsistent results among biological replicates. Presumably this is due to position effects - different positions receive different amounts of light, which also affect internal reactor temperatures. Daily rotation of reactors to new positions can help but does not alleviate the problem because certain stages of algae growth (e.g., early exponential) are more sensitive to positional effects than others (e.g., log phase).
On the opposite side of the spectrum of technological sophistication are fully-controlled commercial photobioreactors. These systems continuously monitor and adjust conditions in the reactor to optimize algae growth. They have programmable lighting, real-time temperature control, and pH control. Unfortunately, they are expensive and typically cost several thousand dollars per reactor. Most scientific and engineering journals require biological replication of results, necessitating the purchase of multiple bioreactors. We present here a bubble column reactor system that bridges the divide between the simple (flask) and sophisticated (fully-controlled bioreactor) approaches for lab-scale algae cultivation. Bubble columns use rising gas bubbles to facilitate gas exchange and mix the reactor. This approach provides some degree of control over the lighting and temperature but does so in a way that is cost-effective. Moreover, we have found this system to yield highly consistent results among biological replicates, reducing the required number of biological replicates needed in order to obtain statistically significant results when compared to the flask or bottle approach. We have also used this system to successfully cultivate mixtures of algae and bacteria21. In addition to algae cultivation, we outline a procedure for measuring the neutral lipid content in the cultured algae. The latter method has been published elsewhere22, but we include the procedure here to provide step-by-step instructions for how to employ it successfully.
Protocol
1. Setup of Bubble Column Photobioreactors
- Construct a set of vented lids from the plastic lids that came with the 1 L glass bottles and hybridization tubes (see Figure 1 for schematic and photos). Construct lids for the humidifier, mixing trap, each air lift photobioreactor, and each bottle reactor.
- Drill ¼” holes in the lid: 2 holes are needed for bioreactor and humidifier lids; 3 holes are needed for the mixing trap.
- Slip a ¼” O-ring over the threads of a 1/8” panel mount Luer fitting, and slide this into the ¼” hole drilled in the lid (Figure 1A).
- Slip a second ¼” O-ring over the threads so that the lid is sandwiched between the two O-rings. Slip a locknut onto the threads and tighten to fix the panel mount Luer in place.
- Snap lock rings onto the exposed male Luer projecting from the lid. Repeat steps 1.1.2-1.1.4 for each hole in the lid.
- For lids that will be used on bubble column and bottle reactors, attach 1/8” female Luer to barb fittings to 1.5” pieces of 1/8” ID PVC tubing. Attach these to each of the exposed male Luer fittings on the lid.
- Connect a check valve (pointing away from the lid) to the free end of one of the 1/8” pieces.
NOTE: This will serve as the exhaust port for the bioreactor. - Connect a male Luer to barb fitting to the second piece of 1/8” tubing projecting from the lid. Click the rotating lock ring into place and fasten a 0.2 μm air filter to this.
NOTE: This will serve as the inlet port for the reactor.

Figure 1. Schematic and photos for constructing bioreactors. (A) Schematic for construction of the bioreactor lids (B) photo of the assembled bioreactor lid, and (C) photo of the assembled lid used for the humidifier. Note that the humidifier fittings should be coated in water-proof silicone to ensure an airtight seal with the lid. Please click here to view a larger version of this figure.
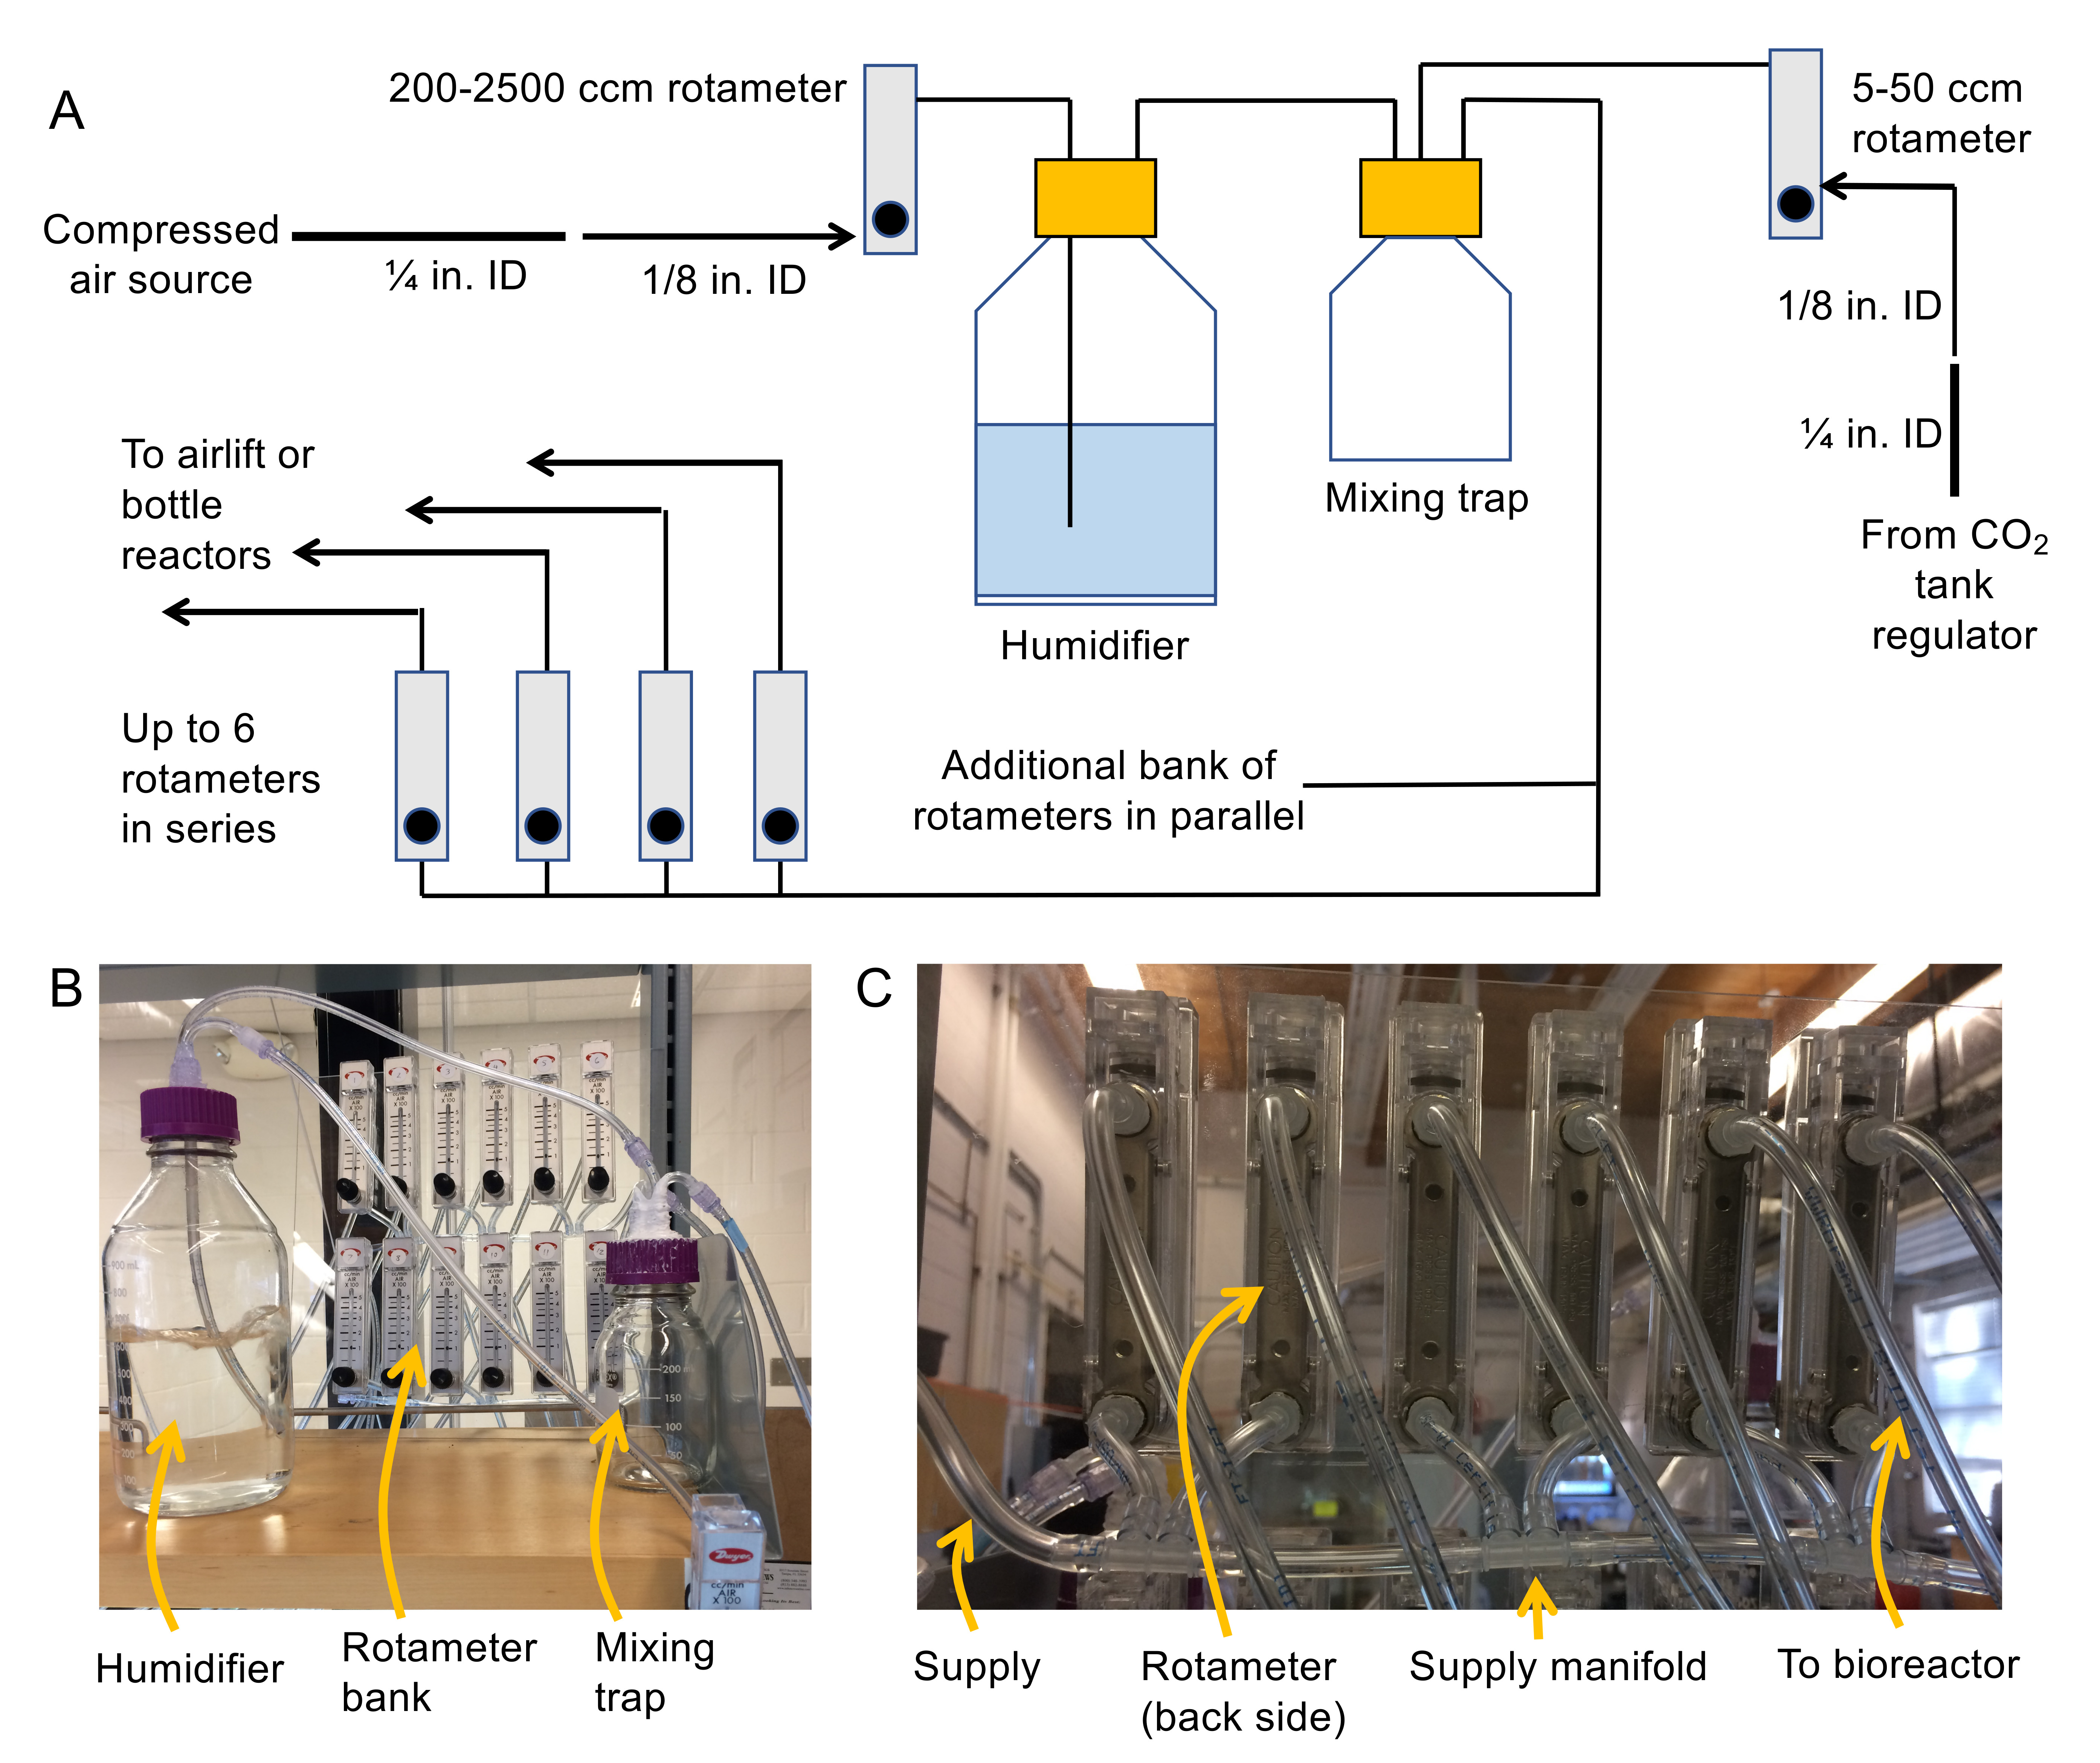
- Assemble the air delivery system (see Figure 2A and 2B for a schematic and photo).
- Attach 1/8” NPT thread to barb fittings to the inlets and outlets on the back of each rotameter.
NOTE: 200-2,500 cm3/min rotameters are for air pressure modulation upstream of the humidifier, 100-1,000 cm3/min rotameters are for bottle reactors, 50-500 cm3/min rotameters are for air lift bioreactors, and 5-50 cm3/min rotemeters are for CO2 flow regulation. It is recommended to mount rotameters to a fixed surface (e.g. plastic sheet) so they do not fall over during operation. - Shut off the compressed air source, then connect ¼” ID flexible PVC tubing to the compressed air source with a hose clamp. Step down the hose diameter to 1/8” ID PVC flexible tubing using a ¼” female to barb fitting and a 1/8” male to barb fitting.
- Connect the free end of the 1/8” ID tubing to the inlet of a 200-2,500 cm3/min rotameter.
NOTE: The outlet of this rotameter will feed the humidifier bottle via 1/8” ID tubing. - Connect the 1/8” tubing to an inlet to a vented lid (use a female Luer to barb fitting to make the connection). Then connect a second piece of 1/8” tubing to the inside of the panel mount fitting.
NOTE: This piece will hang down into the humidifier and bubble air through the water. - Attach 1/8” female Luer to barb fittings to each end of a piece of 1/8” ID tubing and use this piece to connect the outlet of the humidifier to the inlet of the mixing trap.
- In the same manner as 1.2.5, connect the outlet of the CO2 regulator to a second port on the mixing trap.
- Construct a manifold using 1/8” tubing and 1/8” multiport barb (see Figure 2C) to feed air into the rotameter banks.
NOTE: These rotameters will be used to supply the bioreactors. Avoid constructing more than 6 rotameters in series. Instead, use parallel banks of rotameters to expand the system. Ensure that the total flow demand for all reactors is less than 2,500 cm3/min (or else a larger rotameter will be needed upstream of the humidifier). - Connect the outlet (3rd port) of the mixing trap to the newly constructed rotameter banks using 1/8” tubing and a 1/8” female to barb Luer.
- Connect sufficiently long 1/8” tubing to the outlets of each rotameter in the rotameter bank to supply air to the bioreactors. Label the ends of the tubing as well as the rotameters in the bank.
- Apply water-proof silicone around all ports on the humidifier and mixing trap lids to ensure they are air tight.
- Attach 1/8” NPT thread to barb fittings to the inlets and outlets on the back of each rotameter.

Figure 2. Schematic and photos for assembling bubble column system. (A) Schematic of the aeration system (B) photo of the humidifier, mixing trap, and rotameter bank, and (C) photo of the manifolds used to connect the rotameter banks together. Please click here to view a larger version of this figure.
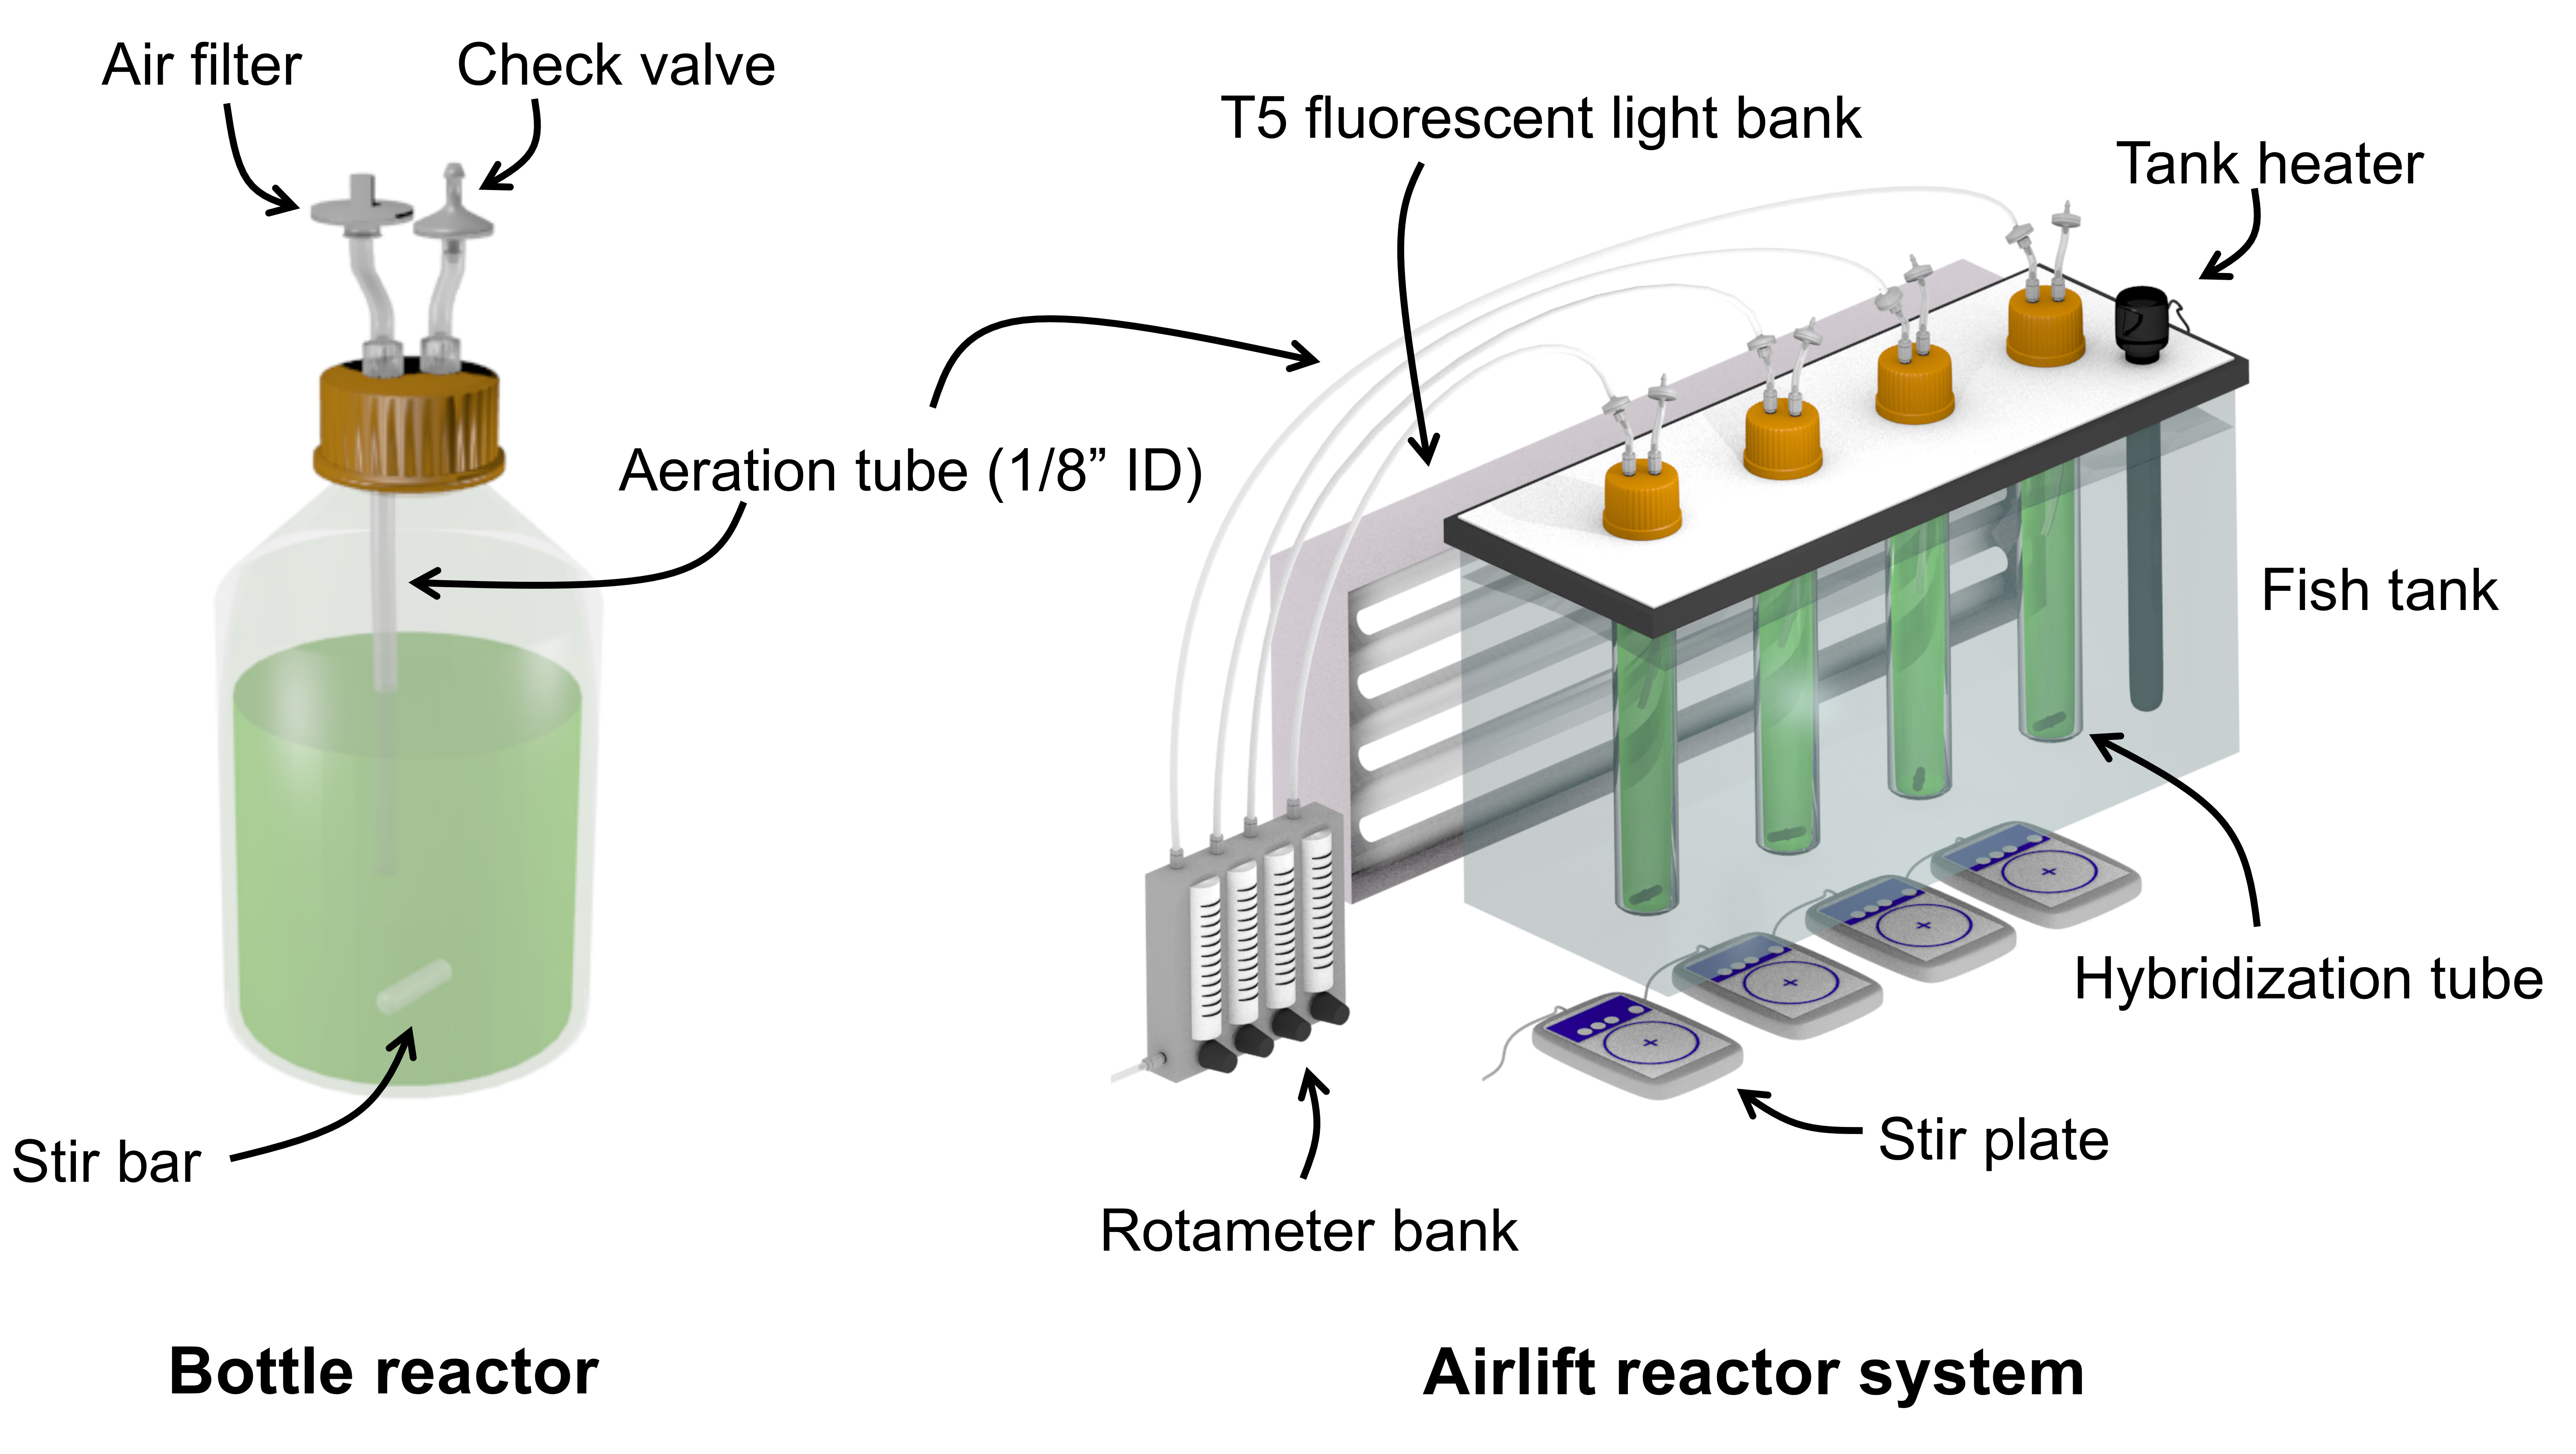
- Set up fish tanks, stir plates, and lights (Figure 3).
CAUTION: This system requires a large number of outlets and sufficient circuit capacity to support all components. Avoid stringing together multiple power strips and extension cords in a daisy-chain fashion because this is an electrical hazard. Use of GFI type outlets and power strips is highly encouraged due to the presence of water in the system.- Arrange the low-profile magnetic stirrers on a level surface that is strong enough to hold the weight of water-filled fish tanks.
- Place small wooden or plastic blocks (that are slightly taller than the stir plates) around the perimeter of the stir plates to support the weight of the fish tanks.
CAUTION: Avoid placing the fish tanks directly on the stir plates as the weight will crush them. - Place the fish tanks over the stir plates and support blocks and fill the tanks with water.
- Cut a piece of a stiff plastic sheet to fit on top of the fish tank as a lid. Cut holes in this cover to slide the hybridization tubes in and out. Also cut a hole for the fish tank heater.
- Arrange the fluorescent light banks next to the fish tank to provide horizontal illumination of the bioreactors. Plug the light bank into a light timer to set a day/night cycle.

Figure 3. System schematic for the bottle bioreactors (left) and the bubble column photobioreactors (right). This figure has been modified from Higgins et al.17. Please click here to view a larger version of this figure.
2. Preparation of Microalgae Inoculum
- Obtain microalgae inoculum from a cryo-preserved, plated, or liquid culture.
NOTE: It is recommended that cryopreserved organisms be plated prior to the use as inoculum to ensure that cells are viable and that the resulting culture is axenic. Agar medium (e.g., ATCC #5 sporulating agar)21 is a rich medium that works well for reviving species of Chlorella and Auxenochlorella from cryo-storage. - Prepare 2.4 L of mineral medium that is appropriate for the particular microalgae species.
NOTE: Examples include N8 medium23 for species of Chlorella, N8-NH4 medium21 for species of Auxenochlorella. Use of a medium appropriate for the algae strain is one of the most important steps toward ensuring robust algae growth. - Aliquot 2.4 L of mineral medium equally into three 1 L glass bottles, add stir bars to each bottle and assemble the vented lids (Figure 1) for each bottle. Double check that the aeration tube is on the inlet side and each bottle has a stir bar in it.
- Autoclave the stock bottles using a liquid sterilization cycle (121 °C) for 30 min. Autoclave 100 mL of deionized water (dH2O) and some 1.5 mL tubes at the same time, which will later be used for plating. Allow the medium to cool overnight. Alternatively, cool the reactor to room temperature and then aerate for 2 h prior to inoculation.
- In a biosafety cabinet (BSC), inoculate microalgae from a plate or axenic liquid culture into the stock bottles. Use sterile technique to maintain axenic cultures in the following steps.
- Add 20 mL of autoclaved dH2O to a sterile 50 mL centrifuge tube. Use a sterile 10 µL disposable loop to pick several single colonies from the plate from step 2.1. Dip the loop into the 50 mL tube and wash the algae cells into the 20 mL of autoclaved dH2O. Shake the 50 mL tube to make a homogenous microalgae solution.
- Pipette 6 mL of microalgae solution into each stock bottle with a 10 mL sterile serological pipette. Swirl the bottle to mix the microalgae evenly into the medium.
- Use a 2 mL sterile serological pipette to draw 1 mL samples from each stock bottle and transfer into sterile 1.5 mL tubes.
NOTE: Micropipettes are not recommended for this step due to the risk of contamination. Tighten the vented lids on stock bottles. - Place the stock bottles on stir plates (~150 rpm) and adjust air flow rate, CO2, and lighting levels as appropriate for the species. Rotate the stock bottle position every day.
- Dilute the 1 mL samples obtained during step 2.6 (100-fold dilution in sterile water usually works well) and spread plate onto a rich agar medium.
NOTE: These plates can be used to check for instances of contamination as well as serve as a source of future algae inoculum for further experiments. - Take samples from the bottles (in the BSC) every two days to check the microalgae growth.
Place samples in a 96-well microplate in triplicate (200 µL) and measure optical density (OD) at 550 nm and 680 nm every two days until OD reaches 0.2-0.3 (which typically requires 5-7 days). - Stop the incubation and place the stock bottles on a bench for 24-48 h to allow the algae cells to settle by gravity.
NOTE: The settled cells will be used next to inoculate the bubble column photobioreactors. If a more rapid cell collection is desired, cells may be centrifuged at no more than 1,000 x g to collect cells.
3. Cultivation of Microalgae in Bubble Column Photobioreactors
- The day before bioreactor inoculation, prepare appropriate media and transfer 200 mL (or desired volume) to the bubble column photobioreactor tubes (hybridization tubes). Autoclave tubes with media and vented lids in place.
NOTE: If using wastewater as a growth medium, autoclave the empty bioreactors and add sterile-filtered wastewater (if axenic culture is desired). - Concentrate the settled microalgae stock by removing the supernatant using a vacuum pump. Leave less than 100 mL of medium in each bottle but avoid removing settled algae.
NOTE: Conduct this procedure inside a BSC and follow sterile technique. A simple vacuum apparatus can be constructed using either a vacuum flask or bottle. Fit a sterile serological pipette onto the end of the tubing. - Suspend and transfer the algae slurry to sterile 50 mL centrifuge tubes. Centrifuge at 1,000 x g for 5 min to further concentrate algae.
- In the BSC, remove enough supernatant to achieve a total volume of ~80 mL of algae concentrates for 12 photobioreacters. Avoid vacuuming out the pellet. Transfer the algae concentrate to a sterile container (or the used algae stock bottle).
- Add 6 mL of algae slurry into each photobioreactor with a sterile 10 mL serological pipette.
- Sterile filter (0.2 μm syringe or vacuum filter) and add appropriate amounts of any other compounds (e.g. vitamin stocks) which cannot be autoclaved.
- Swirl bioreactors to mix algae into the medium.
- Draw a 2 mL sample from each bioreactor using a serological pipette and transfer to a 2 mL tube. Collect a 2 mL sample (in a BSC) every 24 h to monitor culture progress. Check the sample for pH using test strips and adjust the reactor as needed with either 3 M NaOH or 3 M HCl.
- Tighten the bioreactor lids and place all bioreactors into the fish tank water bath. Adjust the aeration, CO2, and lighting to the appropriate level for the species. Rotate the bioreactor position each day after sampling (Step 3.8).
- Apply 200 µL of each culture sample in triplicate to wells of a 96 well microplate. Measure optical density (OD) at 550 nm and 680 nm.
- On the last day of the culture period, measure OD under different dilution factors (e.g., a 1x, 2x, 4x, 8x, 16x and 32x) to establish a correlation between the OD and the actual dry weight after harvest (step 4).
- Centrifuge the 2 mL sample tube at 12,000 x g for 5 min.
- Filter the supernatant through 0.2 µm non-sterile syringe filter and store the supernatant (and pellet if needed) at no higher than -20 °C for long term storage and later analyses of changes in media composition.
4. Harvest and Freeze Drying of Microalgal Biomass
- Measure a fixed volume of algae culture from each bioreactor with a graduated cylinder (e.g., 160 mL from a bioreactor that originally contained 200 mL of medium) and transfer into centrifuge bottles. Rinse the graduated cylinder with dH2O in between each measurement.
- Centrifuge at 4,696 x g for 5 min. Discard the supernatant by carefully vacuuming it out.
- Transfer the pellets to labeled 50 mL tubes. Rinse the centrifuge bottles with dH2O, and transfer contents to the 50 mL tubes. Ensure the total tube volume does not exceed 45 mL.
- Wash the algae pellets with dH2O to remove salts.
- Centrifuge the 50 mL tubes at 4,696 x g for 5 min and discard the supernatant.
- Add 40 mL dH2O to each 50 mL tube; vortex to mix. Centrifuge again at 4,696 x g for 5 min and discard supernatant.
- Repeat step 4.4.2 again.
- Label and weigh empty 15 mL centrifuge tubes on a 4-decimal balance (label both the lid and tube and weigh them together). Weigh one tube per algae culture. Weigh each 15 mL tube twice to minimize error.
- After the last wash, discard the supernatant, and add 7.5 mL of dH2O to each 50 mL tube. Vortex and transfer the algae slurries into the pre-weighed 15 mL tubes. Rinse the 50 mL tubes with additional dH2O and transfer liquid to the 15 mL tubes. Avoid exceeding 12 mL of total volume in the 15 mL tubes.
- Centrifuge the 15 mL tubes at 4,696 x g for 5 min and decant the supernatant. Freeze the tubes with pellets at -80 °C for at least 30 min in preparation for freeze-drying.
- Freeze dry overnight or until dried.
- Weigh and record the freeze dried 15 mL tubes with algae.
5. Lipid Extraction using a Modified Folch method24
- Weigh out 20 mg of freeze-dried algal biomass into a 2 mL screw cap polypropylene tube (check manufacturer label to ensure product is suitable for bead extractions).
- Add 1.5 mL of Folch solvent (2:1 chloroform/methanol) to each 2 mL tube (which contains 20 mg of freeze-dried algae). Pour ~0.5 mL zirconia/silica beads (0.5 mm) into each tube until liquid level in tube reaches 2 mL.
CAUTION: Handle chloroform and methanol in a fume hood and avoid breathing fumes or skin contact. - Homogenize the algae samples in a bead mill for 20 s at a speed of 6.5 m/s. Transfer tubes to ice for 30 s to chill samples. Repeat five more times to fully extract lipids.
- Filter the homogenate through a 5 mL syringe containing a stainless-steel wire mesh disk (#60 mesh) to strain out the beads, collecting filtrate in a 15 mL tube.
- Wash the beads with 1.5 mL of Folch solvent, pushing liquid through with the syringe as necessary. Repeat this wash two more times and collect all filtrate in the 15 mL tube, yielding a final volume of approximately 6 mL.
- Add 1.2 mL of 0.9% (w/v) NaCl solution to the Folch extract in the 15 mL tube and vortex to mix well.
NOTE: If necessary, more Folch solvent can be used to wash beads (use 0.2x the total wash volume of 0.9% NaCl solution to induce phase separation). - Centrifuge the 15 mL tubes at 6,000 x g for 5 min. Record the bottom chloroform (green) phase volume to the nearest 0.1 mL using lines on the side of the 15 mL tube. Transfer the bottom phase to a glass vial (with the lid) using a glass Pasteur pipette.
- Store the lipid at -20 °C or (-80 °C if there are plans to use this extract for fatty acid analysis).
6. Neutral Lipid Assay using a Microplate Method (adapted from Higgins et al. 201422)
- Prepare stock solutions. Prepare 10 mL 1 mg/mL vegetable oil standard in chloroform and store at -20 °C.
NOTE: Any vegetable oil may be used in this assay because it is not sensitive to the types of fatty acids. Prepare 10 mL of 200 µg/mL Nile Red solution in dimethyl sulfoxide (DMSO) and store in the dark at room temperature. - Pre-heat dry microplate block to 55 °C in a fume hood. While this is heating, dilute the lipid extracts and vegetable oil standard 3-fold with methanol.
NOTE: This dilution can be altered based on the lipid content of the algae, but this level works well for most Chlorella. - For each diluted sample, add 80 µL to a 96 well polypropylene microplate in quadruplicate.
CAUTION: Use of polystyrene plasticware is not recommended for use with organic solvents. - For the solvent blank, apply 80 µL of 2:1 methanol/chloroform in quadruplicate. For standards, add 10, 30, 60, 90, and 120 µL of the diluted vegetable oil standard in quadruplicate.
- Place the microplate in a dry block heater at 55 °C for 20-30 min until all solvent has evaporated. While the solvent evaporates, prepare the working Nile Red solution (need 200 µL of 1 µg/ml solution per plate well). As an example, twelve samples and a full set of standards requires 16 mL of 1.0 µg/mL solution; prepare by dissolving 80 µL of the 200 µg/mL stock (in DMSO) into 16 mL dH2O.
- Remove the microplate from the heating block and let cool to room temperature. Add 30 µL of isopropyl alcohol to each well and mix by pipetting up and down. Ensure all pipette channels are mixing the solution and resuspending the lipids, yielding a homogeneous green liquid.
- Add 200 µL of Nile Red solution (1 µg/mL) to each well, pipette up/down 10 times to mix. Incubate the plate for 5 min at room temperature. While waiting, prepare a 50% bleach solution by mixing bleach (6% hypochlorite) with dH2O. 20 µL per well are needed. Preparation of 3 mL of 50% bleach is sufficient for 12 samples and a full set of standards.
- Add 20 µL of bleach solution to each microplate well and pipette up and down 5 times to mix well. Incubate 30 min at room temperature.
- After 30 min, read fluorescence in the samples every 5-10 min at 530 nm excitation/575 nm emission with auto cutoff set to 570 nm until the signal from algae samples stabilizes. Typically, 60 min of total incubation is sufficient.
- Create a calibration curve for the vegetable oil standards (in the range of 0-40 ng oil/well).
NOTE: A linear fit works well for low (<30 ng/well) oil concentrations and a polynomial fit may be used if the standard exceeds 30 ng/well. Use this correlation to quantify the neutral lipid in the sample wells.
Results
This procedure yields a time course of algal optical density data at OD 550 nm (Figure 4A). The optical density and dry weight concentration data can be correlated (Figure 4B). This is accomplished by first calculating the final dry weight algae concentration after the freeze-drying step. Next, the optical density of the culture serial dilution (performed on the last day of sampling) and the actual dry weight concentrations can b...
Discussion
The most important consideration when culturing algae is an understanding of the specific needs of the organism or group of organisms. The algae cultivation system described here can be used to culture a wide range of algae but the specific abiotic factors (temperature, media, pH, light intensity, CO2 level, aeration rate) need to be adjusted to the needs of the organism. Note the parameters described here were used for the cultivation of Chlorella and Auxenochlorella. These organisms are of ...
Disclosures
The authors have nothing to disclose.
Acknowledgements
Support for this research was provided by USDA National Institute of Food and Agriculture Hatch Project ALA0HIGGINS and the Auburn University Offices of the Provost, the Vice President for Research, and the Samuel Ginn College of Engineering. Support was also provided by NSF grant CBET-1438211.
Materials
| Name | Company | Catalog Number | Comments |
| Supplies for airlift photobioreactor setup | |||
| 1 L Pyrex bottles | Corning | 16157-191 | For bottle reactors, humidifiers |
| 1/2" hose clamp | Home Depot | UC953A | or equivalent |
| 1/4" female luer to barb | Nordson biomedical | Nordson FTLL360-6005 | 1/4" ID, PP |
| 1/4" ID, 3/8" OD autoclaveable PVC tubing | Thermo-Nalgene | 63013-244 | 50' |
| 1/4" in O-rings | Grainger | 1REC5 | #010 Medium Hard Silicone O-Ring, 0.239" I.D., 0.379"O.D. |
| 1/8" Female luer to barb | Nordson biomedical | FTLL230-6005 | |
| 1/8" ID, 1/4" OD autoclaveable PVC tubing | Thermo-Nalgene | 63013-608 | 250' |
| 1/8" male spinning luer to barb | Nordson biomedical | MLRL013-6005 | |
| 1/8" multiport barb | Nordson biomedical | 4PLL230-6005 | 1/8" multiport barb |
| 1/8" NPT to barb | Nordson biomedical | 18230-6005 | 1/8" 200 series barb |
| 1/8" panel mount luer | Nordson biomedical | Nordson MLRLB230-6005 | 1/8", PP |
| 10 gallon fish tank | Walmart | 802262 | Can hold up to 8 bioreactors depending on layout |
| 100-1000 ccm flow meter | Dwyer | RMA-13-SSV | For bottle reactors |
| 2 ft fluorescent light bank | Agrobrite | FLT24 T5 | |
| 200-2500 ccm flow meter | Dwyer | RMA-14-SSV | For air regulation upstream of humidifier |
| 250 mL Pyrex bottles | Corning | 16157-136 | For gas mixing after humidifier |
| 50-500 ccm flow meter | Dwyer | RMA-12-SSV | For hybridization tube reactors |
| 5-50 ccm flow meter | Dwyer | RMA-151-SSV | For CO2 flow rate control |
| Air filters 0.2 µm | Whatman/ Fisher | 09-745-1A | Polyvent, 28 mm, 0.2 µm, PTFE, 50 pack |
| Check valves | VWR | 89094-714 | |
| Corning lids for pyrex bottles | VWR | 89000-233 | 10 GL45 lids |
| Female luer endcap | Nordson biomedical | Nordson FTLLP-6005 | Female stable PP |
| Hybridization tubes | Corning | 32645-030 | 35x300 mm, pack of 2 |
| Light timer | Walmart | 556393626 | |
| Locknuts | Nordson biomedical | Nordson LNS-3 | 1/4", red nylon |
| Low profile magnetic stirrer | VWR | 10153-690 | Low profile magnetic stirrer |
| Male luer endcap | Nordson biomedical | Nordson LP4-6005 | Male plug PP |
| Spinning luer lock ring | Nordson biomedical | Nordson FSLLR-6005 | |
| Stir bars - long | VWR | 58949-040 | 38.1 mm, for bottle reactors |
| Stir bars - medium | VWR | 58949-034 | 25 mm, for hyridization tubes |
| Supplies and reagents for culturing algae | |||
| 0.2 µm filters | VWR | 28145-491 | 13 mm, PTFE, for filtering spent media from daily culture sampling |
| 1 mL syringes | Air-tite | 89215-216 | For filtering spent media from daily culture sampling |
| 1.5 mL tubes | VWR | 87003-294 | Sterile (or equivalent) |
| 10 mL Serological pipettes | Greiner Bio-One | 82050-482 | Sterile (or equivalent) |
| 100 mm plates | VWR | 25384-342 | 100x15 mm stackable petri dishes, sterile |
| 15 mL tubes | Greiner Bio-One | 82050-276 | Sterile (or equivalent), polypropylene |
| 2 mL Serological pipette tips | Greiner Bio-One | 82051-584 | Sterile (or equivalent) |
| 2 mL tubes | VWR | 87003-298 | Sterile (or equivalent) |
| 50 mL tubes | Greiner Bio-One | 82050-348 | Sterile (or equivalent), polypropylene |
| 96 well microplate | Greiner Bio-One | 89089-578 | Polystyrene with lid, flat bottom |
| Inocculating loops | VWR | 80094-478 | Sterile (or equivalent) |
| Liquid carbon dioxide tank and regulator | Airgas | CD-50 | |
| Supplies and reagents for lipid extraction and neutral lipid assay | |||
| 2 mL bead tubes | VWR | 10158-556 | Polypropylene tube w/ lid |
| 96 well microplates | Greiner Bio-One | 82050-774 | Polypropylene, flat bottom |
| Bleach | Walmart | 550646751 | Only use regular bleach, not cleaning bleach |
| Chloroform | BDH | BDH1109-4LG | |
| Dimethyl sulfoxide | BDH | BDH1115-1LP | |
| Isopropyl alcohol | BDH | BDH1133-1LP | |
| Methanol | BDH | BDH20864.400 | |
| Nile red | VWR | TCN0659-5G | |
| Pasteur pipette tips | VWR | 14673-010 | |
| Sodium chloride | BDH | BDH9286-500G | |
| Vegetable oil | Walmart | 9276383 | Any vegetable oil should work as long as it is fresh |
| Zirconia/ silica beads (0.5 mm diameter) | Biospec products | 11079105z | |
| Equipment | |||
| Analytical balance | Mettler-Toledo | XS205DU | Capable of at least 4 decimal accuracy |
| Bead homogenizer | Omni | 19-040E | |
| Benchtop micro centrifuge | Thermo | Heraeus Fresco 21 with 24x2 | Including rotor capable of handling 1.5 and 2 mL tubes |
| Dry block heater | VWR | 75838-282 | Including dry block for a microplate |
| Freeze dryer | Labconco | 7670520 | 2.5L freeze drying system |
| Large benchtop centrifuge | Thermo | Heraeus Megafuge 16R Tissue | Including rotors capable of handling 400 mL bottles, 50 mL tubes, and 15 mL tubes |
| Microplate reader | Molecular Devices | SpectraMax M2 | Capable of reading absorbance and fluorescence |
| Vortex mixer | VWR | 10153-838 |
References
- Prandini, J. M., et al. Enhancement of nutrient removal from swine wastewater digestate coupled to biogas purification by microalgae Scenedesmus spp. Bioresource Technology. , 67-75 (2016).
- Liu, C., et al. Phycoremediation of dairy and winery wastewater using Diplosphaera sp. MM1. Journal of Applied Phycology. 28 (6), 3331-3341 (2016).
- Passero, M., Cragin, B., Coats, E. R., McDonald, A. G., Feris, K. Dairy Wastewaters for Algae Cultivation, Polyhydroxyalkanote Reactor Effluent Versus Anaerobic Digester Effluent. BioEnergy Research. 8 (4), 1647-1660 (2015).
- Hodgskiss, L. H., Nagy, J., Barnhart, E. P., Cunningham, A. B., Fields, M. W. Cultivation of a native alga for biomass and biofuel accumulation in coal bed methane production water. Algal Research. 19, 63-68 (2016).
- Gao, C., et al. Oil accumulation mechanisms of the oleaginous microalga Chlorella protothecoides revealed through its genome, transcriptomes, and proteomes. BMC Genomics. 15, (2014).
- Burch, A. R., Franz, A. K. Combined nitrogen limitation and hydrogen peroxide treatment enhances neutral lipid accumulation in the marine diatom Phaeodactylum tricornutum. Bioresource Technology. 219, 559-565 (2016).
- Brennan, L., Owende, P. Biofuels from microalgae--A review of technologies for production, processing, and extractions of biofuels and co-products. Renewable Sustainable Energy Reviews. 14 (2), 557-577 (2009).
- Branyikova, I., et al. Microalgae - Novel highly efficient starch producers. Biotechnology and Bioengineering. 108 (4), 766-776 (2010).
- Chalima, A., et al. Utilization of Volatile Fatty Acids from Microalgae for the Production of High Added Value Compounds. Fermentation. 3 (4), (2017).
- Harun, R., Singh, M., Forde, G. M., Danquah, M. K. Bioprocess engineering of microalgae to produce a variety of consumer products. Renewable and Sustainable Energy Reviews. 14 (3), 1037-1047 (2010).
- Liu, L., et al. Development of a new method for genetic transformation of the green alga Chlorella ellipsoidea. Molecular biotechnology. 54 (2), 211-219 (2013).
- Cheng, J., et al. Mutate Chlorella sp. by nuclear irradiation to fix high concentrations of CO2. Bioresource Technology. 136, 496-501 (2013).
- Davis, R., Aden, A., Pienkos, P. T. Techno-economic analysis of autotrophic microalgae for fuel production. Applied Energy. 88 (10), 3524-3531 (2011).
- Sales, C. M., Au, Comparison of Scale in a Photosynthetic Reactor System for Algal Remediation of Wastewater. Journal of Visualized Experiments. (121), e55256 (2017).
- Higgins, B. T., et al. Cofactor symbiosis for enhanced algal growth, biofuel production, and wastewater treatment. Algal Research. 17, 308-315 (2016).
- Higgins, B., et al. Algal-bacterial synergy in treatment of winery wastewater. Nature Clean Water. 1 (6), (2017).
- Higgins, B. T., et al. Impact of thiamine metabolites and spent medium from Chlorella sorokiniana on metabolism in the green algae Auxenochlorella prototheciodes. Algal Research. 33, 197-208 (2018).
- Lépinay, A., et al. First insight on interactions between bacteria and the marine diatom Haslea ostrearia: Algal growth and metabolomic fingerprinting. Algal Research. 31, 395-405 (2018).
- Franchino, M., Comino, E., Bona, F., Riggio, V. A. Growth of three microalgae strains and nutrient removal from an agro-zootechnical digestate. Chemosphere. 92 (6), 738-744 (2013).
- Choix, F. J., Lopez-Cisneros, C. G., Mendez-Acosta, H. O. Azospirillum brasilense Increases CO2 Fixation on Microalgae Scenedesmus obliquus, Chlorella vulgaris, and Chlamydomonas reinhardtii Cultured on High CO2 Concentrations. Microbial Ecology. 76 (2), 430-442 (2018).
- Higgins, B., VanderGheynst, J. Effects of Escherichia coli on mixotrophic growth of Chlorella minutissima and production of biofuel precursors. PLoS One. 9 (5), e96807 (2014).
- Higgins, B., Thornton-Dunwoody, A., Labavitch, J. M., VanderGheynst, J. S. Microplate assay for quantitation of neutral lipids in extracts from microalgae. Analytical Biochemistry. 465, 81-89 (2014).
- Tanadul, O. U., Vandergheynst, J. S., Beckles, D. M., Powell, A. L., Labavitch, J. M. The impact of elevated CO2 concentration on the quality of algal starch as a potential biofuel feedstock. Biotechnology and Bioengineering. 111 (7), 1323-1331 (2014).
- Folch, J., Lees, M., Sloane Stanley, G. H. A simple method for the isolation and purification of total lipides from animal tissues. Journal of Biological Chemistry. 226 (1), 497-509 (1957).
- Higgins, B. T., et al. Informatics for improved algal taxonomic classification and research: A case study of UTEX 2341. Algal Research. 12, 545-549 (2015).
- Garrett, R. H., Grisham, C. M. . Biochemistry. , 578-730 (2012).
- de-Bashan, L. E., Trejo, A., Huss, V. A. R., Hernandez, J. -. P., Bashan, Y. Chlorella sorokiniana UTEX 2805, a heat and intense, sunlight-tolerant microalga with potential for removing ammonium from wastewater. Bioresource Technology. 99 (11), 4980-4989 (2008).
- Wang, Q., Higgins, B., Ji, H., Zhao, D. . Annual International Meeting of the ASABE. , (2018).
Reprints and Permissions
Request permission to reuse the text or figures of this JoVE article
Request PermissionThis article has been published
Video Coming Soon
Copyright © 2025 MyJoVE Corporation. All rights reserved