A subscription to JoVE is required to view this content. Sign in or start your free trial.
Method Article
High-Throughput DNA Plasmid Multiplexing and Transfection Using Acoustic Nanodispensing Technology
In This Article
Summary
This protocol describes high-throughput plasmid transfection of mammalian cells in a 384-well plate using acoustic droplet ejection technology. The time-consuming, error-prone DNA dispensing and multiplexing, but also the transfection reagent dispensing, are software-driven and performed by a nanodispenser device. The cells are then seeded in these prefilled wells.
Abstract
Cell transfection, indispensable for many biological studies, requires controlling many parameters for an accurate and successful achievement. Most often performed at low throughput, it is moreover time-consuming and error-prone, even more so when multiplexing several plasmids. We developed an easy, fast, and accurate method to perform cell transfection in a 384-well plate layout using acoustic droplet ejection (ADE) technology. The nanodispenser device used in this study is based on this technology and allows precise nanovolume delivery at high speed from a source well plate to a destination one. It can dispense and multiplex DNA and transfection reagent according to a predesigned spreadsheet. Here we present an optimal protocol to perform ADE-based high-throughput plasmid transfection which makes it possible to reach an efficiency of up to 90% and a nearly 100% cotransfection in cotransfection experiments. We extend initial work by proposing a user-friendly spreadsheet-based macro, able to manage up to four plasmids/wells from a library containing up to 1,536 different plasmids, and a tablet-based pipetting guide application. The macro designs the necessary template(s) of the source plate(s) and generates the ready-to-use files for the nanodispenser and tablet-based application. The four-steps transfection protocol involves i) a diluent dispense with a classical liquid handler, ii) plasmid distribution and multiplexing, iii) a transfection reagent dispense by the nanodispenser, and iv) cell plating on the prefilled wells. The described software-based control of ADE plasmid multiplexing and transfection allows even nonspecialists in the field to perform a reliable cell transfection in a fast and safe way. This method enables rapid identification of optimal settings for a given cell type and can be transposed to higher-scale and manual approaches. The protocol eases applications, such as human ORFeome protein (set of open reading frames [ORFs] in a genome) expression or CRISPR-Cas9-based gene function validation, in nonpooled screening strategies.
Introduction
The method presented here describes in detail how to perform DNA plasmid multiplexing and transfection in mammalian cells at high throughput using an acoustic-based liquid nanodispenser in a 384-well plate, even for nonspecialists in the field. This recently published method1 allows performing as much as 384 independent plasmid DNA multiplexing and transfection conditions in one experiment, in less than 1 h. Single or cotransfection experiments were successful, reaching a near 100% cotransfection within the transfected cells population. This protocol makes transfection easier because most of the tedious, time-consuming, and error-prone steps are now software driven (see Figure 1 for a general overview). Further efforts have been made to develop dedicated tools to enhance the ease of use while avoiding human errors during the overall process and to promote successful transfection even for nonspecialists in the field. The described protocol includes a "user-friendly" macro spreadsheet that we developed in order to manage 384 independent transfection conditions with multiplexing possibilities of up to four plasmids in each well. The macro automatically generates templates of the source plate(s) to load the expected DNA plasmid volume from starting stock solutions and the files required to drive the nanodispenser software upon the experimental design that has been inputted. As the manual dispensing of DNA in a 384-well source plate is tedious and error-prone, we also developed a dedicated tablet-based application to guide the user while dispensing DNA solution according to the template.

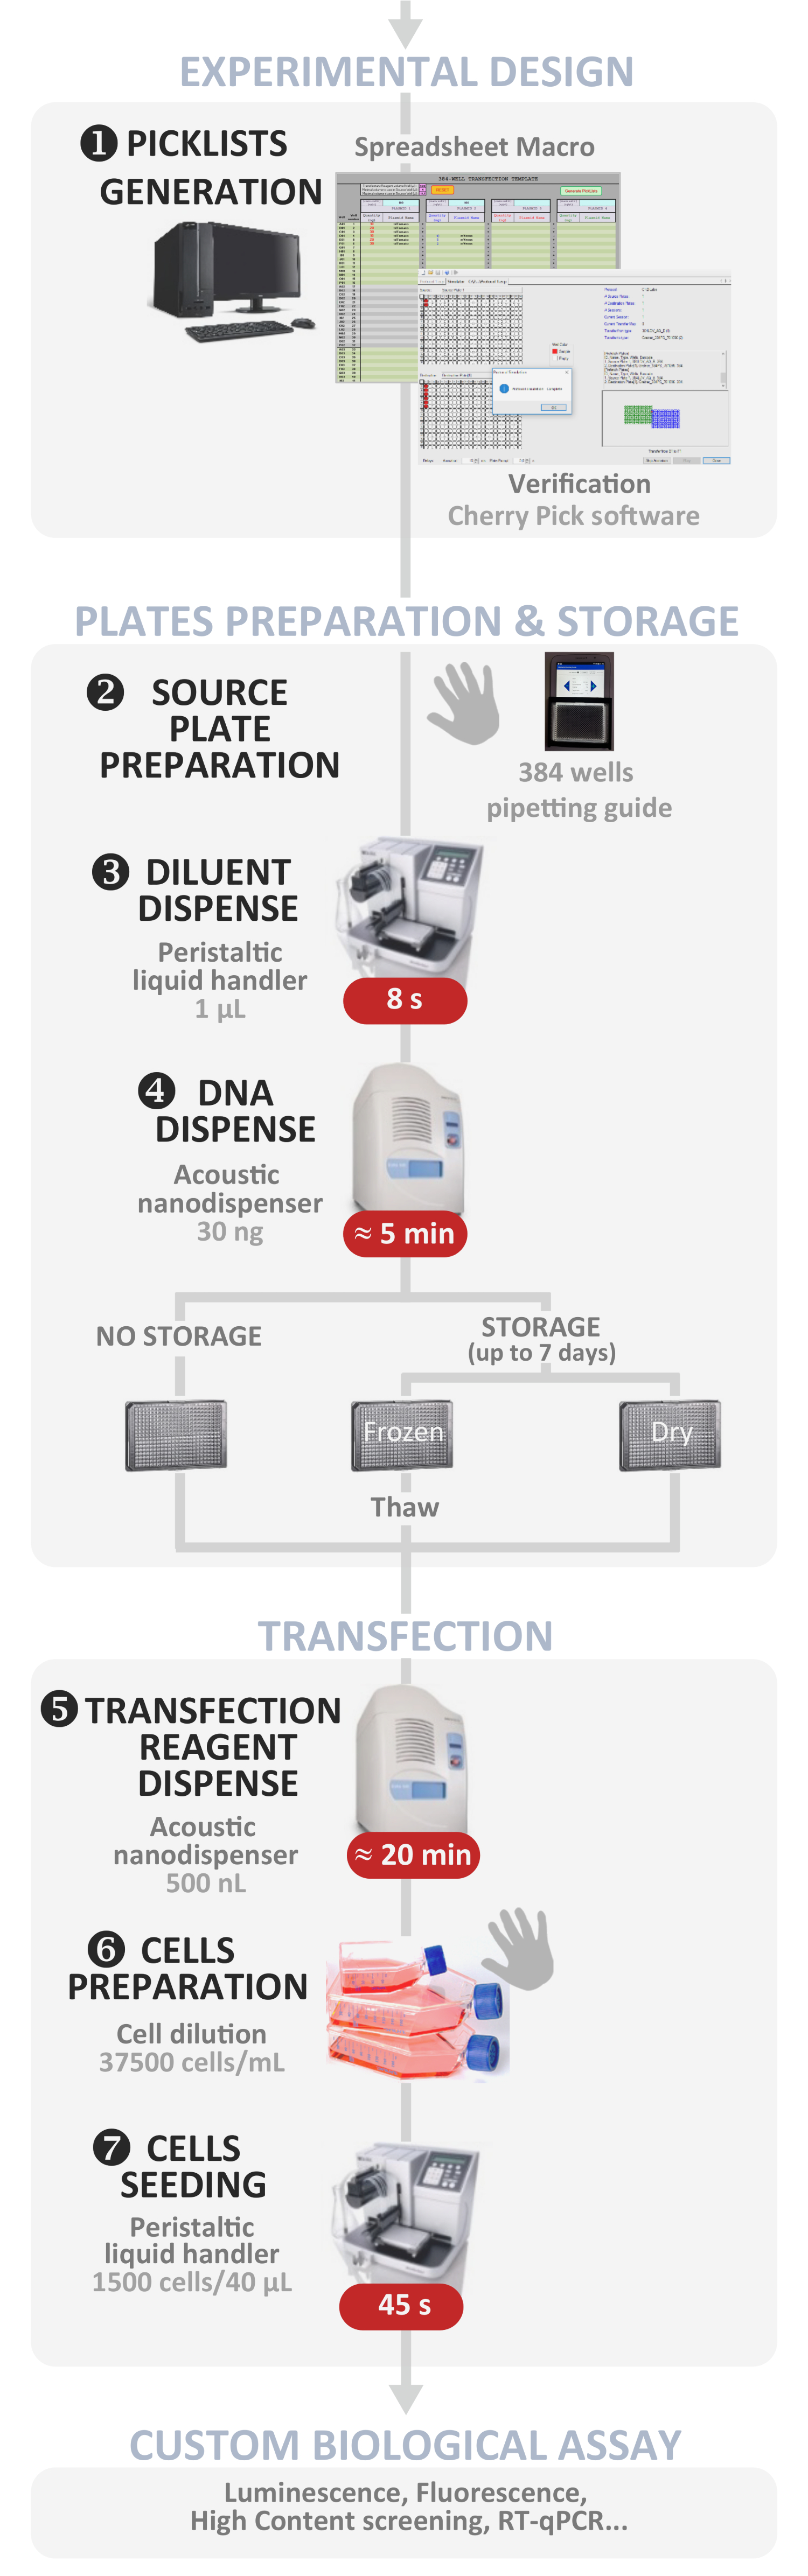
Figure 1: Experimental workflow. Schematic representation of the optimal automated high-throughput reverse transfection protocol (from experimental design to custom biological assay). Manual steps are indicated by the hand symbol and the approximate time for each step is written in a red box. Please click here to view a larger version of this figure.
Many cell-based experiments start with plasmid DNA transfection, and even if many dedicated reagents have been and are still being developed to enhance transfection efficiency and/or ease the procedure, much remains to be done2,3,4. DNA plasmid cell transfection involves several steps to reach high efficiency, such as an initial complex uptake, endosomal escape, and cytoplasmic transport to the nucleus5,6. In addition to calcium precipitation or physical techniques such as electroporation or microinjection using dedicated devices7, modern chemical methods have focused on enhancing DNA cell delivery while lowering the cell cytoxicity8,9. The use of lipids or cationic polymers forming liposome-like complexes and, more recently, nonliposomal polymeric chemistry systems has made transfection easier and more efficient10. Despite these developments, cell transfection still requires specific skills to be accurately performed as most of these physical or chemical transfection protocols require scientists to manually prepare each DNA transfection reaction condition, thus impairing the throughput. To circumvent this problem, reverse transfection protocols have been developed using chemical transfection reagents11,12,13, enabling the user to test or combine several plasmids in a faster way. In these protocols, nucleic acid complexes with transfection reagents are formed before seeding the cells on the complexes. However, these reverse protocols are still limited by the manual handling of DNA solutions and by the combination of each of the independent conditions. Although it is feasible to perform them in a 96-well plate format, the DNA preparation and dispenses will be tedious, and there likely will be mistakes. When different amounts of several DNA plasmids are required and multiplexed with each other, cell transfection becomes even harder to achieve and more time-consuming, and human errors become quite inevitable. Scaling up to the 384-well plate format in a reverse transfection approach, in spite of few multiplexed DNA transfection conditions, becomes an impossible challenge due to the following reasons. i) The DNA amounts, transfection reagent, or reaction mixture volumes to manage are lower than 1 µL for each well. ii) The multiplexing of plasmids for 384 independent conditions becomes extremely complicated. The delivery in each of the 384 wells is also iii) highly time-consuming and iv) error-prone. Indeed, dispensing the right solution in the expected wells is hard to manage because the low volumes already dispensed do not allow visual monitoring between the empty and already filled wells. v) Finally, there is a high risk of drying the mixture by evaporation before the cells are added due to the time needed to perform the necessary dispensing steps. In summary, the limiting factor to set up high-throughput DNA plasmid transfection assays appears to be the miniaturization of the assay, which implies low-volume multiplexing and managing that cannot be handled manually anymore but are also hardly achievable in a reliable way by classical peristatic liquid handlers.
As a proof of difficulty to automatize such assays and gain high-throughput, only a few attempts to automate transfection have been published so far: a 96-well plate format using a commercial liquid handling device and calcium phosphate precipitation14 and, more recently, a lipoplex reagent, and a microfluidic chip enabling 280 independent transfections15 but requiring specialized skills in this field. Another method, acoustophoresis, allowing liquid levitation and leading to fluid manipulation and mixing, was used to perform DNA transfection in 24- to 96-well plate formats16. Although feasible, this approach suffers from an extremely low throughput as the mixing of cells with DNA transfection mixture requires a 60 s incubation for every single point before seeding. This implies a duration of at least 96 min for a complete 96-well plate. Furthermore, this protocol is far away from being amenable to the overall biologists' audience as this work was done with an in-house designed and manufactured device which is currently not available on the market. On the contrary, in the last few years, an easy to use software-driven acoustic-based dispensing technology has emerged with nanovolume dispenser devices. Using focused acoustic energy, these devices allow the tightly controlled ejection of small liquid volumes from 2.5 nL to 500 nL from a source plate to a destination one17. This technology, called acoustic droplet ejection (ADE), has numerous advantages: it is fully automated, contactless, tipless, accurate, precise, and highly reproducible, and it has a high throughput18. First devoted to delivering dimethyl sulfoxide (DMSO) solutions, settings have been enhanced to dispense aqueous buffers19. Acoustic nanodispensers, then, seem suitable for reverse cell transfection protocols and could circumvent most of the above-mentioned manual limitations. As no plasmid transfection attempts were previously described using this technology, we recently evaluated the suitability of an acoustic-based dispensing system to perform reverse cell transfection.
Taking advantage of the nanodispenser throughput and ease of use, we optimized a reverse transfection protocol for HeLa cells by cross-testing several parameters that can influence DNA transfection on a 384-well, single plate, namely, the total DNA amount and source DNA starting concentration, diluent volume, transfection reagent, and number of spread cells. The developed protocol circumvents the above-described manual limitations of cell transfection and presents several advantages over other automated transfection attempts. First, it is miniaturized, thus allowing for cost-effective transfection reagent by saving DNA plasmid preparations and transfection reagent. Secondly, it is much more high-throughput and reproducible than the manual protocol (even for beginners), as transfection of an entire 384-well plate can be achieved in less than 1 h. Finally, it is software-driven, allowing the control of the dispensed DNA amount and the multiplexing of several plasmids. Indeed, thanks to the nanodispenser software (Table of Materials), the user can elaborate a study plan to control the volumes to be dispensed from a defined source well plate to a destination one.
The protocol presented here is mainly intended for those who have access to a nanodispenser and would like to set up transfection experiments at high throughput, but also for those who want to rapidly optimize their transfection parameters for a given cell type by applying this protocol to cross-test several parameters at high throughput. Indeed, we have shown that optimized parameters identified with this nanoscale protocol can be transposed to larger-scale and manual transfection experiments. Finally, as the transfection reagent used in the present protocol allows DNA or siRNA transfection according to the manufacturer, the protocol is also of interest to those aiming at performing array approaches for gene overexpression or knockdown. The destination plates prefilled with DNA can be conserved up to 7 days before use in a transfection assay without loss of efficacy, which is another advantage of the following protocol for this kind of application.
Protocol
1. Advance preparations
- Preparation of the peristaltic liquid handler programs
NOTE: For the diluent and cell dispensing steps of the protocol, a dedicated program must be prepared, taking into account the height of the dispensing head to the plate used and the step intent.- For the 1 µL diluent dispense step, mount a 1 µL cassette and prepare a program with the settings as described in steps 1.1.1.1 and 1.1.1.2.
- Adjust the flow rate parameter to High for the best throughput as no biological material damage is expected in this step. Adjust the dispense height to 9.6 mm (according to the cell culture plate used, Supplemental Figure 1) to allow the 1 µL drop to touch the bottom of the wells during dispensation.
NOTE: This step is crucial to avoid the retention of the droplets on the dispensing head until reaching a sufficient volume to drop. - Adjust the plate clear height to 14.4 mm to allow a free displacement of the dispensing head over the plate after dispensing each row. Visually control the proper settings of the peristaltic liquid handler head height: make sure no drops are retained on the dispensing tips while dispensing and verify that the head is high enough to allow displacement of the head after dispensing each row.
NOTE: Avoiding drop retention is a crucial parameter as it will impair the accuracy of the volume of the dispensation.
- Adjust the flow rate parameter to High for the best throughput as no biological material damage is expected in this step. Adjust the dispense height to 9.6 mm (according to the cell culture plate used, Supplemental Figure 1) to allow the 1 µL drop to touch the bottom of the wells during dispensation.
- For dispensing the 40 µL cell suspension, mount a 10 µL cassette and prepare a program with the settings as described in steps 1.1.2.1-1.1.2.2.
- Adjust the flow rate parameter to Low to dispense cells with a low speed to avoid promoting potential damages to the cells by shear stress and high impact on the bottom of the wells. Adjust the dispensation height to 11.43 mm (according to the cell culture plate used, Supplemental Figure 1), high enough to lower the cell impact on the bottom of the wells during the dispensing process but low enough to avoid retention of the droplets on the dispensing head. Adjust the plate clear height to 16 mm to allow free displacement of the dispensing head over the plate after dispensing each row.
- Visually control the proper settings of the peristaltic liquid handler head height: make sure no drops are retained on the dispensing tips while dispensing and verify that the head is high enough to allow displacement of the head after dispensing each row.
NOTE: Avoiding drop retention is a crucial parameter as it will lead to dispensing an unreliable cell number.
- For the 1 µL diluent dispense step, mount a 1 µL cassette and prepare a program with the settings as described in steps 1.1.1.1 and 1.1.1.2.
- DNA plasmid preparation (classical miniprep extraction protocol)
- Grow a transformed DH5α bacteria strain in LB medium supplemented with 125 µg/mL ampicillin selection antibiotic (Table of Materials) overnight at 37 °C and under gentle agitation (200 rpm) on an orbital shaker (Table of Materials).
- Harvest 2 mL of the culture, pellet the cells by centrifuging for 5 min at 6,000 x g, and discard the supernatant.
- Resuspend the cell pellet with 250 µL of resuspension buffer containing RNase A (Table of Materials). Add 250 µL of lysis buffer and incubate for 5 min at room temperature, according to the manufacturer's instructions.
- Stop the lysis reaction by adding 300 µL of neutralization buffer (Table of Materials) and vortexting shortly. Centrifuge the tubes for 5 min at 11,000 x g.
- Place a new plasmid minicolumn (Table of Materials) in a 2 mL collection tube and decant the supernatant in the column by centrifuging for 1 min at 11,000 x g.
- Discard the flow-through and place the minicolumn back in the collection tube.
- Wash the plasmid minicolumn with 500 µL of optional washing buffer (Table of Materials) and centrifuge for 1 min at 11,000 x g, according to the manufacturer's instructions.
- Discard the flow-through and place the plasmid minicolumn back in the collection tube.
- Add 700 µL of washing buffer (Table of Materials) supplemented with ethanol and centrifuge for 1 min at 11,000 x g, according to the manufacturer's instructions.
- Discard the flow-through and centrifuge the plasmid minicolumn and its collection tube 1x more for 2 min at 11,000 x g to dry the silica membrane.
- Place the dried plasmid minicolumn in a new 1.5 mL tube and add 30 µL of distilled water prewarmed at 60 °C, incubate it for 2 min at room temperature, and then, centrifuge it for 1 min at 11,000 x g.
- Discard the plasmid minicolumn and keep the eluate containing the purified DNA plasmid.
- Measure the DNA concentration of the eluted DNA using a microvolume spectrophotometer (Table of Materials).
- Turn on the spectrophotometer and choose the DNA measurement settings.
- Raise the sampling arm of the spectrophotometer and pipette 1 µL of water onto the measurement pedestal to perform a blank calibration.
- Lower the sampling arm, start the blank measurement, and wait for completion.
- Raise the sampling arm and wipe the sample from the upper and lower pedestals.
- Pipette 1 µL of the DNA solution onto the lower pedestal to measure it.
- Lower the sampling arm, start the DNA concentration measurement, and wait for completion.
- Raise the sampling arm and wipe the sample from the upper and lower pedestals.
- For further DNA concentration measurements, repeat steps 1.2.13.5-1.2.13.7.
- Once the measurements are finished, store the DNA solutions at 4 °C until use.
2. Experimental design and generation of the picklists to drive the ADE-based dispenses
NOTE: A dedicated "user-friendly" spreadsheet macro was developed to manage DNA amounts and mix up to four plasmids in a 384-well plate format. Based on the entered experimental design, this macro generates the necessary files to drive the ADE-based DNA transfection protocol by nanodispenser. In order to generate these files, several fields have to be filled in the Template Sheet as shown in Figure 2.

Figure 2: Generation of the picklists to drive the ADE dispensation using the spreadsheet macro. Several parameters have to be filled, namely (1) the transfection reagent (TR) and the minimal/maximal volumes to be used in the source plate, (2) the initial plasmid concentrations to be dispensed in the source plate, and (3) the whole-plate design, including the expected plasmid amounts and multiplexing in each of the 384-wells. (4) Generate Picklists activation allows the different fields to be verified and, once properly filled, picklists for DNA and TR dispensation and the necessary source plate template are automatically generated. Please click here to view a larger version of this figure.
- Enter the nanodispenser protocol parameters in the pink fields. Set the transfection reagent (TR) mixture value to 500 nL. Set the minimal volume value in the source plate wells to 4 µL. Set the maximal volume in the source plate wells to 11.25 µL.
NOTE: The nanodispenser used here can only transfer a maximum of 500 nL in one run of ADE. These pink fields are prefilled with the recommended values but can be modified according to the user needs. - Enter 100 ng/µL DNA starting concentrations in the blue fields corresponding to the underlying DNA.
NOTE: This value is the optimal concentration previously defined but can, however, be modified for different user needs. - Enter the desired DNA amount in the grey/green fields. Enter the amounts and plasmid names for the 384 wells, ensuring the same spelling if the same plasmid is used in several wells.
- Generate the source plate design, the picklists files, and the pipetting guide file. Click on Generate Picklists to allow the macro to generate the DNA-Picklist.csv, the T.R.-Picklist.csv and the 384-Wells-Pipetting-Guide.csv files from data collected on the corresponding sheet. If requested, correct the orange-filled cell values as it indicates errors or volumes that cannot be handled by the nanodispenser.
- Print the template(s) from the Source Plate sheet. Plasmid names and minimal volume to fill in the wells are indicated. Likewise, transfection reagent mixture volumes that will next have to be filled in the following wells are indicated as TR and highlighted in green.
3. DNA source plate preparation using the 384-well pipetting guide application
- Dilute the stored DNA plasmid from step 1.2.14 to 100 ng/µL using distilled water.
- Calibrate the 384-well grid to the plate dimensions: open the 384-well pipetting guide application on a tablet (Figure 3). Place the source plate on the grid on the lower screen, and in the upper left calibration menu, click + or - (or use the red cursor) to enhance or reduce the size of the grid and wells in order to adjust the green wells to the four corner wells of the plate.

Figure 3: Use of the 384-well pipetting guide application. (1) Calibration of the 384-well grid to the plate size; (2) ) Mount of a universal 3D-printed plate adapter to the tablet using double-sided tape; (3) Placement of the plate on the adapter; (4) Displacement of the grid to center it to the mounted plate. (5) Lock of the calibration step. (6) Opening of the 384 wells pipetting guide.csv file. (7) Given the file list, the application will indicate the expected source plate name, reagent (DNA or transfection reagent), the concentration, and the volume to dispense into the target wells, which will be illuminated one by one. (8) Left and right arrow buttons allow the user to follow the pipetting guide to easily dispense the reagents according to the spreadsheet macro source plate template(s). Please click here to view a larger version of this figure.
- Using double-sided tape, mount the 3D-printed plate adapter on the screen to avoid source plate movements while dispensing. If needed, move the calibrated grid using the rotation arrows and Up/ Down/ Right/ Left buttons to adjust the grid on the screen to the plate position. Once the grid and well sizes are properly calibrated and located, tick the Lock calibration box.
- Click on FILE and open the 384 wells pipetting guide.csv file. Follow the screen instructions to manually dispense the indicated volume of the indicated plasmid at the indicated concentration in the white highlighted well corresponding to the proper target destination of the expected plate. Use - or + arrows to go back or further in the DNA dispensing process. Stop dispensing when reaching the first Transfection reagent solution to load.
- Once the DNA dispensations are finished, remove the source plate from the adapter. If several source plates have to be filled, then place a new source plate on the adapter and follow the dispensing instructions. Once the DNA dispensation has finished, centrifuge the DNA-filled source plate(s) (at 1,500 x g for 2 min) to ensure proper liquid leveling and to remove bubbles leading to inaccuracy in the ADE-based transfers.
4. Peristaltic liquid handler-based 1 µL diluent dispensation in the destination plate
NOTE: Perform steps 4.1-4.5 in a biological safety cabinet.
- Disinfect the 1 µL cassette head by spraying it with a spray disinfectant (Table of Materials), and allow this solution to enter the tip holder. Absorb the remnant disinfectant on absorbing paper. Mount the 1 µL cassette on the peristaltic liquid handler device. Turn on the device and make sure the cassette type setting is correct (1 µL), as well as the plate format (384 wells).
- Disinfect the entire lumen of the tubing: insert the tube organizer (holding the eight tubes together) in a sterile vessel and fill it with 5 mL of 70% alcohol. Using the priming function of the peristaltic liquid handler, first flush the alcohol in the tubing and then rinse it by passing 5 mL of distilled water and 5 mL of serum-free medium (Dulbecco's modified Eagle's medium [DMEM] supplemented with 100 U/mL penicillin-streptomycin; Table of Material), successively filling in the same vessel. Make sure none of the tip is clogged by visually inspecting the liquid flow from all of them.
- Prime the tubing with serum-free medium by filling a new sterile vessel with 10 mL of prewarmed serum-free medium and diving the tube organizer in it. Press the prime button of the peristaltic liquid handler for about 10 s. Once again, ensure no tip is clogged by visually inspecting the liquid flow from all of them.
- Fill the plate with 1 µL of diluent. Place a sterile 384-well culture plate (destination) on the peristaltic liquid handler plate carrier and remove its lid.
- Run the precalibrated program to dispense 1 µL in each well of the 384-well plate. The dispensing time is approximately 8 s. Then replace the lid of the 384-well plate.
NOTE: Alternatively, this step can be handled manually, in a safety cabinet, using a multichannel micropipette.
5. Performance of a survey to control the manually dispensed volumes
NOTE: For details, see Figure 4.
- Run the nanodispenser program, go to the diagnostic tab, tick the source plate Out box, load the source plate on the plate holder, and tick In to enter the plate. When prompted, select 384LDV_AQ_B2 to set the nanodispenser to the aqueous buffer dispensing mode, and press Ok.
- Select Survey in the Miscellaneous menu and click on Launch. Select the prefilled wells to analyze and click on the Go button. Verify that the measured volumes match the expected ones and ensure no wells have been loaded with volumes of more than 12 µL as this will avoid transfers.

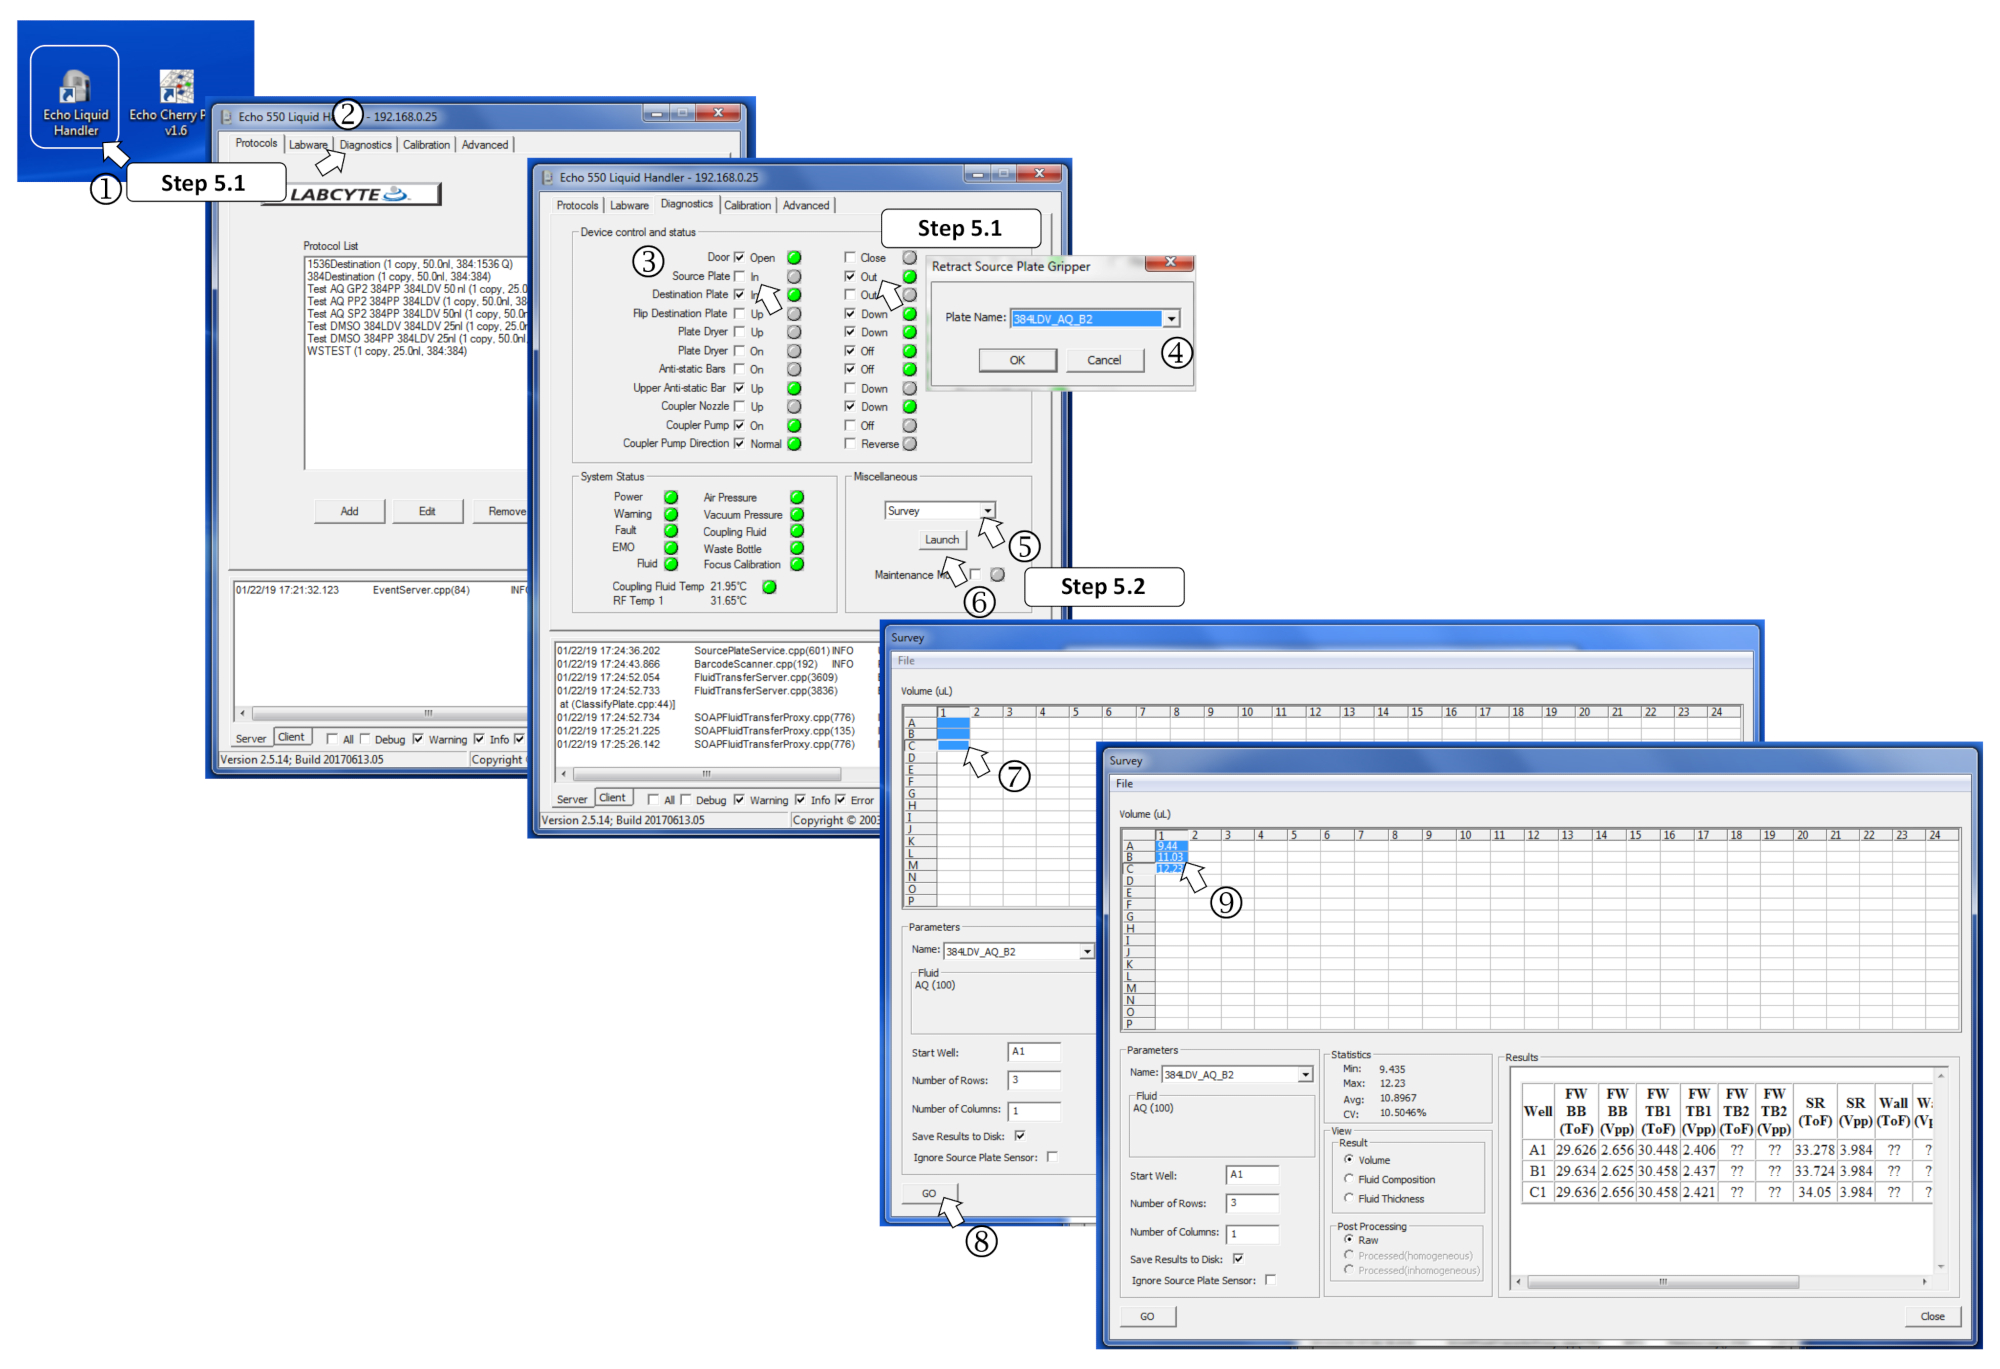
Figure 4: Defining the survey software parameters. (1) Start the nanodispenser program. (2) Open the Diagnostics tab. (3) Insert the source plate by ticking Out for the source plate and, then, In. (4) Define the source plate type in the menu when prompted. (5) In the Miscellaneous box, select Survey in the drop-down menu. (6) Launch the survey program by clicking on Launch. (7) Select the prefilled wells to measure. (8) Start the analysis by clicking on Go. (9) Once the survey is performed, the measured volumes are written in the corresponding selected wells. Please click here to view a larger version of this figure.
6. ADE-driven DNA dispensation into the destination plate
- Run the picklist software, set the 384-well source and destination plate types to 384_LDV and Greiner 384PS_781096, respectively (Figure 5). Set the device to aqueous buffer dispensing mode by selecting 384LDV_AQ_B2, and untick "optimize transfer throughput”.

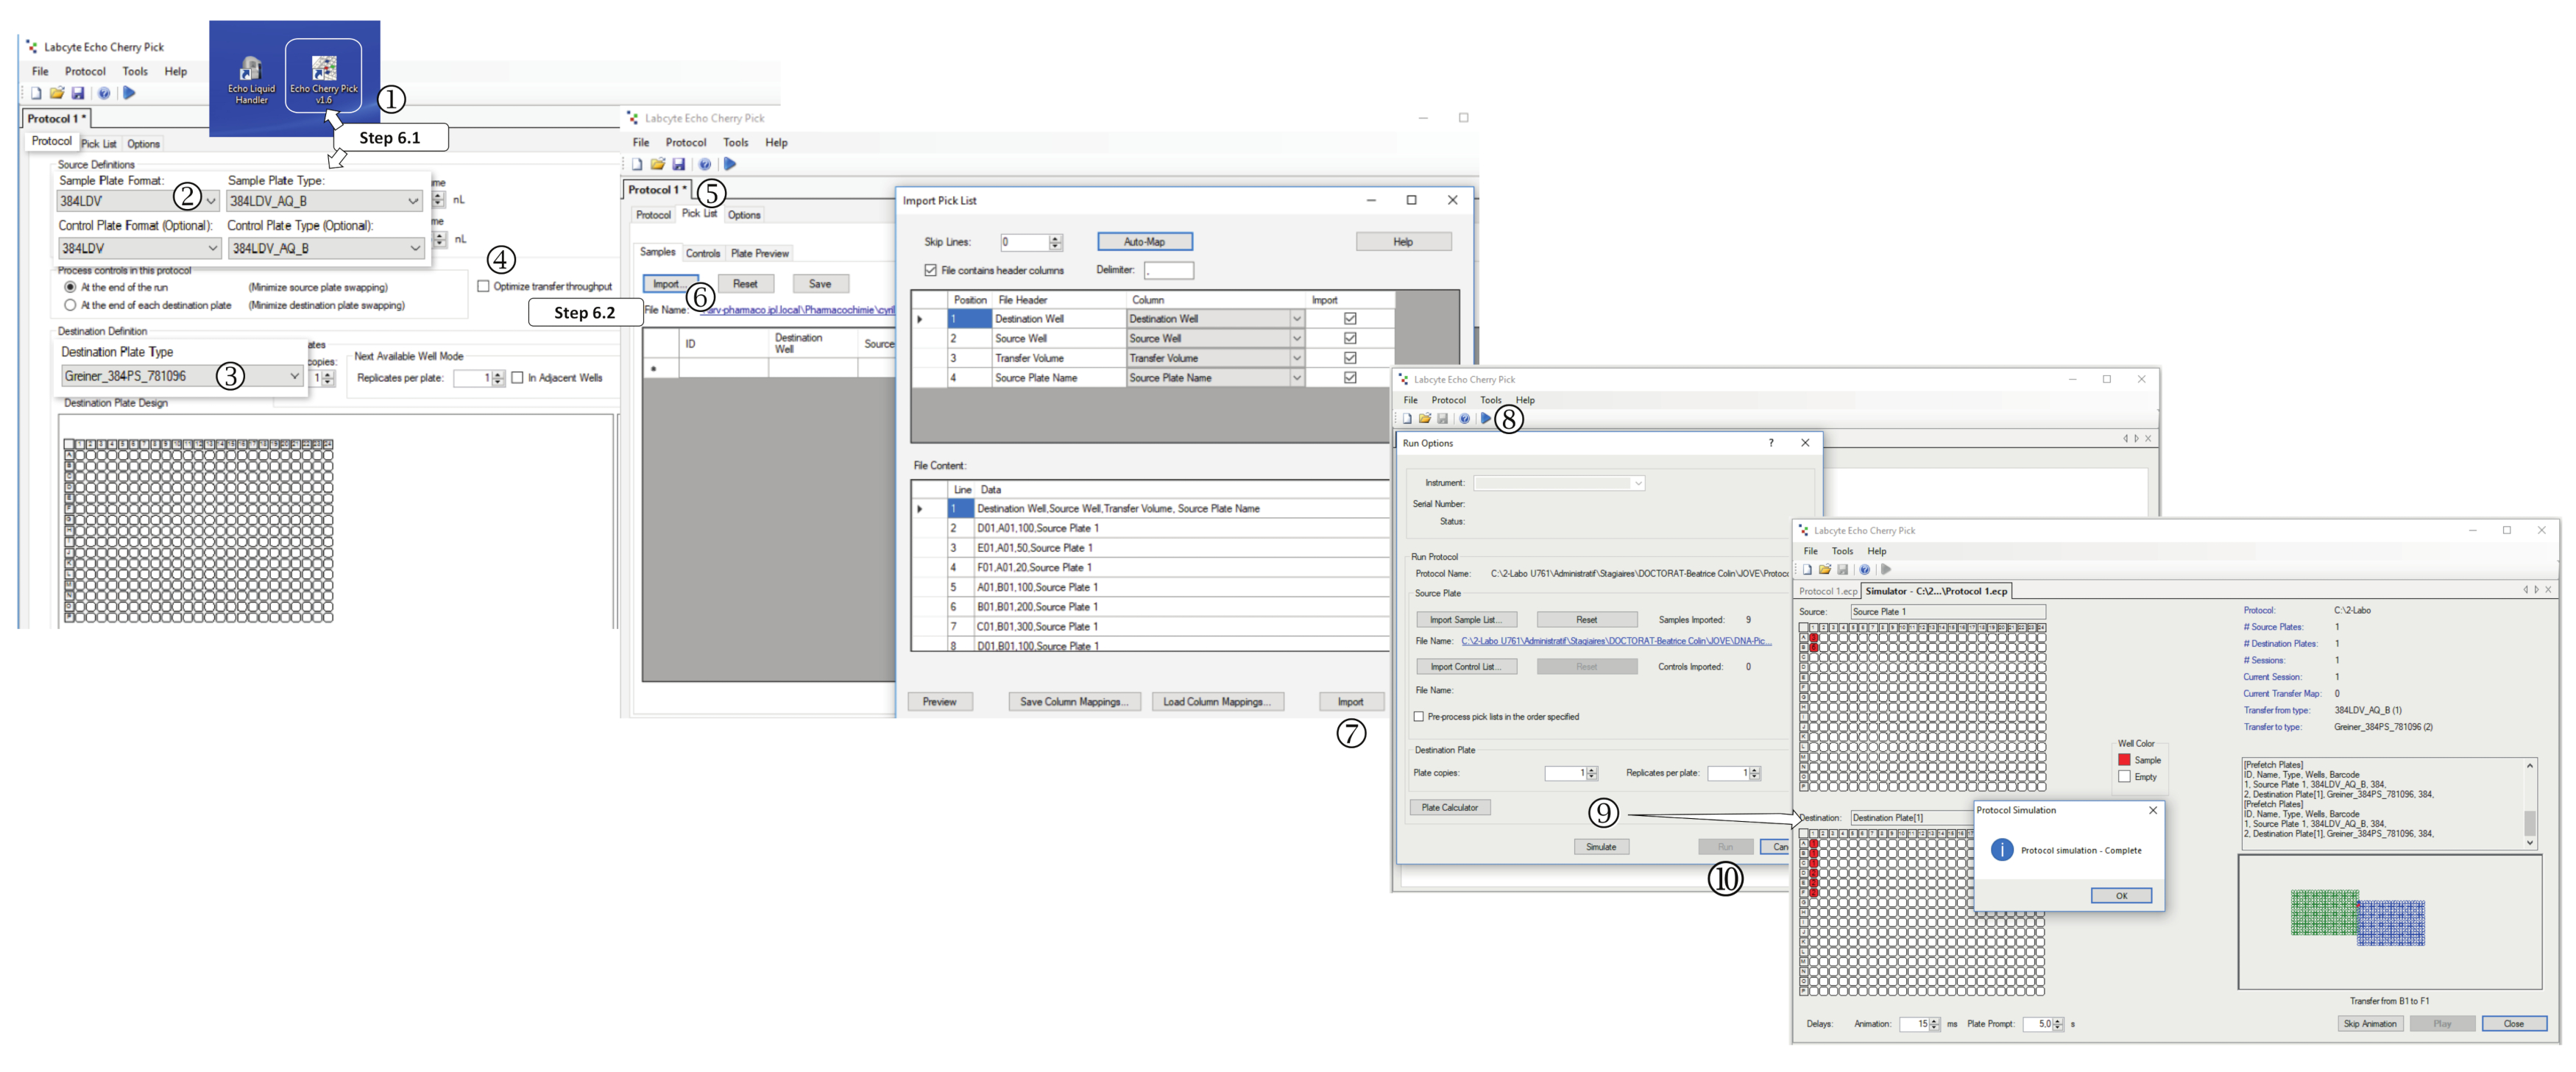
Figure 5: Performance of the picklist-based dispensations. (1) Start the nanodispenser software. In the Protocol tab, select (2) the sample plate format, (3) the destination plate type and (4) unticks "optimize transfer throughput". (5) Select the Pick List tab. (6) Click on Import and select the proper *.csv file (DNA-PickList or T.R.-Picklist). (7) Once selected, click on Import. (8) Click on Play and save the protocol. (9) Perform a dispensation simulation by clicking on Simulate, or (10) Start the programmed dispensation by clicking on Run. Please click here to view a larger version of this figure.
- Select "Pick List" tab, click on Import, select the DNA-Picklist.csv file. Click on Play and save the protocol. Click on Simulate to perform a simulation of the programmed dispensations to make sure that the picklist matches the expected experimental design. Once completed, click on Close.
- Click on Play, and then Run, to start the dispensing program: when asked, insert the requested source plate (DNA solutions manually filled) and the destination plate (diluent-filled) in the nanodispenser.
NOTE: The dispensing time is approximately 5-20 min for a complete 384-well plate, depending on the selected volumes and the total number of dispensations in the experimental design. - Alternatively, pause the protocol here as the diluent- and DNA-filled plates can handle dry or frozen storage for up to 7 days. For dry storage, let the plates dry on the bench at room temperature and then store them the same way. Thaw and centrifuge (at 1,500 x g for 2 min) frozen stored plates before use in a transfection step (section 7).
7. ADE-driven transfection reagent dispensation
- In a biosafety cabinet, extemporaneously dilute lipopolyplex transfection reagent in serum-free medium to a 1x final concentration. Vortex and immediately dispense this transfection reagent mix according to the predefined source plate(s) designed by the macro and using the precalibrated 384-well pipetting guide application as described in step 3.4.
NOTE: Do not centrifuge the source plate once it is loaded with the reagent as no transfection is noticed after centrifugation. - Run the nanodispenser program to perform a "survey" as described in section 5, in order to control the volumes of all the manually filled TR wells of the source plate(s) to avoid dispensing errors due to volumes exceeding 12 µL.
- Click on Reset to clear the sample list of the DNA picklist in the picklist software, and verify that the device parameters are still set to aqueous buffers and to the source and destination plate types used, as in step 6.1.
- Click on Import and choose the TR-Picklist.csv file. Click on Play and save the protocol if prompted, and (this is optionally but strongly recommended) perform a simulation of the programmed transfection reagent mixture dispensations to ensure proper design of the dispensations by clicking on the Simulate button. Once completed, click on Close.
- Click on Play, and then Run button to start the dispensing program: as requested, place the source plate(s) (TR-mixture-filled) and the destination plate (diluent- and DNA-filled) in the nanodispenser.
NOTE: The dispensing time is less than 20 min for a complete 384-well plate when dispensing 500 nL of TR mixture. - Incubate 15-30 min at room temperature after adding the TR to the DNA as indicated by the manufacturer's protocol.
8. Peristaltic liquid handler-based cell dispensation
- Prepare the peristaltic liquid handler for dispensing cells. Disinfect a 10 µL cassette head by spraying it with Aniospray Surf 29 Disinfectant and absorbing the remnant on paper. Mount the cassette on the peristaltic liquid handler device, change the cassette type setting to 10 µL, and make sure the plate format is set to 384 wells.
- Disinfect the 10 µL cassette tubing as previously described in step 4.2. Dive the tube organizer in a sterile vessel and flush the tubing with 5 mL of 70% alcohol, then with 5 mL of distilled water, and finally, with 5 mL of serum-free medium, successively filled in the same vessel and until each tube is empty.
- Prepare the cell suspension to dispense. From a confluent HeLa cell B10-culture dish, wash the cells 1x with 1x phosphate-buffered saline (PBS) solution, and then dissociate the cells with trypsin/EDTA for 5 min at 37 °C.
- Verify the cell dissociation under a microscope and stop the trypsin/EDTA action by adding 10 mL of complete medium (DMEM supplemented with 10% fetal bovine serum and 100 U/mL penicillin-streptomycin; see the Table of Material) in the culture dish. Harvest cells in a 50 mL tube and count the cells under the microscope, using a Malassez cell or an automatic cell counter.
- Prepare at least 25 mL of HeLa cell suspension at a concentration of 37,500 cells/mL in complete medium (i.e., 1,500 cells/40 µL) for a complete 384-well plate, to ensure tube priming and 40 µL/well dispensation.
- To dispense the cells, fill a new sterile vessel with the prepared cell suspension and stir it to avoid sedimentation leading to inaccuracy in the cell density of the dispensation. Insert the tube organizer in this solution and press the Prime button until the cell suspension is starting to flush from the dispensing head. Make sure none of the tip is clogged by visually inspecting the liquid flow from all of them, and ensure each tube is loaded with cell suspension.
- Load the DNA and TR-filled 384-well destination plate on the peristaltic liquid handler plate carrier and remove its lid. Run the precalibrated program to dispense 40 µL of the cell suspension on the complete 384-well plate (i.e., 1,500 cells/well). The dispensing time is about 8 s. Replace the lid of the 384-well plate.
NOTE: Alternatively, the 40 µL cell suspension can be manually dispensed using a multichannel micropipette.
9. Custom biological assay (cell transfection efficiency monitoring)
NOTE: Following the experimental settings and intent of the experiment, use the required methods for luminescence, fluorescence, high-content screening, and reverse transcription quantitative polymerase chain reaction (RT-qPCR). In this section of the protocol, cell transfection efficiency is evaluated by automated fluorescence microscopy and image analysis.
- Incubate the plate at 37 °C with 5% CO2 in a water-saturated atmosphere and until proper protein expression.
NOTE: Here, a 48 h incubation time is used for HeLa cells to monitor the transfection efficiency, using tdTomato- and mVenus-expressing plasmids. - Remove the culture medium 48 h post-transfection by inverting the plate, add 30 µL/well of 10% formalin using the peristaltic liquid handler (10 µL cassette), and incubate for 15 min at room temperature.
- Remove the formalin by inverting the plate; then, incubate the cells for 15 min at room temperature with 0.1 ng/mL Hoechst diluted in 1x PBS solution.
- Wash the cells 3x for 15 min with 80 µL of 1x PBS adjusted to pH = 8 in order to recover the high fluorescence signal lost by the 6.9 pH of the formalin solution incubation step.
- Using an automated fluorescent microscope, acquire images of two or three fluorescent channels (Hoechst, tdTomato, and mVenus) sequentially with 10x objectives and a proper emission filter set (4′,6-diamidino-2-phenylindole [DAPI], dsRed, and fluorescein isothiocyanate [FITC], respectively).
- To evaluate transfection efficiencies, use image analysis software to determine the transfection efficiencies using script analysis based on nuclei staining.
Results
fIn order to determine if the ADE technology could be used for an automated reverse transfection protocol, we monitored cell transfection efficiency by fluorescence microscopy, using a red fluorescent tdTomato expressing plasmid. First aiming at determining the best transfection parameters, different diluent volumes and total amounts of DNA were cross-tested. Diluent volume was used to allow the DNA droplets, once dispensed, to spread all over the wells to circumvent inhomogeneous transfe...
Discussion
The establishment and optimization of an accurate high-throughput transfection method for a given cell line require scientists to follow some key parameters described in this section. We strongly encourage starting with the recommended values throughout the protocol as these settings optimized for HeLa cells also proved to be efficient for HEK cells. However, as the best parameters may depend on the cell lines and transfection reagents, optimal conditions can be defined by varying the cell number, diluent volume, to...
Disclosures
The authors have nothing to disclose.
Acknowledgements
The authors disclosed a receipt of the following financial support for the research, authorship, and/or publication of this article: Inserm, Lille University, Lille Pasteur Institute, Conseil Régional du Nord, and PRIM-HCV1 and 2 (Pôle de Recherche Interdisciplinaire sur le Médicament), Agence Nationale de la Recherche (ANR-10-EQPX-04-01), the Feder (12001407 (D-AL) Equipex Imaginex BioMed) and the European Community (ERC-STG INTRACELLTB n° 260901). The authors wish to thank Dr. S. Moureu, Dr. B. Villemagne, Dr. R. Ferru-Clément, and Dr. H. Groult for their critical review and corrections of the manuscript.
Materials
| Name | Company | Catalog Number | Comments |
| 384LDV Microplate | Labcyte | LP-0200 | |
| 384-well Microplate μClear Black | Greiner | 781906 | |
| Ampicilin | Sigma | A9393-5G | Selection antibiotic for bacteria transformed with ampicilin expressing vector |
| Android Tablet | Samsung | Galaxy Note 8 | used to guide the user while the source plate manual dispense |
| Aniospray Surf 29 | Anios | 2421073 | disinfectant to clean the MicroFlo head |
| Columbus software | Perkin Elmer | image analysis software | |
| Dulbecco's Modified Eagle Medium (DMEM), high glucose, GlutaMAX Supplement, pyruvate | Thermo Fisher Scientific | 10566032 | cell culture medium |
| Echo Cherry Pick 1.5.3 software | Labcyte | Software enabling ADE-based dispenses by the Echo550 device from a *.csv file; nanodispenser software | |
| Echo550 | Labcyte | ADE-based dispenser | |
| Fetal Bovine Serum | Thermo Fisher Scientific | 16000044 | to add in cell culture medium |
| Formalin solution, neutral buffered, 10% | Sigma-Aldrich | HT501128-4L | to fix cell |
| HeLa cells | ATCC | HeLa (ATCC® CCL-2™) | |
| Hoechst 33342, Trihydrochloride, Trihydrate | Thermo Fisher Scientific | H3570 | 10 mg/mL Solution in Water |
| INCell Analyzer 6000 | GE Healthcare | 29043323 | automated laser-based confocal imaging platform |
| LB medium | Thermoischer Scientific LB Broth Base (Lennox L Broth Base)®, powder | 12780052 | culture medium for bacteria growth |
| Lysis Buffer (A2) | Macherey-Nagel | 740912.1 | Buffer from the NucleoSpin Plasmid kit used to prepare plasmid from bacterial culture |
| MicroFlo 10µL cassette | Biotek Instruments Inc | 7170013 | to use with the Microflo Dispenser |
| MicroFlo 1μL cassette | Biotek Instruments Inc | 7170012 | to use with the Microflo Dispenser |
| MicroFlo Dispenser | Biotek Instruments Inc | 7171000 | peristaltic pump-based liquid handler device |
| Microvolume spectrophotometer | Denovix | DS-11 Spectrophotometer | Measure the DNA concentration of samples |
| mVenus plasmid | mVenus cDNA was cloned by enzymatic restriction digestion and ligation in Age1/BsrG1 sites of the tdTomato-N1 plasmid | Vector type: Mammalian Expression, Fusion Protein: mVenus | |
| Neutralization Buffer (A3) | Macherey-Nagel | 740913.1 | Buffer from the NucleoSpin Plasmid kit used to prepare plasmid from bacterial culture |
| NucleoSpin Plasmid kit | Macherey-Nagel | 740588.50 | used to prepare plasmid from bacterial culture |
| Optimal-Modified Eagle Medium (Opti-MEM) Medium | Thermo Fisher Scientific | 31985070 | |
| optional Wash bufferWash Buffer (A4) | Macherey-Nagel | 740914.1 | Buffer from the NucleoSpin Plasmid kit used to prepare plasmid from bacterial culture |
| orbital shaker | incubated large capacity shaker | 444-7084 | Used to grow bacteria under gentle agitation and 37°C |
| Penicillin-Streptomycin | Thermo Fisher Scientific | 15140122 | 10,000 U/mL |
| Phosphate-Buffered Saline | Thermo Fisher Scientific | 10010001 | |
| Plasmid mini-columns | Macherey-Nagel | 740499.250 | Silica membrane mini-column to prepare plasmid from bacterial culture |
| Resuspension Buffer (A1) | Macherey-Nagel | 740911.1 | Buffer from the NucleoSpin Plasmid kit used to prepare plasmid from bacterial culture |
| RNAse A | Macherey-Nagel | 740505 | Enzyme from the NucleoSpin Plasmid kit used to prepare plasmid from bacterial culture |
| tdTomato-N1 plasmid | Addgene | Plasmid #54642 | Vector type: Mammalian Expression, Fusion Protein: tdTomato |
| TransIT-X2 Dynamic Delivery System | Mirus Bio | MIR 6000 | |
| Wash Buffer (AW) | Macherey-Nagel | 740916.1 | Buffer from the NucleoSpin Plasmid kit used to prepare plasmid from bacterial culture |
| 3D printer | Creality | CR10S | used to print the plate adapter |
| Blender Software | https://www.blender.org/ Free software under GNU General Public License (GPL). | version 2.79b | used to design the plate adapter |
References
- Colin, B., Deprez, B., Couturier, C. High-Throughput DNA Plasmid Transfection Using Acoustic Droplet Ejection Technology. SLAS Discovery: Advancing Life Sciences R & D. , 2472555218803064 (2018).
- Mirus Bio. . Optimising Transfection Performance. , (2019).
- Thermo Fisher Scientific. . Factors Influencing Transfection Efficiency | Thermo Fisher Scientific - FR. , (2019).
- Boussif, O., et al. A versatile vector for gene and oligonucleotide transfer into cells in culture and in vivo: polyethylenimine. Proceedings of the National Academy of Sciences of the United States of America. 92 (16), 7297-7301 (1995).
- Figueroa, E., et al. A mechanistic investigation exploring the differential transfection efficiencies between the easy-to-transfect SK-BR3 and difficult-to-transfect CT26 cell lines. Journal of Nanobiotechnology. 15 (1), 36 (2017).
- Kirchenbuechler, I., Kirchenbuechler, D., Elbaum, M. Correlation between cationic lipid-based transfection and cell division. Experimental Cell Research. 345 (1), 1-5 (2016).
- Zhang, Z., Qiu, S., Zhang, X., Chen, W. Optimized DNA electroporation for primary human T cell engineering. BMC Biotechnology. 18 (1), 4 (2018).
- Cao, D., et al. Transfection activity and the mechanism of pDNA-complexes based on the hybrid of low-generation PAMAM and branched PEI-1.8k. Molecular bioSystems. 9 (12), 3175-3186 (2013).
- Bos, A. B., et al. Development of a semi-automated high throughput transient transfection system. Journal of Biotechnology. 180, 10-16 (2014).
- Colosimo, A., et al. Transfer and expression of foreign genes in mammalian cells. BioTechniques. 29 (2), 314-318 (2000).
- Villa-Diaz, L. G., Garcia-Perez, J. L., Krebsbach, P. H. Enhanced transfection efficiency of human embryonic stem cells by the incorporation of DNA liposomes in extracellular matrix. Stem Cells and Development. 19 (12), 1949-1957 (2010).
- Sabatini, D. M. . Reverse transfection method. , WO2001020015A1 (2001).
- Raymond, C., et al. A simplified polyethylenimine-mediated transfection process for large-scale and high-throughput applications. Methods (San Diego, CA). 55 (1), 44-51 (2011).
- Junquera, E., Aicart, E. Recent progress in gene therapy to deliver nucleic acids with multivalent cationic vectors. Advances in Colloid and Interface Science. 233, 161-175 (2016).
- Woodruff, K., Maerkl, S. J. A High-Throughput Microfluidic Platform for Mammalian Cell Transfection and Culturing. Scientific Reports. 6, 23937 (2016).
- Vasileiou, T., Foresti, D., Bayram, A., Poulikakos, D., Ferrari, A. Toward Contactless Biology: Acoustophoretic DNA Transfection. Scientific Reports. 6, 20023 (2016).
- Hadimioglu, B., Stearns, R., Ellson, R. Moving Liquids with Sound: The Physics of Acoustic Droplet Ejection for Robust Laboratory Automation in Life Sciences. Journal of Laboratory Automation. 21 (1), 4-18 (2016).
- Grant, R. J., et al. Achieving accurate compound concentration in cell-based screening: validation of acoustic droplet ejection technology. Journal of Biomolecular Screening. 14 (5), 452-459 (2009).
- Sackmann, E. K., et al. Technologies That Enable Accurate and Precise Nano- to Milliliter-Scale Liquid Dispensing of Aqueous Reagents Using Acoustic Droplet Ejection. Journal of Laboratory Automation. 21 (1), 166-177 (2016).
- Day, R. N., Davidson, M. W. The fluorescent protein palette: tools for cellular imaging. Chemical Society Reviews. 38 (10), 2887-2921 (2009).
- Zielinski, D., Gordon, A., Zaks, B. L., Erlich, Y. iPipet: sample handling using a tablet. Nature Methods. 11 (8), 784-785 (2014).
- Brunner, S., et al. Cell cycle dependence of gene transfer by lipoplex, polyplex and recombinant adenovirus. Gene Therapy. 7 (5), 401-407 (2000).
- Nii, T., et al. Single-Cell-State Culture of Human Pluripotent Stem Cells Increases Transfection Efficiency. BioResearch Open Access. 5 (1), 127-136 (2016).
- Noonan, D. J., Henry, K., Twaroski, M. L. A High-Throughput Mammalian Cell-Based Transient Transfection Assay. Signal Transduction Protocols. 284, 051-066 (2004).
- . . Transfection | TransIT Transfection Reagents | Mirus Bio. , (2015).
- American Type Culture Collection. . General protocol for transfection of stem cells, primary cells, and continuous cell lines with ATCC TransfeX Transfection Reagent. , (2017).
- American Type Culture Collection. . Transfection Reagents for Nucleic Acid Transfer into ATCC Cells. , (2017).
- de Los Milagros Bassani Molinas, M., Beer, C., Hesse, F., Wirth, M., Wagner, R. Optimizing the transient transfection process of HEK-293 suspension cells for protein production by nucleotide ratio monitoring. Cytotechnology. 66 (3), 493-514 (2014).
- Promega. . FuGENE® 6 Transfection Reagent. , (2019).
- Olden, B. R., Cheng, Y., Yu, J. L., Pun, S. H. Cationic polymers for non-viral gene delivery to human T cells. Journal of Controlled Release: Official Journal of the Controlled Release Society. 282, 140-147 (2018).
- Park, E., Cho, H. B., Takimoto, K. Effective gene delivery into adipose-derived stem cells: transfection of cells in suspension with the use of a nuclear localization signal peptide-conjugated polyethylenimine. Cytotherapy. 17 (5), 536-542 (2015).
- Wood, R. W., Loomis, A. L. The physical and biological effects of high-frequency sound-waves of great intensity. The London, Edinburgh, and Dublin Philosophical Magazine and Journal of Science. 4 (22), 417-436 (1927).
- Mamat, U., et al. Eliminating Endotoxin at the Source - A Novel Competent Cell Line with Modified Lipopolysaccharide for Low-Endotoxin Plasmid Production. , (2014).
- Ivanova, N. V., Kuzmina, M. L. Protocols for dry DNA storage and shipment at room temperature. Molecular Ecology Resources. 13 (5), 890-898 (2013).
- Lesnick, J., Lejeune-Dodge, A., Ruppert, N., Jarman, C. . High-Precision Cell Dispensing with the Labcyte Echo® Liquid Handler. , (2017).
- Yang, X., et al. A public genome-scale lentiviral expression library of human ORFs. Nature Methods. 8 (8), 659-661 (2011).
- Peng, J., Zhou, Y., Zhu, S., Wei, W. High-throughput screens in mammalian cells using the CRISPR-Cas9 system. The FEBS journal. 282 (11), 2089-2096 (2015).
Reprints and Permissions
Request permission to reuse the text or figures of this JoVE article
Request PermissionThis article has been published
Video Coming Soon
Copyright © 2025 MyJoVE Corporation. All rights reserved