
恒温测量:研究湍流边界层流的工具
Overview
资料来源:何塞·罗伯托·莫尔托、海梅·多拉多和刘晓峰,圣地亚哥州立大学航空航天工程系,加利福尼亚州圣地亚哥
边界图层是紧邻浸没在流场中的实体表面的细流区域。在此区域,粘性效应(如粘性剪切应力)占主导地位,并且由于流体和固体表面之间的摩擦影响而延迟流动。在边界层之外,流动是无微热的,即没有摩擦、热传导或质量扩散引起的消散效应。
边界层概念由路德维希·普朗特尔于 1904 年引入,它显著简化了 Navier-Stokes (NS) 方程,用于处理固体上的流量。在边界层内,NS方程被简化为边界层方程,而在边界层之外,可以通过Euler方程来描述流,欧拉方程是NS方程的简化版本。

图 1.在平板上的边界层发展。
边界层开发最简单的情况发生在零入射角的平板上。在考虑平板上的边界层开发时,边界层外的速度是恒定的,因此沿墙的压力梯度被认为是零。
边界层在实体表面自然发展,通常经历以下阶段:第一,层边界层状态;第二,过渡状态,第三,湍流边界层状态。每个状态都有自己的定律,描述边界层的流动结构。
边界层的开发和结构研究对理论研究和实践应用都具有重要意义。例如,边界层理论是计算船舶、飞机和涡轮发动机叶片上皮肤摩擦阻力的基础。皮肤摩擦阻力是在边界层内的车身表面产生的,是由于直接接触的流体颗粒对表面施加的粘性剪切应力。皮肤摩擦与表面正常方向的流体粘度和局部速度梯度成正比。皮肤摩擦阻力存在于整个表面上,因此在大面积区域(如飞机机翼)上变得显著。此外,湍流流动会产生更多的皮肤摩擦阻力。宏观湍流流体运动通过将具有高动量的流体颗粒带到表面,增强边界层内的动量传递。
本演示侧重于平板上的湍流边界层,其中流动不规则,如混合或涡流,波动叠加在均流上。因此,湍流边界层中任意点的速度都是时间的函数。在本演示中,将使用恒温热线测量(CTA)进行边界层测量。然后,使用克劳瑟图法计算湍流边界层的皮肤摩擦系数。
Procedure
1. 热线系统动态响应确定
此过程的目的是了解测能仪系统对流量信号变化的响应速度。通过应用方波来测量信号打开和关闭时的频率响应,可以衡量此功能。
- 使用支撑轴将 CTA 系统的热线探头固定在风洞内。
- 设置直流电源、信号发生器和示波器,并连接它们,如图 2(a)所示。信号发生器为惠斯通桥提供方波输入,输出波形在示波器上可视化。
- 打开热线电源、示波器和信号发生器。
- 设置信号发生器以输出具有 150 mV 振幅和 10 kHz 频率的方波。
- 观察示波器中的输出信号,确保输出波形频率和振幅正确。
- 关闭测试部分并插入串行端口。打开风洞,将空速设置为 40 mph。
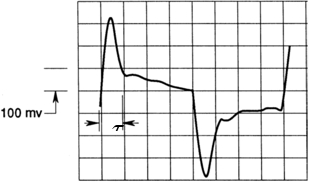
- 一旦气流稳定下来,从示波器测量信号过冲的宽度。"有关*的定义,请参阅图 3。
- 使用*的测量值使用公式获得热线系统的截止频率:f切= 1/1.5
Results
Application and Summary
Tags
跳至...
此集合中的视频:

Now Playing
恒温测量:研究湍流边界层流的工具
Aeronautical Engineering
7.2K Views

模型飞机的空气动力学性能:DC-6B
Aeronautical Engineering
8.3K Views

推进器特性:音高、直径和叶片数在性能上的变化
Aeronautical Engineering
26.4K Views

机翼行为:克拉克Y-14翼上的压力分布
Aeronautical Engineering
21.2K Views

Clark Y-14 翼性能:高提升设备的部署(片和板条)
Aeronautical Engineering
13.4K Views

湍流球法:评估风洞流量质量
Aeronautical Engineering
8.7K Views

交叉圆柱流:测量压力分布和估计阻力系数
Aeronautical Engineering
16.2K Views

喷嘴分析:沿聚合和融合分流喷嘴的马赫数和压力的变化
Aeronautical Engineering
38.0K Views

施利伦成像:一种可视化超音速流特性的技术
Aeronautical Engineering
11.7K Views

水隧道中的流量可视化:在三角洲翼上观察前沿涡流
Aeronautical Engineering
8.2K Views

表面染料流可视化:观察超音速流中条纹模式的定性方法
Aeronautical Engineering
4.9K Views

皮托静态管:测量气流速度的设备
Aeronautical Engineering
49.2K Views

压力传感器:使用皮托静态管进行校准
Aeronautical Engineering
8.5K Views

实时飞行控制:嵌入式传感器校准和数据采集
Aeronautical Engineering
10.3K Views

多直升机空气动力学:六轴飞行器上的特征推力
Aeronautical Engineering
9.1K Views
版权所属 © 2025 MyJoVE 公司版权所有,本公司不涉及任何医疗业务和医疗服务。