Method Article
טכנולוגיית מציאות משולבת והדפסה תלת מימדית בהוראה: אנטומיה של הלב כדוגמה
In This Article
Summary
כאן, אנו מתארים פרוטוקול לבניית מודל לב מאפס המבוסס על טומוגרפיה ממוחשבת ומציגים אותו לסטודנטים לרפואה באמצעות הדפסה תלת מימדית (3D) וטכנולוגיית מציאות מעורבת כדי ללמוד אנטומיה.
Abstract
טכנולוגיית מציאות מעורבת והדפסה תלת מימדית (תלת מימד) הופכות נפוצות יותר ויותר בתחום הרפואה. במהלך מגיפת COVID-19 ומיד לאחר שההגבלות הוסרו, יושמו חידושים רבים בהוראת רופאי העתיד. היה גם עניין בטכניקות סוחפות וטכנולוגיית הדפסת תלת מימד בהוראת אנטומיה. עם זאת, אלה אינם יישומים נפוצים. בשנת 2023 הוכנו הדפסות תלת מימד והולוגרמות בטכנולוגיית מציאות מעורבת לשיעורים המתמקדים במבנה הלב. הם שימשו ללמד תלמידים, שבתמיכת מהנדסים יכלו ללמוד על המבנה המפורט של הלב ולהכיר את הטכנולוגיות החדשות התומכות במודל המסורתי של למידה על גופות אדם. סטודנטים מוצאים שאפשרות זו היא בעלת ערך רב. המאמר מציג את תהליך הכנת החומרים לשיעורים ואפשרויות יישום נוספות. המחברים רואים הזדמנות לפיתוח הטכנולוגיות המוצגות בהוראה של תלמידים ברמות שונות של חינוך והצדקה ליישום נרחב יותר ויותר.
Introduction
טכנולוגיית הדפסה תלת מימדית (תלת מימד) ומציאות מעורבת הם הישגים טכנולוגיים נפוצים יותר ויותר ברפואה. יישומים נוספים נמצאים לא רק בפרקטיקה הקלינית היומיומית של מומחים רבים מתחומים שונים אלא גם בהוראה של מתמחים ורופאים לעתיד, כלומר סטודנטים לרפואה 1,2,3,4,5,6.
טכנולוגיית הדפסת תלת מימד משמשת לעתים קרובות להדפסת מודלים אנטומיים, המוצעים בעיקר על ידי גופים מסחריים, אך העניין הגובר של סטודנטים בסוג זה של הכנה ללמידה מהווה דחף להכנסת חידושים במחלקות האנטומיה באוניברסיטאות לרפואה7. ניתן ליצור הכנות על סמך נתונים מאטלסים אנטומיים, שרטוטים ותחריטים, אך גם על סמך מחקרי הדמיה כגון טומוגרפיה ממוחשבת או הדמיית תהודה מגנטית 1,8,9. ניתן להדפיס תכשירים אנטומיים במדפסת תלת מימד בקני מידה שונים, וניתן להשתמש בצבעים, טושים ווריאציות אחרות כדי להגביר את הנגישות של חומר הלימוד10,11. למרות הזמינות המוגברת של חומרים, לסטודנטים לרפואה בפולין אין גישה רחבה לסוג זה של הכנה, ללא קשר לנכונות המוצהרת לתמוך במודל ההוראה הנוכחי והקלאסי המבוסס על הכנת גופות אנושיות עם תוספת טכנולוגיות חדשות שעדיין לא יושמו במלואן.
טכנולוגיית מציאות מעורבת היא שילוב של העולם הווירטואלי עם העולם האמיתי. הודות למשקפי מגן המאפשרים הדמיה של הולוגרמות שהוכנו בעבר, ניתן "להניח" אותם על עצמים מסביב בעולם האמיתי12. ניתן לתפעל הולוגרמות בחלל, למשל, להגדיל, להקטין או לסובב, מה שהופך את התמונה הנצפית לחזותית, נגישה ושימושית יותר. מציאות מעורבת משמשת יותר ויותר מפעילים בדיסציפלינות כירורגיות, למשל, ניתוחי לב 3,13 אורתופדיה 14,15,16,17, אונקולוגיה 18. יותר ויותר, במיוחד בתקופה שלאחר מגיפת הקורונה, דידקטיקנים בתחום מדעי הרפואה הבסיסיים מתעניינים בטכנולוגיות החדשות, כולל מציאות משולבת, על מנת ליישם אותן בחינוך רופאי העתיד 19,20,21. מורים אקדמאים המלמדים אנטומיה רגילה מוצאים גם הם מקום להכנסת מציאות משולבת בתחומם 22,23,24,25,26. יצירת הולוגרמות דורשת מחקר הדמיה, לרוב טומוגרפיה ממוחשבת, אשר מעובדת ומעובדת על ידי מהנדסים באמצעות תוכנה ייעודית לגרסה הולוגרפית - האפשרית לשימוש עם משקפי מגן.
החלטנו ליצור חומרים שימושיים עבור סטודנטים ללמוד את האנטומיה של הלב האנושי כחלק משיעורי אנטומיה בשנה הראשונה ללימודי הרפואה. לשם כך נעשה שימוש בסריקת אנגיו-CT של הלב, שהועמדה לרשות המחלקה הקרדיולוגית לאחר אנונימיזציה מלאה של הנתונים. אנחנו, שחולקנו לשני צוותים, יצרנו הולוגרמות והדפסות תלת מימד, שלאחר מכן הועמדו לרשות התלמידים כחלק משיעור פיילוט. התלמידים דירגו היטב את הנגישות והדיוק של החומרים, אך מחקר מפורט בנושא זה יוצג בהמשך - התוצאות מוערכות כעת.
כאן, אנו מראים את תהליך יצירת המודלים מטומוגרפיה ממוחשבת ועד להצגת מודלים מוכנים המיושמים בפרקטיקת ההוראה.
Protocol
הפרוטוקול עוקב אחר ההנחיות של ועדת האתיקה למחקר בבני אדם של האוניברסיטה הרפואית של שלזיה. נעשה שימוש בנתוני ההדמיה של המטופל לאחר אנונימיזציה מלאה.
1. 3D הדפסה - סגמנטציה ושחזור של מודל הלב התלת מימדי
- העלאת תמונות ועיבוד מקדים
- פתח את 3D Slicer 5.6.0 ונווט אל מודול הנתונים27.
- לחץ על הוסף נתונים ובחר את תמונות ה-CT הספציפיות למטופל בפורמט DICOM. ודא שהתמונות מועלות בכיוון הנכון.
- העריכו את איכות התמונות על ידי בדיקת תצוגות ציריות, סגיטליות ועטרתיות במציג הפרוסות. ודא ניגודיות מספקת כדי להבחין בין שריר הלב לחדרי הלב.
- אם הניגודיות אינה מספיקה, התאם את הגדרות חלון/רמה כדי לשפר את בידול הרקמות באמצעות מודול אמצעי האחסון. הגדר את החלון ל-350 HU ואת הרמה ל-40 HU כנקודת התחלה, ושנה במידת הצורך.
- אשר את הנראות של אזורי עניין אנטומיים (ROI), כולל שריר הלב וחדרי הלב הפנימיים.
- פילוח מבוסס סף
- נווט אל מודול עורך הפלחים ולחץ על הוסף כדי ליצור פילוח חדש.
- בחר סף מכלי הפילוח. הגדר את ה-Thresold התחתון ל-100 HU ואת הסף העליון ל-300 HU כדי לבודד רקמות רכות.
הערה: ערכים אלה עשויים להשתנות בהתאם לאיכות התמונה ולמאפיינים הספציפיים למטופל. - כוונן את טווח הסף באופן ידני כדי לחדד את ההחזר על ההשקעה על ידי גרירת המחוונים או הזנת ערכים עד לבידוד ברור של שריר הלב ותאי הלב. השתמש בבדיקה חזותית בתצוגות הציריות, הסגיטליות והעטרה כדי להבטיח בחירה נכונה.
- ודא שכל האזורים האנטומיים הרלוונטיים נלכדים. במידת הצורך, עברו לכלי Paint כדי להוסיף או להסיר ידנית אזורים בפילוח שלא נלכדו כהלכה באמצעות קביעת סף.
- לחץ על החל כדי לסיים את הפילוח עבור הבחירה מבוססת הסף (איור 1)
- תיקון ידני של פרוסה אחר פרוסה
- בעזרת הכלים מספריים או מחיקה בעורך הקטעים, בדוק ידנית כל פרוסה של מערך הנתונים של ה-CT. תקן אי דיוקים, כגון אלה שנגרמו על-ידי חפצים או ניגודיות גרועה, על-ידי הסרה או הוספה של אזורים מפולחים לפי הצורך.
- עבור כל פרוסה, התמקדו בזיהוי מדויק של שריר הלב וחדרי הלב הפנימיים. אם מתעוררות אי בהירות, התייעץ עם איש מקצוע רפואי או התייחסות אנטומית כדי להבטיח דיוק.
- הפרד את הלב לשני מקטעים נפרדים: אחד לשריר הלב ואחד לחדרים הפנימיים. השתמש בלחצן צור פלח שוק חדש כדי להבדיל בין מבנים אלה.
- המשך בבדיקה ובתיקון של פרוסה אחר פרוסה עד שכל הפרוסות במישור הצירי, הסגיטלי והעטרה יתוקנו ויפולחו.
- עיבוד לאחר וייצוא מודלים
- ייבא את קבצי ה-STL המיוצאים ל-MeshMixer (איור 2, המכונה תוכנת עיצוב אב-טיפוס).
- התחילו בביטול חפצים קטנים והבטחת אחידות הדגם על-ידי בחירה באפשרות Edit > Make Solid.
- בחלון המוקפץ, בחר Solid Type as Precision כדי לשמור על הפרטים המדויקים של הפילוח. התאם את המחוון Solid Precision לערך בין 0.8 ל- 1.0 לקבלת נאמנות מיטבית.
- לאחר מיצוק הדגם, המשך להסרת חפצים ידנית. השתמש בכלי Erase & Fill כדי לשחזר את כל שטחי הפנים שהופרעו. ניתן לגשת אליו תחת בחר > שנה > מחק ומילוי.
- לחץ וגרור כדי לבחור אזורים בעייתיים, ולאחר מכן השתמש באפשרות מילוי כדי לשחזר את רציפות פני השטח. ודא שהאזורים הממולאים מתמזגים בצורה חלקה עם הגיאומטריה שמסביב.
- לעידון כללי של פני השטח, השתמשו בכלי בחירה כדי לסמן אזורים מסוימים בדגם הדורשים החלקה. לאחר הבחירה, נווט אל Modify > Smooth והחל את הכלי באופן איטרטיבי.
- התאימו את המחוון 'עוצמת החלקה ' בין 10 ל- 50%, בהתאם לחומרת החריגות במשטח. היזהר לשמור על דיוק אנטומי בזמן ההחלקה. השתמש ב - Shift + Left Click כדי לבטל את הבחירה באזורים שאינם דורשים שינוי.
- לאחר השלמת ההחלקה, השתמשו בכלי Inspector כדי לזהות ולמלא באופן אוטומטי את כל החורים שנותרו ברשת. בדוק את הדגם באופן ויזואלי כדי לוודא שאין חפצים עיקריים או אי סדרים במשטח.
- כדי לשלב את שריר הלב וחדרי הלב הפנימיים למודל מגובש אחד, יש ליישם פעולות בוליאניות . עבור אל ערוך > האיחוד הבוליאני ובחר את שני החלקים הנפרדים (שריר הלב ותאים) כדי למזג אותם.
- ודא שהפעולה מצטרפת בהצלחה למבנים מבלי ליצור חורים פנימיים או חפיפה. בדוק את הצמתים והתאם לפי הצורך על ידי זיקוק ידני של אזורי המיזוג באמצעות Erase & Fill או Smooth (איור 3).
- לאחר איחוד ועידון המודל, ייצא את קובץ ה-STL הסופי על ידי בחירה ב-Export >-STL להכנת הדפסת תלת מימד.
- ייבא את קבצי ה-STL המיוצאים ל-MeshMixer (איור 2, המכונה תוכנת עיצוב אב-טיפוס).
- הכנת מודל להדפסת תלת מימד
- בחירת חומרים והגדרות מדפסת
- השתמש בחוט אקרילוניטריל בוטאדיאן סטירן (ABS), המאפשר עיבוד קל לאחר מכן, כגון החלקת אצטון.
הערה: מערכת ה-ABS רגישה לתנודות טמפרטורה, לכן הקפידו על סביבה יציבה במהלך ההדפסה. - בחר במדפסת תלת מימד סגורה לבקרת טמפרטורה טובה יותר.
- השתמש בחוט אקרילוניטריל בוטאדיאן סטירן (ABS), המאפשר עיבוד קל לאחר מכן, כגון החלקת אצטון.
- הגדרות מדפסת וכלי פריסה
- דגם מדפסת: השתמש במדפסת המתאימה. כאן נעשה שימוש ב-Creality Ender 3 עם מארז מתכת בהתאמה אישית.
- חומר נימה: השתמש ב-ABS.
- הגדר את ההגדרות הבאות ב-Cura או בתוכנת חיתוך דומה.
קוטר זרבובית: 0.5 מ"מ
טמפרטורת זרבובית: ~240 מעלות צלזיוס (התאם על בסיס מותג נימה)
טמפרטורת מיטה: ~100 מעלות צלזיוס
גובה שכבה: 0.24 מ"מ
מהירות הדפסה: ~100 מ"מ לשנייה (הפחתה ל-50-60 מ"מ לשנייה לאיכות גבוהה יותר)
צפיפות מילוי: 25% (לאיזון חוזק ושימוש בחומרים)
תומך: אפשר תמיכה אוטומטית (למשל, תומכי עץ)
מאוורר קירור: כבה כדי למנוע עיוות
עזרי הידבקות: השתמש בשוליים או ברפסודה כדי לשפר את הידבקות המיטה - ודא כיול של המדפסת והתאם את ההגדרות בהתבסס על (א) טולרנסים ספציפיים למדפסת, (ב) מאפייני חוט ה-ABS ו-(ג) הפשרה הרצויה בין מהירות ההדפסה לאיכות פני השטח.
- מבני תמיכה ועיבוד לאחר
- מבני תמיכה: צור תמיכה בתוכנת החיתוך באמצעות כלים מובנים (למשל, Cura) כדי לייצב תכונות תלויות במהלך ההדפסה. ודא שהתומכים אינם מפריעים לפרטים אנטומיים עדינים.
- הסרת תמיכה: אפשר לדגם המודפס להתקרר לחלוטין כדי למנוע נזק במהלך הסרת התמיכה. הסר תומכים בזהירות. השתמש בצבת אף מחט לתמיכה נרחבת יותר. לאזורים קטנים או עדינים, יש להסיר בעדינות את התומכים ביד.
- גימור פני השטח: בדוק את הדגם המודפס לאיתור אזורים מחוספסים, במיוחד כאשר חוברו תומכים. החליקו את האזורים הללו באמצעות נייר זכוכית עדין (למשל, 200-400 חצץ), קבצים קטנים לפירוט מדויק, וכוונו למשטח נקי ורציף, כדי לשפר את הדיוק האנטומי.
- עיבוד לאחר מתקדם (אופציונלי): אם נדרש גימור מלוטש, הכינו תא להחלקת אדים עם אצטון וחשפו את הדגם לאדי אצטון למשך ~9 דקות (בצע שלב זה באזור מאוורר היטב עם אמצעי זהירות מתאימים [למשל, כפפות, משקפי מגן]), ותן לדגם להתייבש לחלוטין לפני הטיפול.
- בחירת חומרים והגדרות מדפסת
- נקודות השהייה.
- השהה את הפרוטוקול לאחר כל תיקון פרוסה בשלב 1.3.1 על ידי שמירת הפרויקט ב-3D Slicer. המשך את הפילוח מאוחר יותר ללא אובדן נתונים.
- בשלב 1.4.1, לאחר ייצוא קבצי STL, במידת הצורך, השהה את שלבי העיבוד מכיוון שהם אינם דורשים המשכיות.
2. מציאות משולבת
הערה: עבד את קבצי CT DICOM של הלב לייצוג הולוגרפי באמצעות CarnaLife Holo (המכונה תוכנת מציאות משולבת).
- הכן את החומרה.
- הפעל את המחשב הנייד וחבר אותו לשקע חשמל. הפעל את משקפי המציאות המשולבת.
- חבר את הנתב למחשב הנייד.
- טען את תמונת ה-CT באוזניות המציאות המשולבת מקבצי CT DICOM שנרכשו.
- פתח את תוכנת המציאות המשולבת והיכנס (איור 4).
- בחר את התיקייה המתאימה עם סריקות CT. בחר את הסדרה הנכונה של נתוני CT (איור 5).
- בדוק את כתובת ה- IP המוצגת בעת הפעלת האוזניות והזן אותה במקום המיועד בתוכנת המציאות המשולבת.
- לחץ על כפתור התחבר כדי לראות את ההדמיה באוזניות המציאות המשולבת.
- פלח את מבנה הלב עם כלי פילוח ידני באמצעות אפשרות המספריים (איור 6). בעזרתו, סמן אזורים שיוסרו משחזור נתוני CT על ידי לחיצה שמאלית וגרירה.
- סיים את סימון אזור החיתוך על ידי לחיצה על לחצן העכבר השמאלי ולאחר מכן אישור החיתוך בחלון הקופץ.
- בחר הגדרה מוגדרת מראש (פרמטרים של הדמיית צבע) המתאימה להדמיית מבנה הלב מתוך רשימה של הגדרות קבועות מראש זמינות על ידי לחיצה על שמו: CT CARDIAC HOLLOW.
- במידת הצורך, התאם את התצוגה החזותית על-ידי שינוי החלון באמצעות לחיצה ימנית והחזקה תוך כדי הזזת הסמן בתצוגה התלת-ממדית.
- טען מודלים תלת מימדיים של חדרים ואטריום שמאל וימין.
- לחץ על המקטע מודלים תלת-ממדיים בתוכנת המציאות המשולבת. לחץ על כפתור טען מודלים .
- נווט לתיקייה עם דגמי משטח. בחר את כל ארבעת הקבצים ואשר על ידי לחיצה על פתח. התאם את הצבעים של מודלים חזותיים (איור 7).
- לחץ על סמל העיפרון ברשימת דגמי התלת-ממד. לחץ על הכרטיסיה היבט בחלון המוקפץ הגלוי.
- לחץ על הריבוע הלבן שליד תווית הצבע . בחרו צבע מתאים בעזרת החלון הנפתח Color Picker . אשר על ידי לחיצה על OK לחצן. לחץ לחיצה ימנית על תצוגת תלת מימד.
- חזור על כל השלבים עבור דגמי המשטח הנותרים.
- צור ביאורים של מבנים אנטומיים בתצוגות דו-ממדיות על ידי שימוש בשלוש תצוגות דו-ממדיות (צירית, סגיטלית ועטרה) כדי למקם את נקודת הביאור במקום המתאים.
- לחץ על הקטע ביאור בתוכנה.
- בצד ימין של חלון היישום (בפריסת ברירת המחדל של היישום) יש שלוש תצוגות דו-ממדיות של נתונים משוחזרים.
- עבור בין פרוסות על-ידי לחיצה על סמלי חץ יחיד או כפול לצד המחוון בצד ימין של כל תצוגה דו-ממדית.
- שנה את הפרוסה על-ידי לחיצה ממושכת על לחצן Shift השמאלי תוך גלילה עם גלגל העכבר.
- שנה את הפרוסה על-ידי גרירת קווים כחולים, אדומים או ירוקים (ייצוגי מישור דו-ממדי).
- לאחר הגדרת הפרוסה הנכונה בתצוגה הדו-ממדית שנבחרה, הגדל את התצוגה באמצעות גלגל העכבר והצב את נקודת הביאור בלחיצה שמאלית. הערות ייווצרו במקום שנלחץ.
- חזור לקטע ביאורים ולחץ על סמל העיפרון בביאור ברשימת הביאורים עם מספר הזיהוי המתאים.
- בחלק התחתון של החלון הקופץ, הזן את הטקסט של הביאור, למשל, "חדר שמאלי".
- התאם את הצבעים, העובי והגדלים של הביאור בחלון קופץ זה. חזור לתצוגה הדו-ממדית עם הביאור שהוצב.
- תפוס והעבר את תווית ההערה מחוץ למישור הדו-ממדי למקום מתאים.
- חזור על כל השלבים עבור כל המבנים האנטומיים שצריך להעיר.
- טען מצב הדמיה כדי לקבל הערות שמורות של מבנים אנטומיים בהדמיה.
- לחץ על טען קובץ סמל ליד סמל התקליטונים בפינה הימנית העליונה של תצוגת התלת-ממד. בחלון הנפתח, לחצו על הסמל Folder , נווטו לספרייה עם קובץ מצב התצוגה החזותית שנשמר ולחצו על Select folder.
- אם בוחרים נכון ואם יש קובץ חוקי לנתונים מסוימים אלה, רשימה של קובצי מצב תצוגה חזותית רלוונטיים תחליף את כתב הוויתור No files found בשמות של מצבים שהמשתמש יכול לטעון.
- לחץ לחיצה ימנית על מצב הדמיה מתאים כדי לבחור אותו ולאשר על ידי לחיצה על כפתור הטעינה. לאחר הטעינה, המשתמש יתבקש עם הסטטוס של טעינת מצב הדמיה.
- כדי לראות את ההדמיה המוכנה בחלל ההולוגרפי, הרכיב את האוזניות והשתמש בפקודה הקולית אתר כאן כדי להביא שחזור סריקת CT הולוגרפית תלת מימדית מול העיניים. התאימו אותו באמצעות פקודות קוליות, למשל, סיבוב, זום, גזירה חכמה ושלבו אותו עם מחוות ידיים (איור 8).
- השתמש בפקודה הקולית Cut Smart כדי להחיל ולהתאים את מישור החיתוך בניצב לקו הראייה.
- הזז וסובב את הראש כדי לתרגם את התנועה והכיוון של מישור החיתוך המיושם. התקרב להולוגרמה כדי להזיז את מישור החיתוך עמוק יותר לתוך השחזור ההולוגרפי. סובב את הראש 90° בכיוון השעון כדי לסובב את מישור החיתוך 90° בכיוון השעון וכו'.
- בצע תנועות אלה כדי לראות את החלקים הפנימיים של מבנה הלב, הדמיה הולוגרפית ומודלים של פני השטח שנטענו בעבר והערות של מבנים אנטומיים.
תוצאות
פרוטוקול הפילוח והשחזור התלת-ממדי הניב שתי תפוקות עיקריות לאימון אנטומיה: מודל לב מודפס בתלת מימד והדמיית MR תלת מימדית של הלב. תוצאות אלו, המשתמשות בנתוני CT ספציפיים למטופל, מספקות כלים משלימים לתלמידים לעסוק בחוויות למידה מעשיות וסוחפות.
מודל הלב המודפס בתלת מימד מאפשר לתלמידים לקיים אינטראקציה פיזית עם ייצוג מוחשי של אנטומיה לבבית. מודל זה מציג מאפיינים חיצוניים מובהקים, כגון שריר הלב, כמו גם מבנים פנימיים, כולל התאים והשסתומים. בניסויים מוצלחים, הדיוק האנטומי היה גבוה, עם תכונות מוגדרות היטב וחפצים מינימליים לאחר עיבוד שלאחר העיבוד. איור 9 מציג מודל מודפס בתלת מימד מעובד במלואו עם בידול ברור בין שריר הלב לתאים הפנימיים. במקרים שבהם הניגודיות בתמונות ה-CT הייתה לא אופטימלית, שגיאות סגמנטציה הובילו לאי דיוקים במודל, כגון גדלי תאים לא סדירים או מבני שסתומים לא שלמים. בעיות אלה היו ניתנות לתיקון לעתים קרובות באמצעות התערבות ידנית, כולל החלקה נוספת והסרת חפצים, כפי שמודגש באיור 10.
לעומת זאת, הדמיית המציאות המעורבת התלת מימדית מציעה חוויה דינמית ואינטראקטיבית שבה התלמידים יכולים לחקור את הלב במרחב הווירטואלי. סביבת ה-MR מספקת אינטראקציה בזמן אמת, כולל סיבוב, זום וחתך דרך מישורים אנטומיים שונים, מה שמאפשר הבנה מפורטת יותר של מבנים מורכבים כמו העורקים הכליליים או דפנות המחיצה. יישומים מוצלחים של הדמיית MR הציגו ייצוגים מדויקים ביותר של האנטומיה החיצונית והפנימית כאחד. עם זאת, הדמיות לא אופטימליות (למשל, היכן שהסגמנטציה הייתה פגומה) הובילו לתצוגות מעוותות של מבנים פנימיים, והשפיעו על הריאליזם של מודל ה-MR ועל יעילות ההוראה (איור 11). עבור המבנים האנטומיים המורכבים, גישת הפילוח עשויה שלא להספיק. הודות לאפשרות של עיבוד נפחי ניתן לדמיין צפיפויות שונות (המיוצגות על ידי יחידות Hounsfield) שחשובות להבנת האנטומיה (איור12).
הטכניקות מציעות כלים חזקים ומשלימים המשפרים את חווית הלמידה על ידי מתן מודלים מדויקים וניתנים למניפולציה, אם כי הצלחתם תלויה באיכות הפילוח והשחזור בשלבים הראשונים של הפרוטוקול. בסך הכל, תוצאות אלו מדגימות את יעילות הפרוטוקול ביצירת מודלים לבביים מדויקים מנתוני CT ספציפיים למטופל. תוצאות אלו מדגימות את יעילות הפרוטוקול ביצירת מודלים לבביים מדויקים מנתוני CT ספציפיים למטופל.
מחקר ראשוני נערך כדי להעריך את תפיסות התלמידים לגבי טכנולוגיית מציאות משולבת בחינוך אנטומי - במיוחד בלימוד מבנה הלב. במחקר השתתפו 106 סטודנטים שתחת פיקוח מהנדסים הצליחו להשתמש בהולוגרמות למטרות למידה. בסוף המפגש הם נשאלו: "האם טכנולוגיית המציאות המשולבת עזרה לכם להבין טוב יותר את הנושא - מבנה הלב?" כל המשיבים (100%) ענו "כן". הידע של התלמידים הוערך מיד לאחר המפגש באמצעות מבחן קצר בכתב הדורש מהם לתאר שלושה מבנים אנטומיים הקשורים למורפולוגיה של הלב. הציון הממוצע היה 2.037 לעומת ציון כולל של 3 (טבלה 1).
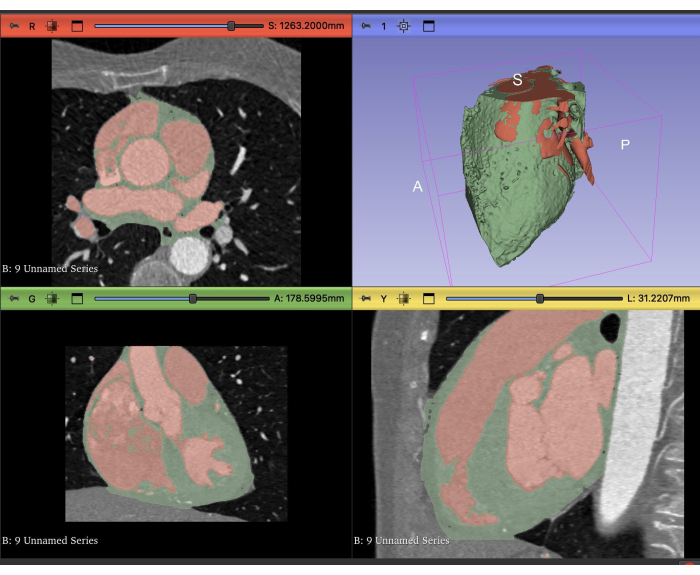
איור 1: פילוח CT של הלב. תצוגות ציריות (משמאל למעלה), עטרה (משמאל למטה), סגיטלי (מימין למטה) ותלת-ממד (מימין למעלה) של פילוח CT בתוכנת 3D Slicer. אנא לחץ כאן לצפייה בגרסה גדולה יותר של איור זה.

איור 2: לאחר עיבוד. תצוגות של דגמי תלת מימד של פילוח בתוכנת עיצוב אב הטיפוס. אנא לחץ כאן לצפייה בגרסה גדולה יותר של איור זה.
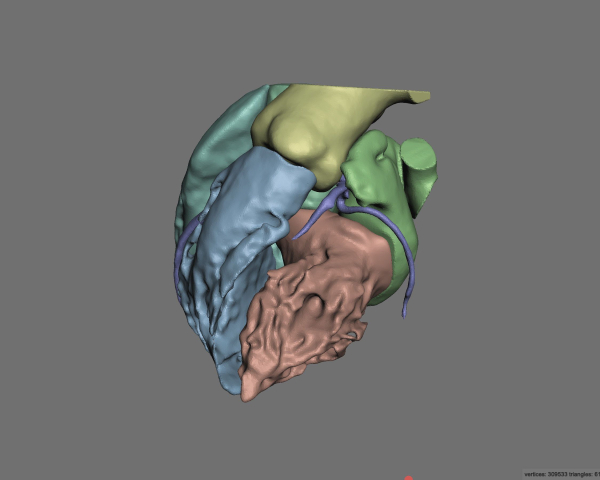
איור 3: לאחר עיבוד שלאחר העיבוד. תצוגות של דגמי תלת מימד של פילוח בתוכנת עיצוב אב הטיפוס. אנא לחץ כאן לצפייה בגרסה גדולה יותר של איור זה.
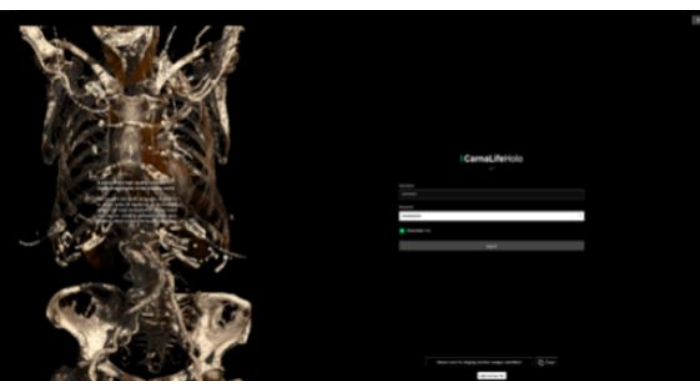
איור 4: מבט על תוכנת המציאות המשולבת. מסך התחלת היישום. לוח כניסה ברור ונגיש. אנא לחץ כאן לצפייה בגרסה גדולה יותר של איור זה.

איור 5: בחירת הסידרה הנכונה בתוכנת המציאות המשולבת. מבחר תמונות טומוגרפיה ממוחשבת זמינות להדמיה הולוגרפית. אנא לחץ כאן לצפייה בגרסה גדולה יותר של איור זה.
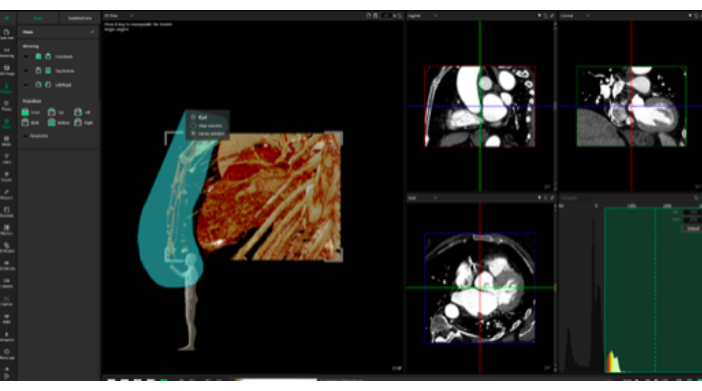
איור 6: אפשרות מספריים לחיתוך חלקי תצוגה חזותית בתוכנת המציאות המשולבת. כלי המאפשר להתאים את ההולוגרמה לצרכי המשתמש בזמן אמת. אנא לחץ כאן לצפייה בגרסה גדולה יותר של איור זה.
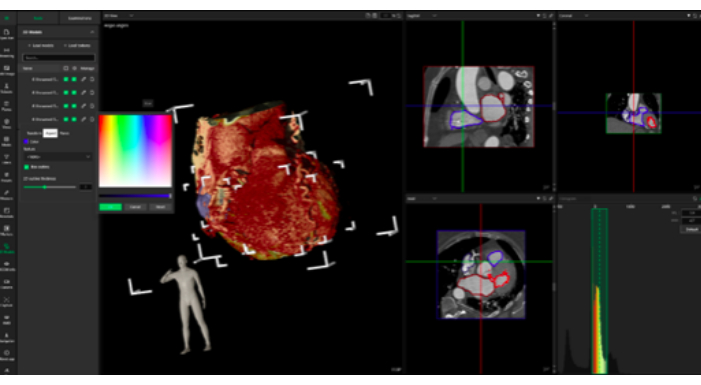
איור 7: התאמת הצבעים של התצוגה החזותית ההולוגרפית בתוכנת המציאות המשולבת. הוספת צבעים לתצוגה החזותית מגבירה את הנגישות והבהירות של הולוגרמות. אנא לחץ כאן לצפייה בגרסה גדולה יותר של איור זה.
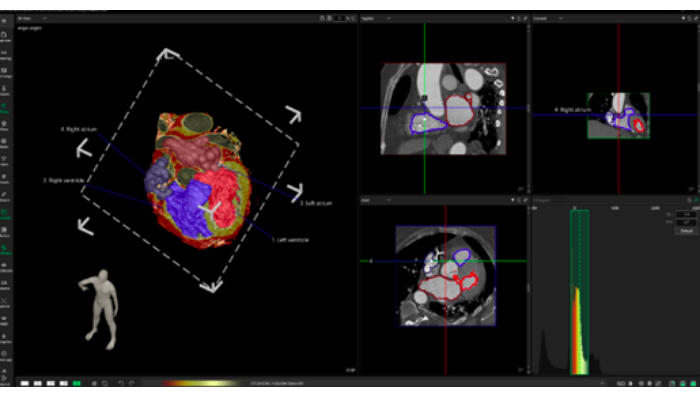
איור 8: תצוגות חזותיות במרחב הולוגרפי שנוצרו באמצעות תוכנת המציאות המשולבת. הולוגרמה תלת מימדית עם צבעים מודגשים וסמני טומוגרפיה ממוחשבת כדי לסייע בהתמצאות במרחב. אנא לחץ כאן לצפייה בגרסה גדולה יותר של איור זה.
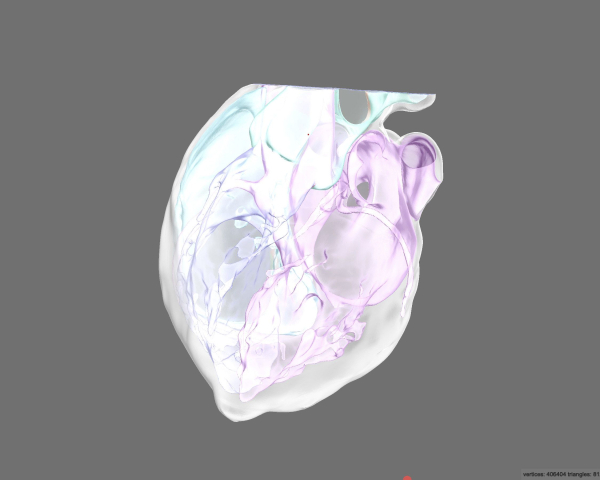
איור 9: לאחר עיבוד לאחר ופעולה בוליאנית תצוגה מקדימה של "רנטגן". תצוגה של מודלים תלת מימדיים בתוכנת עיצוב אב הטיפוס. מודל מודפס בתלת מימד מעובד במלואו עם בידול ברור בין שריר הלב לתאים הפנימיים. אנא לחץ כאן לצפייה בגרסה גדולה יותר של איור זה.
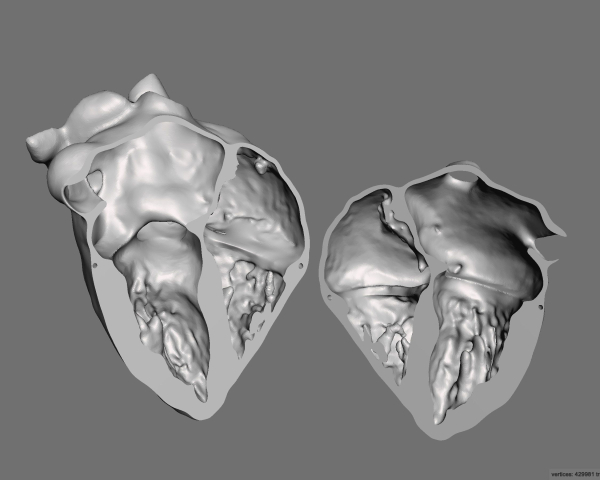
איור 10: לאחר חיתוך המודל בהקרנה של ארבעה חדרים, התצוגה המקדימה הסופית של החלק המודפס בתלת-ממד. תצוגה של מודלים תלת מימדיים בתוכנת עיצוב אב הטיפוס. החלקה נוספת והסרת חפצים. אנא לחץ כאן לצפייה בגרסה גדולה יותר של איור זה.
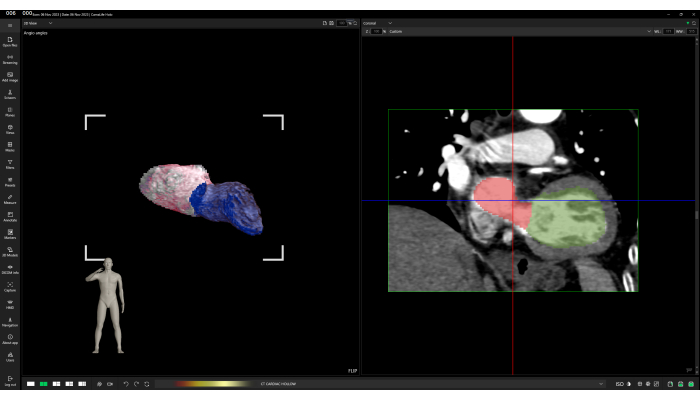
איור 11: ויזואליזציה של נתוני CT בתוכנת המציאות המשולבת. עיבוד פני השטח מייצג את התוצאה של פילוח יתר. אנא לחץ כאן לצפייה בגרסה גדולה יותר של איור זה.
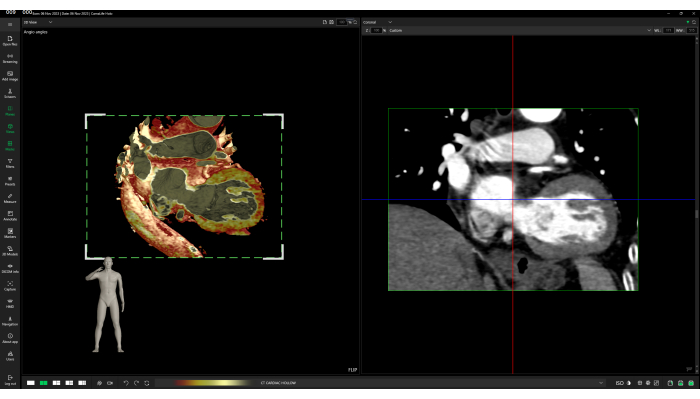
איור 12: הדמיה מופתית של נתוני CT בתוכנת המציאות המשולבת. עיבוד נפח, המציג צפיפויות שונות. אנא לחץ כאן לצפייה בגרסה גדולה יותר של איור זה.
| מספר התלמידים הכולל (n) | 106 | ||
| מספר התלמידים שהשתמשו בהולוגרמות למטרות למידה (n) | 106 | ||
| מספר התלמידים שענו "כן" לשאלה "האם טכנולוגיית המציאות המשולבת עזרה לך להבין טוב יותר את הנושא - מבנה הלב?" (נ) | 106 | ||
| מספר התלמידים שענו "לא" לשאלה "האם טכנולוגיית המציאות המשולבת עזרה לך להבין טוב יותר את הנושא - מבנה הלב?" (נ) | 0 | ||
| ציון מינימלי | 0 | ||
| ניקוד מקסימלי | 3 | ||
| ציון ממוצע של התלמידים שניגשו למבחן קצר בכתב לתיאור שלושה מבנים אנטומיים הקשורים למורפולוגיה של הלב | 2.037 | ||
| סה"כ ניקוד | 3 | ||
טבלה 1: נתונים ראשוניים של המחקר.
Discussion
האנטומיה המודרנית מבוססת בעיקר על שיטות קלאסיות ומוכחות הידועות מאות שנים. גופות אנושיות הן הבסיס להוראת רופאי העתיד, ואנטומיסטים מדגישים את תפקידם לא רק בהבנת המבנים של גוף האדם אלא גם בעיצוב עמדות אתיות28,29. פיתוח הטכנולוגיה נרחב לא רק בהליכים קליניים יומיומיים, אלא גם בהוראה, ומכאן הניסיון ליישם הדפסת תלת מימד 7,30,31,32, ומציאות מעורבת בהוראת אנטומיה 33,34,35,36. נכון לעכשיו, עבודת הרופאים מבוססת במידה רבה על פתרונות מודרניים, ציוד ודיגיטציה מובנת רחבה, והחלק ההולך וגדל של אוטומציה, רובוטיזציה ויישום פתרונות חדשניים יתקדם, תוך התחשבות במגמה הנמשכת כבר שנים.
השלמת צורות חינוך קלאסיות עם הדפסת תלת מימד, שיעורים באמצעות מציאות מעורבת או אולטרסאונד יכולה להשפיע לטובה מאוד על הכנת רופאים עתידיים למקצוע, לא רק בגלל ההזדמנות לרכוש ידע נוסף ולהשוות הדמיות בסוגים שונים של טכניקות הדמיה, אלא גם בגלל מגע עם טכנולוגיות חדשות, היכרות עם השימוש בהם, ומתן דחף לחשוב על יישומים חדשים, במיוחד בתחום העניין37.
הכנת מודלים בטכנולוגיית הדפסת תלת מימד, כמו גם הולוגרמות בטכנולוגיית מציאות משולבת, דורשת מחויבות גדולה מהרגיל, תכנון יצירתם והשגת חופש בהעברת שיעורים באמצעותם. יש להוסיף כי מדובר בפתרונות יקרים, במיוחד מציאות מעורבת, הדורשת מכשירים שיכולים להציג הולוגרמות (משקפי מגן), מתקנים הנדסיים - כולל אפליקציה והפעלתה. הדפסת תלת מימד, בשל הפופולריות הגדולה יותרוהעלויות הנמוכות יותר שלה, קלה יותר ליישום אך דורשת תכנון רכישת מדפסת ונימה אם מחלקת האנטומיה תרצה ליצור דגמים משלה מאפס ותוכנה ליצירת תמונות מוכנות להדפסה ממחקרי הדמיה של DICOM.
CarnaLife Holo מאפשרת למשתמשים להעלות גם נתוני CT וגם תוצאות פילוח, ומספקת גישה ייחודית המיושמת לעתים רחוקות בתחום ה-MR. הטכניקות המתקדמות הנוכחיות מציגות בדרך כלל מודלים תלת-ממדיים באמצעות עיבוד פני השטח המבוסס על קבצי STL או OBJ39,40. כתוצאה מכך, משתמשים יכולים לגשת רק לתוצאות הפילוח, עם יכולת מוגבלת לצפות ישירות בנתונים המקוריים. זה יכול להציב אתגרים בעת ניתוח מבנים קטנים או פתולוגיות, כגון הסתיידויות, כאשר דיוק הפילוח הוא קריטי.
באמצעות הדמיית נתונים גולמיים (עיבוד נפח), משתמשים יכולים להעריך מבנים לא רק לפי גיאומטריה אלא גם על ידי ניתוח התפלגות יחידות Hounsfield (צפיפות) בתוך המבנה. לפילוח לב אוטומטי, טכניקה נפוצה המאפשרת את המשימה המייגעת של פילוח ידני, יש מגבלות41. הוא מוגבל על ידי מספר המבנים שהוא יכול לפלח, במיוחד בנוכחות פתולוגיות, ודורש חומרה בעלת ביצועים גבוהים לעיבוד יעיל.
כדי להתמודד עם אתגרים אלה, הוצע שילוב של שתי שיטות ויזואליזציה - עיבוד נפח ועיבוד פני השטח. גישה היברידית זו מאפשרת הדמיה בו-זמנית של מבנים מפולחים והתפלגות ערכים בתוך הנתונים המנותחים, ומציעה למשתמשים כלי מקיף יותר לפרשנות נתונים.
במקרה של אנטומיה של הלב, יצירת מודל תלת מימד היא מסובכת מכיוון שכלים אוטומטיים סטנדרטיים בתוכנה אינם מספיקים כדי לחלץ רקמת לב מתמונה מלאה בשל ההטרוגניות של גודל, צורה, מיקום מבנים אנטומיים, נוכחות של חפצים וגבולות מטושטשים (ניגודיות נמוכה) בין רקמות סמוכות. לכן, בנוסף לפילוח הסף, יש לבצע פילוח בפיקוח רופא במנגנון "פרוסה אחר פרוסה". השלב הבא הוא התאמת המודל להדפסת תלת מימד, הכוללת הסרה נוספת של עיוותים הנובעים מרעש במהלך רכישת התמונה. לאחר ההדפסה, הדגמים מומסים בעדינות באצטון לקבלת משטח חלק יותר. השימוש במודלים מוכנים על ידי התלמידים הוא פשוט - אנלוגי לצפייה ודיון בהכנות לגופות אנושיות. במקרה של מציאות מעורבת, בכל פעם, נדרשת הכשרה בשימוש בטכנולוגיה - הצמדה נכונה של משקפי מגן לראש, כמו גם שליטה בקול ובמחוות. בשל הציוד המוגבל הזמין, לא ניתן לקיים מספר גדול יותר של תלמידים המשתתפים בו זמנית. על מנת להגביר את הנגישות של החומר המצולם, נעשה שימוש בסמנים של מבנים אנטומיים ספציפיים כדי להקל על דיון מהיר יותר בתכשירים - הולוגרמות.
שליטה בתהליך הפילוח והשחזור התלת-ממדי ב-3D Slicer יכולה להיות מאתגרת למתחילים, מכיוון שהיא כרוכה בלימוד פונקציות ותהליכי עבודה מרובים. פיתוח מיומנות דורש בדרך כלל תרגול וניסיון משמעותיים. בתצפיות שלנו, השגת ביטחון עם התוכנה דרשה כ-20-30 שעות של עבודה ייעודית, שכללה פילוח של לפחות 5-7 דגמי לב נפרדים. 3D Slicer היא פלטפורמת קוד פתוח הנהנית מקהילה מקוונת חזקה. הוא מציע משאבים נרחבים לפתרון בעיות, פורומים לפתרון בעיות ושפע של מדריכים ומקרי שימוש. משאבים אלה מקלים על תהליך הלמידה על ידי מתן הדרכה נגישה. בנוסף, שימוש בכלים כגון מודלים גדולים של שפה (LLMs), כולל ChatGPT או Gemini, יכול לשפר עוד יותר את ההבנה של התוכנה ותכונותיה. במהלך שלב הלמידה, גישה למנטור או מפקח מנוסה בהדמיה רפואית ואנטומיה מוכיחה את עצמה כיתרון רב. משוב מיידי על אסטרטגיות פילוח ודיוק מאיץ את פיתוח המיומנויות ומבטיח שמירה על דיוק אנטומי. מתחילים צריכים לצפות שניסיונות ראשוניים עשויים לגזול זמן ומועדים לטעויות. עם זאת, תרגול עקבי הופך את תהליכי הפילוח והליטוש לאינטואיטיביים ויעילים יותר באופן משמעותי. חיוני לגשת לעקומת למידה זו בסבלנות, שכן עיסוק קבוע בכלי משפר משמעותית את המהירות והדיוק.
השלבים הקריטיים של הפרוטוקול שהוצג היו פילוח וחילוץ נכון של רקמת לב ממחקר ההדמיה על מנת ליצור מודל תלת מימדי שימושי להדפסת תלת מימד וטכנולוגיות מציאות מעורבת.
שיעור אנטומיית הלב באמצעות הדפסת תלת מימד וטכנולוגיית מציאות מעורבת התקבל היטב על ידי התלמידים, והרוב המכריע מצא את התמיכה הטכנולוגית שימושית - מה שמאפשר הבנה טובה יותר של הנושא הנדון. לדברי המחברים, טכנולוגיות חדשות צריכות לתמוך בפתרונות הדידקטיים הקיימים והקלאסיים ולהיות בשימוש נרחב יותר ויותר.
Disclosures
Maciej Stanuch, Marcel Pikuła, Oskar Trybus ו-Andrzej Skalski הם עובדי MedApp S.A. MedApp S.A. היא החברה המייצרת את פתרון CarnaLifeHolo.
Acknowledgements
המחקר בוצע כחלק משיתוף פעולה לא מסחרי.
Materials
| Name | Company | Catalog Number | Comments |
| 3D Slicer | The Slicer Community | https://www.slicer.org | Version 5.6.0 |
| CarnaLifeHolo | MedApp S.A. | https://carnalifeholo.com | 3D visualization software |
| Meshmixer | Autodesk Inc. | https://www.research.autodesk.com/projects/meshmixer/ | prototype design software |
| Ender 3 | Creality | https://www.creality.com/products/ender-3-3d-printer | 3D printer |
| Cura | UltiMaker | https://ultimaker.com/software/ultimaker-cura/ | 3D printing software |
References
- Marconi, S., et al. Value of 3D printing for the comprehension of surgical anatomy. Surg endosc. 31, 4102-4110 (2017).
- Bernhard, J. C., et al. Personalized 3D printed model of kidney and tumor anatomy: a useful tool for patient education. World J Urol. 34 (3), 337-345 (2016).
- Gehrsitz, P., et al. Cinematic rendering in mixed-reality holograms: a new 3D preoperative planning tool in pediatric heart surgery. Front Cardiovasc Med. 8, 633611(2021).
- Vatankhah, R., et al. 3D printed models for teaching orbital anatomy, anomalies and fractures. J Ophthalmic Vis Res. 16 (4), 611-619 (2021).
- O'Reilly, M. K., et al. Fabrication and assessment of 3D printed anatomical models of the lower limb for anatomical teaching and femoral vessel access training in medicine. Anat Sci Educ. 9 (1), 71-79 (2016).
- Garas, M., et al. 3D-Printed specimens as a valuable tool in anatomy education: A pilot study. Ann Anat. 219, 57-64 (2018).
- AbouHashem, Y., et al. The application of 3D printing in anatomy education. Med Educ Online. 20, 29847(2016).
- Wu, A. M., et al. The addition of 3D printed models to enhance the teaching and learning of bone spatial anatomy and fractures for undergraduate students: a randomized controlled study. Ann Transl Med. 6 (20), 403(2018).
- McMenamin, P. G., et al. The production of anatomical teaching resources using three-dimensional (3D) printing technology. Anat Sci Educ. 7 (6), 479-486 (2014).
- Tan, L., et al. Full color 3D printing of anatomical models. Clin Anat. 35 (5), 598-608 (2022).
- Garcia, J., et al. 3D printing materials and their use in medical education: a review of current technology and trends for the future. BMJ Simul Technol Enhanc Learn. 4 (1), 27-40 (2018).
- Milgram, P., et al. Augmented reality: A class of displays on the reality-virtuality continuum. Proceedings of the International Society for Optical Engineering. (SPIE 1994), Photonics for Industrial Applications; Boston, MA. , The International Society for Optical Engineering. Boston, MA. (1994).
- Brun, H., et al. Mixed reality holograms for heart surgery planning: first user experience in congenital heart disease. Eur Heart J Cardiovasc Imaging. 20 (8), 883-888 (2019).
- Lu, L., et al. Applications of mixed reality technology in orthopedics surgery: A pilot study. Front Bioeng Biotechnol. 22 (10), 740507(2022).
- Condino, S., et al. How to build a patient-specific hybrid simulator for orthopaedic open surgery: benefits and limits of mixed-reality using the Microsoft HoloLens. J Healthc Eng. 2018, 5435097(2018).
- Wu, X., et al. Mixed reality technology launches in orthopedic surgery for comprehensive preoperative management of complicated cervical fractures. Surg Innov. 25, 421-422 (2018).
- Łęgosz, P., et al. The use of mixed reality in custom-made revision hip arthroplasty: A first case report. J Vis Exp. (186), e63654(2022).
- Wierzbicki, R., et al. 3D mixed-reality visualization of medical imaging data as a supporting tool for innovative, minimally invasive surgery for gastrointestinal tumors and systemic treatment as a new path in personalized treatment of advanced cancer diseases. J Cancer Res Clin Oncol. 148 (1), 237-243 (2022).
- Wish-Baratz, S., et al. Assessment of mixed-reality technology use in remote online anatomy education. JAMA Netw Open. 3 (9), e2016271(2020).
- Owolabi, J., Bekele, A. Implementation of innovative educational technologies in teaching of anatomy and basic medical sciences during the COVID-19 pandemic in a developing country: The COVID-19 silver lining. Adv Med Educ Pract. 8 (12), 619-625 (2021).
- Xiao, J., Evans, D. J. R. Anatomy education beyond the Covid-19 pandemic: A changing pedagogy. Anat Sci Educ. 15 (6), 1138-1144 (2022).
- Robinson, B. L., Mitchell, T. R., Brenseke, B. M. Evaluating the use of mixed reality to teach gross and microscopic respiratory anatomy. Med Sci Educ. 30 (4), 1745-1748 (2020).
- Ruthberg, J. S., et al. Mixed reality as a time-efficient alternative to cadaveric dissection. Med Teach. 42, 896-901 (2020).
- Stojanovska, M., et al. Mixed reality anatomy using microsoft hololens and cadaveric dissection: a comparative effectiveness study. Med Sci Educ. 30, 173-178 (2020).
- Zhang, L., et al. Using Microsoft HoloLens to improve memory recall in anatomy and physiology: a pilot study to examine the efficacy of using augmented reality in education. J Educ Tech Dev Exch. 12 (1), 17-31 (2020).
- Vergel, R. S., et al. Comparative evaluation of a virtual reality table and a HoloLens-based augmented reality system for anatomy training. IEEE Trans Hum Mach Syst. 50 (4), 337-348 (2020).
- Fedorov, A., et al. 3D slicer as an image computing platform for the quantitative imaging network. Magn Reson Imaging. 30 (9), 1323-1341 (2012).
- Boulware, L. E., et al. Whole body donation for medical science: a population-based study. Clin Anat. 17 (7), 570-577 (2004).
- Arráez-Aybar, L. A., Bueno-López, J. L., Moxham, B. J. Anatomists' views on human body dissection and donation: An international survey. Ann anat. 196 (6), 376-386 (2014).
- Vaccarezza, M., Papa, V. 3D printing: a valuable resource in human anatomy education. Anat Sci Int. 90 (1), 64-65 (2015).
- Smith, C. F., Tollemache, N., Covill, D., Johnston, M. Take away body parts! An investigation into the use of 3D-printed anatomical models in undergraduate anatomy education. Anat Sci Educ. 11 (1), 44-53 (2018).
- Lim, K. H., et al. Use of 3D printed models in medical education: A randomized control trial comparing 3D prints versus cadaveric materials for learning external cardiac anatomy. Anat Sci Educ. 9 (3), 213-221 (2016).
- Richards, S. Student engagement using HoloLens mixed-reality technology in human anatomy laboratories for osteopathic medical students: an instructional model. Med Sci Educ. 33 (1), 223-231 (2023).
- Veer, V., Phelps, C., Moro, C. Incorporating mixed reality for knowledge retention in physiology, anatomy, pathology, and pharmacology interdisciplinary education: a randomized controlled trial. Med Sci Educ. 32 (6), 1579-1586 (2022).
- Romand, M., et al. Mixed and augmented reality tools in the medical anatomy curriculum. Stud Health Technol Inform. 270, 322-326 (2020).
- Birt, J., et al. Mobile mixed reality for experiential learning and simulation in medical and health sciences education. Information. 9 (2), 31(2018).
- Kazoka, D., Pilmane, M., Edelmers, E. Facilitating student understanding through incorporating digital images and 3D-printed models in a human anatomy course. Educ Sci. 11 (8), 380(2021).
- Shen, Z., et al. The process of 3D printed skull models for anatomy education. Comput Assist Surg (Abingdon). 24 (1), 121-130 (2019).
- Ye, W., et al. Mixed-reality hologram for diagnosis and surgical planning of double outlet of the right ventricle: a pilot study. Clin Radiol. 76 (3), 237.e1-237.e7 (2021).
- Bonanni, M., et al. Holographic mixed reality for planning transcatheter aortic valve replacement. Int J Cardiol. 412, 132330(2024).
- Chen, L., et al. Automatic 3D left atrial strain extraction framework on cardiac computed tomography. Comput Methods Programs Biomed. 252, 108236(2024).
Reprints and Permissions
Request permission to reuse the text or figures of this JoVE article
Request PermissionExplore More Articles
This article has been published
Video Coming Soon
Copyright © 2025 MyJoVE Corporation. All rights reserved