Method Article
In vitro Assessment of Aortic Regurgitation Using Four-Dimensional Flow Magnetic Resonance Imaging
In This Article
Summary
Aortic regurgitation is an aortic valve heart disease. This manuscript demonstrates how four-dimensional flow magnetic resonance imaging can evaluate aortic regurgitation using in vitro heart valves mimicking aortic regurgitation.
Abstract
Aortic regurgitation (AR) refers to backward blood flow from the aorta into the left ventricle (LV) during ventricular diastole. The regurgitant jet arising from the complex shape is characterized by the three-dimensional flow and high-velocity gradient, sometimes limiting an accurate measurement of the regurgitant volume using 2D echocardiography. Recently developed four-dimensional flow magnetic resonance imaging (4D flow MRI) enables three-dimensional volumetric flow measurements, which can be used to accurately quantify the amount of the regurgitation. This study focuses on (i) magnetic resonance compatible AR model fabrication (dilatation, perforation, and prolapse) and (ii) systematic analysis of the performance of 4D flow MRI in AR quantification. The results indicated that the formation of the forward and backward jets over time was highly dependent on the types of AR origin. The amount of regurgitation volume bias for the model types were -7.04%, -33.21%, 6.75%, and 37.04% compared to the ground truth (48 mL) volume measured from the pump stroke volume. The largest error of the regurgitation fraction was around 12%. These results indicate that careful selection of imaging parameters is required when absolute regurgitation volume is important. The suggested in vitro flow phantom can easily be modified to simulate other valvular diseases such as aortic stenosis or bicuspid aortic valve (BAV) and can be used as a standard platform to test different MRI sequences in the future.
Introduction
Aortic regurgitation (AR) refers to the backward flow from the aorta into the left ventricle during the diastolic phase of the ventricle. AR is typically classified into aortic dilatation, cups prolapse, cups perforation, cups retraction, and others1. Chronic AR may cause the volume overload of the LV mainly due to hypertrophy and dilatation, and eventually causes its decompensation2. Acute AR is mainly caused by infectious endocarditis, aortic dissection, and traumatic rupture, which leads to hemodynamic emergencies2.
Current clinical standards for AR diagnosis are mainly based on transthoracic echocardiography (TTE) or transesophageal echocardiography (TEE)3. Despite the advantages of real-time imaging and short exam time, the accuracy of echocardiography is highly operator-dependent. Especially for the regurgitant volume measurement, direct measurement of the regurgitant volume is limited as the regurgitant jet shifts out of the two-dimensional (2D) measurement plane due to the motion of the aortic valve. Indirect estimation using proximal iso-velocity surface area (PISA) methods are often used, but assumptions such as circular orifice area often limit the accurate measurement4.
Recent medical guidelines5 also recommend cardiac MR (CMR), especially for moderate or severe AR patients to compensate for the limitation of echocardiography by measuring the mass and global function of the LV. Structural parameters such as aortic leaflets and LV size, and flow parameters such as jet width, vena contracta width, and regurgitant volume can also be comprehensively considered in AR diagnosis6. However, aortic regurgitation volume estimated with the LV global function may fail especially for patients with other heart valvular diseases or shunt.
Alternatively, 4D flow MRI has been considered as a promising technique that can directly measure the regurgitant volume with time-resolved velocity information within the volume of interest7. The motion of the valve according to the time can be easily tracked and compensated when measuring the regurgitant flow volume8,9. Also, an arbitrary plane perpendicular to the regurgitant jet can be retrospectively positioned, which increases the accuracy of the measurement10. However, as the 4D flow MRI inherently obtains the spatiotemporally averaged information, the accuracy of this technique still warrants validation by using well-controlled in vitro flow experiments.
This study aims to (i) develop MRI compatible in vitro experimental platform that can reproduce the different clinical scenarios of AR (dilatation, perforation, and prolapse) and (ii) enrich our understanding of 4D flow MRI performance in quantifying different AR at these AR models. In addition, 3D hemodynamic visualization and quantification based on 4D flow MRI were conducted according to the various clinical scenarios. This protocol is not limited to AR and can be extended to other types of valvular disease studies that require a series of in vitro experiments and hemodynamic quantification.
Protocol
NOTE: The protocol is largely composed of three stages: (1) model fabrication, (2) MRI scan and parameter selection, and (3) data analysis. Figure 1 is a flow diagram showing the overall process of the protocol.
1. Model fabrication
- Aortic root model
- As shown in Figure 2, determine the parameter values of the aortic root, such as valve base diameter and sinus radius. For this experiment, the values were DA = 32.24 mm, DO = 26 mm, LB = 8.84 mm, LA = 26 mm, rmin = 16.64 mm, rmax = 21.32 mm.
- Run the 3D modeling software by clicking Sketch > Tools Sketch Tools > Sketch Picture.
NOTE: Solidwork is used for 3D modeling in the experiment. - To make a sinus model, sketch circles corresponding to rmax and rmin using the circle tool. Draw a curved line of the sinus using the free curve function11, click Loft Tool and select the sketch area for loft.
- Sketch additional circles on the top and bottom of the current model, click Extrude Tool, and select the circles. Set the options as 20 mm downward and 30 mm upward. Make a hexahedron model of size 100 mm x 100 mm x 76 mm in the same way.
- Click Combine Tool from Insert > Features > Combine. Select Subtract in the property manager. Select the hexahedron model and the sinus model. Fabricate the final design as an acrylic model with a 5-axis CNC machine as per manufacturer's instruction.
- Valve frame
- Run 3D modeling software and open a new sketch. Draw a square of size 100 mm x 100 mm and a circle of 25 mm in the center for the valve base, manually. Click the Extrude Tool and adjust the height of the valve base to 5 mm.
- Extrude the circle with a height of 23.5 mm and a thickness of 3 mm thick. Divide the model into 12 uniform pieces using Line Tool so that each piece has 30°. Select three pieces with 120° intervals and extrude with a height of 16.5 mm to make three pillars.
- Click Fillet Tool and select the pillars. Adjust the fillet radius at the top and bottom as 4 mm and 10 mm, respectively. Save it in an STL file format.
- 3D-print the valve frame. Set the infill density to 100% and use acrylonitrile butadiene styrene as fill material. See Figure 3 for the shape and dimensions of the aortic valve frame.
- Aortic regurgitation model using expanded polytetrafluoroethylene (ePTFE)
- Run the 3D modeling software and open a new sketch. Draw a horizontal line of 23.24 mm and a vertical line of 15 mm with reference to Figure 4A.
NOTE: The geometric parameters of the valve's base, height, and leaflet free-edge length were chosen according to a previous study12. - Click 3 Point Arc Tool from the arc command manager and set two points on each end of the horizontal line and the last point on the end of the vertical line. Extrude the sketch with a thickness of 5 mm. Export the model with STL file format and 3D print it.
- Overlap the ePTFE membrane in two layers and draw three leaflet borders at intervals of 2 mm using the printed leaflet. Suture along the drawn lines and side borders at 1 mm intervals with a polyamide suture with a diameter of 0.1 mm. Suture the ePTFE valve from top to bottom on the frame at 1 mm intervals.
- Cut the outer side of the membrane and suture it with each other. Perform the following three modifications to obtain three different models.
- Dilatation model: Reduce the ratio of the designed leaflet parameters to 90%.
- Perforation model: Make a circular hole with a diameter of 2 mm using scissors in the center of one leaflet.
- Prolapse: Fix the two commissures of the valve at a hole with a low post height.
NOTE: Figure 4 shows the materials and fabrication method of ePTFE valve. Figure 5 shows the characteristics of each AR-type.
- Run the 3D modeling software and open a new sketch. Draw a horizontal line of 23.24 mm and a vertical line of 15 mm with reference to Figure 4A.
2. MRI scan and parameter selection
- Prepare the experimental system consisting of an AR model, aortic sinus model, a heart simulation pump, and MRI.
- Set the experiment models in the MRI room and connect the pump, reservoir, and models using a 25 mm (inner diameter) silicone tube. Use a 10 cm long cable tie to fasten the connection parts to prevent possible leakage.
- Use a motor-controlled piston pump to simulate the aortic blood flow waveforms to generate a physiological flow waveform through the flow circuit system. Use water as the working fluid and attach one-way valves to the inlet and outlet to prevent backflow. Details of the flow pump can be found in the previous study23.
- Locate the model within the field of view (FOV) of the MRI. Perform a scout scan to observe phantom images in the coronal, axial, and sagittal views in MRI operating console monitor. This image is used as a guide to position the following image sequences.
- Locate the 2D image plane in the center of the aorta model. Run a variable velocity-encoding parameter (VENC) 2D phase-contrast imaging to select the most appropriate VENC value for 4D flow MRI.
- Set VENC to a 10% higher value in 4D flow MRI to minimize possible velocity aliasing7. Enter the desired spatial resolution and the temporal resolution on the MRI console. The spatial and temporal resolution for the aortic flow is recommended to be 2-3 mm and 20-40 ms, respectively7. Table 2 shows the MRI scan parameters.
- Acquire data for both with and without flow using the 3 types of AR valves and the without valve.
3. Data analysis
- Data sorting and correction
- Copy raw data files from the scanner to proceed with the data analysis. Sort the dicom files according to the header named series description using the Dicom sort software. Click Sort Images in Dicom sort software to sort three-directional phase images and magnitude images in separate folders.
- Load magnitude image into the ITK-snap software. Click Brush in the ITK-snap and manually paint the internal fluid region of the phantom using the brush tool. Save segmented image.
- (Optional) Load both phase image data obtained with the flow on and off using MATLAB. Subtract the data with the flow by the data without flow to remove background errors. Repeat this for every direction and cardiac cycle.
- Calculate the velocity of 5D matrix phase data (row x column x slice x direction x time) using a vendor-specific pixel-to-velocity equation. In general, the maximum intensity of the pixel corresponds to the selected VENC value.
- Visualization
- Load the 5D matrix velocity from step 3.1.4 into flow visualization analysis software.
NOTE: Input velocity matrix may vary according to the analysis software. Ensight users should follow Ensight gold case format guide13. - Click the Isosurface Part, change the data type from isosurface to isovolume for 3D analysis by clicking the Isovolume button. Drag the speed data in the variables command manager, add it to the isovolume to check the velocity distribution of the model.
- Click Particle Trace Emitters Tool in the main menu. Check Advanced Option for a more accurate analysis. Select the desired visualization such as Streamlines or Pathlines in creation.
- For this experiment, set the following value: Emit From Option = Part, Part ID = 2, No. of Emitters = 10000, Direction = +/-. Create and check the results over time.
- Right-click the Particle Trace model and click the Color by. Select the velocity component to color the streamline with the velocity.
- Load the 5D matrix velocity from step 3.1.4 into flow visualization analysis software.
- Quantification
- Load the velocity data (step 3.1.4) and segmented image (step 3.1.2) onto MATLAB. Set the velocity outside of the segmentation region to zero. This can be easily performed by elementwise multiplying the segmented matrix data and the velocity matrix data.
- Check if the velocity data has phase-wrapping using the Imshow function of MATLAB. Inversion of the velocity direction indicates phase-wrapping.
- Slice the desired plane of the matrix data. Sum all velocity data within the plane and multiply spatial resolution to calculate the flow rate through the plane. Sum all flow rates throughout the cardiac cycle and multiply the temporal resolution to calculate the stroke volume.
Results
Three representative classes of aortic regurgitation models were fabricated, and one case without a valve was fabricated for comparison (Figure 3). The dilation model clearly showed incomplete closure of the valve leaflet due to the smaller-sized leaflets. A hole was punctured on one of the leaflets using scissors to mimic the perforation model. One leaflet of the prolapse model looked smaller than the other two leaflets because the two commissures were sutured at a position lower than the original height. There were no significant differences from the top view.
With the 3D velocity information acquired over time using 4D flow MRI, streamlines of normal and regurgitation jets were visualized during systole and diastole (Figure 6). The forward jet was straight in all models except for the perforation model. In the perforation model, a wall-biased jet occurred during the systole phase. The regurgitating jet showed a different velocity and shape according to the AR classification. In the case of without a valve, an overall forward and backward flow occurred. The regurgitant jet of the dilation model came out from the center and tended to change directions over time. The perforation and prolapse model regurgitant jet leaned toward the wall. The peak velocity of the forward and regurgitant jet was 0.28 m/s, -0.29 m/s in the model without valve, 2.03 m/s, -3.53 m/s in the dilatation model, 2.52 m/s, -3.13 m/s in the perforation model, and 2.76 m/s, -2.88 m/s in the prolapse model.
Figure 7 shows the flow rate for each valve and the forward and regurgitant volumes in a 3D plane away from the valve base. The flow rates showed different waveforms and quantities for each model. The amount of regurgitation volume was 51.38 mL, 63.94 mL, 44.76 mL, and 30.22 mL for without valve, dilatation, perforation, and prolapse models, respectively. The bias for without valve, dilatation, perforation, and prolapse model were -7.04%, -33.21%, 6.75%, and 37.04%, respectively, compared to the ground truth (48 mL) measured from the pump stroke volume. The positive percentage values indicate underestimation while the negative percentage values represent over estimation. The regurgitation fraction error was -7.78%, -6.00%, 0.33% and -11.18% for without valve, dilatation, perforation and prolapse model, respectively.
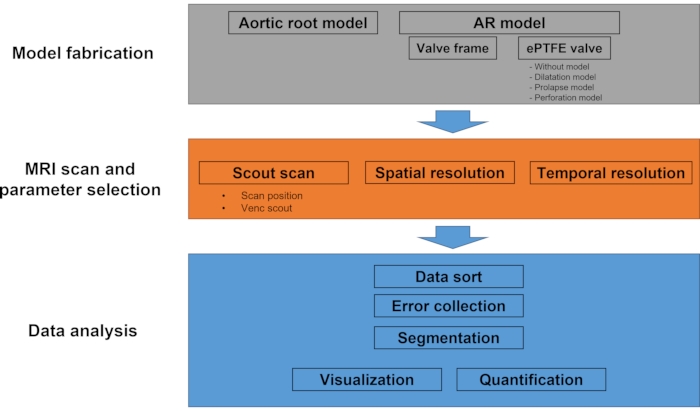
Figure 1: Workflow diagram of the protocol. This experimental protocol mainly consists of model fabrication, MRI scan, and data analysis. In the model fabrication step, the outer aortic root model and four different types of AR model (without valve, dilatation, prolapse, and perforation) are fabricated. During the MRI scan, scout imaging followed by multi-VENC scan and 4D flow MRI is performed. The data analysis part includes data sorting, image segmentation, velocity calculation, visualization, and quantification. Please click here to view a larger version of this figure.
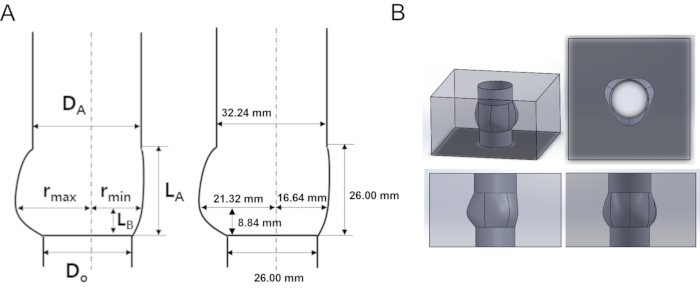
Figure 2: Schematic and designed acrylic model of the aortic root (A) Geometrical characterization and parameters of the aortic root geometry. (B) Aortic root 3D model in multi-dimensional view. DA: diameter of sinotubular junction (STJ), DO: diameter of annulus, rmax: maximum sinus diameter, rmin: minimum sinus diameter, LA: height of sinus, LB: height of STJ. Please click here to view a larger version of this figure.
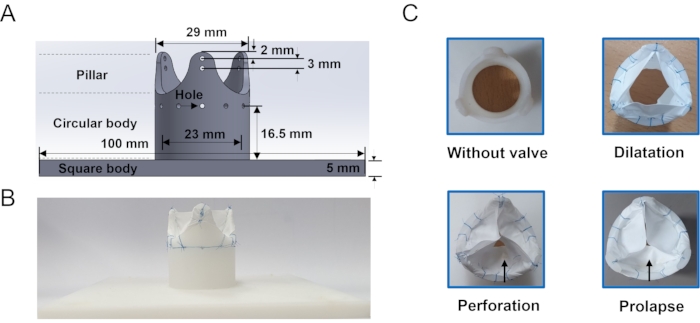
Figure 3: Aortic regurgitation frame and model (A) Geometrical information of the aortic valve frame which is used to hold the leaflet. Holes around the body of the frame is where the suture line passes. (B) Example of ePTFE membrane sutured valve. (C) En-face view of the in vitro models: without valve, dilation, perforation and prolapse fabricated in this study. The arrow indicates the damaged cusp. Please click here to view a larger version of this figure.
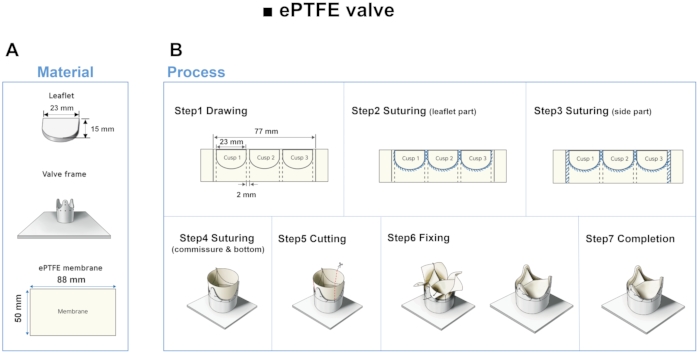
Figure 4: Material and fabrication step of ePTFE leaflet. (A) Using 3D printed leaflets as a guide, leaflets are made using ePTFE membrane. (B) Drawing, suturing, cutting and fixing steps of the ePTFE valve. Please click here to view a larger version of this figure.
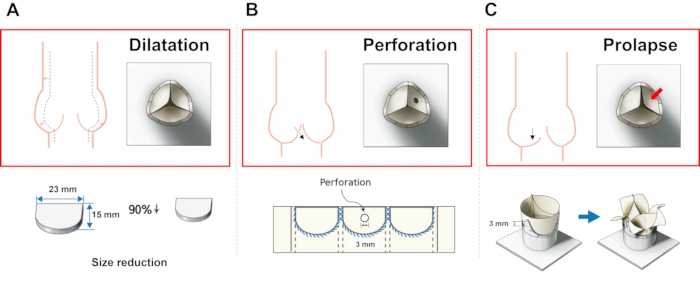
Figure 5: Fabrication methods of different AR models. (A) Dilatation model, (B) perforation model, and (C) prolapse model. Please click here to view a larger version of this figure.
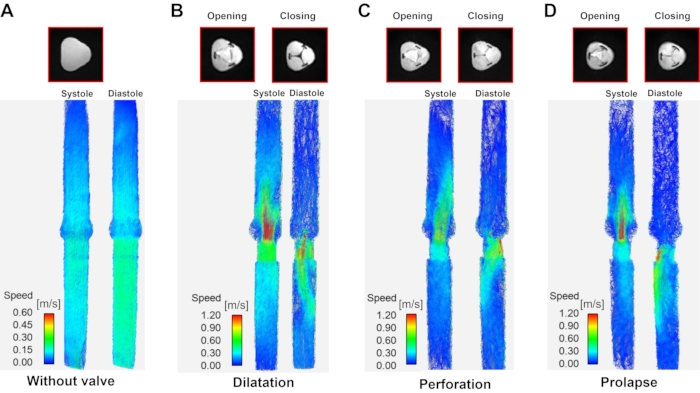
Figure 6: Streamline visualization according to aortic regurgitation type. A streamline visualization at systole (left of each panel) and diastole (right of each panel) according to aortic regurgitation type. (A) Model without valve (the diastole/systole image are the same due to lack of a valve), (B) dilatation, (C) perforation, and (D) prolapse. Systole and diastole data were taken where the inlet velocity is the highest and the lowest during the cardiac cycle. Please click here to view a larger version of this figure.
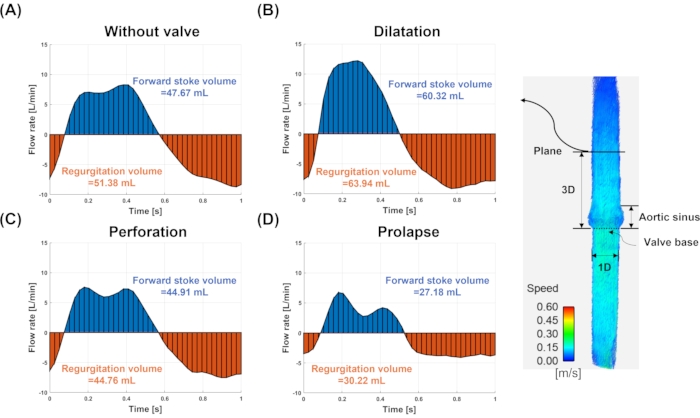
Figure 7: Flow rate and stroke volume. The flow rate and stroke volume for (A) model without valve, (B) dilatation, (C) perforation, and (D) prolapse. The flow rate and stroke volume are measured at the plane (solid line) three-diameter downstream to the valve annulus. The blue and red colors indicate the forward and regurgitating flows, respectively. Please click here to view a larger version of this figure.
| Ratio (Do= 26 mm) | DA/Do | LA/Do | LB/Do | rmax/Do | rmin/Do |
| 1.24 | 1 | 0.34 | 0.82 | 0.64 |
Table 1. Geometrical parameters of the aortic root geometry shown in Figure1.
| Temporal resolution | 0.025 ms/40 phases |
| Spatial resolution | 2mm x 2mm/0.5 pixel per 1 mm |
| Matrix | 96 x 160 x 26 pixel |
| Slice thickness | 2 mm |
| Echo time | 2.54 ms |
| Encoding velocity | 25-330 cm/s |
Table 2. 4D Flow MRI sequence parameters in vitro.
Discussion
Four-dimensional flow MRI has recently been verified by various ex vivo and in vivo studies as an application for clinical routine use14. As the 4D flow MRI obtains 3D velocity information over the entire cardiac cycle, one strong application is a direct quantification of the valvular regurgitant volume, which conventional 2D Doppler echocardiography is not capable of quantifying15. In vitro experiments using 4D Flow MRI can provide the 3D flow velocity and related hemodynamic parameters which can be used for investigating the relationship between cardiovascular disease and hemodynamics. However, despite its promising capability, no systematic studies on this application have been reported yet. This is possibly due to the lack of well-controlled in vitro experiments that mimic the regurgitation of the tri-leaflet valves.
Recent developments in in vitro studies have provided more accurate and realistic experimental methods to access the pre- and post-valvular hemodynamics16,17. Coupled with an optical image-based particle image velocimetry (PIV), accurate measurement and quantification of the flow around the valve was possible in previous in vitro studies18. However, accurate 3D flow fields, especially for the post-valvular flow, were limited owing to the opaque model and refraction. On the other hand, 3D velocity measurements using MRI were also limited, as metal components cannot be used19,20.
Hence in this study, a protocol to build a flow experimental platform that is MR compatible and highly modifiable to reproduce various clinical scenarios of valvular diseases is introduced. The ePTFE membrane is used to mimic the tricuspid valve without metal components as it has been widely used as a valve and vascular graft material due to its high tensile strength and chemical resistance17,21,22. Based on ePTFE films, three different origins of the AR have been reproduced (dilatation, perforation, and prolapse) as well as a model without a valve for comparison. The next important step in this flow experimental protocol is MR imaging and quantification. A motor-controlled piston pump that can simulate the aortic blood flow waveforms is used to generate a physiological flow waveform through the flow circuit system. Details of the flow pump can be found in the previous study23. As this study also aims to validate the accuracy of the 4D flow MRI in flow quantification, all the imaging parameters are selected based on the previous study which summarizes the parameters that can be used in the clinical routine24. As the MRI system includes inherent errors due to imperfections such as eddy currents and nonlinearity of the magnetic field25, the background correction strategy is applied prior to the actual data quantification as described in step 3.1.3.
The hand-made aortic regurgitation model suggested in this study showed similar hemodynamic characteristics of regurgitant jet according to model classification as previous studies reported26,27. The closed shape was symmetrical, and a straight jet occurred at the center of the valve in the dilatation model. A posteriorly directed eccentric jet appears owing to cusp damage in the perforation model. Partial prolapse of the valve shows a jet whose direction was bent from the culprit cup owing to limited mobility. The aortic regurgitation volume directly measured using the 4D flow MRI was overestimated in the without valve and dilatation model, while it was largely underestimated in the prolapse model when compared with the ground truth. However, when the regurgitant fraction was calculated, the largest bias was only 11% in the prolapse model. This strongly indicates that not only the regurgitant flow but also the normal aortic jet was affected by the MR scan. At the current stage, individual scan parameters were not optimized for each AR model. A future systemic parameter study may improve the accuracy of regurgitant volume measurement. Alternatively, the use of regurgitant fraction is more robust as it cancels out the inherent errors in 4D flow MRI but also is clinically more relevant than simply measuring the absolute regurgitant volume.
In conclusion, this study suggests an MR compatible in vitro flow experimental model that is highly modifiable to simulate various types of AR. Also, the accuracy of AR volume measurement using 4D flow MRI was compared. The limitation of this study is that the motion of the aortic valve was not simulated, which can affect the actual development of the regurgitant jet. In addition, the partial volume effect and temporal averaging nature of the 4D-flow MRI may limit the accuracy of the flow measurement, especially considering the high dynamic range of velocity within the jet and surroundings. Therefore, further systematic parameter study is required.
Disclosures
The authors have nothing to disclose.
Acknowledgements
This research was supported by the Basic Science Research Program through the National Research Foundation of Korea, which is funded by the Ministry of Education (2021R1I1A3040346, 2020R1A4A1019475, 2021R1C1C1003481, and HI19C0760). This study was also supported by 2018 Research Grant (PoINT) from Kangwon National University.
Materials
| Name | Company | Catalog Number | Comments |
| 3D modeling software(SolidWorks) | Dassault Systèmes SolidWorks Corporation | Waltham, MA, USA | |
| 3D printer | Zortrax S.A. | the construction of a three-dimensional object from a CAD model or a digital 3D model,(zortrax m200 plus, Zortrax S.A.,Olsztyn, Poland) | |
| Dicom sort | Open source software | Jonathan Suever, Software Engineer | |
| Ensight | Ansys | Flow visualization software (Canonsburg, PA, USA). | |
| Expanded Polytetrafluoroethylene(ePTFE) | SANG-A-FRONTEC | Medical membrane (ePTFE,SANG-A-FRONTEC, Incheon, korea) | |
| Itk snap software | Open source software | GNU General Public License, | |
| MATLAB | MathWorks | Natick, MA, USA | |
| MRI | Siemens | 3T, Erlangen, Germany | |
| Scissors | Scanlan International Inc | n43 1765 | 7007-454, Scanlan International Inc., Saint Paul, USA |
| Suture | AILEE | NB530 | Ailee, Polyamide suture, UPS 5-0 |
References
- Koo, H. J., et al. Functional classification of aortic regurgitation using cardiac computed tomography: comparison with surgical inspection. The International Journal of Cardiovascular Imaging. 34 (8), 1295-1303 (2018).
- Bekeredjian, R., Grayburn, P. A. Valvular heart disease: aortic regurgitation. Circulation. 112 (1), 125-134 (2005).
- Lancellotti, P., et al. European Association of Echocardiography recommendations for the assessment of valvular regurgitation. Part 1: aortic and pulmonary regurgitation (native valve disease). European Journal of Echocardiography. 11 (3), 223-244 (2010).
- Zo, J. H. Echocardiographic Evaluation of Valvular Regurgitation:Semiquantitation Based on the Color Flow is Enough in Everyday Clinical Practice. Korean Circulation Journal. 29 (10), 1144-1150 (1999).
- Falk, V., et al. ESC/EACTS Guidelines for the management of valvular heart disease. European Journal of Cardio-Thoracic Surgery. 52 (4), 616-664 (2017).
- Members, W. C., et al. ACC/AHA guideline for the management of patients with valvular heart disease: a report of the American College of Cardiology/American Heart Association Joint Committee on Clinical Practice Guidelines. Journal of the American College of Cardiology. 77 (4), 25(2021).
- Ha, H., Huh, H., Yang, D. H., Kim, N. Quantification of Hemodynamic Parameters Using Four-Dimensional Flow MRI. Journal of the Korean Society of Radiology. 80 (2), 239-258 (2019).
- vander Geest, R. J., Garg, P. Advanced analysis techniques for intra-cardiac flow evaluation from 4D flow MRI. Current Radiology Reports. 4 (7), 38(2016).
- Blanken, C. P., et al. Quantification of mitral valve regurgitation from 4D flow MRI using semiautomated flow tracking. Radiology: Cardiothoracic Imaging. 2 (5), 200004(2020).
- Kim, B. G., et al. Evaluation of aortic regurgitation by using PC MRI: a comparison of the accuracies at different image plane locations. Journal of the Korean Physical Society. 61 (11), 1884-1888 (2012).
- de Tullio, M. D., Pedrizzetti, G., Verzicco, R. On the effect of aortic root geometry on the coronary entry-flow after a bileaflet mechanical heart valve implant: a numerical study. Acta Mechanica. 216 (1), 147-163 (2011).
- Fallahiarezoudar, E., Ahmadipourroudposht, M., Yusof, N. M. Geometric modeling of aortic heart valve. Procedia Manufacturing. 2, 135-140 (2015).
- Computational Engineering International. EnSight User Manual for Version 10.2. Computational Engineering International, Inc. , (2017).
- Garg, P., et al. Comparison of fast acquisition strategies in whole-heart four-dimensional flow cardiac MR: Two-center, 1.5 Tesla, phantom and in vivo validation study. Journal of Magnetic Resonance Imaging. 47 (1), 272-281 (2018).
- Gabbour, M., et al. 4-D flow magnetic resonance imaging: blood flow quantification compared to 2-D phase-contrast magnetic resonance imaging and Doppler echocardiography. Pediatric Radiology. 45 (6), 804-813 (2015).
- Kvitting, J. P. E., et al. et al. In vitro assessment of flow patterns and turbulence intensity in prosthetic heart valves using generalized phase-contrast MRI. Journal of Magnetic Resonance Imaging: An Official Journal of the International Society for Magnetic Resonance in Medicine. 31 (5), 1075-1080 (2010).
- Chang, T. I., et al. In vitro study of trileaflet polytetrafluoroethylene conduit and its valve-in-valve transformation. Interactive Cardiovascular and Thoracic Surgery. 30 (3), 408-416 (2020).
- Kim, D., et al. Comparison of Four-Dimensional Flow Magnetic Resonance Imaging and Particle Image Velocimetry to Quantify Velocity and Turbulence Parameters. Fluids. 6 (8), 277(2021).
- Bai, K., Katz, J. On the refractive index of sodium iodide solutions for index matching in PIV. Experiments in Fluids. 55 (4), 1-6 (2014).
- Hargreaves, B., et al. Metal induced artifacts in MRI. AJR. American Journal of Roentgenology. 197 (3), 547(2011).
- Zhu, G., Ismail, M. B., Nakao, M., Yuan, Q., Yeo, J. H. Numerical and in-vitro experimental assessment of the performance of a novel designed expanded-polytetrafluoroethylene stentless bi-leaflet valve for aortic valve replacement. PloS One. 14 (1), 0210780(2019).
- Ebnesajjad, S. Expanded PTFE applications handbook: Technology, manufacturing and applications. , William Andrew. (2016).
- Kim, J., Lee, Y., Choi, S., Ha, H. Pulsatile flow pump based on an iterative controlled piston pump actuator as an in-vitro cardiovascular flow model. Medical Engineering & Physics. 77, 118-124 (2020).
- Dyverfeldt, P., et al. 4D flow cardiovascular magnetic resonance consensus statement. Journal of Cardiovascular Magnetic Resonance. 17 (1), 1-19 (2015).
- Stankovic, Z., Allen, B. D., Garcia, J., Jarvis, K. B., Markl, M. 4D flow imaging with MRI. Cardiovascular Diagnosis and Therapy. 4 (2), 173(2014).
- Patel, P. A., et al. Aortic regurgitation in acute type-A aortic dissection: a clinical classification for the perioperative echocardiographer in the era of the functional aortic annulus. Journal of Cardiothoracic and Vascular Anesthesia. 32 (1), 586-597 (2018).
- Boodhwani, M., et al. Repair-oriented classification of aortic insufficiency: impact on surgical techniques and clinical outcomes. The Journal of Thoracic and Cardiovascular Surgery. 137 (2), 286-294 (2009).
Reprints and Permissions
Request permission to reuse the text or figures of this JoVE article
Request PermissionThis article has been published
Video Coming Soon
Copyright © 2025 MyJoVE Corporation. All rights reserved