Method Article
Cristallisation et détermination structurale d’une enzyme : complexe de substrat par cristallographie sérielle dans une puce microfluidique polyvalente
Dans cet article
Résumé
Un dispositif microfluidique polyvalent est décrit qui permet la cristallisation d’une enzyme en utilisant la méthode de contre-diffusion, l’introduction d’un substrat dans les cristaux par trempage, et la détermination de la structure 3D de l’enzyme: substrat complexe par une analyse en série des cristaux à l’intérieur de la puce à température ambiante.
Résumé
La préparation de cristaux bien diffracteurs et leur manipulation avant leur analyse des rayons X sont deux étapes critiques des études biocrystallographiques. Nous décrivons une puce microfluidique polyvalente qui permet la production de cristaux par la méthode efficace de contre-diffusion. L’environnement exempt de convection fourni par les canaux microfluidiques est idéal pour la croissance du cristal et utile pour diffuser un substrat dans le site actif de l’enzyme cristalline. Ici nous avons appliqué cette approche à l’enzyme CCA-ajoutant de la bactérie psychrophilic Planococcus halocryophilus dans l’exemple présenté. Après cristallisation et diffusion/trempage du substrat, la structure cristalline du complexe enzyme:substrat a été déterminée à température ambiante par cristallographie en série et l’analyse de plusieurs cristaux directement à l’intérieur de la puce. L’ensemble de la procédure préserve les propriétés authentiques de diffraction des échantillons car il ne nécessite aucune manipulation de cristal.
Introduction
La cristallographie est une méthode pour déchiffrer l’architecture 3D des macromolécules biologiques. Ce dernier est important pour comprendre comment une enzyme sélectionne et traite ses substrats. La détermination d’une structure cristalline nécessite la cristallisation de la macromolécule cible et le conditionnement des cristaux pour leur analyse par diffraction aux rayons X1. La préparation et la manipulation des cristaux sont des étapes cruciales mais délicates qui peuvent affecter la qualité des cristaux et les propriétés de diffraction, ainsi que la résolution (c’est-à-dire la précision) de la structure 3D qui en résulte. Pour faciliter la préparation de cristaux de haute qualité et éliminer la manipulation inutile pour préserver leurs propriétés de diffraction, nous avons conçu un dispositif microfluidique convivial et polyvalent appelé ChipX2,3,4.
Dans cet article, nous allons démontrer comment charger la solution protéique dans les canaux ChipX en utilisant du matériel de laboratoire conventionnel pour préparer les cristaux par contre-diffusion. Cette méthode de cristallisation fournit un criblage efficace de la sursaturation et des conditions potentielles de nucléation le long des canaux microfluidiques contenant la solution enzymatique due au gradient de concentration généré par la diffusion de l’agent cristallisant5,6.
La configuration de la puce est simple, elle n’utilise que des pipets de laboratoire standard et ne nécessite aucun équipement coûteux. Lorsque les cristaux ont poussé dans ChipX, les ligands de l’enzyme peuvent être introduits par diffusion. Les données de diffraction sont ensuite recueillies à température ambiante sur une série de cristaux contenus dans les canaux de la puce à l’aide d’une source de rayons X synchrotron. L’étude structurale décrite ici a mené à la détermination des structures d’une enzyme de maturation d’ARN t dans sa forme d’apo et dans le complexe avec un analogue de son substrat de CTP introduit par le trempage. Cette protéine appelée enzyme à ajout de CCA polymérise la queue trinucléotide CCA à l’extrémité 3' des ARN. La comparaison des deux images 3D obtenues par cristallographie sérielle révèle les changements conformationnels locaux liés à la liaison du ligand dans des conditions plus physiologiques que celles utilisées en cryo-cristallographie. Le protocole décrit dans cette vidéo est généralement applicable à toute biomolécule, qu’il s’agit d’une protéine, d’un acide nucléique ou d’un complexe multi-composants.
Protocole
1. Mise en place d’analyses de cristallisation dans ChipX
REMARQUE : Le dispositif microfluidique ChipX peut être obtenu auprès des auteurs. Une description de la puce est donnée à la figure 1. Les solutions contenant le crystallant (ou agent cristallisant) utilisé pour déclencher la cristallisation peuvent être d’origine commerciale ou préparées par l’expérimentateur.
- Chargement de l’échantillon de biomolécule
REMARQUE : Le volume de l’échantillon réellement requis pour effectuer un essai individuel de contre-diffusion dans la section droite de chaque canal de ChipX est de 300 nL. Toutefois, pour plus de commodité, nous suggérons de charger 5 μL pour remplir complètement les huit canaux en tenant compte de la longueur variable de leur section incurvée et les volumes morts d’entrée.- Pipet 5 μL de solutions enzymatiques utilisant pipet et pointe standard de 10 μL.
- Introduire la pointe verticalement dans l’entrée de l’échantillon et injecter la solution jusqu’à ce que les huit canaux soient remplis jusqu’à leur extrémité opposée (entrée du réservoir cristallant).
- Injecter 1 μL d’huile de paraffine dans l’entrée de l’échantillon afin de déconnecter les canaux les uns des autres.
- Récupérez la solution supplémentaire dans le réservoir cristallant à l’extrémité de chaque canal à l’aide d’un tuyau standard de 10 μL.
- Sceller l’entrée de l’échantillon avec un morceau de ruban adhésif de 1 cm x 1 cm.
- Chargement des solutions de cristallisation
- Pipet 5 μL de solution de cristallisation à l’aide de pipet et de pointe standard de 10 μL. Le volume du réservoir est de 10 μL, mais le chargement de seulement la moitié d’entre eux évite le débordement lors de l’étanchéité avec du ruban adhésif et facilite l’ajout de ligand pour les expériences de trempage. Si les conditions initiales de cristallisation ont été obtenues par diffusion de vapeur, augmenter la concentration cristallante d’un facteur de 1,5 à 2. Les solutions peuvent être différentes dans chaque réservoir (dans le cas présenté, 1 M de phosphate d’hydrogène diammonium, 100 mM d’acétate de sodium, pH 4,5 a été utilisé partout).
- Orienter la pointe du tuyau vers l’entrée du chenal dans la partie en forme d’entonnoir du réservoir afin d’éviter la formation d’une bulle d’air lors du dépôt de solution. Cela empêcherait le contact entre les deux solutions et la diffusion cristallisée dans le canal.
- Injectez la solution cristallante dans le réservoir.
- Sceller les réservoirs avec un morceau de ruban adhésif de 2,5 cm x 1 cm.
- Incuber la puce à 20 °C (la température peut être ajustée en fonction de la cible, généralement entre 4 et 37 °C 4).
2. Étiquetage protéique avec carboxyrhodamine pour la détection de fluorescence
REMARQUE : Cette étape est facultative. Il doit être effectué avant le chargement de l’échantillon pour faciliter la détection des cristaux dans la puce à l’aide de fluorescence. La méthode détaillée d’étiquetage fluorescent de trace a été décrite par Pusey et ses collègues7. Toutes les étapes sont effectuées à température ambiante.
- Dissoudre 5 mg de poudre d’ester de carboxyrhodamine dans du diméthyl-formamide anhydre de 1 mL, diviser la solution en aliquots de 0,6 μL à stocker à -20 °C.
- Préparer une solution de stock de 1 M Na-borate pH 8.75.
- Diluer le stock pour préparer le tampon de réaction à 0,05 M Na-borate pH 8,75.
- Rincer une colonne de désaltage (7 kDa MWCO, 0,5 mL) avec 800 μL de tampon de réaction.
- Centrifugez la colonne pendant 1 min à 1400 x g, retirez le filtrate.
- Répétez cette opération deux fois (étapes 2.4-2.5) pour laver la colonne.
- Déposez 80 μL de protéines dans son tampon de stockage sur la colonne (la protéine peut être diluée jusqu’à 1 mg/mL pour augmenter le volume si nécessaire).
- Centrifuger la colonne pendant 1 min à 1400 x g. Cette étape vise à transférer la protéine de son tampon de stockage vers le tampon de réaction.
- Récupérez le flow-through (contenant la protéine dans le tampon de réaction) et mélangez-le avec 0,6 μL de solution de carboxyrhodamine.
- Incuber 5 min à température ambiante.
- Pendant ce temps, rincer la colonne 3 x avec le tampon de stockage, centrifuger la colonne pendant 1 min à 1400 x g et jeter le filtrate.
- Déposez la solution de réaction sur la colonne.
- Centrifuger la colonne pendant 1 min à 1400 x g et récupérer le débit (c.-à-solution de protéines étiquetées dans son tampon de stockage).
- Compléter la solution de protéines stock avec 0,1-1 % (w / w) de protéines étiquetées.
- Configurer les analyses de cristallisation ChipX telles que décrites dans la section 1.
- Vérifiez la présence de cristaux protéiques dans les analyses en excitant la sonde fluorescente avec une source de lumière de longueur d’onde de 520 nm.
3. Observation de cristal
REMARQUE : L’appareil ChipX peut être manipulé sans soins particuliers, même avec des cristaux à l’intérieur, sauf si la température doit être contrôlée.
- Utilisez n’importe quel stéréomicroscope pour vérifier les résultats des analyses de cristallisation dans ChipX. Son empreinte a les dimensions standard des glissières de microscope et est compatible avec n’importe quel système et support de glissière.
- Vérifiez le contenu des canaux microfluidiques à partir du réservoir où la concentration cristallante est la plus élevée à l’entrée de l’échantillon où la concentration cristallante est la plus faible. Le matériau ChipX est transparent à la lumière visible, compatible avec l’utilisation de polariseurs, ainsi qu’avec l’éclairage UV pour l’identification des cristaux de protéines par fluorescence intrinsèque tryptophane8.
- Enregistrez les positions cristallines à l’aide des étiquettes en relief le long des canaux ou marquez les emplacements en cristal avec un marqueur permanent en dessinant des points de couleur à côté d’eux sur la surface de la puce.
4. Trempage en cristal avec ligands
REMARQUE : Cette procédure est facultative. Il est utilisé pour introduire des ligands, des substrats enzymatiques ou des atomes lourds dans les cristaux et doit être effectué au moins 24-48 h avant l’analyse des rayons X pour permettre la diffusion du composé le long des canaux et dans les cristaux.
- Retirer délicatement le ruban adhésif des réservoirs.
- Ajouter jusqu’à 5 μL de solution ligand dans un ou plusieurs réservoirs à l’aide d’un micropipet de 10 μL (par exemple, 3 μL de cytidine-5'-[(α,β)-méthyleno] triphosphate (CMPcPP) solution a été ajoutée pour atteindre une concentration finale de 3,75 mM). CMPcPP est un analogue non hydrolizable du CTP, un substrat naturel de l’enzyme.
- Sceller les réservoirs avec un morceau de ruban adhésif de 2,5 cm x 1 cm.
- Incuber la puce à température contrôlée pendant 24-48 h pour permettre la diffusion de ligand le long des canaux de la puce.
5. Analyse cristalline par cristallographie en série
REMARQUE : Cette partie du protocole doit être adaptée en fonction de la configuration de la ligne de faisceau et des propriétés de diffraction des cristaux. Seules des indications générales sont données pour l’analyse cristallographique basée sur des expériences réalisées à la ligne de faisceau X06DA (SLS, Villigen, Suisse).
- ChipX montage sur le goniomètre beamline
REMARQUE : Le fichier pour l’impression 3D du support ChipX est fourni en réf4.- Éteignez le cryo-jet de la ligne de faisceau. L’analyse ici est effectuée à température ambiante.
- Monter le ChipX sur un support dédié avec le canal contenant les cristaux à analyser positionné au centre du support. Le support ChipX4 ne nécessite pas de vis ou de pièce supplémentaire, car il a été conçu pour fournir un ajustement parfait pour ChipX.
- Fixez le support au goniomètre.
- Collecte de données
- Orientez la couche la plus épaisse (couche supérieure, figure 1)de ChipX (dans cette étiquette d’orientation le long des canaux sont directement lisibles à l’aide de la caméra centrale de la ligne de faisceau), vers le faisceau direct et le visage le plus mince derrière le cristal pour minimiser l’atténuation du signal diffracté tel que décrit dans l’arbitre3.
- Pour éviter la collision de ChipX avec le matériau environnant (beamstop, collimateur), limitez les mouvements des goniomètres dans la plage ±30° (0° correspondant aux canaux perpendiculaires au faisceau de rayons X).
- Trouver la position des cristaux à l’aide des étiquettes en relief le long des canaux.
- Sélectionnez une position cristalline.
- Centrez le cristal soit par la grille standard à faible dose / raster dépistage ou 1-click procédure (la vidéo montre un exemple de dépistage de grille).
- Recueillir des données de diffraction dans la plage -30° / +30°.
- Redémarrez la procédure aux étapes 5.2.4-5.2.6 sur un autre cristal dans le même canal après traduction de la puce.
- Réalignez manuellement un autre canal ChipX au centre du support et continuez la collecte de données sur les cristaux présents dans ce canal.
- Utilisez des ensembles et procédures cristallographiques standard pour traiter et fusionner les données, puis pour résoudre et affiner la structure.
Résultats
La puce microfluidique décrite ici a été conçue pour permettre la configuration facile des analyses de cristallisation et de l’analyse des cristaux à température ambiante. La procédure décrite ci-dessus et dans la vidéo a été appliquée dans le cadre de la caractérisation structurale de l’enzyme cca-ajoutant de la bactérie planococcus halocryophilus adaptée au froid. Cette enzyme appartient à une famille essentielle de polymésase qui catalyse l’ajout séquentiel de la séquence 3' CCA sur les ARN À l’aide de CTP et ATP9,10.
La puce a d’abord été utilisée pour préparer des cristaux de l’enzyme pour l’analyse structurale par la méthode de contre-diffusion. À cette fin, la solution enzymatique a été chargée dans les huit canaux microfluidiques (chambres de cristallisation) par une seule injection dans l’entrée de l’échantillon de la puce (voir la figure 1). L’enzyme a été utilisée à 5,5 mg/mL dans son tampon de stockage contenant 20 mM Tris/HCl pH 7,5, 200 mM NaCl et 5 mM MgCl2. Cette étape a été effectuée manuellement avec un micropipet standard de 10 μL. Des solutions de cristallisation (100 mM de pH d’acétate de sodium 4,5,1 M de phosphate d’hydrogène diammonium) ont ensuite été déposées dans les réservoirs à l’autre extrémité des canaux.
La procédure de chargement est simple et ne prend pas plus de cinq minutes (Figure 2). Le cristallant se diffuse ensuite dans les canaux, crée un gradient de concentration qui déclenche la nucléation cristalline et la croissance. Ce gradient évolue dynamiquement et explore un continuum d’états de sursaturation5,6 jusqu’à atteindre un équilibre de concentration cristallante entre les canaux et le réservoir. Les analyses de cristallisation sont généralement vérifiées sous le micoscope sur une période de 2 à 4 semaines pour suivre la croissance des cristaux. Des cristaux bipyramidaux d’enzyme s’ajoutant au CCA sont apparus dans tous les canaux après quelques jours d’incubation à 20 °C (figure 3). L’étiquetage fluorescent facultatif7 de la protéine facilite grandement l’identification des cristaux protéiques et leur discrimination à l’égard des cristaux de sel (figure 4).
Nous avons exploité l’environnement diffusif dans les canaux de copeaux pour livrer un substrat à l’enzyme qui accumule les cristaux. En l’espèce, le CMPcPP, un analogue du PCC, a été ajouté aux solutions du réservoir à une concentration finale de 3,75 mM(figure 5). Cet ajout a été effectué deux jours avant l’analyse cristallographique pour permettre au CMPcPP d’atteindre et d’occuper le site catalytique de l’enzyme, comme l’a confirmé plus tard la structure cristalline (voir ci-dessous).
Nous avons fabriqué un support de puce (figure 6) en acide polylactique à l’aide d’une imprimante 3D. Le support permet le montage de copeaux sur les goniomètres à l’aide de têtes magnétiques standard. Par conséquent, la puce peut être facilement positionnée et traduite dans le faisceau de rayons X pour apporter les cristaux en position de diffraction. La stratégie de collecte de données doit être adaptée en fonction des caractéristiques de la ligne de faisceau et des propriétés cristallines. Dans le cas de l’enzyme d’ajout de CCA, des données ont été recueillies aux faisceaux X06DA et X10SA, Source lumineuse suisse (SLS), avec une longueur d’onde de rayons X de 1,0 Å et pilatus 2M-F et 6M détecteurs de pixels, respectivement. 30-60° de rotation ont été recueillis sur chaque cristal à température ambiante avec des images de 0,1° ou 0,2° et 0,1 s d’exposition (voir le tableau 1). Des ensembles de données partiels ont été traités individuellement et coupés lorsque la résolution des modèles de diffraction a commencé à se décomposer en raison de dommages causés par les radiations (détectés par la diminution du rapport  signal-bruit et cc1/2, et une augmentation des meas R dans la coquille haute résolution). Les ensembles de données complets ont été reconstitués en fusionnant les données de 5 cristaux( tableau 1). Les structures cristallines ont été dérivées par remplacement moléculaire à l’aide d’ensembles et de procédures cristallographiques standard pour le traitement des données11 etle raffinement 12. La comparaison des structures de l’enzyme et de son complexe avec le CMPcPP révèle l’adaptation conformationnelle locale qui accompagne la liaison du substrat dans le site actif de l’enzyme ajoutée par le CCA (figure 7).
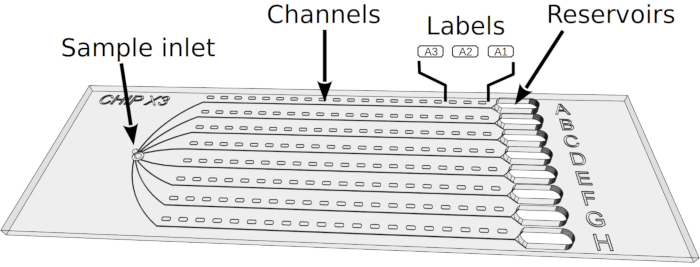
Figure 1: Conception ChipX. La puce se compose d’une couche supérieure en COC (épaisseur : 1 mm) dans laquelle huit canaux et réservoirs microfluidiques sont imprimés. La puce entière est scellée avec une couche de COC (épaisseur : 0,1 mm). Tous les canaux sont reliés à une seule entrée sur le côté gauche pour l’injection simultanée d’échantillons et à des réservoirs individuels sur le côté droit dans lesquels des solutions de cristallisation sont déposées. Les canaux, qui constituent les chambres de cristallisation réelles de la puce, mesurent 4 cm de long et ont une section transversale de 80 μm x 80 μm. Les étiquettes (A1, A2, A3, etc.) en relief le long des canaux facilitent le positionnement des cristaux au microscope et la préparation d’une liste d’échantillons pour la collecte de données. ChipX a la taille d’une lame de microscope standard (7,5 cm x 2,5 cm). S’il vous plaît cliquez ici pour voir une version plus grande de ce chiffre.
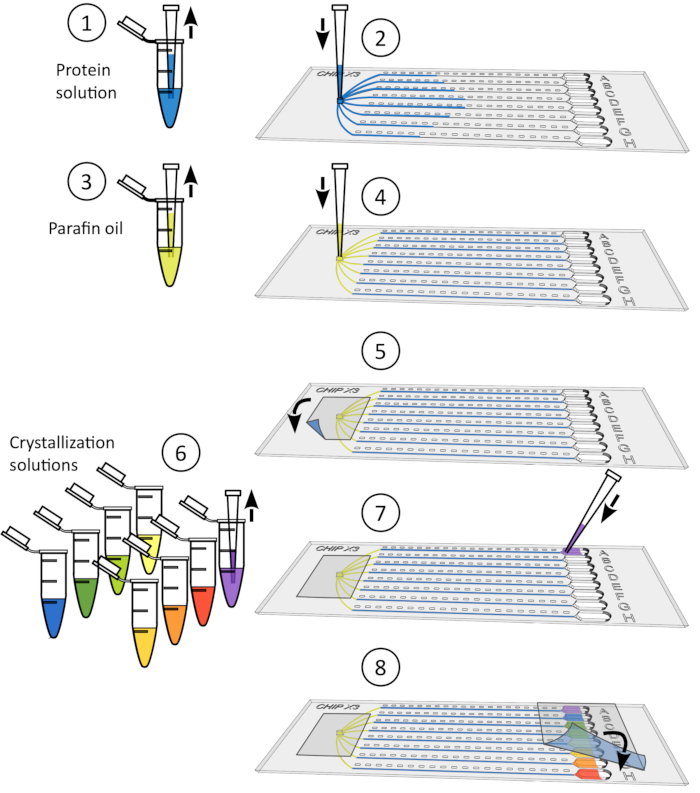
Figure 2: Mise en place d’analyses de cristallisation dans ChipX. 1) Déposer de 5 à 6 μL de solutions enzymatiques à l’aide d’une pipet et d’une pointe standard de 10 μL. 2) Introduire la pointe verticalement dans l’entrée de l’échantillon et injecter la solution dans les huit canaux. 3) Pipet 1 μL d’huile de paraffine. 4) Introduire la pointe verticalement dans l’entrée de l’échantillon et injecter l’huile afin de déconnecter les canaux les uns des autres. 5) Sceller l’entrée avec un morceau de ruban adhésif. 6) Pipet 5 μL de solution de cristallisation à l’aide de pipet et de pointe standard de 10 μL. Les solutions peuvent être différentes dans chaque réservoir (p. ex., à partir d’une trousse de dépistage). 7) Orientez la pointe pipet vers l’entrée du chenal dans la partie en forme d’entonnoir du réservoir (pour éviter la formation d’une bulle d’air lors du dépôt de solution) et injectez la solution cristallante dans le réservoir. 8) Sceller les réservoirs avec un morceau de ruban adhésif et incuber la puce à température contrôlée. S’il vous plaît cliquez ici pour voir une version plus grande de ce chiffre.

Figure 3: Cristaux d’enzyme s’ajoutant à la CCA cultivées par contre-diffusion dans les canaux microfluidiques de ChipX. La barre d’échelle est de 0,1 mm. Veuillez cliquer ici pour voir une version plus grande de ce chiffre.
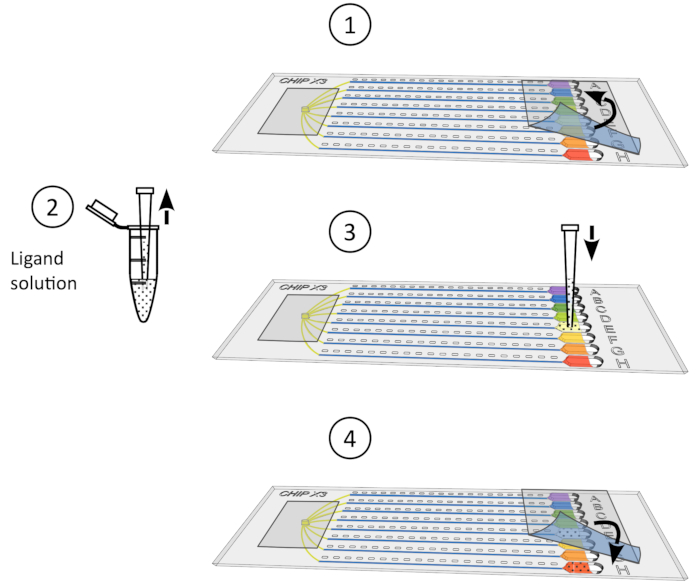
Figure 4: Procédure de trempage du cristal. 1) Retirer délicatement le ruban des réservoirs. 2) Déposez jusqu’à 5 μL de solution ligand à l’aide d’un micropipet de 10 μL. 3) Ajouter le ligand à un ou plusieurs réservoirs. 4) Sceller à nouveau les réservoirs avec un morceau de ruban adhésif et incuber la puce à température contrôlée pendant 24-48 h avant la collecte des données. S’il vous plaît cliquez ici pour voir une version plus grande de ce chiffre.
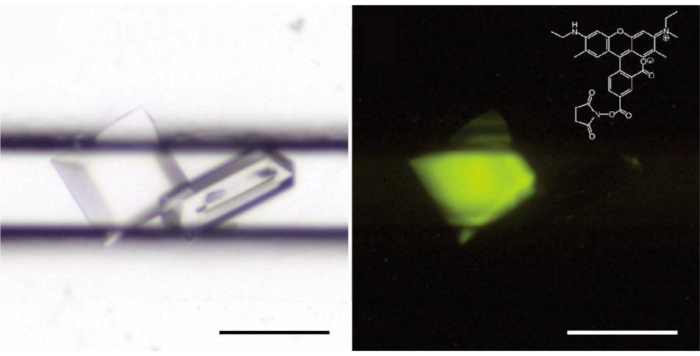
Figure 5: L’étiquetage fluorescent trace discrimine les protéines (à gauche) des cristaux de sel (droite). La solution enzymatique cca-ajoutant a contenu 0.4 % (w/w) de protéine étiquetée avec la carboxyrhodamine. Sur la droite, les cristaux sont éclairés avec une source de lumière de longueur d’onde de 520 nm et l’image est prise avec un filtre de passage bas à 550 nm (LP550); structure (inset) de carboxyrhodamine-succinimidyl ester. S’il vous plaît cliquez ici pour voir une version plus grande de ce chiffre.
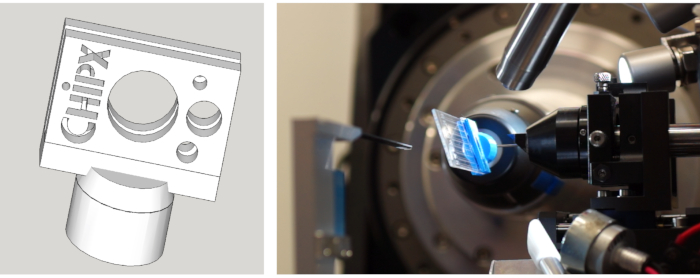
Figure 6: (Gauche) Dessin du support ChipX et (à droite) ChipX monté sur le goniomètre de beamline X06DA chez SLS (Villigen, Suisse) pour l’analyse des cristaux en série. Veuillez cliquer ici pour voir une version plus large de ce chiffre.
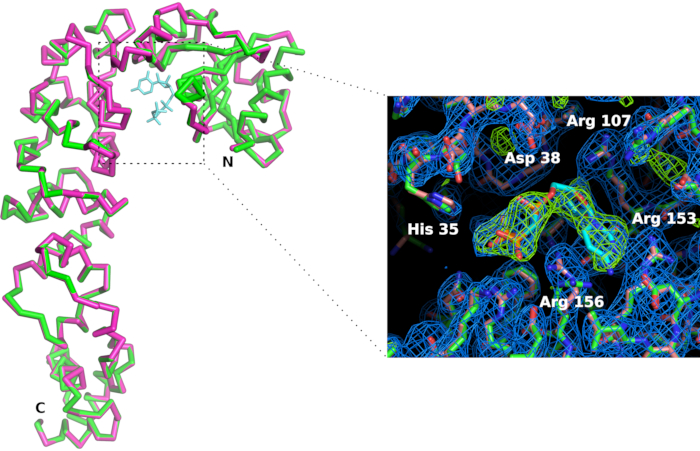
Figure 7: Comparaison du site actif enzymatique s’ajoutant au CCA sous forme d’apo (en rose) et dans le complexe avec un analogue CTP (en vert). Bien que la conformation globale de l’enzyme ne soit pas affectée, la liaison du ligand CMPcPP s’accompagne d’une légère réorganisation des chaînes latérales du site actif. La carte de densité électronique 2Fo-Fc (en bleu) est profilée à 1,2 sigma. La carte de densité électronique de différence profilée à 4 sigma (en vert) confirme la présence du ligand dans le site actif. S’il vous plaît cliquez ici pour voir une version plus grande de ce chiffre.
| Échantillon cristallisé | Enzyme s’ajoutant à la CCA | Enzyme cca-ajoutant + CMPcPP |
| Analyse cristalline | ||
| Faisceaux de rayons X | SLS - X06DA | SLS - X10SA |
| Longueur d’onde (Å) | 1.000 | 1.000 |
| Température (K) | 293 | 293 |
| Détecteur | Pilatus 2M-F | Pilatus 6M |
| Distance du détecteur de cristaux (mm) | 300 | 400 |
| Cristaux collectés | 6 | 14 |
| Cristaux sélectionnés | 5 | 5 |
| Plage de rotation par image (°) | 0.1 | 0.2 |
| Temps d’exposition par image (s) | 0.1 | 0.1 |
| Non. d’images sélectionnées | 1000 | 540 |
| Plage de rotation totale (°) | 100 | 108 |
| Groupe spatial | P43212 | P43212 |
| a, c (Å) | 71.5, 293.8 | 71.4, 293.6 |
| Mosaïque moyenne (°) | 0.04 | 0.04 |
| Plage de résolution (Å) | 46 – 2.54 (2.6 – 2.54) | 48 – 2.3 (2.4 – 2.3) |
| Total No. de réflexions | 176105 (9374) | 232642 (32937) |
| Non. de réflexions uniques | 23922 (1598) | 34862 (4066) |
| Exhaustivité (%) | 90.6 (84.6) | 99.5 (100.0) |
| Redondance | 7.5 (6.0) | 6.7 (8.1) |
 | 8.1 (1.3) | 6.9 (0.7) |
| Mesures (%) § | 18.6 (126.0) | 18.0 (231.2) |
| CC1/2 (%) £ | 98.7 (55.0) | 98.7 (46.9) |
| Facteur B global de wilson parcelle (Å2) | 57.4 | 60.6 |
| Raffinement cristallographic | ||
| Non. de réflexions, ensemble de travail / ensemble de test | 23583 / 1180 | 34840 / 3405 |
| Rcryst final (%) / Rlibre (%) | 18.8 / 21.4 | 20.0 / 22.9 |
| Non. des atomes non-H : globale / protéine / ligand / solvant | 2998 / 2989 / 0 / 9 | 3057 / 2989 / 29 / 10 |
| R.m.s. écarts pour les liaisons (Å) / angles (°) | 0.009 / 1.23 | 0.010 / 1.22 |
| Facteurs B moyens (Å2):globale / protéines / ligand / solvant | 60.1 / 60.1 / 0 / 52.7 | 62.5 / 62.6 / 60.1 / 55.5 |
| Complot de Ramachandran: le plus favorisé (%) / autorisé (%) | 98.1 / 1.9 | 97.2 / 2.8 |
| Id PDB | 6IBP (en) | 6T52 (6T52) |
Tableau 1 :Statistiques sur la collecte et le perfectionnement des données
§ Rmeas indépendants de redondance = Ρhkl(N/N-1)1/2 Ţi | Ii(hkl)- (hkl)>| / ΡhklŢi i i(hkl), où N est la multiplicité des données 17.
£ Données avec faible dans la coquille externe (<2.0) ont été inclus sur la base du critère CC1/2 (corrélation entre deux moitiés aléatoires de l’ensemble de données > 50%) tel que proposé par Karplus & Diederichs 18.
Discussion
Les protocoles actuels en biocrystallographie impliquent la préparation de cristaux à l’aide de méthodes telles que la diffusion de vapeur ou lelot 13,14, et leur transfert dans un microloop pour cryo-refroidissement15,16 avantd’effectuer l’analyse de diffraction dans un jet d’azote à des conditions cryogéniques. En revanche, le cryo-refroidissement en cristal direct n’est pas possible dans ChipX3 et les cristaux ne peuvent pas être extraits de leur canal microfluidique, ce qui peut être considéré comme des limitations de cette configuration. Toutefois, le protocole décrit dans l’article fournit un pipeline entièrement intégré pour la détermination des structures cristallines à température ambiante (c.-à-d. dans des conditions plus physiologiques). Même si la collecte de données à température ambiante entraîne une augmentation des dommages causés par les radiations19, cet effet est contrebalancé par un temps d’acquisition rapide des données (une rotation maximale de 60° est collectée sur chaque cristal) et par la fusion de plusieurs ensembles de données partiels. La conception et le matériau ChipX ont été optimisés pour réduire la diffusion en arrière-plan et l’atténuation du signal de diffraction3,et la collecte de données peut être effectuée sur des cristaux dont les dimensions équivalentes à la moitié de la taille des canaux (40 μm)4.
Pour résumer, les principaux avantages du protocole sont les suivants. Les cristaux sont produits dans un environnement exempt de convection (canaux microfluidiques), ce qui est très favorable à la croissance de cristaux de haute qualité. La méthode de contre-diffusion mise en œuvre dans ChipX est très efficace pour le dépistage du paysage de la sursaturation; la diffusion de cristallants dans le canal des copeaux crée une onde de concentration et de sursaturation qui aide à déterminer les conditions de nucléation et de croissanceappropriées 5. Les cristaux ne sont jamais manipulés directement, mais sont analysés in situ, à l’intérieur de la puce, ce qui préserve leurs propriétés authentiques de diffraction (c.-à-d. ne modifie pas la mosaïque cristalline par interaction physique ou cryocooling)20. L’analyse de diffraction est effectuée sur une série de cristaux distribués le long des canaux de puce avec une faible exposition à la dose pour minimiser les dommages causés par les radiations, et un ensemble complet de données est assemblé en fusionnant des données partielles de la série. L’empreinte standard et la conception simple de ChipX permettront à l’avenir une automatisation complète de la collecte de données in situ à l’aide d’installations synchrotron ou XFEL. Toutes les étapes du protocole sont effectuées dans ChipX. Du point de vue de l’expérimentateur, la configuration des puces est simple et facile à exécuter avec des pipets standard et ne nécessite pas d’équipement supplémentaire. La connexion de canal en arbre à l’entrée de l’échantillon minimise les volumes morts dans le système, ce qui est important lorsque vous travaillez avec des échantillons qui sont difficiles à purifier ou qui ne sont disponibles qu’en quantité limitée.
En conclusion, l’approche de laboratoire sur puce mise en œuvre dans ChipX simplifie et miniaturise efficacement le processus de cristallisation par contre-diffusion et détermination de la structure cristalline, permettant de passer de l’échantillon à sa structure 3D en un seul appareil. Il est largement applicable et offre une solution conviviale et rentable pour les études de routine de biocrystallographie en série à température ambiante.
Déclarations de divulgation
Les auteurs n’ont rien à divulguer.
Remerciements
Les auteurs reconnaissent la Source lumineuse suisse (Villigen, Suisse) pour son allocation de faisceaux au projet sur les faisceaux X10SA (PXII) et X06DA (PXIII), Alexandra Bluhm pour sa contribution au raffinement de la structure, Clarissa Worsdale pour l’enregistrement de la voix off et François Schnell (Université de Strasbourg) pour son aide au montage vidéo et à la SFX. Ces travaux ont été soutenus par Français Centre National de la Recherche Scientifique (CNRS), l’Université de Strasbourg, le consortium LabEx « NetRNA » (ANR-10-LABX-0036_NETRNA), un doctorat en R.dW de l’Initiative d’Excellence (IdEx) de l’Université de Strasbourg dans le cadre du programme national Français « Investissements d’Avenir », un doctorat à K.R. de l’Université Français-allemande (UFA-DFH, n°1). CT-30-19), la Deutsche Forschungsgemeinschaft (subvention no. Mo 634/10-1). Les auteurs ont bénéficié du programme de coopération PROCOPE Hubert Curien (Français ministère des Affaires étrangères et Deutscher Akademischer Austauschdienst).
matériels
| Name | Company | Catalog Number | Comments |
| Axioscope A1 stereomicroscope | Zeiss | Crystal observation (step 3) | |
| Carboxyrhodamine succinimidyl ester | Invitrogen | C-6157 | Protein labeling (step 2) |
| CMPcPP | Jena Bioscience | NU-438 | Crystal soaking (step 4) |
| Crystal clear sealing tape | Hampton research | HR3-511 | ChipX sealing (step 1) |
| Parafin oil | Hampton research | HR3-411 | ChipX loading (step 1) |
| Ultimaker 2 extended+ | Ultimaker | 3D printer - Representative results | |
| UV light source | Xtal Concepts Gmbh | XtalLight100c | Crystal observation (step 3) |
| Zeba spin desalting column 7K MWCO | ThermoFisher Scientific | 89882 | Protein labeling (step 2) |
Références
- Giegé, R., Sauter, C. Biocrystallography: past, present, future. HFSP Journal. 4 (3-4), 109-121 (2010).
- Dhouib, K., et al. Microfluidic chips for the crystallization of biomacromolecules by counter-diffusion and on-chip crystal X-ray analysis. Lab on a Chip. 9 (10), 1412-1421 (2009).
- Pinker, F., et al. ChipX: A Novel Microfluidic Chip for Counter-Diffusion Crystallization of Biomolecules and in Situ Crystal Analysis at Room Temperature. Crystal Growth & Design. 13 (8), 3333-3340 (2013).
- de Wijn, R., et al. A simple and versatile microfluidic device for efficient biomacromolecule crystallization and structural analysis by serial crystallography. IUCrJ. 6 (3), 454-464 (2019).
- García-Ruiz, J. M. A supersaturation wave of protein crystallization. Journal of Crystal Growth. 232 (1-4), 149-155 (2001).
- Otálora, F., Gavira, J. A., Ng, J. D., García-Ruiz, J. M. Counterdiffusion methods applied to protein crystallization. Progress in Biophysics and Molecular Biology. 101 (1-3), 26-37 (2009).
- Pusey, M., Barcena, J., Morris, M., Singhal, A., Yuan, Q., Ng, J. Trace fluorescent labeling for protein crystallization. Acta Crystallographica Section F Structural Biology Communications. 71 (7), 806-814 (2015).
- Meyer, A., Betzel, C., Pusey, M. Latest methods of fluorescence-based protein crystal identification. Acta Crystallographica Section F Structural Biology Communications. 71 (2), 121-131 (2015).
- Betat, H., Rammelt, C., Mörl, M. tRNA nucleotidyltransferases: ancient catalysts with an unusual mechanism of polymerization. Cellular and Molecular Life Sciences. 67 (9), 1447-1463 (2010).
- Ernst, F. G. M., Erber, L., Sammler, J., Jühling, F., Betat, H., Mörl, M. Cold adaptation of tRNA nucleotidyltransferases: A tradeoff in activity, stability and fidelity. RNA Biology. 15 (1), 144-155 (2018).
- Kabsch, W. XDS. Acta Crystallographica. Section D, Biological Crystallography. 66 (2), 125-132 (2010).
- Adams, P. D., et al. PHENIX: a comprehensive Python-based system for macromolecular structure solution. Acta Crystallographica. Section D, Biological Crystallography. 66 (2), 213-221 (2010).
- Dessau, M. A., Modis, Y. Protein Crystallization for X-ray Crystallography. Journal of Visualized Experiments. (47), e2285 (2011).
- Sauter, C., Lorber, B., McPherson, A., Giegé, R., Arnold, E., Himmel, D. M., Rossmann, M. G. Crystallization - General Methods. International Tables of Crystallography, Vol. F, Crystallography of Biological Macromolecules. , 99-120 (2012).
- Garman, E. "Cool" crystals: macromolecular cryocrystallography and radiation damage. Current Opinion in Structural Biology. 13 (5), 545-551 (2003).
- Li, D., Boland, C., Aragao, D., Walsh, K., Caffrey, M. Harvesting and Cryo-cooling Crystals of Membrane Proteins Grown in Lipidic Mesophases for Structure Determination by Macromolecular Crystallography. Journal of Visualized Experiments. (67), e4001 (2012).
- Diederichs, K., Karplus, P. A. Improved R-factors for diffraction data analysis in macromolecular crystallography. Nature Structural Biology. 4 (4), 269-275 (1997).
- Karplus, P. A., Diederichs, K. Linking Crystallographic Model and Data Quality. Science. 336 (6084), 1030-1033 (2012).
- de la Mora, E., Coquelle, N., Bury, C. S., Rosenthal, M., Holton, J. M., Carmichael, I., Garman, E. F., Burghammer, M., Colletier, J. -. P., Weik, M. Radiation damage and dose limits in serial synchrotron crystallography at cryo- and room temperatures. Proceedings of the National Academy of Sciences of the United States of America. 117 (8), 4142-4151 (2020).
- Nave, C. A. Description of Imperfections in Protein Crystals. Acta Crystallographica. Section D, Biological Crystallography. 54 (5), 848-853 (1998).
Réimpressions et Autorisations
Demande d’autorisation pour utiliser le texte ou les figures de cet article JoVE
Demande d’autorisationThis article has been published
Video Coming Soon