Войдите в систему

Male Rectal Exam

Обзор

Source: Joseph Donroe, MD, Internal Medicine and Pediatrics, Yale School of Medicine, New Haven, CT

While its usefulness in cancer screening is debated, the male rectal examination remains an important part of the physical exam. The exam is indicated in selected patients with lower urinary tract symptoms, urinary and/or fecal incontinence or retention, back pain, anorectal symptoms, abdominal complaints, trauma patients, unexplained anemia, weight loss, or bone pain. There are no absolute contraindications to the rectal exam; however, relative contraindications include patient unwillingness to undergo the exam, severe rectal pain, recent anorectal surgery or trauma, and neutropenia.

When performing the rectal exam, the examiner should conceptualize the relevant anatomy. The external anal sphincter is the most distal part of the anal canal, which extends three to four centimeters before transitioning into the rectum. The prostate gland lies anterior to the rectum, just beyond the anal canal. The posterior surface of the prostate, including its apex, base, lateral lobes, and median sulcus, can be palpated through the rectal wall (Figure 1). The normal consistency of the prostate is similar to the thenar eminence when the hand is in a tight fist. The thumb knuckle is representative of what a hard nodule may feel like. The normal size of the prostate increases with age and is approximately 4.0 cm by 3.5 cm, or 20-30 g, in a young man.

The steps of the male rectal exam, including preparation, positioning, neurologic assessment, external inspection and palpation, examination of the prostate and rectum, and evaluation of the stool, are detailed in this video.

Figure 1
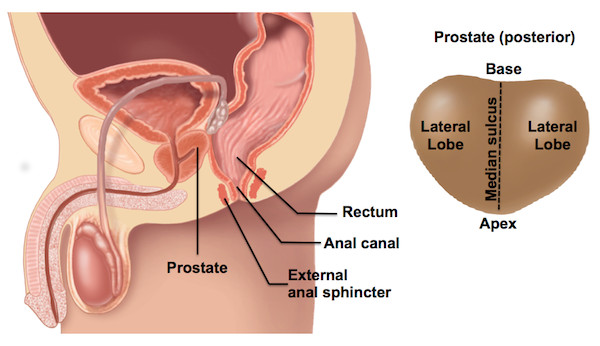
Figure 1. Male rectal anatomy (left) and regions of prostate gland posterior surface (right).

Процедура

1. Preparation

  1. Prepare the Patient
    1. Inform the patient of the exam about to be performed and the reason for it. Recognize that some men may feel uncomfortable at the idea of having the exam performed. If it seems that the patient feels uncomfortable with the exam, take a moment to explore the reasons why. Discussing the exam in a-matter-of-fact way tends to lessen a patient's anxiety.
    2. As with all sensitive examinations, it is important to be mindful of the language used during the exam. While conducting the exam, tell the patient what you intend to do before actually performing the maneuver. In general, avoid words that can have intimate connotation, such as "feel", "touch", and "looks good", as well as words that are overly medical, such as "probe" and "palpate". Some useful neutral words include "examine", "check", "assess", "insert", and "appears healthy".
    3. Attempt to minimize exposure and expose only the area necessary to perform a thorough exam, then cover the patient as soon as the examination of that body part is completed. Avoid unnecessary physical contact, including inadvertent contact between your leg and the patient.
    4. If the patient is not already in a gown, ask them to change into one. Let the patient know you will leave the room while they change, and that you will knock prior to re-entry.
  2. Equipment
    1. Before beginning the exam, be sure everything needed is ready in advance. Prepare one pair of latex-free gloves, lubricant pre-expressed on a paper towel, a guaiac card and reagent (if checking for occult blood), a cotton swab (if doing a neurologic exam), and tissue paper to hand to the patient in order to clean up after the exam has ended.
  3. Physician Preparation
    1. Wash hands before beginning the exam.
    2. Before positioning or exposing the patient, put on your gloves and apply the lubricant to your dominant index finger. Apply a thin layer to the entire length and circumference of the finger. Applying too much leads to an unnecessary mess, while applying too little causes patient discomfort.
    3. It is helpful to engage in normal conversation with the patient while preparing, in order to minimize anxiety about the exam.

2. Performing the Exam

  1. Positioning the Patient
    There are several acceptable ways to position a patient for the rectal exam:
    1. In the first position, or Sims' position, have the patient lie down in the bed or on the exam table, and ask them to roll onto their left side with the left leg straight and the right leg flexed at the hip and knee. This is the preferred position for hospitalized patients and those unable to stand for the exam.
    2. In the second position, or modified lithotomy position, have the patient lie on their back with feet together and their hips and knees bent and abducted. This position may be useful in the hospitalized patient and may facilitate palpation of anterior structures, but limits inspection.
    3. In the third position, direct the patient to stand in front of the exam table with feet shoulder-width apart. Have the patient bend forward at the waist and support himself on his elbows and forearms. This is the preferred position in the office setting when the genitourinary (GU) exam will also be performed and for obese patients.
  2. Neurologic Assessment
    1. In the appropriate setting, it may be important to complete the neurological assessment with examination of perianal sensation, anal reflex, and sphincter tone. This is particularly important in patients for whom the diagnosis of cauda equina syndrome is being considered.
    2. Using a non-lubricated finger or cotton swab, gently touch the perianal region in a dermatomal pattern, and ask the patient to identify when you contact their skin.
    3. Test the anal reflex, an S2-S4 pathway, by using a non-lubricated finger to gently scratch the skin surrounding the anus, and observe for sphincter contraction.
    4. Assess the sphincter tone during the digital rectal exam (DRE).
  3. External Inspection and Palpation
    1. Carefully inspect the skin of the buttocks, sacrococcygeal, and perianal regions. To facilitate thorough inspection, either use the non-lubricated hand to separate the buttocks or ask the patient to reach back with the right hand and pull the right buttock forward.
    2. Carefully palpate any abnormal areas identified during perianal inspection.
  4. Digital Rectal Exam: Examination of Prostate and Rectum
    1. Inform the patient that, during the DRE, they may feel the urge to have a bowel movement. Reassure the patient that this is normal and an actual bowel movement will not occur.
    2. Ask the patient to bear or strain down, as if having a bowel movement.
    3. Quickly inspect the anus during the strain phase for prolapsing internal hemorrhoids or rectal tissue.
    4. Next, place the lubricated fingertip on the external anal sphincter, using gentle pressure, and pause.
    5. Once you feel the sphincter relax, fully insert the finger. If there is pain or the sphincter tightens, wait a moment and then continue once the sphincter has relaxed. Note sphincter tone during insertion. If there are concerns about sphincter tone, the clinical context calls for a complete neurologic assessment, ask the patient to squeeze down on your finger.
    6. Palpate the posterior surface of the prostate through the rectal wall, the apex of which is typically encountered 4-6 cm from the external anal sphincter. The prostate can be encountered by directing the finger anteriorly toward the umbilicus.
    7. Appreciate the median sulcus running between the lateral lobes of the prostate and follow it until the base of the prostate is felt. This may be beyond the length of the examiner's finger.
    8. Next, examine each lateral lobe of the prostate using abduction-adduction, flexion-extension, and supination-pronation movements of the finger. Use sufficient finger pressure to enhance detection of smaller lesions.
    9. Note relative symmetry of size, consistency, areas of nodularity, and tenderness. Use your fingertip to approximate the size of the prostate. Each fingertip-sized area is approximately 10-15 g.
    10. Next, with the finger fully inserted into the rectum, proceed to palpate the rectum.
    11. Begin by rotating the hand clockwise from six o'clock to one o'clock.
    12. Finally, rotate the hand counter-clockwise to twelve o'clock. In order to achieve this, the examiner must turn their body to the left, away from the patient. This is most easily done if the examiner is seated on a swivel chair or stool.

3. Completing the Exam

  1. After palpation of the rectum, withdraw your finger smoothly.
  2. Replace the gown to avoid exposing the patient for longer than necessary.
  3. Hand the patient tissue paper and invite him to clean himself.
  4. If a curtain is available, close it at this point to allow for privacy, otherwise turn your back to the patient until they are ready to continue.
  5. Inspect any stool that may be on your gloved hand for color, consistency, and blood. Use the guaiac card to test for occult blood, if indicated.
  6. Carefully dispose of the gloves and wash your hands.
  7. Once the patient is ready, review any normal and abnormal findings with him and discuss any next steps.
Заявка и Краткое содержание

The male rectal exam remains an important part of the physical exam, particularly for patients with abdominal, genitourinary, or gastrointestinal concerns. It is a sensitive procedure and requires careful attention to verbal and body language to ensure patient comfort. This video reviewed the indications and contraindications for the exam, relevant anatomy, as well the steps involved in performing the examination. Abnormalities that may be encountered at each step are found in Table 1. Physician comfort and technical proficiency with the rectal exam improves through practice, and the accuracy of the exam correlates with the experience of the examiner. As in other aspects of the physical exam, it is important to have a systematic method of examination. The method demonstrated in this video involves neurologic assessment, inspection and palpation of the perianal region, palpation of the prostate, palpation of the rectum, and finally, inspection of any stool on the gloved finger after the exam.

Table 1
Table 1. Abnormalities detected during the male rectal exam. The table shows potential pathological findings that can be observed during rectal examination and their interpretations.

Limitations of the rectal exam are important to become familiar with. The rectum extends 12 to 15 cm beyond the anal canal, thus only the most distal portion can be palpated. Additionally, determining prostate size by DRE may be unreliable and thus should be considered an approximation. When compared with experienced urologists, students tend to palpate fewer areas of the prostate and use insufficient pressure, both of which limit detection of nodules. The examiner should always attempt to palpate the prostate from apex to base and both lateral lobes. However, with larger prostates, the examiner's finger may not be long enough to reach the base, limiting the evaluation. Finally, early malignancy is unlikely to be detected by DRE alone, thus screening for prostate cancer should be done with concomitant prostate specific antigen (PSA) testing in the appropriate patients.

Теги
Male Rectal ExamPhysical ExamSensitive ExaminationPhysicianModestyClinical IndicationsLower Urinary Tract SymptomsUrinary IncontinenceUrinary RetentionFecal IncontinenceFecal RetentionBack PainAnorectal SymptomsAbdominal ComplaintsTrauma PatientsUnexplained AnemiaWeight LossBone PainRelevant AnatomyExternal Anal SphincterAnal CanalRectumProstate Gland

Перейти к...

0:00

Overview

1:09

Male Rectal Anatomy

2:13

Male Rectal Exam Procedure

9:12

Summary

Видео из этой коллекции:

article

Now Playing

Male Rectal Exam

Physical Examinations II

112.5K Просмотры

article

Eye Exam

Physical Examinations II

75.8K Просмотры

article

Ophthalmoscopic Examination

Physical Examinations II

66.7K Просмотры

article

Ear Exam

Physical Examinations II

53.7K Просмотры

article

Nose, Sinuses, Oral Cavity and Pharynx Exam

Physical Examinations II

64.6K Просмотры

article

Thyroid Exam

Physical Examinations II

103.5K Просмотры

article

Lymph Node Exam

Physical Examinations II

381.1K Просмотры

article

Abdominal Exam I: Inspection and Auscultation

Physical Examinations II

200.6K Просмотры

article

Abdominal Exam II: Percussion

Physical Examinations II

245.5K Просмотры

article

Abdominal Exam III: Palpation

Physical Examinations II

137.5K Просмотры

article

Abdominal Exam IV: Acute Abdominal Pain Assessment

Physical Examinations II

66.4K Просмотры

article

Comprehensive Breast Exam

Physical Examinations II

85.5K Просмотры

article

Pelvic Exam I: Assessment of the External Genitalia

Physical Examinations II

299.7K Просмотры

article

Pelvic Exam II: Speculum Exam

Physical Examinations II

148.2K Просмотры

article

Pelvic Exam III: Bimanual and Rectovaginal Exam

Physical Examinations II

145.4K Просмотры

JoVE Logo

Исследования

Образование

О JoVE

Авторские права © 2025 MyJoVE Corporation. Все права защищены