A subscription to JoVE is required to view this content. Sign in or start your free trial.
Method Article
Visualizing the Live Drosophila Glial-neuromuscular Junction with Fluorescent Dyes
In This Article
Summary
We described structural features of the Glia-neuromuscular synapses in a novel Inside-out tissue preparation of live fly larvae using fluorescent dyes with confocal microscopy. We labeled live neuron terminals with fluorescent primary antibodies to HRP, and also visualized the perisynaptic space with fluorescent Dextrans.
Abstract
Protocol
Part 1: Tissue Preparation
- Our goal is a tissue preparation of fly larvae where the nervous system is intact, but the interior surface of the body wall muscle is exposed to an artificial hemolymph, and can be positioned close to a microscope cover slip for good optics. In other words, an inside out larval preparation.
Since conventional tissue preparations involve cutting, pinning and stretching the body wall muscle, and sometimes removing part of the nervous system, we needed a different approach.
We wanted the animals inside-out because we wanted to get a good look at structural features and structural changes over time in the synapse, and we wanted to keep the nervous system intact. We also wanted to avoid stretching the tissue, and activating stretch receptors, which would make the muscles twitch and ruin our images. - For starters, stage the animals. Feeding third larvae and Wandering third larvae are big and easy to dissect so we'll demonstrate on W3 larvae. This animal is has the Tubby phenotype, and is wide, so it is easy to evert.
We only used larvae that we saw actively crawling, including W3 larvae . - Clean the surface of a maggot with a very soft paint brush in a petri dish of double-distilled H2O. Clean larvae have better optics and cleaning reduces bacteria.
- Transfer the animal to a small petri dish of about 3 ml ice cold HL-6, and artificial hemolymph. Put the dish on ice until the animal stops moving, and relaxes (about 5 minutes).
- Hold very fine tip forceps in one hand and spring scissors in the other. I use the scissors with my dominant hand. Make a small hole in the body wall with teh scissors to equlibrate the pressure across the body wall.
- Hold the animal gently with the forceps down on the bottom of the dish and cut off the posterior two segments. Dissect away the viscera and fat body will likely move out of the body cavity. Cut away this tissue also.
- Hold the larvae against the dish bottom with fine forceps. Hold a #0 insect pin in (with a blunt tip) and push it against the mouth parts of the larvae. Push the mouth parts through the body cavity like you are turning a sock inside out.
- The inside out tissue will look like figure: below. With ultra-fine dissecting tool, dissect away the fat body and trachioles from the body wall. Try REALLY hard not to pull the trachioles, or disconnect the nervous system. Ripping the trachioles will rip holes in the body wall muscle.
Remove as much fat body as you can. Both of these structures disrupt the optical quality of your tissue. You may want to skip the coffee before doing this preparation. - When you are finished the muscle will be translucent, not opaque or white. If you put the tissue prep into HL-6 without glutamate, at room temp, it will likely contract rhythmically because the motor pattern generators in the CNS are working.
Avoid using preps with obviously contracted, or irregularly contracted body wall muscle.
The intact inside out body wall readily tends to fold in half along the dorsal and ventral midlines, so the prep gives a left or right “hemi-animal” to visualize. - 1.9 Mount the tissue in either a small volume commercial chamber, such as the Warner chamber, or a microscope slide with a bridged cover slip arrangement. See part 3 for suggestions on mounting tissue.
Part 2: Neuronal Bouton Labeling with fluorescently labeled primary antibody against HRP.
- Put 50 micro liters of fluorescently labeled primary anti-body against HRP in HL-6 in a drop on a petri dish. Immerse the inside- out body wall prep in the dye bath. You may see neuron terminal labeling after about 5 minutes, but incubate for 10-20 minutes, for a complete and bright label.
- Rinse the dye off for 10-30 seconds in HL-6 at room temperature. Non-bound dye rinses off quickly, so the rinse cycle need not be aggressive.
- Vary the dye concentration and incubation time as needed.
Part 3: Perisynaptic space labeling with dextran flurophore conjugate
- Dilute fluorescently conjugated dextran dye diluted in HL-6. A concentration that worked well for our purposes was:
- If you are not concerned about the timing of dye access into to your extracellular space, put a 20 micro liter drop of dye on a “bridged” coverslip (see part 4) and deposit the prep in the dye bath.
Part 4: Mounting the tissue for visualization (with confocal microscopy).
If you do not need to perfuse your prep (short observations) or you want to keep the volume of bathing HL-6 small, use the double bridged slide method
If you want to perfuse your prep, try using a perfusion chamber. We used a modified Chamber from Warner Instruments.
Details for both follow.
Mounting prep on a double-bridged slide.
- Use a very clean microscope slide. Superglue two square, 18mm (#1.5) coverslips onto the slide. Leave a 2 mm gap between the edges of the coverslips.
- Let the glue fully dry, or it will form a weird film over the aqueous media around your prep.
- Position the inside out larvae between the edges of the coverslips. You may need to position the prep on a diagonal if the larvae is large and your image aquisition system has a limited pixel array.
- Cover the tissue with a # 1.5 coverslip, 18mm (very clean). Adhere the “top” coverslip the slide affixed tissue flanking slips, with minimal vaseline.
- Put a drop of Cargill custom objective oil with a refractive index of 1.3379 (if you use HL-6) on the top coverslip and flip this assembly over.
- Position the tissue assembly on your microscope, oil side toward the objective, and focus your objective.
Mounting the tissue in a modified perfusion chamber. - Glue a 1.5 coverslip to form a floor in the RC 20 chamber. Position the tissue in the chamber as per RC-20 instructions. Use a piece of Nytex mesh instead of a coverslip to form a roof for the chamber.
Part 5: Representative Results:
- Inside- out tissue preparation dissection sequence:

W3 larvae, washed (“Tubby” phenotype)( 5.1.1). W3 larvae, posterior 2 segments dissected. You can see fat body pushed out of the body cavity by trans-body wall pressure (arrow). Try to minimize visceral “eruption” by making a small hole in the body wall 1 minute before dissection ( 5.1.2). The prep with the viscera dissected before turning the prep inside out (5.1.3). The prep, mostly everted, with the pin (arrow) inside the lumen of the prep (5.1.4). The muscle is now on the outside and the cuticle is on the inside, with some fat body and trachioles attached (5.1.5). A fully dissected tissue preparation with nearly all the fat body and trachioles dissected (5.1.6).

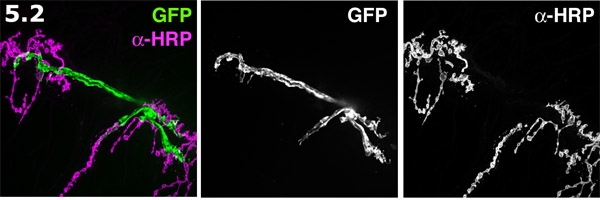
- Live labeling using anti-HRP at the larval NMJ. A representative W3 larval nerve-muscle synapse with a glial extension (inside out-prep). The motor neuron bouton terminals are labeled with a primary anti-body against HRP (magenta), which is conjugated to Cy5. The glial processes are labeled with GFP (green).

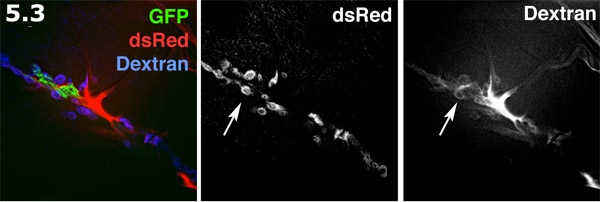
- Perisynaptic space fluorescently visualized with Alexa 680 dextran in an inside out prep. The glial process (green) is labeled with membrane targeted GFP. The post-synaptic SSR on the muscle surface (blue) is labeled with dsRed. The Alexa dextran (red) forms concentrates in extracellular areas. The dextran dye forms doughnut shaped pools in the perisynaptic spaces. The dextran labeling and dsRed labeled SSR are shown in grayscale. Note the multiple doughnut shaped dye pools highlighting the perisynaptic spaces (arrow).
Access restricted. Please log in or start a trial to view this content.
Discussion
This procedure permits long- term imaging of live labeled proteins and cell processes. The in situ tissue prep we described has an intact and functioning CNS, PNS and reflex circuits. This tissue prep has advantages over standard larval fly muscle protocols, where the larval body wall muscle is stretched (when it is pinned out). Stretching can distort synaptic morphology and trigger reflex based contractions. Our inside out prep was mechanically stable, and had exceptionally good optics that facilitated high r...
Access restricted. Please log in or start a trial to view this content.
Acknowledgements
This project was funded by the CIHR and NSERC. We would like to acknowledge Barb Jusiak for contributing to the creation of the fly strains expressing dsRed labeled SSR (BJ line), and the UBC Bio-imaging Facility.
Access restricted. Please log in or start a trial to view this content.
Materials
| Name | Company | Catalog Number | Comments | |
| HL-6: Artifical Drosophila hemolymph, with 5 mM L-glutamate added, and 2 mM Calcium. | Reagent | N/A | NA | 5 mM L-glutamate blocked muscle contractions. We used Molecular grade L-Glutamate (Sigma).2 mM Calcium is close to physiological Calcium levels in natural larval hemolymph.References: Macleod et al 2002 and Macleod 2004 |
| Dextran, Alex Fluor 680; 10,000 MW, anionic, fixable | Reagent | Molecular Probes, Life Technologies | D34680 | Use a small volume perfusion chamber to keep the total volume of dye low |
| Anti-HRP-CY5 conjugate (goat) | Reagent | Jackson ImmunoResearch | 123-175-021 | Dilute 2.0 mg into 1 ml ddH2O; aliquot into 4 microliter aliquots. Freeze at –20C. Dilute one aliquot into 100 microliters of HL-6 |
| Alexa 647 antibody labeling kit | Reagent | Molecular Probes, Life Technologies | A10475 | We prepared a total of 80 micro liters of conjugated primary antibody, and stored as 2 microliter aliquots. We diluted each aliquot into 100 microliter of HL-6 for labeling. |
| Custom Formulated Objective Oil, refractive index 1.3379 | Reagent | Cargill Labs | Custom Formulated | |
| Ultra Fine Forceps | Tool | Fine Science Tools | 11252-23 or 11295-20 | |
| Spring scissors | Tool | Fine Science Tools | 91500-09 | |
| Ultra fine clipper scissors | Tool | Fine Science Tools | 15200-00 | |
| Perfusion Chamber RC 20 Series | Tool | Warner Instruments | 64-02222 | |
| Spinning Disc confocal | Microscope | Quorum Technologies | Quorum Wave FX | Mounted on a Leica DMI6000 Inverted Microscope |
References
- Macleod, G. T., Marin, L., Charlton, M., Atwood, H. L. Synaptic Vesicles: Test for a role in presynaptic Calcium regulation. J. Neurosci. 24, 2496-2505 (2004).
- Macleod, G. T., Hegstro, M., Wojtowicz, M., Charlton, M. P., Atwood, H. L. Fast Calcium signals in Drosophila motor neuron terminals. J. Neurophysiology. 88, 2659-2663 (2002).
- Morales, M., Ferrus, A., Martinez-Padron, M. Presynaptic calcium-channel currents in normal and csp mutant Drosophila peptidergic terminals. Eur J Neurosci. 11, 1818-1826 (1999).
- Stork, T., Engelen, D., Krudewig, A., Silies, M., Bainton, R. J., Kla¨mbt, C. Organization and Function of the Blood–Brain Barrier in Drosophila. J. Neurosci. 28, 587-597 (2008).
Access restricted. Please log in or start a trial to view this content.
Reprints and Permissions
Request permission to reuse the text or figures of this JoVE article
Request PermissionExplore More Articles
This article has been published
Video Coming Soon
Copyright © 2025 MyJoVE Corporation. All rights reserved