Method Article
Non-invasive Assessment of Dorsiflexor Muscle Function in Mice
In This Article
Summary
Measurement of rodent skeletal muscle contractile function is a useful tool that can be used to track disease progression as well as efficacy of therapeutic intervention. We describe here the non-invasive, in vivo assessment of the dorsiflexor muscles that can be repeated over time in the same mouse.
Abstract
Assessment of skeletal muscle contractile function is an important measurement for both clinical and research purposes. Numerous conditions can negatively affect skeletal muscle. This can result in a loss of muscle mass (atrophy) and/or loss of muscle quality (reduced force per unit of muscle mass), both of which are prevalent in chronic disease, muscle-specific disease, immobilization, and aging (sarcopenia). Skeletal muscle function in animals can be evaluated by a range of different tests. All tests have limitations related to the physiological testing environment, and the selection of a specific test often depends on the nature of the experiments. Here, we describe an in vivo, non-invasive technique involving a helpful and easy assessment of force frequency-curve (FFC) in mice that can be performed on the same animal over time. This permits monitoring of disease progression and/or efficacy of a potential therapeutic treatment.
Introduction
Skeletal muscle is an important metabolic tissue that comprises approximately 40% of the total body weight. It plays a crucial role in the control of energy metabolism and homeostasis1. Skeletal muscle mass is maintained by a fine balance between the rates of protein synthesis and degradation1. Numerous disease conditions affect these processes in skeletal muscle, leading to a net loss in muscle mass (atrophy). These include, but are not limited to, cancer, AIDS, aging, fasting, and limb immobilization2,3. In the aging population, loss of strength is associated with a loss of muscle mass and is a predictor of all-case mortality4. In this context, assessment of muscle function provides an important measure when determining the efficacy of therapeutic strategies to combat and/or prevent skeletal muscle wasting and loss of function.
Researchers have used many different approaches and animal models to understand the molecular pathways of muscle atrophy5,6 and the implications of these mechanisms on muscle contractile function2,3,7. Therefore, correlating changes at the molecular level to differences in muscle function is imperative in understanding how molecular level changes can impact muscle functionality.
Skeletal muscle function, especially in small rodents, is typically performed using three well-described procedures8,9 to detect impaired force production and/or monitor disease progression. (1) Ex vivo; where muscle is removed from the animal and incubated in a Ringer's bath solution to assess the muscle function using field stimulation10. (2) In situ; where the proximal attachment of the muscle remains in the animal and the distal tendon is connected to a force transducer, allowing muscle function to be performed by direct nerve stimulation11. (3) In vivo; where electrodes are placed subcutaneously to obtain nerve-evoked muscle force production9,12. While these three procedures are used for different purposes, they each possess advantages and disadvantages. Therefore, it is important to select an appropriate method based on the aim of the study. The main limitation with ex vivo experiments is the removal of muscle from its normal environment and the use of field stimulation. The in situ method maintains a normal blood supply and uses stimulation through the nerve, but normal anatomy is altered and the nature of the experiment is terminal; thus, this makes follow-up muscle function measurements impossible. The in vivo method described here most closely mimics normal physiology in that the anatomy is undisturbed, the neuromuscular bundle remains intact, and the experiment is not terminal, allowing follow-up measures within the same animal over time8.
Here, we describe an in vivo procedure that allows multiple measurements of muscle function in the same animal over time. This procedure involves the assessment of muscles of the anterior crural compartment — including the tibialis anterior(TA), extensor digitorum longus (EDL), and extensor hallicus longus (EHL) muscles, responsible for dorsiflexion — in a non-invasive procedure by fibular (also known as peroneal) nerve stimulation. The TA provides most of the force for ankle dorsiflexion13, with only minimal contribution by the EDL and EHL that control movement of the toes. This non-terminal protocol ensures the preservation of nerve and blood supply. This allows for the investigation of disease evolution and treatment efficacy over time in the most physiological environment currently available in an animal model.
Protocol
All experimental procedures were approved by Deakin University Animal Ethics Committee (Project #G19/2014).
1. Equipment Setup
- Ensure that all machines are properly connected.
- Turn on the computer, the high-power bi-phase stimulator, and dual-mode lever system.
- Set up the mouse knee clamp on the platform, as well as the mouse footplate on the transductor.
- Turn on the heating platform to 37 °C.
- Open the dynamic muscle control software on the desktop.
NOTE: This is the software needed to perform functional testing.
2. Software and Model Setup
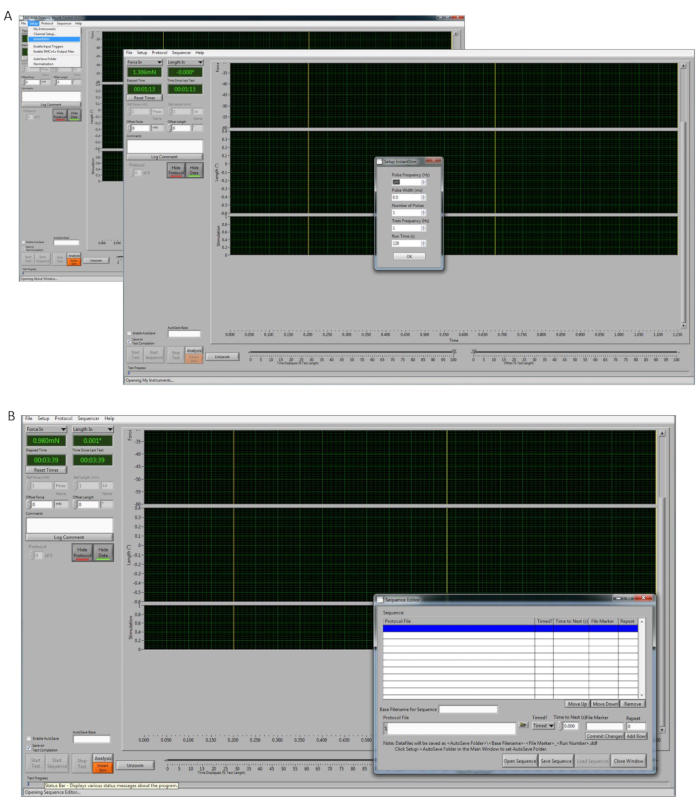
- Once the program is opened (Figure 1), calibrate the transducer and select Setup | My Instruments | Calibrate.
- On the "Setup" button, select InstantStim and change the "Run Time" parameters to 120 s (Figure 1A).
NOTE: Optimal voltage can also be achieved by performing single twitches, manually setting up, or starting the InstantStim as many times as needed. - In the type-able window labeled "Autosave Base" to input the name of the auto save file location (e.g., mouse1-date-timepoint1). Click the checkbox to the left of the "Autosave Base" window and change it to Enable Autosave.
- At the top of the DMC control screen go to Sequencer, which will open a new pop up window. Select Open Sequence and select the premade protocol to be used (Figure 1B). Click Load Sequence | Close Window.
NOTE: This step is used to generate a force frequency-curve (FFC) test (1, 10, 20, 30, 40, 50, 60, 80, 100, 150, 200, 250 Hz). - Set the "RANGE" knob to 10 mA on the bi-phase stimulator.
NOTE: Ensure that the "ADJUST" knob (right next bottom) is on zero. This fine adjustment allows the setup of the electrodes.
3. Mouse Setup
NOTE: All force measurements were performed on male wild-type mice (C57BI/6) at 12 weeks of age.
- Place each mouse into the anesthesia chamber with an oxygen flow rate of 1 L/min with 5% isoflurane (via nosecone inhalation) until the mouse loses consciousness. Confirm adequate anesthesia via loss of the foot reflex.
- Remove all hair on the right leg of the mouse by shaving with electric hair clippers.
- Place the animal in a supine position on the heated platform and clean the right leg (either side can be used) with 70% alcohol and iodine. At this point, adjust the isoflurane to 2% (with oxygen flow at 1 L/min) and apply the conductive gel to the skin where electrodes will be placed.
NOTE: Use a rectal temperature probe to monitor the body temperature during the procedure and apply eye ointment to prevent any dryness and/or damage to the eye. - Place the foot onto the footplate and attach using medical tape. Clamp the knee to stabilize and immobilize the leg during the procedure.
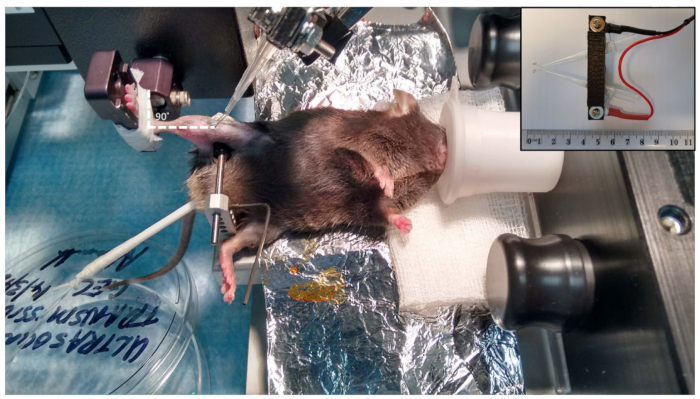
NOTE: Some studies have described using a very thin pin inserted through the proximal tibia (posterior to the dorsiflexors muscles)12 to provide stabilization. This protocol opts for a clamp, as this provides sufficient stabilization without unnecessary compression/damage to the knee. The clamp also avoids potential inflammation that a trans-osseous pin might create, while still allowing accurate assessment of muscle contractility. Furthermore, the mouse knee clamp has been successfully used14. - At this point, use the knobs on the platform to position the mouse hindlimb so that there is a 90° angle at the ankle (Figure 2).
4. Optimization of the Electrodes Position
- Once the mouse is placed on the platform, position the electrodes under the skin (subcutaneous) in the right leg.
NOTE: This is a crucial step, and some repositioning may be required to get the desired position during the setup in step 4.4. - Place the electrodes on the lateral side of the right leg; place one near the head of the fibula and the other electrode more distally on the lateral side of the leg (Figure 2).
NOTE: A custom-made electrode system is designed to optimize this step. However, this test can be performed with electrode needles provided by the manufacturer in this system. - Once these steps are achieved, on the high-power bi-phase stimulator adjust the knob labeled "ADJUST" as needed to obtain a stimulation of the peroneal nerve that results in maximum dorsiflexion torque.
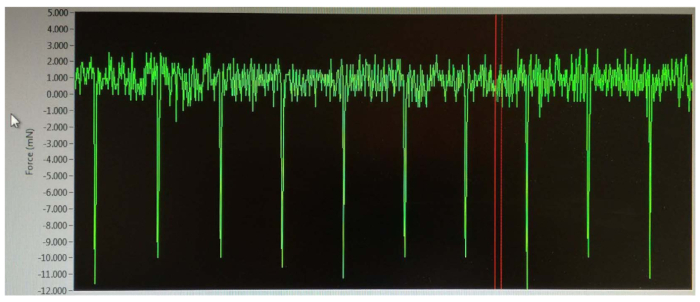
NOTE: For adult wild-type mice, this range is less than 2 mA; however, this may be dependent on the size, age, and sex of the animal. The force production (peaks of curves) should be increased slowly until the maximum force is reached. - During stimulation, turn the transducer clockwise to yield negative values (Figure 3), which are important to ensure that the electrodes are stimulating only the dorsiflexor muscles by peroneal nerve. Once this step is achieved, stabilize the electrodes using a clamp, preventing any movement during the procedure.
NOTE: The peaks will slowly increase in magnitude, and the maximum amperage is determined as the level at which three or more consecutive stimulations result in identical contractility. Resist turning the amperage higher than necessary; the maximum amperage will stimulate the neighboring and potentially antagonist muscles to contract, causing co-contraction, which can generate peaks of positive values. - Stop the Instant Stim on the software.
- On the main screen, turn on the button labeled "Start Sequence" to start the previous setup sequence (as described in step 2.4).
5. Ending the Procedure
- Once the force measurements are finished, remove the electrodes, release the knee clamp, and remove the foot tape.
- Turn off the isoflurane and maintain oxygen delivery for a few minutes aiding the animal recovery. Once the mouse starts moving and/or regains consciousness and can self-right, return the mouse to its cage.
NOTE: A nonsteroidal anti-inflammatory drug (NSAID) can be injected subcutaneously (1 mg/kg meloxicam) to prevent any discomfort and/or soreness after the procedure.
6. Data Analysis
- Open the data analysis software.
- Go to High Throughput (top-left on the screen). Select Force Frequency to analyze the above described setup sequence.
- Select Manual and change the "End Cursor" value to 3. Also select Remove Baseline.
- Click on Pick Files to access the previously performed procedure and then click Analyze. At this point the result can be accessed on the screen or exported to a spreadsheet for further analysis and/or calculations.
NOTE: The data were measured in mN; however, the torque can be calculated by multiplying the force value by the length of the lever arm (absolute force). If normalization is required (specific force), torque can be normalized to body weight, or terminal experiments can be performed to collect muscle mass of age-matched.
Results
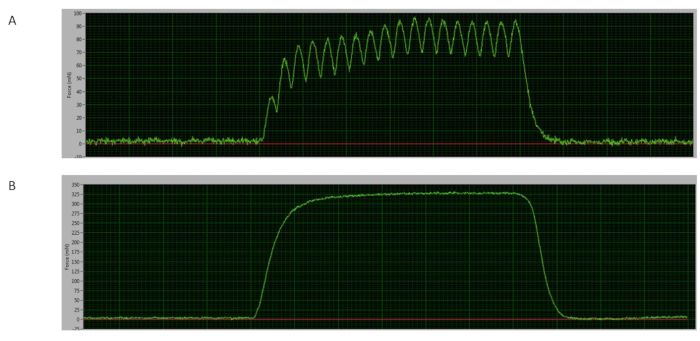
The force-frequency curve is a useful test in which muscles can be stimulated by lower and higher frequencies to distinguish suboptimal and optimal force responses15. The force at lower frequencies can stimulate a single twitch, activating fewer and smaller motor units, and at higher frequencies a stable peak is reached, where isolated twitches fused (tetanus), reaching maximum force through activating all motor units16. In the test presented, the tetanic curve starts at ~60 Hz, where the potentiation can be visualized (Figure 4A) and the maximum force is determined at ~150 Hz (Figure 4B), when the plateau is reached with a completed fused curve9,16.
Any variation of these results may indicate that the muscles are not being properly stimulated by the electrodes. Electrode placement is an important step in the preparation of this procedure, as the electrical stimulation must be correctly positioned to innervate the peroneal nerve and thus fully activate the muscles of dorsiflexion, which it supplies (TA, EDL, and EHL). Correct electrode positioning results in the generation of negative peaks (Figure 3) during this process, whereas misalignment of the electrodes or higher amperage can lead to the stimulation of surrounding muscles, causing co-contraction of the neighboring muscles and antagonist muscles, which in turn generates peaks of positive values.
Figure 5A shows representative force frequency-curve data from a mouse across time, where the procedure was repeated once a week until 5 timepoints were completed. These observations have shown consistent force production values throughout the timepoints and/or observations measured. This procedure has also shown to be consistent between mice measurements, as Figure 5B shows the representative area under the curve of the FFC stimulated over 5 different observations in 6 mice tested once a week.

Figure 1: Software system. (A) Control software illustration of the steps for setting up the "Instant Stim" parameters. On the background photo, click Setup | Instant Stim. On the small popped up window (front photo), set up the parameters. (B) Illustration of the "Sequencer" setup view. Please click here to view a larger version of this figure.

Figure 2: Mouse setup. Overview of the position of the anesthetized animal. The right knee clamp is placed so that the knee is at 90° and so that the foot and the ankle are at 90° angles (dotted white line). Contraction of the dorsiflexors muscles is achieved by stimulation of the peroneal nerve, which is located just under (distal to) the head of the fibula. We use custom-designed electrodes (inset); however, needle electrodes that are provided with the unit, or purchased separately, are also sufficient. Please click here to view a larger version of this figure.

Figure 3: Output from placement of the electrodes. Once the electrodes are positioned under the skin and the voltage is initiated, peaks with negative values are observed. At this point, reaching negative values (green lines) is a crucial step in making sure that the stimulation is achieved in the dorsiflexor muscles only (TA, EDL, and EHL). The real-time measurement is indicated between the two red lines. Please click here to view a larger version of this figure.

Figure 4: Representative curves. (A) Sample of the force curve at 60 Hz (mouse #06). (B) Sample of the tetanic curve at 150 Hz (mouse #03). Please click here to view a larger version of this figure.

Figure 5: Representative force frequency curve (FFC) and area under the curve data. (A) FFC (x-axis) over 5 different timepoints (weeks 1, 2, 3, 4, and 5) in a sample mouse (#05). (B) Area under the curve (AU, y-axis) of the FFC over 5 different timepoints (mouse #01, 02, 03, 04, 05, and 06, respectively; x-axis). Results are expressed as mean ± standard error of measurement (SEM) of five timepoints (tests) in 6 mice and were analyzed by one-way ANOVA test (p < 0.05). Please click here to view a larger version of this figure.
Discussion
Measurement of maximal muscle contractile function in an accurate and repeatable manner is critical to the progressive assessment of genetic, metabolic, and muscle conditions17. Similarly, in vivo muscle contractile function allows for the assessment of novel treatments and therapeutics for debilitating muscle conditions. We demonstrate herein the measurement of force production of the dorsiflexor muscles of mouse lower hindlimb through an in vivo procedure.
Commercial apparatuses are efficient and helpful in performing this non-invasive procedure. This test provides important advantages related to the assessment of muscle contractile function while preserving a native physiological environment, in which blood supply and innervation remain intact. On the other hand, its disadvantages are related to normalization of the force per unit of cross sectional area of muscle (specific force), which can only be ascertained in an isolated muscle that is harvested after experimentation. However, the non-invasive test allows multiple measurements of contractile function of the flexor muscles in the same animal over time, resulting in reduced numbers of experimental animals being required, especially if the goal is to assess relative changes (changes in absolute force over time).
There are important steps that must be considered during this procedure in order to achieve consistent data over the timepoints. First, one should attempt to standardize animal positioning whenever possible. Second, during the setting up it is important to be consistent with electrode positioning so that optimal stimulation can be reached via stimulation of the peroneal nerve. The location of the electrodes should be on the lateral side of the (in this case right) leg, near to the head of the fibula and other further down the lateral side of the leg (Figure 2). Based on this, the custom-made electrodes are designed as such that both can be placed at same position every time. However, sufficient stimulation can also be achieved using the electrode needles provided with the commercial apparatuses. Third, it is crucial to achieve negative peaks during the voltage setup by turning clockwise the transducer connected to the footplate. Correct positioning of the mouse leg electrodes with maximum voltage setup has shown to be a technique that can be performed on the same mouse over time.
The ability to assess and track muscle function at different timepoints on the same animal is an important assessment to characterize different muscle diseases as well as their progression. Furthermore, this measurement of muscle dorsiflexion in mice can be a tool to assess the efficacy of potential treatments in a native physiological environment, with minimum metabolic stress12. Thus, it provides a technique in assessing muscle disease, its progression and potential treatment.
Disclosures
The authors have nothing to disclose.
Acknowledgements
Funding from this project was from the School of Exercise and Nutrition Sciences, Deakin University. The authors would like to thank Mr. Andrew Howarth for his extensive work in optimizing the electrodes device.
Materials
| Name | Company | Catalog Number | Comments |
| 1300A: 3-in-1 Whole Animal System – Mouse | Aurora Scientific Inc. | 305C-LR: Dual-Mode Footplate; 605A: Dynamic Muscle Data Acquisition And Analysis System; 701C: Electrical Stimulator and 809C: in-situ Mouse Apparatus | Complete muscle function system |
| Conductive gel | Livingstone | ECGEL250 | conductive gel used in the mice |
| Eye ointment | Alcon | Poly Visc | pharmaceutic product (ophthalmic use) |
| nonsteroidal anti-inflammatory drug (NSAID) | Ilium | Metacam | veterinary medicine (injectable 5mg/ml) |
| Isoflurane | Zoetis | Isoflo | veterinary inhalation Anaesthetic |
References
- Frontera, W. R., Ochala, J. Skeletal muscle: a brief review of structure and function. Calcified Tissue International. 96 (3), 183-195 (2015).
- Gerlinger-Romero, F., Guimaraes-Ferreira, L., Yonamine, C. Y., Salgueiro, R. B., Nunes, M. T. Effects of beta-hydroxy-beta-methylbutyrate (HMB) on the expression of ubiquitin ligases, protein synthesis pathways and contractile function in extensor digitorum longus (EDL) of fed and fasting rats. The Journal of Physiological Sciences. 68 (2), 165-174 (2018).
- Pinheiro, C. H., et al. Metabolic and functional effects of beta-hydroxy-beta-methylbutyrate (HMB) supplementation in skeletal muscle. European Journal of Applied Physiology. 112 (7), 2531-2537 (2012).
- Metter, E. J., Talbot, L. A., Schrager, M., Conwit, R. Skeletal muscle strength as a predictor of all-cause mortality in healthy men. The Journal of Gerontology, Series A: Biological Sciences and Medical Sciences. 57 (10), B359-B365 (2002).
- Foletta, V. C., White, L. J., Larsen, A. E., Leger, B., Russell, A. P. The role and regulation of MAFbx/atrogin-1 and MuRF1 in skeletal muscle atrophy. Pflügers Archiv: European Journal of Physiology. 461 (3), 325-335 (2011).
- Zacharewicz, E., et al. Identification of microRNAs linked to regulators of muscle protein synthesis and regeneration in young and old skeletal muscle. PLoS One. 9 (12), e114009(2014).
- Ryan, M. J., et al. Suppression of oxidative stress by resveratrol after isometric contractions in gastrocnemius muscles of aged mice. The Journal of Gerontology, Series A: Biological Sciences and Medical Sciences. 65 (8), 815-831 (2010).
- Iyer, S. R., Valencia, A. P., Hernandez-Ochoa, E. O., Lovering, R. M. In Vivo Assessment of Muscle Contractility in Animal Studies. Methods in Molecular Biology. 1460, 293-307 (2016).
- Mintz, E. L., Passipieri, J. A., Lovell, D. Y., Christ, G. J. Applications of In Vivo Functional Testing of the Rat Tibialis Anterior for Evaluating Tissue Engineered Skeletal Muscle Repair. Journal of Visualized Experiments. (116), e54487(2016).
- Hakim, C. H., Wasala, N. B., Duan, D. Evaluation of muscle function of the extensor digitorum longus muscle ex vivo and tibialis anterior muscle in situ in mice. Journal of Visualized Experiments. (72), e50183(2013).
- Moorwood, C., Liu, M., Tian, Z., Barton, E. R. Isometric and eccentric force generation assessment of skeletal muscles isolated from murine models of muscular dystrophies. Journal of Visualized Experiments. 71, e50036(2013).
- Lovering, R. M., Roche, J. A., Goodall, M. H., Clark, B. B., McMillan, A. An in vivo rodent model of contraction-induced injury and non-invasive monitoring of recovery. Journal of Visualized Experiments. (51), e50036(2011).
- Corona, B. T., Ward, C. L., Baker, H. B., Walters, T. J., Christ, G. J. Implantation of in vitro tissue engineered muscle repair constructs and bladder acellular matrices partially restore in vivo skeletal muscle function in a rat model of volumetric muscle loss injury. Tissue Engineering Part A. 20 (3-4), 705-715 (2014).
- Collins, B. C., et al. Deletion of estrogen receptor alpha in skeletal muscle results in impaired contractility in female mice. Journal of Applied Physiology (1985). 124 (4), 980-992 (2018).
- Lynch, G. S., Hinkle, R. T., Chamberlain, J. S., Brooks, S. V., Faulkner, J. A. Force and power output of fast and slow skeletal muscles from mdx mice 6-28 months old. The Journal of Physiology. 535 (Pt 2), 591-600 (2001).
- Vitzel, K. F., et al. In Vivo Electrical Stimulation for the Assessment of Skeletal Muscle Contractile Function in Murine Models. Methods in Molecular Biology. 1735, 381-395 (2018).
- Jackman, R. W., Kandarian, S. C. The molecular basis of skeletal muscle atrophy. American Journal of Physiology Cell Physiology. 287 (4), C834-C843 (2004).
Reprints and Permissions
Request permission to reuse the text or figures of this JoVE article
Request PermissionExplore More Articles
This article has been published
Video Coming Soon
Copyright © 2025 MyJoVE Corporation. All rights reserved