Method Article
In vivo Calcium Imaging in Mouse Inferior Olive
In This Article
Summary
We present a protocol to expose the brainstem of adult mouse from the ventral side. By using a gradient-refractive index lens with a miniature microscope, calcium imaging can be used to examine the activity of inferior olive neural somata in vivo.
Abstract
Inferior olive (IO), a nucleus in the ventral medulla, is the only source of climbing fibers that form one of the two input pathways entering the cerebellum. IO has long been proposed to be crucial for motor control and its activity is currently considered to be at the center of many hypotheses of both motor and cognitive functions of the cerebellum. While its physiology and function have been relatively well studied on single-cell level in vitro, presently there are no reports on the organization of the IO network activity in living animals. This is largely due to the extremely challenging anatomical location of the IO, making it difficult to subject to conventional fluorescent imaging methods, where an optic path must be created through the entire brain located dorsally to the region of interest.
Here we describe an alternative method for obtaining state-of-the-art -level calcium imaging data from the IO network. The method takes advantage of the extreme ventral location of the IO and involves a surgical procedure for inserting a gradient-refractive index (GRIN) lens through the neck viscera to come into contact with the ventral surface of the calcium sensor GCaMP6s-expressing IO in anesthetized mice. A representative calcium imaging recording is shown to demonstrate the feasibility to record IO neuron activity after the surgery. While this is a non-survival surgery and the recordings must be conducted under anesthesia, it avoids damage to life-critical brainstem nuclei and allows conducting large variety of experiments investigating spatiotemporal activity patterns and input integration in the IO. This procedure with modifications could be used for recordings in other, adjacent regions of the ventral brainstem.
Introduction
The main goal of systems neuroscience is to understand how spatiotemporal activity patterns of neuronal networks contribute to generation of animal behavior. Thus, fluorescent imaging methodology utilizing calcium-sensitive probes has in the past decade become a main tool for examining neuronal network activity in living animals1,2, as it allows visualization of such dynamics across spatial scales ranging from single cells to mesoscale circuitry. In recent years, the common approach where neural circuits in superficial brain structures (such as cerebral or cerebellar cortices) are imaged through a transparent cranial window3 has been complemented with the use of gradient-refractive index (GRIN) lenses4 allowing examination of network dynamics in deep brain structures. Currently-available GRIN lenses allow reaching into structures several millimeters deep, such as the mouse amygdala, hippocampus and basal ganglia5. However, many regions of interest such as various nuclei in the ventral medulla lie significantly deeper, placing them at the extreme of the GRIN lens reach.
Here, we describe how to overcome this difficulty by taking advantage of the relatively easy accessibility of medulla through the ventral aspect of the brain. Using adult mice where the inferior olive (IO), a nucleus in the ventral medulla, has been virally transfected with a calcium sensor GCaMP6s, we describe the surgical steps (modified from the method described originally in Khosrovani et al. 20076) to place a GRIN lens on the ventral surface of the brain of an anesthetized mouse. Using a miniature microscope, we demonstrate the feasibility of recording neuronal activity in such extremely ventral brain regions. While the procedure is necessarily a non-survival surgery and no experimentation can be performed in awake animals, the method allows examination of intact network dynamics in the context of sensory or other afferent pathway stimulation, providing clear advantages over ex vivo-approaches such as using acute slice preparations.
Protocol
All applicable international, national, and institutional guidelines for the care and use of animals were followed. Aseptic surgery techniques were applied to the stereotaxic virus vector injection.
1. Stereotaxic virus vector injection
NOTE: Virus carrying the genetic material for expressing GCaMP6s (AAV9.CAG.GCaMP6s.WPRE.SV40) is stereotaxically injected as previously described7,8 with following modifications.
- Use quartz glass (external diameter: 1.14 mm, internal diameter: 0.53 mm) instead of borosilicate glass to fabricate a pipette with long and rigid taper for IO injection using a laser capillary puller with parameters adjusted as in the product manual. After pulling, cut off 1-2 mm from the tip of the pipette with a scalpel to acquire an 8-10 mm long taper with a 15-20 µm internal tip diameter (Figure 1a). Finalize the pipette by beveling its tip to a 30° needle shape with a rotating micropipette beveler for easier brain penetration and less pipette bending (Figure 1a).
NOTE: The commonly used borosilicate glass pipette will be too flexible to correctly target deep areas when pulled to this length. A nanoliter injector was used with the glass pipette to deliver the virus in this study. Alternatively, a precision glass syringe or a pressure injector can also be used. - Make sure the mouse chest lies on the thermal pad so its neck is not stretched with enough body support, and be extremely careful with leveling the skull when fixing the mouse on the stereotaxic frame (Figure 1b).
NOTE: Bregma-lambda difference should be less than 0.05 mm in vertical dimension. - Use 6.2 mm caudal, ±0.5 mm lateral and 6.6 mm ventral relative to bregma as the the coordinates for targeting the principal IO nucleus (Figure 1c).
NOTE: Perfect leveling of brain will dramatically increase the success rate of injecting virus into IO. The coordinates must be confirmed by the experimenter as significant differences are expected between laboratories, mouse strains and individual researchers. For preparing video material for this publication, we used one male C57Bl/6J mouse. - Follow the relevant institutional guidelines for post-operative care and housing procedures for viral-transfected animals for 3-4 weeks.
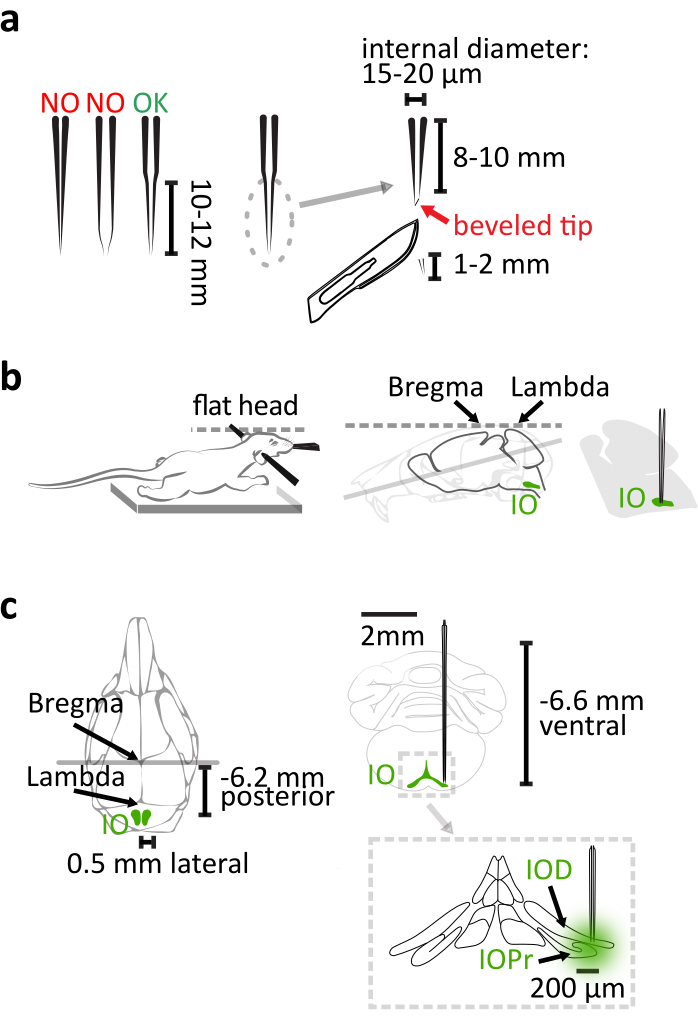
Figure 1: Stereotaxic virus vector injection. (a) The laser-pulled quartz glass pipette has a 10-12 mm long straight taper. After pulling, cut off 1-2 mm from the tip. The pipette is finalized by beveling the tip to a 30° needle shape. (b) The correct injection relies on the proper position of mouse body in the stereotaxic frame. Support the mouse chest to prevent stretching the neck. Level the mouse head by aligning the bregma and lambda horizontally. (c) The IO coordination relative to bregma is shown in dorsal view (left) of the mouse skull and coronal view (right top) of the brain. Injection reaches the lateral part of the principal (IOPr) and the dorsal (IOD) subnuclei of IO (right bottom). Please click here to view a larger version of this figure.
2. Preparation of tools and consumables for ventral approach surgery
- Prepare an intubation tube by cutting a 5 to 6 mm long and 0.8 mm wide slit from the tip of a 20-gauge catheter so the intubated animal can breathe out (Figure 2a).
NOTE: The slit is needed for animal to breath out if a common isoflurane vaporizer with constant airflow is utilized. If a ventilator is used in addition to the vaporizer, the catheter can be left intact. - Prepare a blunt needle to support the trachea during the tracheotomy. Cut off the sharp tip of a 25-gauge needle with pliers. Smooth the fracture surface with sandpaper. Bend the blunt needle in the middle to about 15° with pliers.
NOTE: A curved needle lifts the trachea gently. This can decrease the deformation of the trachea. - Dilute 50 mg/mL ketamine with saline to 15%. The final concentration is 7.5 mg/mL.
- Assemble the clean surgery tools and the consumables including lidocaine gel, saline, gelatin sponges, absorbent swabs, petroleum jelly and cleaning tissue.
- Switch on the isoflurane vaporizer. Set the animal heating pad to 38 °C.
- Turn the nose cone of stereotaxic frame 180° horizontally, so the mouse can be fixed into the frame ventral side up. Adjust the nose cone height so that it is at the level of ear bars.
3. Administration of anesthesia and preparation of the mouse for the surgery
- Weigh the animal with a weighing scale and calculate the amount of diluted ketamine for injection.
NOTE: The total amount of ketamine needed is 56.25 mg per kg body weight. Therefore, the volume of diluted ketamine is 7.5 mL per kg body weight. The drawbacks of using ketamine alone include poor muscle relaxation, tachycardia and enhanced muscle tone9. In this protocol, though, ketamine is only used to cover the 10-20 s period during which isoflurane administration is interrupted due to the tracheotomy. By keeping this step as brief as possible, the anesthetic effect of isoflurane is not significantly diminished and the drawbacks using ketamine are minimized. - Place the mouse into the anesthetic induction chamber prefilled with 5% isoflurane. When the animal is fully anesthetized shown by loss of righting reflex and deeper and slower breathing pattern, switch the isoflurane flow to the nose cone of stereotaxic frame and reduce the isoflurane concentration to 2.5%.
- Fix the animal in the stereotaxic frame ventral side up (Figure 2b). Adjust the elevation and the pitch of the nose cone to make sure the animal can breathe easily. Keep the animal warm with the pre-warmed heating pad.
NOTE: Covering the lower part of the animal body with a piece of tissue paper or aluminum foil can help maintaining the animal temperature. - Remove the skin hair in throat and thigh areas with a shaver and hair removal cream (Figure 2b). Topically apply the lidocaine gel on the throat skin.
NOTE: The thigh clamp peripheral oxygen saturation (SpO2) sensor, which will be used in procedure 6, works best on hairless skin. - Monitor the animal temperature with a rectal thermometer (Figure 2b).
- Inject 1 mL of warm (37 °C) saline intraperitoneally to compensate for the fluid loss during surgery.
- Assess the depth of anesthesia by strong pinch on hind limb toes. No detectable response should be evoked.
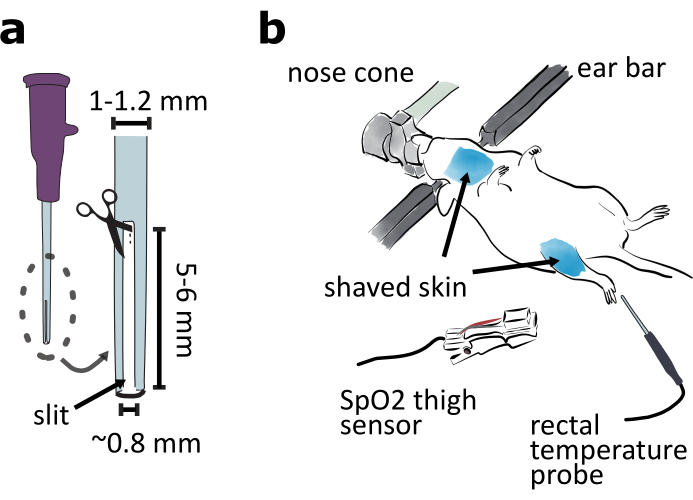
Figure 2: Preparation of ventral approach surgery. (a) Prepare an intubation tube by cutting a 5-6 mm long and 0.8 mm wide slit in the tip of 20-gauge catheter. (b) Mount the animal ventral side up in a stereotaxic frame and adjust the nose cone angle to ensure the animal is breathing easily. Shave the skin around the throat and thigh areas. Attach the SpO2 sensor to the thigh for monitoring mouse vital signs. Insert the rectal temperature probe for monitoring mouse body temperature. Please click here to view a larger version of this figure.
4. Tracheotomy and intubation (20-25 min)
- Exposing the trachea.
- Make a vertical incision in throat skin along the midline. Separate the neck skin from the viscera under it by using the blunt dissection method and cut the skin off to reveal the salivary glands (Figure 3a-b, 4a).
- Free salivary glands from the connective tissue and flip them laterally to expose the sternothyroid muscle covered trachea with forceps (Figure 3b-c).
NOTE: The petroleum jelly can be applied on the exposed tissue to keep them moist. Avoid the trachea area to keep it clean for the following steps.
- Tracheotomy
- Inject the first dose of diluted ketamine (7.5 mg/mL) intraperitoneally, 5 mL per kg body weight (37.5 mg/kg).
NOTE: It takes 3-5 min for ketamine to function, thus the first dose of ketamine should be injected before separating the trachea from surrounding muscles and blood vessels. Ketamine is administered in two injections because of the elevated risk of overdose effects when combined with isoflurane anesthesia. - Carefully split the sternothyroid muscle along the midline with the tip of a fine forceps to expose the trachea (Figure 3c). Detach the trachea from the blood vessels and the esophagus with forceps using the blunt dissection method.
- Intraperitoneally inject the second dose of diluted ketamine (7.5 mg/mL), 2.5 mL per kg body weight (18.75 mg/kg).
- Insert a blunt needle under the trachea crosswise to prop it up (Figure 3d). Hold this needle with fingers to support the trachea. Guide the suture thread around the third trachea ring caudal to the thyroid gland with a half-circle needle (Figure 3d). Make four instrument ties on this tracheal ring.
NOTE: The thread tied to the tracheal ring is used to secure the trachea to the animal chest. Do not cut the thread off from the half circle needle at this step. Tracheal rings are made of cartilage which is flexible but less strong than bones. Do not tie the suture thread too tight or the ring may break. - Pinch the chest skin with a pair of forceps. Pierce the chest skin with the same half-circle needle used in the last step and lead the thread through the skin, in preparation for securing the trachea to the chest in the next step (Figure 3d).
- Gently lift the trachea by pulling the thread tied to the tracheal ring and cut the trachea rostral to the tied ring and caudal to the thyroid glands. Pull the caudal trachea towards the chest. Raise the opening of the trachea by adding a small piece of surgical sponge under it.
NOTE: Make sure more than 5 min have passed after the second injection of ketamine before cutting the trachea to ensure the anesthesia level. - Remove any remaining liquid inside the opening tip of the trachea with a thin strip of cleaning tissue. Switch the isoflurane flow from stereotaxic nose cone to the intubation tube. Insert the intubation tube into the trachea about 2 mm deep and make sure part of the slit in the tube remains outside of the trachea to allow breathing (Figure 3e, 4b).
NOTE: Carefully adjust the angle of the intubation tube and its insertion depth to make the mouse breath smoothly and to avoid damaging the trachea. Petroleum jelly can be applied on the outside of trachea to prevent it from getting dry, so the trachea does not rupture easily. - Fix the trachea to the chest skin by making 3-4 instrumental ties. Tie the trachea with the suture thread to secure the intubation tube (Figure 3e, 4b).
- Inject the first dose of diluted ketamine (7.5 mg/mL) intraperitoneally, 5 mL per kg body weight (37.5 mg/kg).
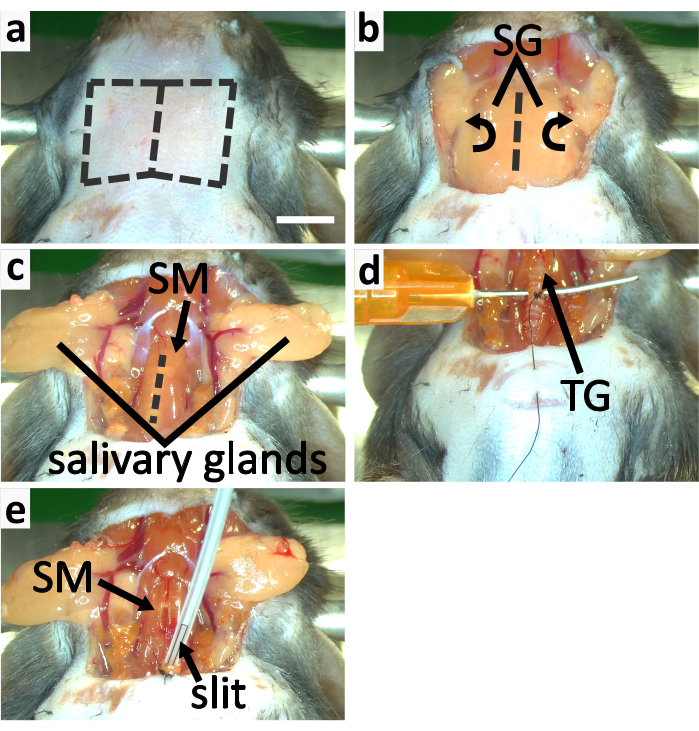
Figure 3: Tracheotomy and intubation of mouse. (a-c) panels show the process of exposing trachea. (a) Remove the throat skin by cutting along the dashed lines. (b) Flip the salivary glands (SG) laterally to expose the trachea covered by the sternothyroid muscle (SM). (c) Slit open SM along the dashed line to expose the trachea. (d-e) panels show the tracheotomy. (d) Support the trachea with a blunt and curved needle. Tie the third trachea ring caudal to the thyroid gland for securing the trachea to the chest skin. (e) Apply isoflurane with an intubation tube with a slit in the tip. Secure the trachea to the chest skin with the suture thread. Secure the intubation tube to the trachea by tying them together. Scale bar in a=5 mm, applies to all panels. Please click here to view a larger version of this figure.
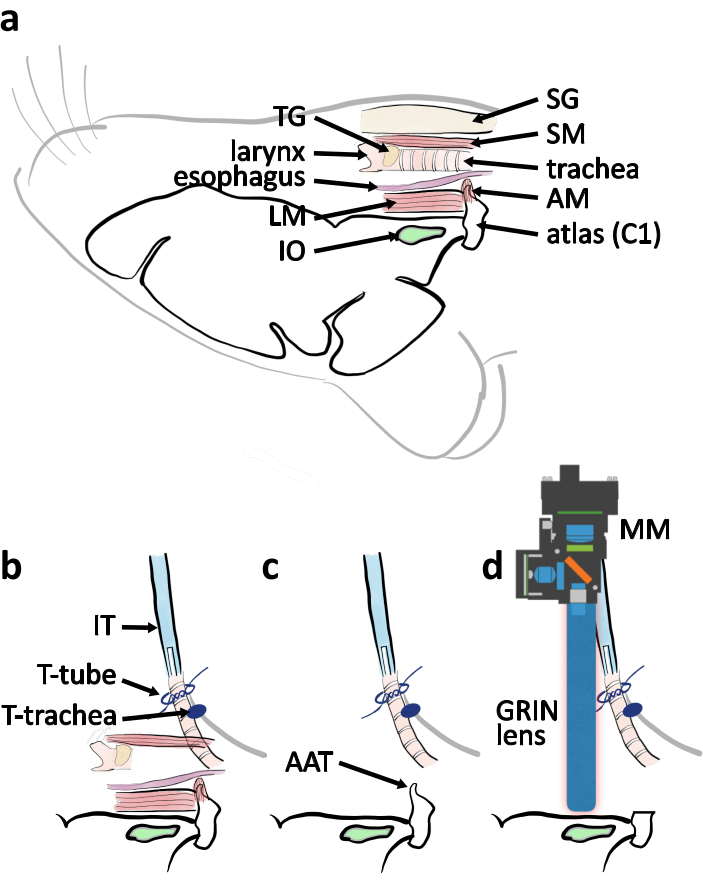
Figure 4: Schematic diagram of ventral approach surgery from lateral view. (a) A schematic drawing with relevant anatomical parts indicated in their relative location when mouse is placed ventral side up. Abbreviations: muscle covering atlas (AM), longitudinal muscle (LM), salivary glands (SG), sternothyroid muscle (SM), thyroid gland (TG). (b) Schematic of arrangement of the intubation tube in relation to the trachea when the tracheotomy is completed. The trachea is secured by the ties on the chest skin (T-trachea). The intubation tube (IT) is secured by the ties around the trachea end (T-tube). (c) Remove the atlas anterior tubercle (AAT) to clear the line of vision to the IO. (d) Schematic describing the positioning of the miniature microscope (MM) and the GRIN lens above the IO for imaging experiment. Please click here to view a larger version of this figure.
5. Exposing the brainstem (40-45 min)
- Slit the sternothyroid muscle along the muscle fiber with the fine forceps. Cut the isolated part off with the spring scissors (Figure 3e).
- Carefully free the left-over trachea and the larynx from muscles to minimize the damage on the blood vessels in muscles. Remove the left-over trachea and the larynx. Free the esophagus from the attached tissue with forceps and cut it off with spring scissors. (Figure 5a).
- Remove the muscle covering the ventral arch and the anterior tubercle of atlas with fine forceps and spring scissors (Figure 5b).
NOTE: When removing the muscle, split part of it with the tip of the fine forceps. Cut the separated part off with a pair of spring scissors. Repeat this multiple times to expose the atlas ventral arch to minimize the risk of ripping blood vessels. - Cut the ventral arches of atlas with a rongeur (Figure 4c, 5c). Remove the anterior tubercle of atlas. Remove the blood and fluid with surgical sponge to view the foramen magnum and the brain stem (Figure 4c, 5d).
- Expand the foramen magnum by removing the occipital bone with a rongeur. (Figure 5d-e).
- Remove the thin cartilage above the foramen magnum with fine forceps and spring scissors. Carefully peel the periosteal layer of the dura mater with fine forceps to have a clear view of the ventral brainstem (Figure 5f). Do not break the dura mater.
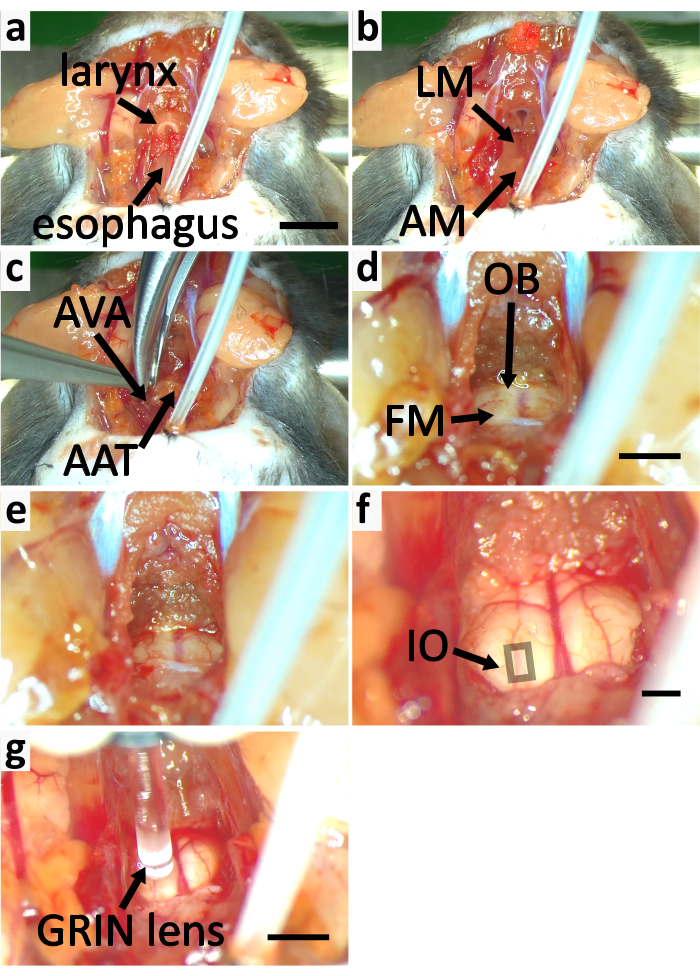
Figure 5: Expose brainstem of mouse for calcium imaging. (a-f) panels show the process of exposing brainstem. (a) Remove the sternothyroid muscle (SM) labeled in Figure 3e. Cut off the larynx and the esophagus. (b) Remove the longitudinal muscle (LM) and the muscle covering atlas (AM). (c) Cut the atlas ventral arches (AVA) with a rongeur and remove the atlas anterior tubercle (AAT). (d) Cut off the occipital bone (OB) to expand the foramen magnum (FM). (e) Expanded FM. (f) The thin cartilage above the foramen magnum is removed. The periosteal layer of dura mater is peeled off. The square indicates the area containing superficial IO neurons. (g) Image the IO with GRIN lens. Scale bar in a=5 mm, applies to a-c. Scale bar in d=2 mm, applies to d-e. Scale bar in f=2 mm. Scale bar in g=2 mm. Please click here to view a larger version of this figure.
6. Calcium imaging
- Clamp the SpO2 sensor on the thigh of the mouse to monitor vital signs such as heart rate, oxygen saturation and breath rate (Figure 2b).
NOTE: The heart rate should be between 500 bpm and 600 bpm, the oxygen saturation should be higher than 90%, and the breath rate should be 50-70 breaths per minute10,11. - Mount the GRIN lens probe (9mm length. 1 mm diameter) on the implantation rod.
NOTE: Clean the GRIN lens with 70% ethanol-soaked cleaning tissue before imaging for good imaging quality. - Fix the implantation rod on the stereotaxic frame and mount the miniature microscope on the implantation rod.
NOTE: Preparation of the miniature microscope for imaging should be completed according to appropriate product user guidelines. - Add several drops of warm saline in the brainstem area for immersion of the GRIN lens.
- Approach the brainstem with the GRIN lens (Figure 4d, 5g). Turn on the excitation blue LED (455 ± 8) in the miniature microscope. Locate the GCaMP6s-transfected IO neurons by monitoring the fluorescence image from the miniature microscope. Look for IO neurons in a rectangle-shaped region ~0.5-1.7 mm rostral to the remaining atlas and ~0.6-1.1 mm lateral to the midline in the superficial area of ventral brainstem (Figure 5f).
NOTE: When looking for an appropriate field of view for IO imaging, look for the location where the average diameter of somata matches that of IO neuron somata (about 15 µm12). The adjacent regions in medullary reticular formation consist of significantly larger cells13,14. Be careful when moving GRIN lens vertically, as pressing it on brainstem too hard may kill animal.
7. Euthanizing animal following procedure
- At the end of experiment, euthanize the animal with cervical dislocation or other method approved by local laboratory animal care regulation.
- For further histology investigation, first anesthetize the animal with injectable drug, such as ketamine/xylazine combination (100 mg/kg and 10 mg/kg, respectively)15 before heart perfusion with Ringer's solution followed by fixative solution to fix the brain.
8. Data processing
- Pre-process the recorded calcium imaging video before analyzing data.
NOTE: The commercial data processing software accompanied with the miniature microscope was used for this step and the following protocol steps relate to that. Alternatively, free and open source software such as CaImAn16, MINIPIPE17, and MiniscoPy18 can be utilized for both pre-processing and analysis.- Load the recorded calcium imaging video in the data processing software.
- Click the Preprocess button. Define a crop area excluding regions without any fluorescent neurons and crop the video to decrease the file size for faster processing.
- Click the Spatial Filter button. Set the low cut-off and the high cut-off for spatial filter to 0.005 pixel-1, and 0.5 pixel-1 respectively. Apply the spatial filter on each frame of the video to increase the contrast and smooth the image.
NOTE: The spatial filter is a bandpass Gaussian filter. Low spatial frequency components originating in out-of-focus cells may confound motion correction in next step. High spatial frequency component may cause the video to appear less smooth. - Click the Motion Correction button. Apply the motion correction to the video by using the first frame as the reference frame to reduce the movement-related artefacts caused by blood flow in the brainstem.
NOTE: The motion correction uses an image registration method developed by Thevenaz et al19. - Export the motion-corrected video as TIFF format.
- Apply CNMF-E20 on the motion-corrected video in MATLAB to identify single neurons, following the instructions for the CNMF-E MATLAB code in the online repository21.
NOTE: CNMF-E is a constrained non-negative matrix factorization approach customized for one-photon imaging. Demo scripts in the repository can be modified and used to process data.
Results
Here we present a representative recording obtained with the method as described. Figure 6a shows the location of brightly labeled IO cells visualized during the experiment. The dark diagonal stripes are blood vessels. Note the variable brightness of individual cells, resulting from variable transfection efficacy. In panel Figure 6b we show the mean-normalized fluorescence intensity (deltaF/F) traces obtained from the somata indicated with colors and numbers in panel a. Upward deflections represent transient increases in intracellular calcium. Note how different level of GCaMP6s expression (reflected in cell brightness in panel a) lead to variable signal-to-noise-ratios (SNR).
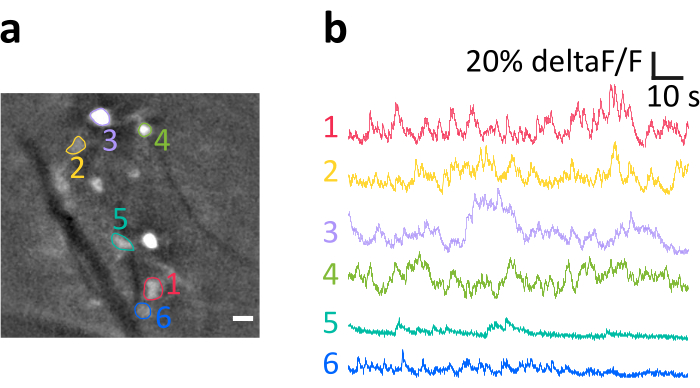
Figure 6: Example recording of activity of IO neurons in anesthetized mouse. (a) Representative example frame from a recording after spatial filtering. Bright spots are IO neuronal somata, several of which have been indicated as regions of interests (ROIs, colored numbers). Dark stripes are blood vessels. (b) Example deltaF/F traces obtained from the ROIs indicated in panel a. Upwards deflections reflect increases in calcium signal. Scale bar in a=10 µm. Please click here to view a larger version of this figure.
Discussion
As the surgical procedure involves operations performed in the throat region with numerous vitally critical structures (arteries, nerves), it is essential that it is conducted by a researcher with high-level surgical skills. In following, we highlight and comment on several key points of the procedure; however, it must be reminded that no amount of written advice can supplant the experience, skill, and intuition of the researcher.
The most critical step in the surgery is tracheotomy. It involves cutting the trachea, switching isoflurane from the nose cone to the intubation tube, securing the trachea to the chest skin and tying the trachea and the intubation tube together. All these operations must be completed in a smooth and fast manner to avoid accidents, such as inadequate anesthesia, inflow of fluid into trachea or intubation tube slip-off. One must keep the protocol clear in mind before cutting the trachea.
Hemorrhage is one of the major causes of animal death in this surgery. Since the neck area is dense with blood vessels, cut should only be executed when the line of sight is clear to avoid cutting unseen veins and arteries. Therefore, muscles and connective tissues obscuring vision must be removed, and blood from broken capillaries must be cleaned before advancing.
Animal can be kept alive for a long time (more than 8 hours) from the start of surgery. However, it is important to finish the surgical procedure quickly so there is more time to examine brainstem neurons when animal physiological condition is good. A skilled researcher can finish the whole procedure in 70 min.
While the method provides a clean view of ventral brain surfaces, it is unfortunately impossible to do so without performing a tracheotomy as well as removing significant amount of tissue in the throat region. Therefore, the animal cannot be allowed to wake from anesthesia. Furthermore, even though it is possible to keep the animal alive for many hours with careful adjustment of anesthetic delivery, maintaining body temperature and hydration, it is inevitable that prolonged experimentation will eventually lead to weakening of the animal condition. It is left to the expertise of the researcher to consider the maximal duration of stable recordings.
Another potential limitation of the method as described here is that as the GRIN lens is not inserted into the brain parenchyma, only relatively superficial neurons (~150-200 µm) can be examined. While surgical implantation of GRIN lens is technically possible, acute surgery method does not allow sufficient time for neurons to recover from oxidative stress and presence of blood after implantation likely will degrade image quality beyond acceptable.
Despite the above concerns, we believe this is the first time a method for in vivo imaging of IO neurons is presented. It allows examination of spatiotemporal activity in the IO neurons in the context in vivo in the presence of intact afferent inputs from sensory systems as well as the signals from the cerebellar nuclei and the mesodiencephalic junction22, a feat that has not been possible hitherto. With this method, the function of the IO can now be investigated in greater depth with combination of sensory and optogenetic stimulation. Notably, with the evolution of voltage imaging (such as our recent method for voltage imaging in the IO 23), we hope the presented surgical method will inspire numerous researchers to take up the challenge of investigating how the IO contributes to the generation of cerebellar complex spikes.
Disclosures
The authors have nothing to disclose.
Acknowledgements
We thank Andrew Scott from media center of OIST for his help with video recording and editing. Also, we thank Hugo Hoedemaker for his help with developing the surgery to expose the brainstem and Dr. Kevin Dorgans for his help with drawing diagrams for figures. In addition, great thanks to Salvatore Lacava for his voice-over narration, as well as all nRIM members and pets for continuing support for wellbeing in the tough times of COVID-19.
Materials
| Name | Company | Catalog Number | Comments |
| AAV.CAG.GCaMP6s.WPRE.SV40 | Addgene, USA | 100844-AAV9 | |
| Absorbable suture with 6 mm half circle needle | Natume, Japan | L6-60N2 | hook needle with thread |
| Absorption triangles | FST, Germany | 18105-03 | Surgical sponges |
| Stereo microscopes | Leica, Germany | M50 | |
| Castroviejo curved tip needle holder with lock | FST, Germany | 12061-01 | Surgery tool |
| cotton swabs | Sanyo, Japan | HUBY-340 | |
| Delicate suture tying forceps | FST, Germany | 11063-07 | Surgery tool |
| Delicate Suture Tying Forceps | FST, Germany | 11063-07 | Surgery tool |
| Dumont #5/45 forceps | FST, Germany | 11251-35 | Surgery tool |
| Fine Iris scissors | FST, Germany | 14060-09 | Surgery tool |
| Friedman-Pearson rongeur curved tip | FST, Germany | 16221-14 | Surgery tool |
| Gelfoam absorbable gelatin sponge | Pfizer, USA | 0315-08 | Hemostatic gelatin sponge |
| Glass-Capillary Nanoinjection | Neurostar, Germany | n/a | For virus vector injection |
| Graefe Forceps with serrated tip | FST, Germany | 11052-10 | Surgery tool |
| Implantation rod | Inscopix, USA | n/a | It is part of the nVoke2 system. It's designed to nVoke2 miniature microscpe and GRIN lens can be mounted on it |
| IsoFlo | Zoetis, UK | n/a | Isoflurane |
| KETALAR FOR INTRAMUSCULAR INJECTION | Daiichi Sankyo, Japan | n/a | Ketamine |
| Kimwipes | Kimberly-Clark, USA | Cleaning tissue | |
| Laser-Based Micropipette Puller | Sutter Instrument, USA | P-2000 | |
| Micropipette Beveler | Sutter Instrument, USA | BV-10 | |
| Motorized Stereotaxic based on Kopf, Model 900 | Neurostar, Germany | n/a | Stereotaxic frame |
| mouseOxPlus with rectal temperature sensor and thigh clamp pulse oximeter | Starr Life Sciences, PA, USA | MouseOxPlus | Measures animal heart rate, arterial oxygen saturation (SpO2), breath rate, and temperature |
| nVoke2 integrarted Calcium imaging micro camera system | Inscopix, USA | 1000-003026 | Miniature microscope |
| Ohaus Compact Scales | Ohaus, USA | CS 200 | Scale used to weight animal |
| Otsuka Normal Saline | Otsuka Pharmaceutical Factory, Japan | n/a | |
| Physiological-biological temperature controller system | SuperTech Instruments, Hungary | TMP-5b | Thermal pad for mouse |
| ProView Lens Probe 1.0 mm diameter, 9.0 mm length | Inscopix, USA | 1050-002214 | Gradient-refractive index (GRIN) lens |
| Q114-53-10NP glass capillaries | Sutter Instrument, USA | 112017 | Customized quartz glass capillaries |
| Safety IV Catheter 20G | B. Braun, Germany | 4251652-03 | 20 gauage catheter used to prepare intubation tube |
| Sand paper | ESCO, Japan | EA366MC | Used to polish the tip of 25G needle to prepare curved and blunt needle |
| Scalpel blade | Muromachi Kikai, Japan | 10010-00 | Used to cut the tip of quartz glass pipette |
| SomnoSuite low flow inhalation anesthesia system | Kent Scientific, USA | SOMNO | Provides precise control of isoflurane flow |
| Surgic XT Plus drill | NSK | Y1002774 | For virus vector injection |
| Syringe 1 ml | Terumo, Japan | SS-01T | |
| Syringe needle 25G | Top, Japan | 00819 | Used to make blunt and bended needle |
| Syringe needle 26G | Terumo, Japan | NN-2613S | |
| Thrive 2100 Professional Trimmer | Thrive, Japan | n/a | Shaver |
| Vannas-Tübingen spring scissors | FST, Germany | 15004-08 | Surgery tool |
| Vaseline | Hayashi Pure Chemical, Japan | 22000255 | |
| Veet sensitive skin | Veet, Canada | n/a | Hair removal cream |
| Xylocaine Jelly 2 % 30ml | Aspen Japan, Japan | 871214 |
References
- Russell, J. T. Imaging calcium signals in vivo: A powerful tool in physiology and pharmacology. British Journal of Pharmacology. , (2011).
- Zhang, T., et al. Kilohertz two-photon brain imaging in awake mice. Nature Methods. , (2019).
- Lin, X., Zhao, T., Xiong, W., Wen, S., Jin, X., Xu, X. M. Imaging neural activity in the primary somatosensory cortex using Thy1-GCaMP6s transgenic mice. Journal of Visualized Experiments. 2019 (143), 1-8 (2019).
- Lee, H. S., Han, J. H. Successful In vivo Calcium Imaging with a Head-Mount Miniaturized Microscope in the Amygdala of Freely Behaving Mouse. Journal of visualized experiments. (162), 1-19 (2020).
- Aharoni, D., Khakh, B. S., Silva, A. J., Golshani, P. All the light that we can see: a new era in miniaturized microscopy. Nature Methods. 16 (1), 11-13 (2019).
- Khosrovani, S., Van Der Giessen, R. S., De Zeeuw, C. I., De Jeu, M. T. G. In vivo mouse inferior olive neurons exhibit heterogeneous subthreshold oscillations and spiking patterns. Proceedings of the National Academy of Sciences. 104 (40), 15911-15916 (2007).
- Osten, P., Cetin, A., Komai, S., Eliava, M., Seeburg, P. H. Stereotaxic gene delivery in the rodent brain. Nature Protocols. 1 (6), 3166-3173 (2007).
- Berg, L., Gerdey, J., Masseck, O. A. Optogenetic Manipulation of Neuronal Activity to Modulate Behavior in Freely Moving Mice. Journal of visualized experiments : JoVE. , e61023(2020).
- Green, C. J., Knight, J., Precious, S., Simpkin, S. Ketamine alone and combined with diazepam or xylazine in laboratory animals: A 10 year experience. Laboratory Animals. 15 (2), 163-170 (1981).
- Tsukamoto, A., Serizawa, K., Sato, R., Yamazaki, J., Inomata, T. Vital signs monitoring during injectable andn inhalant anesthesia in mice. Experimental Animals. 64 (1), 57-64 (2015).
- Ewald, A. J., Werb, Z., Egeblad, M. Monitoring of vital signs for long-term survival of mice under anesthesia. Cold Spring Harbor Protocols. 6 (2), 174-178 (2011).
- Vrieler, N., et al. Variability and directionality of inferior olive neuron dendrites revealed by detailed 3D characterization of an extensive morphological library. Brain Structure and Function. 0 (0), 1677-1695 (2019).
- Esposito, M. S., Capelli, P., Arber, S. Brainstem nucleus MdV mediates skilled forelimb motor tasks. Nature. , (2014).
- Martin, E. M., Devidze, N., Shelley, D. N., Westberg, L., Fontaine, C., Pfaff, D. W. Molecular and neuroanatomical characterization of single neurons in the mouse medullary gigantocellular reticular nucleus. Journal of Comparative Neurology. , (2011).
- Cold Spring Harbor. Ketamine/Xylazine. Cold Spring Harbor Protocols. 2006 (1), (2006).
- Giovannucci, A., et al. CaImAn an open source tool for scalable calcium imaging data analysis. eLife. 8, 1-45 (2019).
- Lu, J., et al. MIN1PIPE: A Miniscope 1-Photon-Based Calcium Imaging Signal Extraction Pipeline. Cell Reports. 23 (12), 3673-3684 (2018).
- Sciences S.U. GitHub - PeyracheLab/miniscoPy: A package to analyse calcium imaging data recorded with the Miniscope. , Available from: https://github.com/PeyracheLab/miniscoPy (2020).
- Thévenaz, P., Ruttimann, U. E., Unser, M. A pyramid approach to subpixel registration based on intensity. IEEE Transactions on Image Processing. , (1998).
- Zhou, P., et al. Efficient and accurate extraction of in vivo calcium signals from microendoscopic video data. eLife. 7, 1-37 (2018).
- Zhou, P., et al. GitHub - zhoupc/CNMF_E: Constrained Nonnegative Matrix Factorization for microEndoscopic data. , Available from: https://github.com/zhoupc/CNMF_E (2020).
- De Gruijl, J. R., Bosman, L. W. J., De Zeeuw, C. I., De Jeu, M. T. G. Inferior olive: All ins and outs. Handbook of the Cerebellum and Cerebellar Disorders. , (2013).
- Dorgans, K., Kuhn, B., Uusisaari, M. Y. Imaging Subthreshold Voltage Oscillation With Cellular Resolution in the Inferior Olive in vitro. Frontiers in Cellular Neuroscience. , (2020).
Reprints and Permissions
Request permission to reuse the text or figures of this JoVE article
Request PermissionThis article has been published
Video Coming Soon
Copyright © 2025 MyJoVE Corporation. All rights reserved