
A subscription to JoVE is required to view this content. Sign in or start your free trial.
Method Article
Chromosome Screening of Human Preimplantation Embryos by Using Spent Culture Medium: Sample Collection and Chromosomal Ploidy Analysis
* These authors contributed equally
In This Article
Erratum Notice
Summary
The present study reports a protocol for chromosome screening of human embryos that uses spent culture medium, which avoids embryo biopsy and enables chromosome ploidy identification using NGS. The present article presents the detailed procedure, including the preparation of culture medium, whole genome amplification (WGA), next-generation sequencing (NGS) library preparation, and data analysis.
Abstract
In clinical in vitro fertilization (IVF), the prevailing method for PGT-A requires biopsy of a few cells from the trophectoderm (TE). This is the lineage that forms the placenta. This method, however, requires specialized skills, is invasive, and suffers from false positives and negatives because the chromosome numbers in the TE and the inner cell mass (ICM), which develops into the fetus, are not always the same. NICS, a technology requiring sequencing of DNA that released into the culture medium from both TE and ICM, may offer a way out to these problems but has previously been shown to have limited efficacy. The present study reports the full protocol of NICS, which includes culture medium sampling methods, whole genome amplification (WGA) and library preparation, and NGS data analysis by analysis software. Considering the different cryopreservation times in different embryo laboratories, embryologists have two methods for collecting embryo culture medium that can be selected according to the actual conditions of the IVF laboratory.
Introduction
Assisted reproductive technologies (ARTs) have been increasingly used for the treatment of infertility. However, the success rate of ART, such as IVF, has been limited, and the pregnancy loss rate is significantly higher than that of the normal population1. The main cause of these problems is chromosomal abnormalities, which commonly exist in preimplantation human embryos2. PGT-A is an effective method of screening embryos for chromosomal balance before implantation3,4. Some studies have proven that PGT-A can reduce the rate of abortion and improve the rate of pregnancy5,6,7,8. However, PGT-A requires complex technical expertise that requires specific training and experience. The invasive embryo biopsy procedure could also potentially cause damage to the embryos9. Studies have shown that blastomere biopsy can hinder subsequent development, and the number of biopsied TEs may affect the implantation rates10. Although the long-term biosafety issue of embryo biopsy has not yet been evaluated thoroughly in humans, animal studies have shown its negative influences on embryo development11,12,13.
Previous reports indicated that trace amounts of DNA materials were secreted into the culture medium during embryo development, and efforts have been made to perform comprehensive chromosome screening (CCS) using spent embryo culture medium14,15,16,17,18. However, the detection rates and the accuracy of the tests have not met the requirements for extensive clinical use. The present study reported an improvement in the NICS assay for increasing the detection rates as well as the accuracy of the NICS test19. In recent years, blastocoele fluid (BF) has been studied as an analytical sample of minimally invasive PGT-A. However, the proportion of successful genome-wide amplification and detectable DNA in blastocyst fluid samples ranges from 34.8% to 82%20,21,22. The volume of BF reported in various studies ranges from 0.3 nL to 1 µL. In view of the low amount of DNA in BF, it is possible to increase the amount of cell-free DNA by mixing blastocyst fluid and culture medium to improve the success rate and consistency of detection. Kuznyetsov et al.23 and Li et al.24 treated the zona pellucida with a laser and released blastocyst fluid into the culture medium to improve the total amount of embryonic DNA, and the amplification rate of the combined medium/BF samples after WGA was 100% and 97.5%, respectively. Jiao et al.25 also obtained a 100% amplification success rate by using the same method.
The present study reports a detailed protocol that includes spent media sample preparation, NGS preparation and data analysis. By carefully removing cumulus cells from oocytes, the present study performed intracytoplasmic single sperm injection (ICSI) and blastocyst culture. The, day 4-day 5/day 6 spent medium was collected for WGA and NGS library preparation. By using NICS technology, the present study streamlined the WGA and NGS library preparation steps in approximately 3 h and obtained CCS results noninvasively in approximately 9 h.
Protocol
Ethical permission was acquired from the Ethics Committee of Peking University Third Hospital.
1. Preparation
NOTE: The required materials and equipment are listed in Table of Materials.
- Reagents
- Prewarm and equilibrate (balanced) 20-30 µL of gamete medium/fertilization medium and cleavage/blastocyst-stage culture medium (covered with mineral oil) and hyaluronidase (in a tightly capped tube) at 37 °C, 5% CO2 and 5% O2 in a Tri-gas incubator overnight before use.
- Prewarm hyaluronidase to 37 °C on a working surface in a fume hood.
- Prepare vitrification buffer and sample collection reagents according to the manufacturer's instructions.
- Tools
- Prepare sample collection and transfer pipettes (inner diameter of ~200 to 250 µm), denudation/stripper pipettes (inner diameter of ≥150 µm, ~130-140 µm, and ~120 µm), and pipettes for washing (inner diameter of ~150 µm) by pulling glass Pasteur pipettes to generate fire-polished open fine tips.
NOTE: The pipettes used for sample collection/transfer, denudation, and washing can be purchased directly. The holding needles and injection needles can also be purchased directly.
- Prepare sample collection and transfer pipettes (inner diameter of ~200 to 250 µm), denudation/stripper pipettes (inner diameter of ≥150 µm, ~130-140 µm, and ~120 µm), and pipettes for washing (inner diameter of ~150 µm) by pulling glass Pasteur pipettes to generate fire-polished open fine tips.
2. Protocol 1: Sample collection
- Pretreatment of oocyte-corona-cumulus complex (OCCCs) before digestion with hyaluronidase
- Achieve ovarian stimulation with both follicle stimulating hormone (FSH) and human menopausal gonadotropin (hMG) preparations. When the lead follicle is >18 mm, use 10,000 IU of chorionic gonadotropin (hCG) for final oocyte maturation.
- Perform oocyte retrieval 36 h after trigger shot. Pick up and transfer oocytes into tissue culture dishes with 2.5 mL of prewarmed m-HTF covered by mineral oil.
- Rapidly transfer the OCCCs to the central well of an organ culture dish containing 1 mL of Fertilization Medium using a transfer pipette and then incubate with the oocytes at 37 °C in a 5% CO2 and 5% O2 incubator for 2-4 h.
- Digest OCCCs with hyaluronidase by adding 1 mL of 37 °C prewarmed hyaluronidase (80 IU/mL) to the central well of an organ culture dish containing OCCCs (step 2.1.3). Keep the final concentration of hyaluronidase at 40 IU/mL and mix thoroughly.
- Incubate the OCCCs on a 37 °C thermal platform for 2 min. Observe the changes under a microscope every 30 s until only 1-2 layers of granulosa cells remained.
- Denudation of granulosa cells
- Rapidly transfer the digested OCCCs in the culture dish for oocyte handling and cover with mineral oil in each well.
- Observe the separated granulosa cells under a microscope. Gently aspirate and release the oocytes 5 times to remove residual granulosa cells around the oocytes.
- Repeat the previous step in the remaining 3 wells to completely remove the granulosa cells.
NOTE: The above steps (2.1-2.3) can be performed according to the routine operation of each laboratory.
- Evaluation of the oocyte
- Evaluate the completeness of granulosa cell removal using a microscope. If the cells could not be completely removed, then the retention of 5 or fewer granulosa cells is acceptable at this time.
NOTE: If cumulus cells are still attached to the oocyte, the remnant can be removed later on day 3 before the embryo is transferred from cleavage-stage culture medium to blastocyst-stage culture medium.
- Evaluate the completeness of granulosa cell removal using a microscope. If the cells could not be completely removed, then the retention of 5 or fewer granulosa cells is acceptable at this time.
- After performing intracytoplasmic sperm injection (ICSI)26, transfer the oocytes into 20-30 µL cleavage embryo culture medium microdroplets (one oocyte corresponds to one microdroplet) using transfer pipettes and incubate in a 37 °C, 5% CO2 and 5% O2 incubator.
- Record the day of ICSI as day 0. Check the embryos and score according to the Istanbul consensus workshop on embryo assessment of day 1 for fertilization (approximately 18 h), day 2 (approximately 45 h) and day 3 (approximately 68 h) for embryo cleavage27.
- Embryo washing
- Prepare 20-30 µL of blastocyst culture medium microdroplets for each embryo covered with mineral oil in tissue culture dishes at day 2 in a 37 °C, 5% CO2 and 5% O2 incubator.
- Prepare another three microdroplets covered with mineral oil, and label the new tissue culture dishes for washing No. 1-3.
- Transfer the day 3 embryos into the washing microdroplets. Gently aspirate and release the embryos 3 times in each droplet using denudation pipettes.
NOTE: This procedure can also help remove the residual granular cells attached to the embryo. - Observe and evaluate the embryos under a microscope on day 3 before the medium was changed from cleavage-stage culture medium to blastocyst culture medium for morphological scoring. If cumulus cells were still attached to the embryo, appropriately pipette up and down in another prewarmed and equilibrated blastocyst culture medium droplet covered with mineral oil with a stripper pipette until the cumulus cells were completely removed.
NOTE: All attached cumulus cells had to be removed completely on day 3 before the embryo was transferred from the cleavage-stage culture medium plate to the blastocyst-stage culture medium plate. Any remaining cumulus cells will interfere in the final analysis and give false negative results.
- Two options for culture medium collection
NOTE: The IVF center can choose from one of two methods for culture medium collection based on the center's resources, demands, and preferences.- Option 1: Embryo wash and culture
NOTE: This option is for IVF labs that perform vitrification on the morning of day 5.- Transfer the embryo into prewarmed (37 °C) microdroplets of culture medium, and gently wash each embryo serially in 3 microdroplets by pipetting at day 4 afternoon.
- Transfer each embryo into a unique prewarmed (37 °C) single microdroplet of culture medium for sample collection. The volume of a single droplet of culture medium cannot exceed 25 µL.
- Perform blastocyst embryo culture on day 5/day 6 at 37 °C, 5% CO2, and 5% O2.
- Option 2: Embryo wash and culture
NOTE: This option is for IVF labs that perform vitrification on day 5 afternoon or day 6.- Transfer the embryo into prewarmed (37 °C) microdroplets of 10-15 µL culture medium, and gently wash each embryo serially in 3 microdroplets by pipetting on day 5.
- Transfer each embryo into a unique prewarmed (37 °C) single microdroplet of culture medium for sample collection. The volume of a single droplet of culture medium cannot exceed 15 µL.
- Perform blastocyst embryo culture on day 5/day 6 at 37 °C and 5% CO2.
- Option 1: Embryo wash and culture
- Sample Collection
- Gently adjust the ICM at a considerable distance from the targeted point of the laser beam, which focuses on the cell junction of the trophectoderm to generate a small hole in the trophectoderm to release the fluid from the blastocoel cavity. Then embryos are moved to freezing solution for cryopreservation according to the conventional process.
- Transfer culture medium from each cultured embryo into an RNase/DNase-free PCR tube containing 5 µL of cell lysis buffer.
- Collect the same amount of culture medium without being used for embryo culture as a negative control. Freeze all collected samples immediately in liquid nitrogen and then store at −80 °C after being collected until subjected to the NICS assay.
- Perform vitrification as described in the protocol.
3. Protocol 2: Library Construction
- Culture medium lysis
- Dilute 1 µL of positive control (10 ng human gDNA) with 199 µL of fresh culture medium. Mix thoroughly and centrifuge the tube briefly (200 x g for 5 s).
- Transfer 10 µL of day 5-day 6 blastocyst culture medium, diluted positive control, and fresh culture medium to new 0.2 mL PCR tubes.
- Add 1 µL of MT Enzyme Mix to each PCR tube and mix thoroughly by pipetting and centrifuge immediately for 2-3 s at 200 x g.
- Put the PCR tube(s) from step 3.1.3 in a preheated NICS Sample Prep Station and run the lysis program as follows: 10 min at 75 °C; 4 min at 95 °C; hold at 22 °C.
NOTE: The sample prep station is comparable to a standard PCR machine.- Click the Lysis icon to enter the setup screen.
- Select Tube for Control mode; input 10 µL for Sample volume; select On for Hotlid control and enter 105 °C for the temperature. Select No for Pause at the first seg. Click OK to proceed.
- Wait until Remain time shows --:--:--, which indicates the end of the program, and then click Stop to terminate the program.
- Stop the program after the process is complete. Proceed to the next step immediately.
- Pre-Library Preparation
- Thaw the Pre-Lib Buffer to RT. Mix thoroughly by pipetting and centrifuge immediately for 2-3 s at 200 x g.
- Prepare a master mix for prelibrary reaction as follows: add 2 µL of Pre-Lib Enzyme Mix to 60 µL of Pre-Lib Buffer, mix the reaction thoroughly and centrifuge briefly.
- Add 60 µL of prelibrary reaction mix into each pretreated medium sample from the previous step. Mix thoroughly by pipetting and centrifuge immediately for 2-3 s at 200 x g.
- Place the PCR tube(s) from step 3.2.3 in the Sample Prep Station and run the prelibrary program as follows: 95 °C for 2 min; 12 cycles of 15 °C for 40 s, 22 °C for 40 s, 33 °C for 30 s, 65 °C for 30 s, 72 °C for 40 s, 95 °C for 10 s and 63 °C for 10 s; and hold at 4 °C.
- Click the Pre_Lib icon to enter the setup screen.
- Select Tube for Control mode; input 70 µL for Sample volume; select On for Hot lid control and enter 105 °C for the temperature. Select No for Pause at the first seg. Click OK to proceed.
- Wait until Remain time shows --:--:--, which indicates the end of the program, and click Stop to terminate the program.
- Stop the program when the process is complete. Proceed to the next step immediately.
- Library Preparation
- Thaw the Library Buffer to RT. Mix thoroughly by pipetting and centrifuge immediately for 2-3 s at 200 x g.
- Prepare a master mix for library reaction as follows: add 1.6 µL of Library Enzyme Mix to 60 µL of Library Buffer, mix the reaction thoroughly and centrifuge briefly.
- Add 60 µL of library reaction mix and 2 µL of Barcode Primer to each prelibrary product from step 3.2.3. Mix the reaction thoroughly and centrifuge briefly.
- Place the PCR tube(s) from step 3.2.3 in the thermal cycler and run library preparation program as follows: 94 °C for 30 s; 17 cycles of 94 °C for 25 s, 62 °C for 30 s, and 72 °C for 45 s); and then hold at 4 °C.
- Click the Lib_Prep icon to enter the setup screen.
- Select Tube for Control mode; input 130 µL for Sample volume; select On for Hotlid control and enter 105 °C for the corresponding temperature. Select No for Pause at the first seg. Click OK to proceed.
- Wait until Remain time shows --:--:--, which indicates the end of the program, and click Stop to terminate the program.
- Library Purification
- Remove Magbeads from storage at 2-8 °C for at least 20 min before the purification step. Vortex and mix the Magbeads for 20 s. Dispense enough beads for the purification step into a new 1.5 mL microcentrifuge tube and warm beads to RT.
- Add 1x Magbeads into each library. Mix by pipetting up and down ≥10 times and incubate at RT for 5 min.
NOTE: For example, add 100 µL of Magbeads to 100 µL of library sample. - After incubation, centrifuge the tube briefly and place on a magnetic stand.
- Wait for approximately 5 min until the solution becomes clear. While keeping the tube on the magnetic stand, carefully aspirate the solution and discard.
- Add 200 µL of freshly prepared 80% ethanol to the tube. Incubate at RT for 30 s and carefully remove the supernatant. Repeat one more time.
- Remove the ethanol as completely as possible. Air dry the beads on the magnetic stand for approximately 5-10 min at RT.
- Remove the tube from the magnetic stand, add 17.5 µL of elution buffer, and vortex the tube to resuspend the beads. Centrifuge the tube briefly and incubate at RT for 5 min.
- Place the tube onto the magnetic stand and wait until the solution becomes clear. Carefully transfer 15 µL supernatant to a new tube.
- Library quantification
- Quantify purified libraries by using the fluorometer according to the user guide of the qubit dsDNA HS Assay kits28. The yield of the libraries ranges from ~15 to 300 ng.
- Library Pooling
- Use 10 nanograms of each library sample for pooling.
- Sequencing
- Refer to the sequencing user guide (15027617 v01)29.
- Purified library sequences of 50 bp at a single end on the platform yielded approximately 2 million reads for each sample, and a 0.03 × sequencing depth was recommended.
- Data analysis
- Enter the users' Name and Password in the login page
- After logging into the system, click Analysis and a new page will appear. Click Create Submission under the NICS-A tab. Then, choose NGS for the platform, select corporation, choose NICSInst for the reagent, enter the project information in the box under Project ID, set the analysis preferences and upload the files. Once all sequencing files are successfully uploaded, click Submit to start the analysis (Figure 3A).
- Click View Submissions to show the list of submitted projects. Once the analysis is complete, the status of a project will become Completed and a Show button will appear in the report field. Click the Show button to view the summary table of NICS analysis (Figure 3B).
- Click the Export report button to save the reports (Figure 3C).
NOTE: Three types of files will be exported for each analysis. A graphic file that includes all copy number variation (CNV) plots for each chromosome and whole genome, which will be stored under the "graph" folder; a spreadsheet that contains the sample QC details of this analysis run; a document file that contains the NICS reports customized by the user; and a spreadsheet that contains the sample summary information of this analysis run.
Results
The present study applied the proposed method to a patient. IRB approval and informed consent were obtained before the application of NICS analysis. The present study obtained 6 blastocysts from patients and performed NICS on all 6 embryos on day 4 to day 5 medium. Chromosome abnormalities caused by the parents' balanced translocation were detected in five of chromosomes with the NICS assay; therefore, they could not be used for transfer (Figure 4A-E). The NICS results o...
Discussion
Modifications and troubleshooting
If the NICS results are contaminated with parental genetic materials, make sure all cumulus-corona radiata cells are removed and make sure ICSI is performed for fertilization. Improper medium storage or template preparation processes are avoided, which may degrade DNA. The working space was purified thoroughly with DNase and RNase decontamination reagents. To avoid contamination from other embryos, one embryo was always cultured in a single dr...
Disclosures
Yaxin Yao, Jieliang Ma, Jing Wang and Sijia Lu are employees of Yikon Genomics Co., Ltd.
Acknowledgements
The authors would like to thank Shiping Bo and Shujie Ma for their assistance in NGS data analysis. Funding: this work was supported by the National Key Research and Development Program (Grant No. 2018YFC1003100).
Materials
| Name | Company | Catalog Number | Comments |
| 1.5 mL EP tube, 0.2 mL PCR tube | Axygen | MCT-150-C, PCR-02-C | DNase/RNase free, Low Binding PCR tubes and 1.5 mL micro-centrifuge tubes are recommended. |
| 10 µL, 200 µL, 1000 µL DNase /RNase Free Tips | Axygen | T-300-R-S, T-200-Y-R-S, T-1000-B-R-S | This can be replaced by other brand/For sample transfer |
| 100 % ethanol | Sinopharm Chemical | 10009218 | This can be replaced by other brand/For DNA library purification |
| Barcode Primer1-48 | Yikon Genomics | Reagent in NICSInst library preparation kit | For library amplificaton |
| BD Falcon Organ Culture Dish, Sterile | BD Bioscience | 363037 | This can be replaced by other brand/For embryo culture |
| BD Falcon Tissue culture Dishes (Easy Grip) , Sterile | BD Bioscience | 353001 | This can be replaced by other brand/For embryo culture |
| BD Falcon Tissue culture Dishes, Sterile | BD Bioscience | 353002 | This can be replaced by other brand/For embryo culture |
| Cell Lysis Buffer | Yikon Genomics | Reagent in NICSInst library preparation kit | For culture medium pre-treatment |
| Cell Lysis Enzyme | Yikon Genomics | Reagent in NICSInst library preparation kit | For culture medium pre-treatment |
| ChromGo software | Yikon Genomics | Data analysis | |
| CMPure Magbeads | Yikon Genomics | Reagent in NICSInst library preparation kit | For library purification |
| Cryotop open systerm | KITAZATO BioPharma | 81110 | This can be replaced by other brand/For embryo vitrification |
| Distill water | Yikon Genomics | Reagent in NICSInst library preparation kit | To dissolve DNA |
| ES (Vitrification kit) | KITAZATO BioPharma | Reagent inVitrification kit | This can be replaced by other brand/For embryo vitrification |
| HOLDNIG | ORIGIO | MPH-MED-35 | This can be replaced by other brand/For ICSI |
| Hyaluronidase solution, 80 U/mL | SAGE | ART4007-A | This can be replaced by other brand/Digest oocyte-corona-cumulus complex |
| ICSI | ORIGIO | MPH-35-35 | This can be replaced by other brand/For ICSI |
| Illumina MiSeq® System | Illumina | SY-410-1001 | For library sequencing |
| Incubator | Labotect | Inkubator C16 | This can be replaced by other brand/For embryo culture |
| Library buffer | Yikon Genomics | Reagent in NICSInst library preparation kit | For library amplificaton |
| Library Enzyme Mix | Yikon Genomics | Reagent in NICSInst library preparation kit | For library amplificaton |
| Magnetic Stand | DynaMagTM-2 | 12321D | For library purification |
| Microscope | OLYMPUS | 1X71 | This can be replaced by other brand/For embryo observation |
| Mini-centrifuge | ESSENSCIEN | ELF6 | For separation |
| MT Enzyme Mix | Yikon Genomics | Reagent in NICSInst library preparation kit | For culture medium pre-treatment |
| NICSInst library preparation kit | Yikon Genomics | KT1000800324 | Whole genome amplification and library construction |
| NICSInst Sample Prep Station | Yikon Genomics | ME1001003 | Amplificate DNA |
| Nunc IVF 4-Well Dish | Thermo Scientific | 144444 | This can be replaced by other brand/For embryo washing and blastocyst culture |
| Pasteur Pipette | Oirgio | MXL3-IND-135 | This can be replaced by other brand/For embryo tansfer |
| Pasteur pipettes | ORIGIO | PP-9-1000 | This can be replaced by other brand/For IVF laboratory |
| Pre-Lib Buffer | Yikon Genomics | Reagent in NICSInst library preparation kit | Pre-library preparation |
| Pre-Lib Enzyme | Yikon Genomics | Reagent in NICSInst library preparation kit | Pre-library preparation |
| Qubit® 3.0 Fluorometer | Thermo Scientific | Q33216 | For library quantification |
| Quinn's Advantage Blastocyst Medium | SAGE | ART-1029 | For embryo blastocyst stage culture |
| Quinn's Advantage Cleavage Medium | SAGE | ART-1026 | This can be replaced by other brand/For embryo cleavage stage culture |
| Quinn's Advantage Fertilization Medium | SAGE | ART-1020 | This can be replaced by other brand/For oocyte and sperm fertilization |
| Quinn's Advantage m-HTF Medium with HEPES | SAGE | ART-1023 | This can be replaced by other brand/For embryo clutrure |
| Quinn's Advantage SPS Serum protein Substitute Kit | SAGE | ART-3010 | This can be replaced by other brand/To denude the oocyte |
| Quinn's Advantage Tissue culture mineral oil | SAGE | ART-4008P | This can be replaced by other brand/To cover the culture medium |
| STRIPPER TIPS | ORIGIO | MXL3-IND-135 | This can be replaced by other brand/For denudating granulosa cells |
| Vitrification Cryotop Open systerm | KIZTAZATO | 81111 | This can be replaced by other brand/For embryo vitrification |
| Vitrification kit | KITAZATO BioPharma | VT101 | This can be replaced by other brand/For embryo vitrification |
| Vortexer | Qilinbeier | DNYS8 | Sample mix |
| VS (Vitrification kit) | KITAZATO BioPharma | Reagent inVitrification kit | This can be replaced by other brand/For embryo vitrification |
| ZILOS-tk Laser System | Hamilton Thorne | CLASS 1 laser | This can be replaced by other brand/For artificial blastocoele collapse |
References
- Barlow, P. Early pregnancy loss and obstetrical risk after in-vitro fertilization and embryo replacement. Human Reproduction. 3 (5), 671-675 (1988).
- Munne, S. Chromosome abnormalities and their relationship to morphology and development of human embryos. Reproductive BioMedicine Online. 12 (2), 234-253 (2006).
- Harton, G. L. Diminished effect of maternal age on implantation after preimplantation genetic diagnosis with array comparative genomic hybridization. Fertility and Sterility. 100 (6), 1695-1703 (2013).
- Hodes-Wertz, B. Idiopathic recurrent miscarriage is caused mostly by aneuploid embryos. Fertility and Sterility. 98 (3), 675-680 (2012).
- Keltz, M. D. Preimplantation genetic screening (PGS) with Comparative genomic hybridization (CGH) following day 3 single cell blastomere biopsy markedly improves IVF outcomes while lowering multiple pregnancies and miscarriages. Journal of Assisted Reproduction and Genetics. 30 (10), 1333-1339 (2013).
- Scott, R. T. Blastocyst biopsy with comprehensive chromosome screening and fresh embryo transfer significantly increases in vitro fertilization implantation and delivery rates: a randomized controlled trial. Fertility and Sterility. 100 (3), 697-703 (2013).
- Forman, E. J. In vitro fertilization with single euploid blastocyst transfer: a randomized controlled trial. Fertility and Sterility. 100 (1), 100-107 (2013).
- Yang, Z. Selection of single blastocysts for fresh transfer via standard morphology assessment alone and with array CGH for good prognosis IVF patients: results from a randomized pilot study. Molecular Cytogenetics. 5 (1), 24 (2012).
- Cimadomo, D. The Impact of Biopsy on Human Embryo Developmental Potential during Preimplantation Genetic Diagnosis. BioMed Research International. 2016, 7193075 (2016).
- Scott, R. T., Upham, K. M., Forman, E. J., Zhao, T., Treff, N. R. Cleavage-stage biopsy significantly impairs human embryonic implantation potential while blastocyst biopsy does not: a randomized and paired clinical trial. Fertility and Sterility. 100 (3), 624-630 (2013).
- Wu, Y. Blastomere biopsy influences epigenetic reprogramming during early embryo development, which impacts neural development and function in resulting mice. Cellular and Molecular Life Sciences. 71 (9), 1761-1774 (2014).
- Zhao, H. C. Aberrant epigenetic modification in murine brain tissues of offspring from preimplantation genetic diagnosis blastomere biopsies. Biology of Reproduction. 89 (5), 117 (2013).
- Zeng, Y. Preimplantation genetic diagnosis (PGD) influences adrenal development and response to cold stress in resulting mice. Cell and Tissue Research. 354 (3), 729-741 (2013).
- Palini, S. Genomic DNA in human blastocoele fluid. Reproductive BioMedicine Online. 26 (6), 603-610 (2013).
- Gianaroli, L. Blastocentesis: a source of DNA for preimplantation genetic testing. Results from a pilot study. Fertility and Sterility. 102 (6), 1692-1699 (2014).
- Stigliani, S., Anserini, P., Venturini, P. L., Scaruffi, P. Mitochondrial DNA content in embryo culture medium is significantly associated with human embryo fragmentation. Human Reproduction. 28 (10), 2652-2660 (2013).
- Stigliani, S. Mitochondrial DNA in Day 3 embryo culture medium is a novel, non-invasive biomarker of blastocyst potential and implantation outcome. Molecular Human Reproduction. 20 (12), 1238-1246 (2014).
- Wu, H. Medium-Based Noninvasive Preimplantation Genetic Diagnosis for Human α-Thalassemias-SEA. Medicine. 94 (12), e669 (2015).
- Xu, J. Noninvasive chromosome screening of human embryos by genome sequencing of embryo culture medium for in vitro fertilization. Proceedings of the National Academy of Sciences. 113 (42), 11907-11912 (2016).
- Capalbo, A. Diagnostic efficacy of blastocoel fluid and spent media as sources of DNA for preimplantation genetic testing in standard clinical conditions. Fertility and Sterility. 110 (5), 870-879 (2018).
- Tobler, K. J. Blastocoel fluid from differentiated blastocysts harbors embryonic genomic material capable of a whole-genome deoxyribonucleic acid amplification and comprehensive chromosome microarray analysis. Fertility and Sterility. 104 (2), 418-425 (2015).
- Magli, M. C. Preimplantation genetic testing: polar bodies, blastomeres, trophectoderm cells, or blastocoelic fluid?. Fertility and Sterility. 105 (3), 676-683 (2016).
- Kuznyetsov, V. Evaluation of a novel non-invasive preimplantation genetic screening approach. PLoS One. 13 (5), e0197262 (2018).
- Li, P. Preimplantation Genetic Screening with Spent Culture Medium/Blastocoel Fluid for in Vitro Fertilization. Scientific Reports. 8 (1), 9275 (2018).
- Jiao, J. Minimally invasive preimplantation genetic testing using blastocyst culture medium. Human Reproduction. 34 (7), 1369-1379 (2019).
- Palermo, G. D. Births after intracytoplasmic injection of sperm obtained by testicular extraction from men with nonmosaic Klinefelter's syndrome. New England Journal of Medicine. 338 (9), 588-590 (1998).
- Alpha Scientists in Reproductive, M., & Embryology, E. S. I. G. o. The Istanbul consensus workshop on embryo assessment: proceedings of an expert meeting. Human Reproduction. 26 (6), 1270-1283 (2011).
- . Qubit dsDNA HS Assay Kit Available from: https://www.thermofisher.com/order/catalog/product/Q32851?ICID=search-product (2015)
- . Miseq system use guide Available from: https://support.illumina.com/downloads/miseq_system (2016)
- Lane, M. Ability to detect aneuploidy from cell free DNA collected from media is dependent on the stage of development of the embryo. Fertility and Sterility. 108 (3), (2017).
- Rubio, C. Multicenter prospective study of concordance between embryonic cell-free DNA and trophectoderm biopsies from 1301 human blastocysts. American Journal of Obstetrics and Gynecology. 223 (5), 751-751 (2020).
- Rubio, C. Embryonic cell-free DNA versus trophectoderm biopsy for aneuploidy testing: concordance rate and clinical implications. Fertility and Sterility. 112 (3), 510-519 (2019).
- Lledo, B. Consistent results of non-invasive PGT-A of human embryos using two different techniques for chromosomal analysis. Reproductive BioMedicine Online. 42 (3), 555-563 (2021).
- Kuznyetsov, V. Minimally Invasive Cell-Free Human Embryo Aneuploidy Testing (miPGT-A) Utilizing Combined Spent Embryo Culture Medium and Blastocoel Fluid -Towards Development of a Clinical Assay. Scientific Reports. 10 (1), 7244 (2020).
Erratum
Formal Correction: Erratum: Chromosome Screening of Human Preimplantation Embryos by Using Spent Culture Medium: Sample Collection and Chromosomal Ploidy Analysis
Posted by JoVE Editors on 10/01/2021. Citeable Link.
An erratum was issued for: Chromosome Screening of Human Preimplantation Embryos by Using Spent Culture Medium: Sample Collection and Chromosomal Ploidy Analysis. The Protocol and Representaive Results sections were updated.
In the Protocol, step 3.8.2 was updated from:
After logging into the system, click Create Submission under the NICS tab. Then, select the sequencing platform, choose ChromInst for the reagent, enter the project information in the box under Project ID, set the analysis preferences and upload the files. Once all sequencing files are successfully uploaded, click Submit to start the analysis (Figure 3A).
to:
After logging into the system, click Create Submission under the NICS-A tab. Then, choose NGS for the platform, select corporation, choose ChromInst for the reagent, enter the project information in the box under Project ID, set the analysis preferences and upload the files. Once all sequencing files are successfully uploaded, click Submit to start the analysis (Figure 3A).
In the Representative Results, Figure 3 was updated from:
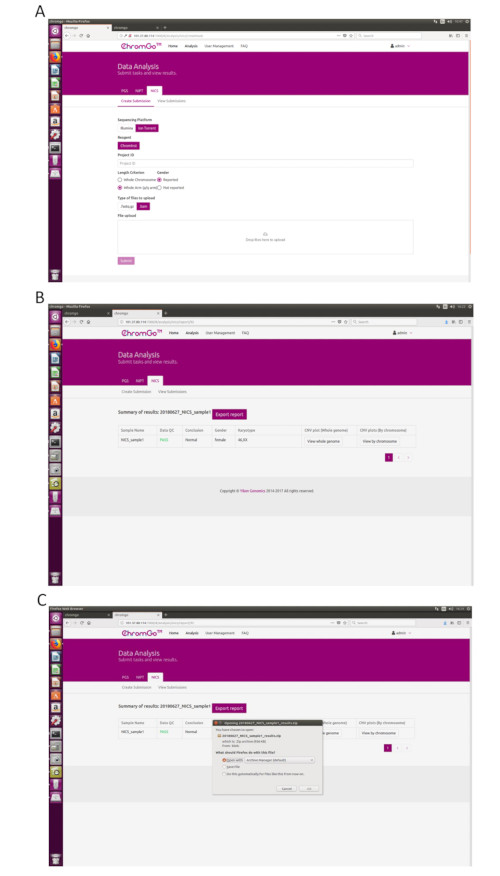
Figure 3. Data Analysis. (A) The page of Create Submission. There are different options for the user application. For sequencing platform, users can choose Illumina or Ion Torrent. For analysis criterion, there are two length detection resolution for selection, the whole chromosome and whole arm level. The users also can choose whether the mosaicism or gender information is reported. Finished the above parameter setting,click on the box under File upload and choose the appropriate sequencing files to upload. For Illumina, choose the files with an extension of fastq.gz. For Ion Torrent platform, choose files with an extension of bam. Click Submit to start the analysis after successfully upload. (B) The view of summary table. The summary table consists of following information: Sample Name: The name of each NICS sample is listed; Data QC: Indicates whether the sequencing file passes the QC for NICS analysis; Conclusion: Indicates whether the NICS analysis is normal or abnormal, "N/A" indicates no conclusive result is available; Gender: If the user chooses to report the sex information, this column will appear in the summary table; Karyotype: Shows the analysis results; CNV plot (Whole Genome): View the CNV profiles of all chromosomes; CNV plot (By Chromosome): View the CNV profiles of each chromosome. (C) The Save Report Page. Click Export report button next to the Summary of Results. Select the information you want to show on the final report and click Export. Select Save File in the appearing dialog window and then click OK. The reports will be saved to the Download folder of the computer. Please click here to view a larger version of this figure.
to:
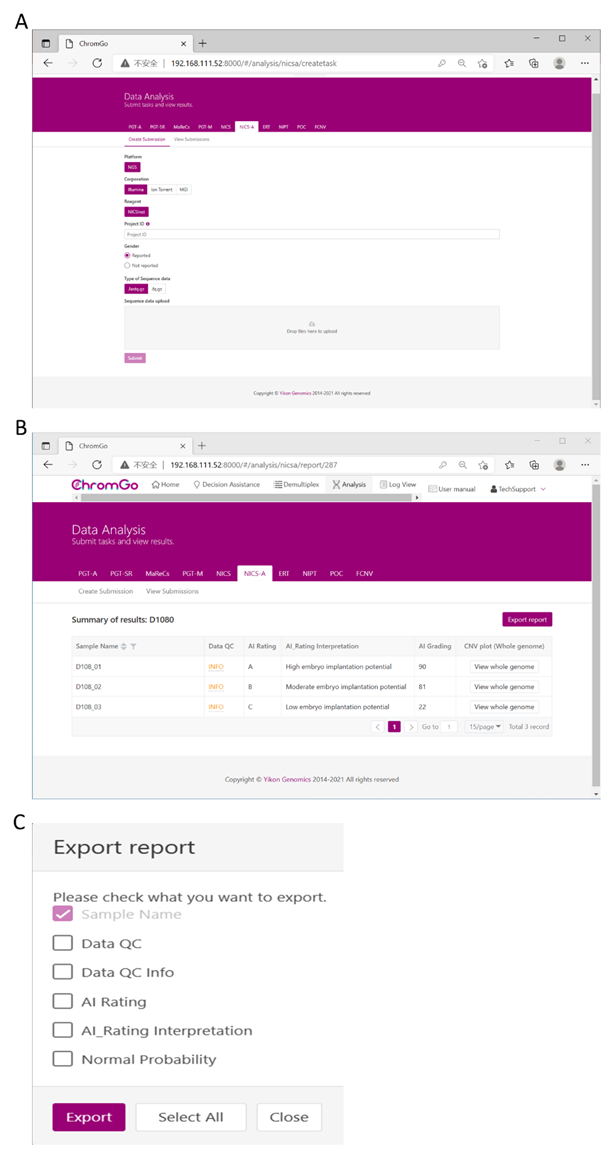
Figure 3. Data Analysis. (A) There are different options for the user application. For sequencing platform corporation, users can choose Illumina, Ion Torrent or MGI. The users can choose whether the gender information is reported. Finished the above parameter setting, click on the box under File upload and choose the appropriate sequencing files to upload. For Illumina, choose the files with an extension of fastq.gz. Click Submit to start the analysis after successfully upload. (B) The view of summary table. The summary table consists of following information: Sample Name: The name of each NICS sample is listed; Data QC: Indicates whether the sequencing file passes the QC for NICS analysis; AI Rating: The rating (A, B or C) for each NICS sample; AI_Rating Interpretation: Evaluation of embryo implantation potential; AI Grading: The score for each NICS sample; CNV plot (Whole Genome): View the CNV profiles of all chromosomes; (C) The Save Report Page. Click Export report button next to the Summary of Results. Select the information you want to show on the final report and click Export. The reports will be saved to the Download folder of your computer. Please click here to view a larger version of this figure.
Reprints and Permissions
Request permission to reuse the text or figures of this JoVE article
Request PermissionExplore More Articles
This article has been published
Video Coming Soon
Copyright © 2025 MyJoVE Corporation. All rights reserved