
Aby wyświetlić tę treść, wymagana jest subskrypcja JoVE. Zaloguj się lub rozpocznij bezpłatny okres próbny.
Method Article
Generating Transgenics and Knockouts in Strongyloides Species by Microinjection
W tym Artykule
Podsumowanie
The functional genomic toolkit for the parasitic nematodes Strongyloides stercoralis and Strongyloides ratti includes transgenesis, CRISPR/Cas9-mediated mutagenesis, and RNAi. This protocol will demonstrate how to use intragonadal microinjection to introduce transgenes and CRISPR components into S. stercoralis and S. ratti.
Streszczenie
The genus Strongyloides consists of multiple species of skin-penetrating nematodes with different host ranges, including Strongyloides stercoralis and Strongyloides ratti. S. stercoralis is a human-parasitic, skin-penetrating nematode that infects approximately 610 million people, while the rat parasite S. ratti is closely related to S. stercoralis and is often used as a laboratory model for S. stercoralis. Both S. stercoralis and S. ratti are easily amenable to the generation of transgenics and knockouts through the exogenous nucleic acid delivery technique of intragonadal microinjection, and as such, have emerged as model systems for other parasitic helminths that are not yet amenable to this technique.
Parasitic Strongyloides adults inhabit the small intestine of their host and release progeny into the environment via the feces. Once in the environment, the larvae develop into free-living adults, which live in feces and produce progeny that must find and invade a new host. This environmental generation is unique to the Strongyloides species and similar enough in morphology to the model free-living nematode Caenorhabditis elegans that techniques developed for C. elegans can be adapted for use with these parasitic nematodes, including intragonadal microinjection. Using intragonadal microinjection, a wide variety of transgenes can be introduced into Strongyloides. CRISPR/Cas9 components can also be microinjected to create mutant Strongyloides larvae. Here, the technique of intragonadal microinjection into Strongyloides, including the preparation of free-living adults, the injection procedure, and the selection of transgenic progeny, is described. Images of transgenic Strongyloides larvae created using CRISPR/Cas9 mutagenesis are included. The aim of this paper is to enable other researchers to use microinjection to create transgenic and mutant Strongyloides.
Wprowadzenie
Strongyloides stercoralis has long been overlooked as an important human pathogen compared to the more widely recognized hookworms and the roundworm Ascaris lumbricoides1. Previous studies of worm burden often severely underestimated the prevalence of S. stercoralis due to the low sensitivity of common diagnostic methods for S. stercoralis2. In recent years, epidemiological studies based on improved diagnostic tools have estimated that the true prevalence of S. stercoralis infections is much higher than previously reported, approximately 610 million people worldwide2.
Both S. stercoralis and other Strongyloides species, including the closely related rat parasite and common lab model S. ratti, have an unusual life cycle that is advantageous for experimental genomic studies because it consists of both parasitic and free-living (environmental) generations3 (Figure 1). Specifically, both S. stercoralis and S. ratti can cycle through a single free-living generation. The free-living generation consists of post-parasitic larvae that develop into free-living adult males and females; all progeny of the free-living adults develop into infective larvae, which must infect a host to continue the life cycle. Furthermore, this environmental or free-living generation can be experimentally manipulated in the laboratory. Because free-living Strongyloides adults and C. elegans adults share similar morphology, techniques such as intragonadal microinjection that were originally developed for C. elegans can be adapted for use with free-living adult Strongyloides4,5. While DNA is generally introduced into free-living adult females, both males and females of Strongyloides can be microinjected6. Thus, functional genomic tools are available to interrogate many aspects of the biology of Strongyloides. Other parasitic nematodes lack a free-living generation, and as a result, are not as readily amenable to functional genomic techniques3.

Figure 1: The Strongyloides stercoralis life cycle. The S. stercoralis parasitic females inhabit the small intestine of their mammalian hosts (humans, non-human primates, dogs). The parasitic females reproduce by parthenogenesis and lay eggs within the small intestine. The eggs hatch while still inside the host into post-parasitic larvae, which are then passed into the environment with feces. If the post-parasitic larvae are male, they develop into free-living adult males. If the post-parasitic larvae are female, they can either develop into free-living adult females (indirect development) or third-stage infective larvae (iL3s; direct development). The free-living males and females reproduce sexually to create progeny that are constrained to become iL3s. Under certain conditions, S. stercoralis can also undergo autoinfection, in which some of the post-parasitic larvae remain inside the host intestine rather than passing into the environment in feces. These larvae can develop into autoinfective larvae (L3a) inside the host, penetrate through the intestinal wall, migrate through the body, and eventually return to the intestine to become reproductive adults. The life cycle of S. ratti is similar, except that S. ratti infects rats and does not have an autoinfective cycle. The environmental generation is key to using Strongyloides species for genetic studies. The free-living adult females (P0) can be microinjected; their progeny, which will all become iL3s, are the potential F1 transgenics. This figure has been modified from Castelletto et al.3. Please click here to view a larger version of this figure.
S. stercoralis shares many aspects of its biology with other gastrointestinal human-parasitic nematodes, including host invasion and host immune modulation. For example, human-parasitic hookworms in the genera Necator and Ancylostoma also infect by skin penetration, navigate similarly through the body, and ultimately reside as parasitic adults in the small intestine7. Thus, many gastrointestinal nematodes likely use common sensory behaviors and immune evasion techniques. As a result, the knowledge gleaned from Strongyloides will complement findings in other less genetically tractable nematodes and lead to a more complete understanding of these complex and important parasites.
This microinjection protocol outlines the method for introducing DNA into Strongyloides free-living adult females to make transgenic and mutant progeny. The strain maintenance requirements, including the developmental timing of adult worms for microinjections and the collection of transgenic progeny, are described. Protocols and a demonstration of the complete microinjection technique, along with protocols for culturing and screening transgenic progeny, are included, along with a list of all necessary equipment and consumables.
Protokół
NOTE: Gerbils were used to passage S. stercoralis, and rats were used to passage S. ratti. All procedures were approved by the UCLA Office of Animal Research Oversight (Protocol No. 2011-060-21A), which adheres to AAALAC standards and the Guide for the Care and Use of Laboratory Animals. The following tasks must be completed at least one day before microinjecting: worm culturing, preparing microinjection pads, creating constructs for the microinjection mix, and spreading bacteria (E. coli HB101) onto 6 cm Nematode Growth Media (NGM) plates8. The free-living females require a minimum of 24 h post-fecal collection at 25 °C to develop into young adults before they can be microinjected. Microinjection pads must be completely dry. Bacterial plates must dry and establish a small lawn.
1. Preparation of microinjection slides: at least one day before injecting
NOTE: Worms are mounted on microinjection coverslips with dry agar pads for injection.
- Set a heat block to 90 °C.
- Add 5 mL of ddH2O, then 100 mg of agarose to a borosilicate glass tube.
- Heat the agarose mix in the tube over a flame until the agarose is dissolved.
- Place the tube in a heat block set at 90 °C to maintain the agarose in the liquid state.
- Drop ~180 µL of the agarose solution onto a coverslip using a glass Pasteur pipet or a pipet with a plastic tip. Immediately drop a second coverslip on top to flatten the agarose into a thin pad.
- After 5-10 s, remove the top coverslip by sliding the two apart. Determine which slide the agar pad is on and lay it face up.
- Select a tiny piece of glass shard from a broken coverslip and gently press it into the agar near the top edge of the pad using forceps (Supplemental Figure S1).
- Continue making microinjection pads with the agarose solution.
- Dry the agarose pads overnight on the bench or in an oven. Store in the coverslip box.
NOTE: The agarose pads can be used for up to 2 months but are only used for one injection run.
2. Culturing Strongyloides to obtain worms for microinjection: 1 - 2 days before injection
NOTE: A strain maintenance protocol can be found in the Supplemental Material, which includes a detailed description of how to infect gerbils and rats with nematodes and harvest nematodes from the feces of infected animals.
- Two days before the injection day, place the infected animals9,10 in collection cages overnight.
- The next morning, collect infested feces and make fecal-charcoal plates9,10.
- Place a plate at 25 °C for 24 h to allow the free-living worms to develop into young adults.
- The night before the injection day, place uninfected host animals in collection cages.
- On the injection day, collect uninfested feces for post-injection cultivation.
3. Making the microinjection mix: prior to or on the day of injection
NOTE: The microinjection mix consists of the plasmids of interest diluted to the desired concentration in worm buffered saline (BU) (50 mM Na2HPO4, 22 mM KH2PO4, 70 mM NaCl)11.
- Determine the concentration of the plasmid stocks and the desired concentration in the microinjection mix (Table 1).
| Microinjection mix: reporter construct | |||
| Component | Stock Concentration | Amount | Final Concentration |
| pMLC30 gpa-3::gfp | 300 ng/µL | 1.7 µL | 50 ng/µL |
| BU | na | 8.3 µL | na |
| total | 10 µL | 50 ng/µL | |
| Microinjection mix: CRISPR/Cas9 mutagenesis | |||
| Component | Stock Concentration | Amount | Final Concentration |
| pMLC47 tax-4 sgRNA | 300 ng/µL | 2.7 µL | 80 ng/µL |
| pEY11 Ss-tax-4 HDR plasmid | 400 ng/µL | 2.0 µL | 80 ng/µL |
| pPV540 strCas9 plasmid | 350 ng/µL | 1.1 µL | 40 ng/µL |
| BU | na | 4.2 µL | na |
| total | 10 µL | 200 ng/µL | |
| Microinjection mix: piggyBac integration | |||
| Component | Stock Concentration | Amount | Final Concentration |
| pMLC30 gpa3::gfp | 300 ng/µL | 2.0 µL | 60 ng/µL |
| pPV402 transposase plasmid | 450 ng/µL | 0.9 µL | 40 ng/µL |
| BU | na | 7.1 µL | na |
| total | 10 µL | 100 ng/µL | |
Table 1: Examples of microinjection mixes. The plasmids and concentrations for three example microinjection mixes: one for a gpa-3::GFP reporter construct10, one for CRISPR/Cas9-mediated disruption of the Ss-tax-4 locus14,15, and one for piggyBac-mediated integration of an Ss-gpa-3::GFP construct13,17,18. strCas9 denotes the Strongyloides codon-optimized Cas9 gene. The final concentrations listed are commonly used in Strongyloides microinjection mixes.
- Dilute the plasmids in BU to a total volume of 10-20 µL.
- Spin the mix through a filter column at 5,000 × g for 1-2 min.
- Use the microinjection mix immediately or store it at -20 °C for future use.
4. Collect young adult Strongyloides for microinjection: morning of the injection day
- Set up the Baermann apparatus with 1 fecal-charcoal plate of young adult Strongyloides (Figure 2).
NOTE: The fecal-charcoal plate may contain some infective larvae. Personal protective equipment consists of a lab coat, gloves, and eye protection. No skin should be exposed between the glove and the sleeve of the lab coat.

Figure 2: The Baermann apparatus used to collect parasitic worms from cultures10. The contents of a fecal-charcoal plate are placed at the top of a column of warm water. The worms migrate into the water and collect at the bottom of the funnel. (A) To set up the Baermann apparatus, the stand for the Baermann funnel is clamped to the bench with a C-clamp. A rubber tube attached to the end of the funnel is closed with pinch clamps, and a catch bucket is placed underneath the tube for drips. Warm water is added to the glass funnel. (B) The plastic ring holder for the fecal-charcoal mix is then lined with 3 pieces of laboratory tissues (left). A wooden stick or tongue depressor (middle) is used to transfer the contents of a fecal-charcoal plate (right) into the plastic ring holder. (C) A close-up of the bottom of the plastic ring holder for the fecal-charcoal mix, showing the double layer of nylon tulle lining the bottom of the holder. (D) The fecal-charcoal holder is then placed on the top of the glass funnel. (E) The laboratory tissue is dampened with water and closed over the fecal-charcoal mix. More warm water is added to mostly submerge the fecal-charcoal. (F) The complete Baermann setup, with the fecal-charcoal culture submerged under warm water. Please click here to view a larger version of this figure.
- Install a glass funnel with rubber collection tubing on a ring stand using an O-ring and secure it with a clamp. Close the collection tubing with 2 pinch clamps (Figure 2A).
- Place a catch bucket under the funnel to catch drips.
- Add warm (approximately 40 °C) water to the funnel to 5 cm below the rim. Verify that the system is not leaking.
- Line the Baermann holder, a sieve made from 2 plastic rings with 2 layers of nylon tulle netting secured between them, with 3 overlapping pieces of lab tissue. Add the fecal-charcoal mixture to the Baermann holder (Figure 2B,C).
- Place the Baermann holder with the fecal-charcoal mixture in the funnel. Fold the tissues around the fecal-charcoal mix and add enough water to submerge most of the fecal-charcoal. Do not fill above 2 cm from the rim of the funnel (Figure 2D,E).
- Top the funnel with a 15 cm plastic Petri dish lid to contain the odor. Label the funnel as needed (Figure 2F).
- Wait 30 min to 1 h to collect the worms from the Baermann apparatus.
- Hold a 50 mL centrifuge tube under the rubber tubing at the bottom of the funnel. Carefully open the clamps at the bottom to dispense 30-40 mL of water containing worms into the 50 mL tube.
- Transfer 15 mL of the Baermann water containing the worms to a 15 mL centrifuge tube. Spin the 15 mL centrifuge tube for 1 min at ~750 × g (slow). Alternatively, allow the worms to gravity settle for 10-15 min.
- Remove the supernatant to ~2 mL and discard the supernatant into a waste liquid container with iodine to kill any worms.
- Add more Baermann water to the 15 mL collection tube and repeat the spin. Remove the supernatant to ~2 mL and discard as in step 4.11.
- Repeat steps 4.11 and 4.12 until all the worms are collected in the 15 mL centrifuge tube. After the final spin, remove as much water as possible.
- Inspect the pellet of worms (40-100 µL) at the bottom of the tube. If no worms are visible, wait for another 1-2 h and try collecting more worms from the Baermann apparatus.
- Transfer the worms in as little water as possible to a 6 cm 2% NGM plate with a lawn of E. coli HB101. Use this plate as the source plate for the microinjection.
- Discard the fecal-charcoal mix by treating it with diluted iodine (a 50% dilution of Lugol's iodine in water), wrapping it in plastic film to catch drips, and placing it in a biohazard waste container.
- Add 10 mL of diluted iodine to the catch bucket and drain the excess water from the Baermann into it.
- Wash the reusable components (the funnel, the catch bucket, the plastic holder with tulle, the plastic lid, and the clamps) with 10% bleach and rinse thoroughly.
5. Pulling and loading microinjection needles: just before injection
- Prepare microinjection needles by pulling glass capillary tubes using a needle puller.
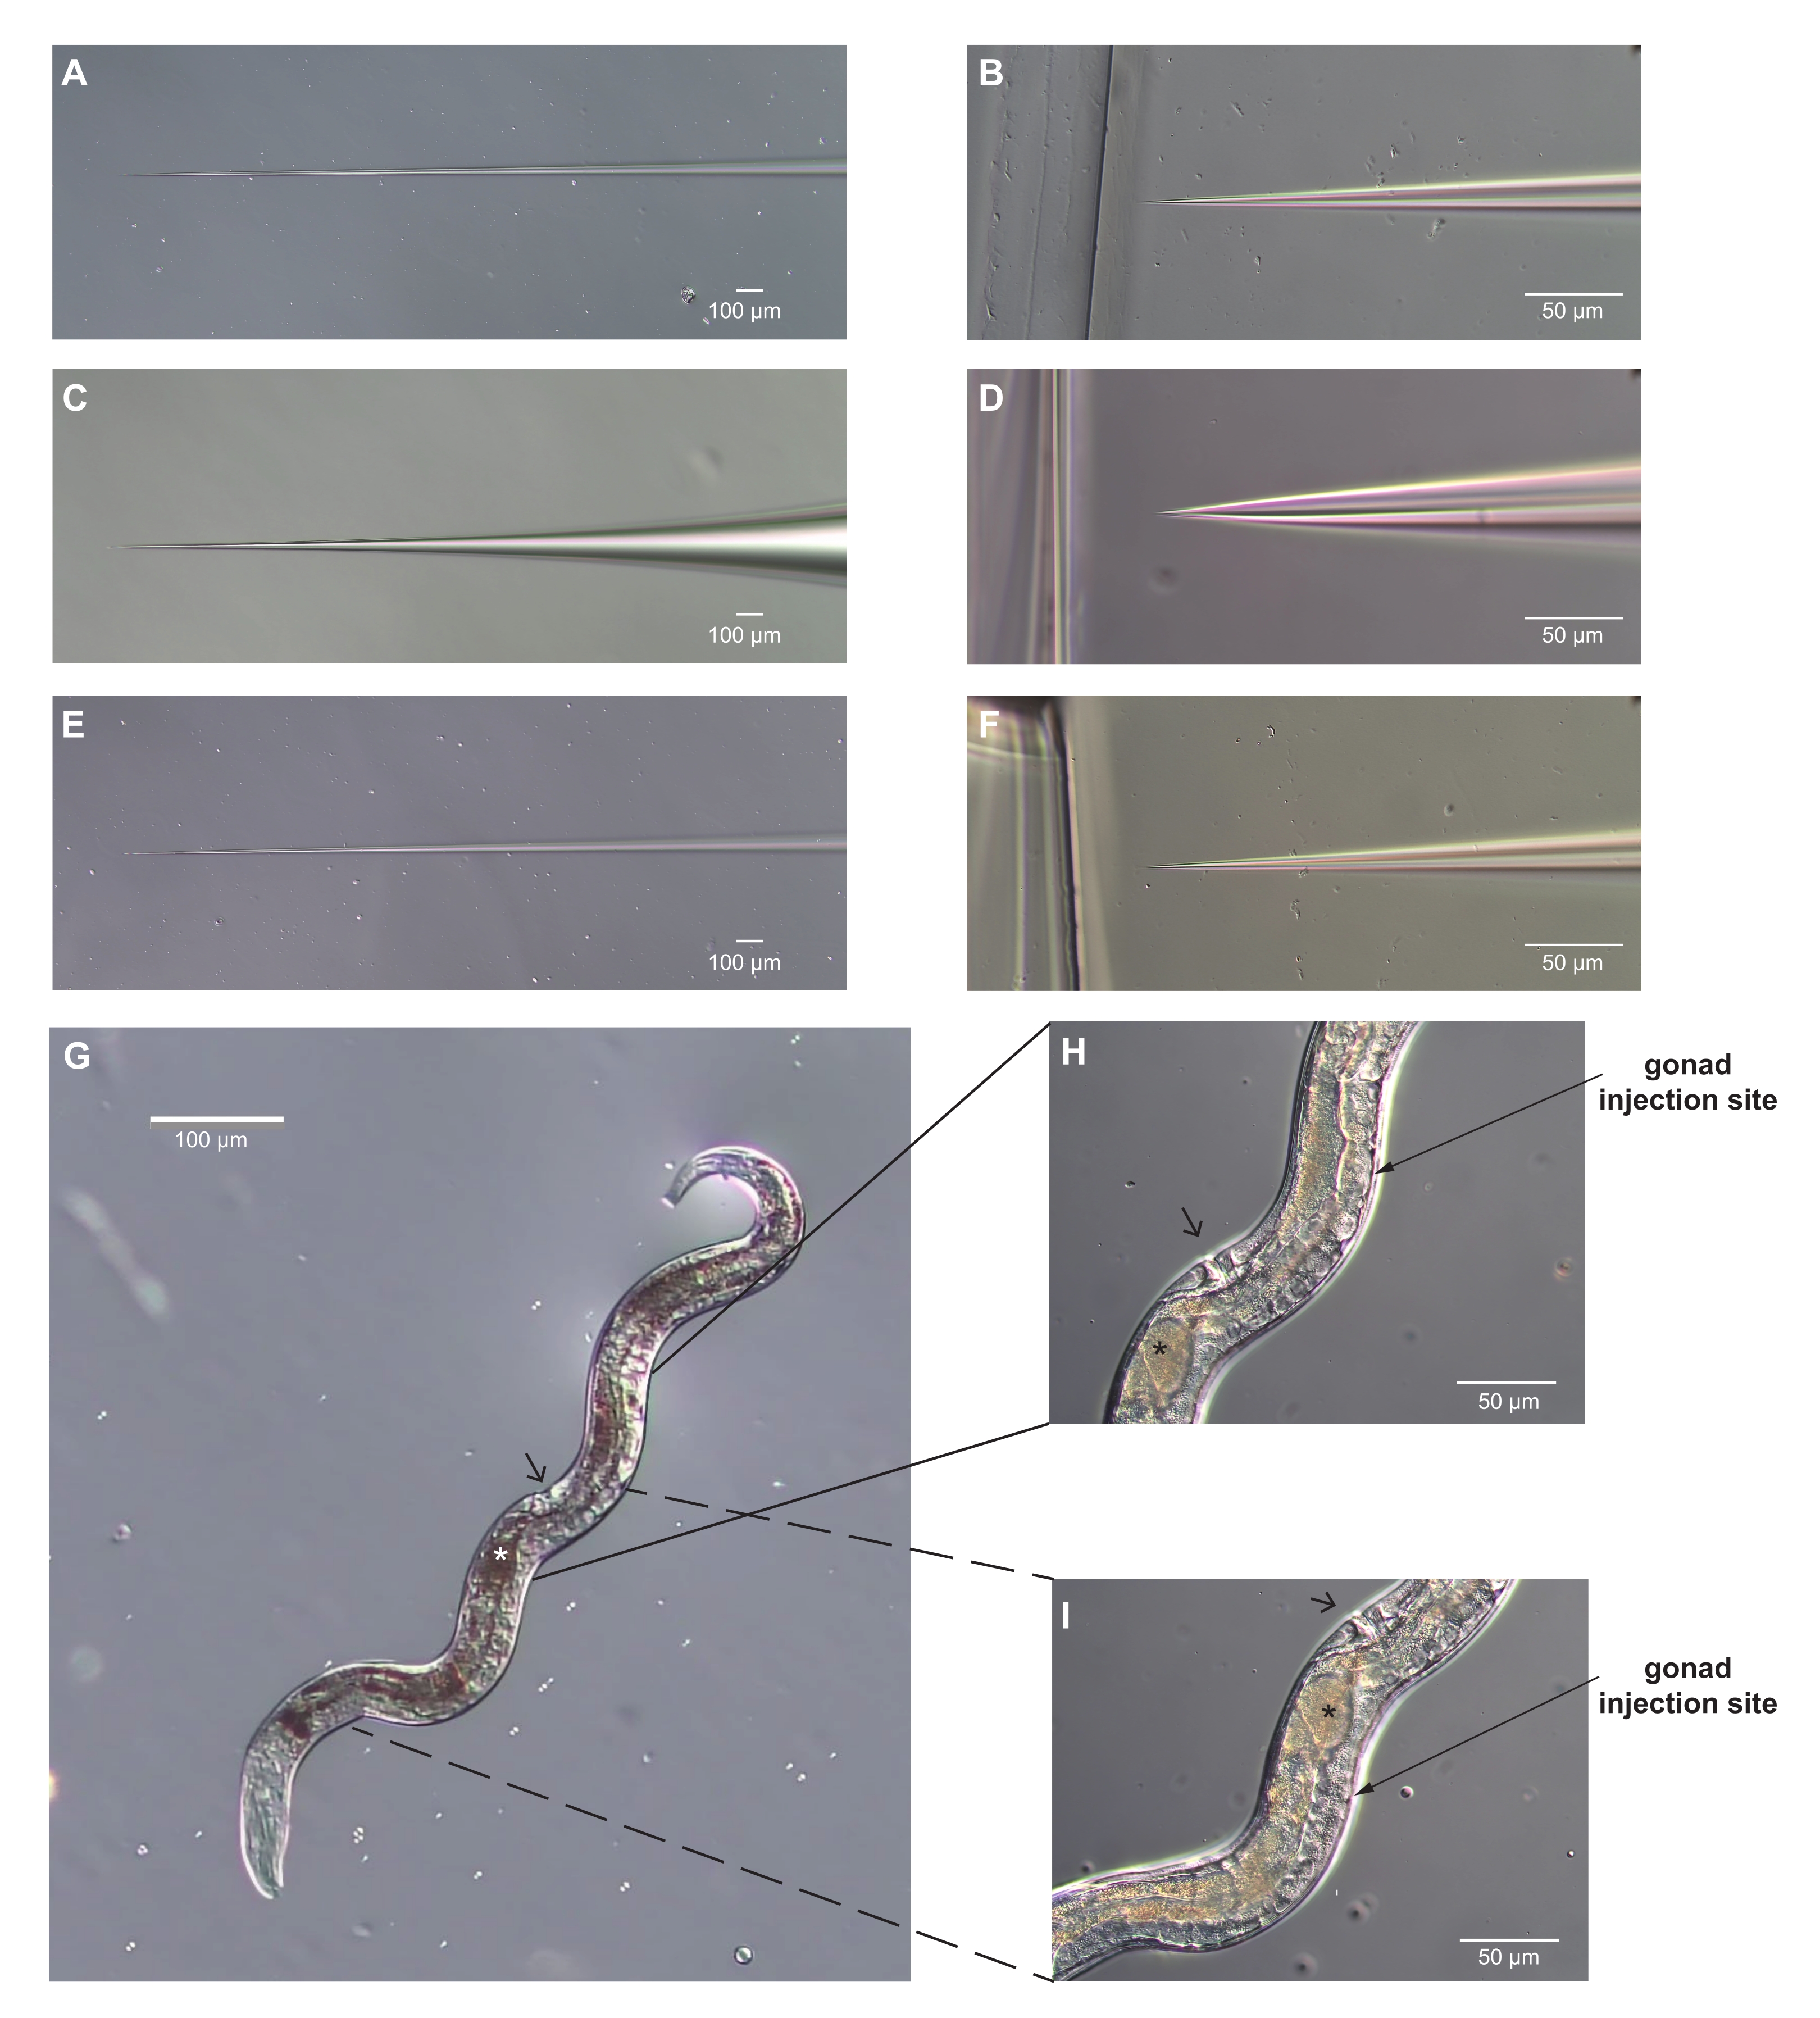
NOTE: Example settings for a commercial needle puller equipped with a 3 mm platinum/iridium filament are Heat = 810-820, Pull = 800-820, micrometer = 2.5. - View the tips under a dissecting microscope. If the needles have the desired shape (Figure 3A-F), pull 4-6 needles (2-3 capillary tubes). To achieve the proper needle shape, change the settings as needed: adjust the Heat or Pull settings by 10 and pull new needles until the shape of the taper and shaft are more appropriate.

Figure 3: Microinjection needles and a Strongyloides stercoralis adult female with optimal sites for microinjection identified. (A-F) Images of microinjection needles. (A-B) The shaft taper (A) and the tip (B) of a needle that is correctly shaped for microinjection. The tip is sharp enough to pierce the cuticle and narrow enough not to cause excessive damage. (C-D) The shaft taper (C) and the tip (D) of a microinjection needle that is incorrectly shaped for microinjecting. The tip is too blunt and wide, and will cause excessive damage to the worm. (E-F) The shaft taper (E) and the tip (F) of a needle that is likely to be too long and slender to work for microinjection. The tip in F is very similar to the tip in D. However, the shaft is narrower and too flexible to effectively pierce the cuticle. In addition, very slender needles clog easily. (G) An image of the whole worm correctly positioned for microinjection, assuming the needle is coming in from the right. Anterior is down and to the left; the vulva is indicated by the arrowhead. The gonad is visible along the right side of the female. This female has only one egg in her uterus (indicated by the asterisk). (H, I) Magnified views of the microinjection sites. The angle of the arrow approximates the angle of the injection needle. The vulva can be used as a landmark; it is on the opposite side of the worm from the arms of the gonad. The arms of the gonad curve around the intestine, and the ends with the dividing nuclei are opposite the vulva. (H) The posterior arm of the gonad; (I) the anterior arm. Either or both arms can be injected. For H, I, conventions are as in G. Scale bars = 50 µm (B, D, F, H, I); 100 µm (A, C, E, G). Please click here to view a larger version of this figure.
- Store the pulled needles in a 15 cm plastic Petri dish with a piece of rolled tape to secure the needles and to avoid dust accumulation on the tips.
- Place a 0.7 µL drop of the microinjection mix on the open end of the shaft. Hang the needle perpendicular to a shelf using a rolled piece of tape to fill the tapered shaft with the mix within 10 min. Prepare 2 needles at a time in case the first does not work.
6. Preparing the microscope and breaking the needle
NOTE: Microinjection uses an inverted microscope with 5x and 40x objectives equipped with a microinjector setup to control the movement of the needle. The inverted microscope should be placed on a heavy table or anti-vibration air table to reduce vibrational noise. The microinjector needle holder is connected to nitrogen gas that applies the pressure needed to deliver the microinjection mix. A smaller dissecting microscope nearby is used to transfer the worms.
- Set the gas tank pressure to ~40-60 psi for breaking the needle and to ~30-50 psi for microinjecting, depending on liquid flow.
- On the dissecting microscope, cover the shard of glass on the microinjection pad coverslip with halocarbon oil using a standard platinum worm pick.
- Place the microinjection pad coverslip on the microinjection scope and locate the shard of glass covered in oil. Align the glass shard such that an edge is perpendicular to the direction of the needle to serve as the surface used to break the needle.
- Verify that the needle has no bubbles or debris in the tapered shaft using the dissecting microscope. Then, secure the needle 1-1.5 cm into the pressurized holder.
- Position the tip of the needle in the center of the microscope field of view by eye. Then under low magnification, position the tip of the needle in the field of view, perpendicular to the side of the glass shard.
- Switch to high power and align the tip of the needle with the edge of the glass, near but not touching it.
NOTE: When pulled, the needles are fused closed. - To break the tip of the needle to allow liquid flow, gently tap it on the side of the piece of glass while applying continuous pressure from the gas (Supplemental Figure S1). Once the liquid begins to flow, check the shape of the tip and ensure that it is sharp with easily flowing liquid.
NOTE: If the liquid is flowing too fast or the end is too blunt, the worms will be damaged during microinjection (Video 1 and Figure 3A-F). - When the liquid is flowing well from the needle, move the microinjection slide to the dissecting scope and place drops of 1-2 µL halocarbon oil on the agar pad for placement of the worms.
- Transfer 20-30 young adult Strongyloides to a 2% NGM plate without bacteria for at least 5 min to remove excess surface bacteria and select single worms for microinjection. Add more worms to the NGM plate as needed while injecting.
7. Microinjecting Strongyloides
- Use a small amount of halocarbon oil on a worm pick to select a Strongyloides young adult female with 1-4 eggs in her gonad from the 2% NGM plate without bacteria.
- Transfer the worm into a tiny drop of oil on the agar pad. Using the worm pick, gently position the worm so it is not coiled and the gonad is visible and easy to access. Note the direction of the gonad (Figure 3G).
- Position the worm in the microinjection microscope field of view. Ensure the gonad is on the same side as the needle and positioned so that the needle will contact the gonad at a slight angle (Figure 3H,I).
- Bring the tip of the needle to the side of the worm in the same focal plane. Aim for the gonad arm near the middle of the worm. Use the microinjector to insert the needle gently into the gonad (Video 2).
- Immediately apply pressure to the needle to gently fill the entire gonad arm with the DNA solution. Determine by eye when enough fluid has been injected (Video 2).
NOTE: It may take up to 2 s to fill the gonad. - Remove the needle and check to determine that the wound closes.
NOTE: The worm is too damaged to produce progeny if the gonad protrudes through the body wall (Supplemental Video S1). - Repeat with the other arm of the gonad if it is visible.
- When finished injecting, quickly verify the needle is not clogged by applying pressure with the tip of the needle on the agar pad. Transfer the slide with the injected worm to the dissecting microscope.
- To recover the injected worm, first place a few drops of BU on the worm to float it off the agar pad.
- Collect a small amount of HB101 bacteria on a worm pick. Touch the worm with the adherent bacteria on the worm pick to remove it from the liquid.
- Gently transfer the worm to the recovery plate, a 2% NGM plate containing an HB101 lawn.
NOTE: The worm should start crawling within minutes. - After a few females have been injected, add some uninjected males from the source plate.
NOTE: A minimum of one male for five females is a good baseline; an excess of males is preferred. - Repeat all steps until enough females have been injected for the experiment.
- Leave the adults on the recovery plate for at least 1 h post-injection to allow the worms to recover and mate.
8. Recovery and culturing of injected Strongyloides
- Collect feces overnight from uninfected host animals, using the same protocol as for infected animals.
- Mix the uninfested feces with a small amount of charcoal (feces to charcoal ratio of approximately 2 to 1 for these plates).
- Pour a small amount of the fecal-charcoal mix into a 6 cm Petri dish lined with damp filter paper. Ensure that the mix does not touch the lid of the dish.
- Flood the recovery plate with BU. Using a pipet set at 3 µL, transfer the worms to the feces in the fecal-charcoal plate. Place the worms directly on the feces, not on the charcoal.
- Verify that the adults are on the fecal-charcoal plate using a dissecting scope.
- To culture the worms, place the plate in a humidified chamber, i.e., a plastic box with a tight-fitting lid lined with damp paper towels.
NOTE: After 2 days, there will be a mix of larval stages. After 5 days, most of the larvae will have developed into iL3s; a few younger larvae will remain. After 7 days, all the larvae should be iL3s.
9. Collecting and screening F 1 larvae to recover transgenics/knockouts
- Using a Baermann setup, collect the larvae from the post-injection small-scale fecal-charcoal culturing plates. To get as many larvae as possible, wait for at least 2 h before recovering the worms from the Baermann apparatus.
- Concentrate the larvae in a 15 mL centrifuge tube as in steps 4.10-4.14 and transfer the larvae to a small watch glass with BU.
- If the larvae will be used for behavioral experiments, use 2% NGM plates with a thick lawn of HB101 for screening.
- Transfer 20-30 larvae to the HB101 lawn.
NOTE: The bacteria will slow the movement of the larvae. - Under a fluorescence dissecting microscope, identify the larvae expressing the transgene of interest. Use a worm pick to select the transgenic larvae and move them to a small watch glass with BU.
- Use a new HB101 plate to screen another small batch of larvae. When enough larvae have been collected for experimental use, treat the HB101 plates and the excess worms with diluted iodine (50% Lugol's iodine diluted in water) and discard them as biohazard waste. Alternatively, kill the excess worms using concentrated kennel cleaner containing alkyl benzyl ammonium chlorides.
- Use the worms immediately or leave them in a shallow watch glass in a small amount of BU overnight.
NOTE: Worms may become hypoxic if the liquid is too deep. It is possible that leaving larvae in BU overnight may affect certain behaviors; therefore, use larvae for behavioral experiments within 6 h.
- Transfer 20-30 larvae to the HB101 lawn.
- If the larvae will be used for microscopy and not behavioral assays, then immobilize the worms by nicotine paralysis reversibly for screening.
- Using a razor blade, score a grid onto the plastic bottom of a 10 cm chemotaxis plate12 to make it easier to keep track of the location of the worms on the plate.
- Drop ~3 µL of larvae in BU into a square on the grid. Fill as many squares as needed. Do not use the ones near the edges of the plate, as the larvae may crawl to the sides of the plate.
- Add 15-20 µL drops of 1% nicotine in water to the worm drops.
NOTE: After 4 min, the worms will be paralyzed. - Screen the worms using a fluorescence dissecting microscope.
- Use a worm pick to transfer the transgenic larvae into a small watch glass with 1-2 mL of BU.
NOTE: The larvae will be paralyzed for several hours and can be easily mounted on microscope slides for microscopy. If left overnight in BU, the iL3s will recover and may be used for some assays or mammalian host infection. However, nicotine paralysis and the overnight incubation in BU may affect certain behaviors.
Wyniki
If the experiment was successful, the F1 larvae will express the transgene and/or mutant phenotype of interest (Figure 4). However, transformation rates are highly variable and depend on the constructs, the health of the worms, the post-injection culturing conditions, and the skill of the experimenter. In general, a successful experiment will yield >15 F1 larvae per injected female and a transformation rate of >3% for fluorescent markers. If the total number of ...
Dyskusje
This microinjection protocol details the methods for introducing constructs for transgenesis and CRISPR/Cas9-mediated mutagenesis into S. stercoralis and S. ratti. For both S. stercoralis and S. ratti, post-injection survival and the rate of transgenesis or mutagenesis are subject to several variables that can be fine-tuned.
The first critical consideration for successful transgenesis is how plasmid transgenes are constructed. Previous st...
Ujawnienia
The authors declare no conflicts of interest.
Podziękowania
pPV540 and pPV402 were kind gifts from Dr. James Lok at the University of Pennsylvania. We thank Astra Bryant for helpful comments on the manuscript. This work was funded by a Burroughs-Wellcome Fund Investigators in the Pathogenesis of Disease Award, a Howard Hughes Medical Institute Faculty Scholar Award, and National Institutes of Health R01 DC017959 (E.A.H.).
Materiały
| Name | Company | Catalog Number | Comments |
| (−)-Nicotine, ≥99% (GC), liquid | Sigma-Aldrich | N3876-5ML | nicotine for paralyzing worms |
| 3" iron C-clamp, 3" x 2" (capacity x depth) | VWR | 470121-790 | C-clamp to secure setup to bench top |
| Agarose LE | Phenix | RBA-500 | agarose for slides |
| Bone char, 4 lb pail, 10 x 28 mesh | Ebonex | n/a | charcoal for fecal-charcoal cultures |
| Bone char, granules, 10 x 28 mesh | Reade | bonechar10x28 | charcoal for fecal-cultures (alternative to the above) |
| Coarse micromanipulator | Narishige | MMN-1 | coarse micromanipulator |
| Corning Costar Spin-X centrifuge tube filters | Fisher | 07-200-385 | microfilter column |
| Cover glass, 48 x 60 mm, No. 1 thickness | Brain Research Lab | 4860-1 | coverslips (48 x 60 mm) |
| Deep Petri dishes, heavy version with 6 vents, 100 mm diameter | VWR | 82050-918 | 10 cm Petri dishes (for fecal-charcoal cultures) |
| Eisco retort base w/ rod | Fisher | 12-000-101 | stand for Baermann apparatus |
| Eppendorf FemtoJet microinjector microloader tips | VWR | 89009-310 | for filling microinjection needles |
| Fisherbrand absorbent underpads | Fisher | 14-206-62 | bench paper (for prepping) |
| Fisherbrand Cast-Iron Rings | Fisher | 14-050CQ | Baermann o-ring |
| Fisherbrand tri-cornered polypropylene beakers | Fisher | 14-955-111F | Plastic beaker (for mixing) |
| Fisherbrand tri-cornered polypropylene beakers | Fisher | 14-955-111F | Plastic beaker (for catch bucket/water bucket) |
| Fisherbrand tri-cornered polypropylene beakers | Fisher | 14-955-111F | Plastic beaker (x2) (to make holder) |
| Gorilla epoxie in syringe | McMaster-Carr | 7541A51 | glue (to attach tubing) |
| Halocarbon oil 700 | Sigma-Aldrich | H8898-50ML | halocarbon oil |
| High-temperature silicone rubber tubing for food and beverage, 1/2" ID, 5/8" OD | McMaster-Carr | 3038K24 | tubing (for funnel) |
| KIMAX funnels, long stem, 60° Angle, Kimble Chase | VWR | 89001-414 | Baermann funnel |
| Kimberly-Clark Professional Kimtech Science benchtop protectors | Fisher | 15-235-101 | bench paper (for prepping) |
| Leica stereomicroscope with fluorescence | Leica | M165 FC | GFP stereomicroscope for identifying and sorting transgenic worms |
| microINJECTOR brass straight arm needle-holder | Tritech | MINJ-4 | microinjection needle holder |
| microINJECTOR system | Tritech | MINJ-1 | microinjection system |
| Mongolian Gerbils | Charles River Laboratories | 213-Mongolian Gerbil | gerbils for maintenance of S. stercoralis, male 4-6 weeks |
| Nasco Whirl-Pak easy-to-close bags, 18 oz | VWR | 11216-776 | Whirl-Pak sample bags |
| Nylon tulle (mesh) | Jo-Ann Fabrics | zprd_14061949a | nylon mesh for Baermann holder |
| Platinum wire, 36 Gauge, per inch | Thomas Scientific | 1233S72 | platinum/iridium wire for worm picks |
| Puritan tongue depressors, 152 mm (L) x 17.5 mm (W) | VWR | 62505-007 | wood sticks (for mixing samples) |
| QIAprep Spin Miniprep Kit (250) | QIAGEN | 27106 | QIAGEN miniprep kit |
| Rats-Long Evans | Envigo | 140 HsdBlu:LE Long Evans | rats for maintenance of S. ratti, female 4-6 weeks |
| Rats-Sprague Dawley | Envigo | 002 Hsd:Sprague Dawley SD | rats for maintenance of S. ratti, female 4-6 weeks |
| Really Useful Boxes translucent storage boxes with lids, 1.6 L capacity, 7-5/8" x 5-5/16" x 4-5/16" | Office Depot | 452369 | plastic boxes for humidified chamber |
| Shepherd techboard, 8 x 16.5 inches | Newco | 999589 | techboard |
| Stainless steel raised wire floor | Ancare | R20SSRWF | wire cage bottoms |
| StalkMarket compostable cutlery spoons, 6", white, pack of 1,000 | Office Depot | 9587303 | spoons |
| Stender dish, stacking type, 37 x 25 mm | Carolina (Science) | 741012 | watch glasses (small, round) |
| Stereomicroscope | Motic | K-400 LED | dissecting prep scope |
| Storage tote, color clear/white, outside height 4-7/8 in, outside length 13-5/8 in, Sterilite | Grainger | 53GN16 | plastic boxes for humidified chamber |
| Sutter P-30 micropipette puller | Sutter | P-30/P | needle puller with platinum/iridium filament |
| Syracuse watch glasses | Fisher | S34826 | watch glasses (large, round) |
| Thermo Scientific Castaloy fixed-angle clamps | Fisher | 05-769-2Q | funnel clamps (2x) |
| Three-axis hanging joystick oil hydrolic micromanipulator | Narishige | MM0-4 | fine micromanipulator |
| United Mohr pinchcock clamps | Fisher | S99422 | Pinch clamps (2x) |
| Vented, sharp-edge Petri dishes (60 mm diameter) | Tritech Research | T3308P | 6 cm Petri dishes (for small-scale fecal-charcoal cultures) |
| VWR light-duty tissue wipers | VWR | 82003-820 | lining for Baermann holder |
| watch glass, square, 1-5/8 in | Carolina (Science) | 742300 | watch glasses (small, square) |
| Whatman qualitative grade plain circles, grade 1, 5.5 cm diameter | Fisher | 09-805B | filter paper (for 6 cm Petri dishes) |
| Whatman qualitative grade plain circles, grade 1, 9 cm diameter | Fisher | 09-805D | filter paper (for 10 cm Petri dishes) |
| World Precision Instrument borosilicate glass capillary, 1.2 mm x 4 in | Fisher | 50-821-813 | glass capillaries for microinjection needles |
| X-Acto Knives, No. 1 Knife With No. 11 Blade | Office Depot | 238816 | X-Acto knives without blades to hold worm picks |
| Zeiss AxioObserver A1 | Zeiss | n/a | inverted microscope |
Odniesienia
- Krolewiecki, A. J., et al. A public health response against Strongyloides stercoralis: time to look at soil-transmitted helminthiasis in full. PLoS Neglected Tropical Diseases. 7 (5), 2165 (2013).
- Buonfrate, D., et al. The global prevalence of Strongyloides stercoralis infection. Pathogens. 9 (6), 468 (2020).
- Castelletto, M. L., Gang, S. S., Hallem, E. A. Recent advances in functional genomics for parasitic nematodes of mammals. Journal of Experimental Biology. 223, 206482 (2020).
- Evans, T. C., et al. Transformation and microinjection. WormBook. , (2006).
- Lok, J. B., Unnasch, T. R., et al. Transgenesis in animal parasitic nematodes: Strongyloides spp. and Brugia spp. WormBook. , (2013).
- Shao, H. G., Li, X. S., Lok, J. B. Heritable genetic transformation of Strongyloides stercoralis by microinjection of plasmid DNA constructs into the male germline. International Journal for Parasitology. 47 (9), 511-515 (2017).
- Schafer, T. W., Skopic, A. Parasites of the small intestine. Current Gastroenterology Reports. 8 (4), 312-320 (2006).
- Stiernagle, T. Maintenance of C. elegans. The C. elegans Research Community, WormBook. , (2006).
- Gang, S. S., et al. Targeted mutagenesis in a human-parasitic nematode. PLoS Pathogens. 13 (10), 1006675 (2017).
- Lok, J. B. Strongyloides stercoralis: a model for translational research on parasitic nematode biology. The C. elegans Research Community, WormBook. , (2007).
- Hawdon, J. M., Schad, G. A. Long-term storage of hookworm infective larvae in buffered saline solution maintains larval responsiveness to host signals. Proceedings of the Helminthological Society of Washington (USA). 58 (1), 140-142 (1991).
- Bargmann, C. I., Hartwieg, E., Horvitz, H. R. Odorant-selective genes and neurons mediate olfaction in C. elegans. Cell. 74 (3), 515-527 (1993).
- Junio, A. B., et al. Strongyloides stercoralis: cell- and tissue-specific transgene expression and co-transformation with vector constructs incorporating a common multifunctional 3' UTR. Experimental Parasitology. 118 (2), 253-265 (2008).
- Gang, S. S., et al. Chemosensory mechanisms of host seeking and infectivity in skin-penetrating nematodes. Proceedings of the National Academy of Sciences of the United States of America. 117 (30), 17913-17923 (2020).
- Bryant, A. S., et al. A critical role for thermosensation in host seeking by skin-penetrating nematodes. Current Biology. 28 (14), 2338-2347 (2018).
- Lok, J. B. Nucleic acid transfection and transgenesis in parasitic nematodes. Parasitology. 139 (5), 574-588 (2012).
- Shao, H., et al. Transposon-mediated chromosomal integration of transgenes in the parasitic nematode Strongyloides ratti and establishment of stable transgenic lines. PLoS Pathogens. 8 (8), 1002871 (2012).
- Lok, J. piggyBac: a vehicle for integrative DNA transformation of parasitic nematodes. Mobile Genetic Elements. 3 (2), 24417 (2013).
- Li, X., et al. Successful transgenesis of the parasitic nematode Strongyloides stercoralis requires endogenous non-coding control elements. International Journal for Parasitology. 36 (6), 671-679 (2006).
- Bryant, A. S., Hallem, E. A. The Wild Worm Codon Adapter: a web tool for automated codon adaptation of transgenes for expression in non-Caenorhabditis nematodes. G3. 3 (7), (2021).
- Crane, M., et al. In vivo measurements reveal a single 5'-intron is sufficient to increase protein expression level in Caenorhabditis elegans. Scientific Reports. 9 (1), 9192 (2019).
- Han, Z., et al. Improving transgenesis efficiency and CRISPR-associated tools through codon optimization and native intron addition in Pristionchus nematodes. Genetics. 216 (4), 947-956 (2020).
- Adams, S., Pathak, P., Shao, H., Lok, J. B., Pires-daSilva, A. Liposome-based transfection enhances RNAi and CRISPR-mediated mutagenesis in non-model nematode systems. Scientific Reports. 9 (1), 483 (2019).
- Dulovic, A., Puller, V., Streit, A. Optimizing culture conditions for free-living stages of the nematode parasite Strongyloides ratti. Experimental Parasitology. 168, 25-30 (2016).
- Harvey, S. C., Gemmill, A. W., Read, A. F., Viney, M. E. The control of morph development in the parasitic nematode Strongyloides ratti. Proceedings of the Royal Society B: Biological Sciences. 267 (1457), 2057-2063 (2000).
- Kim, A., Pyykko, I. Size matters: versatile use of PiggyBac transposons as a genetic manipulation tool. Molecular and Cellular Biochemistry. 354 (1-2), 301-309 (2011).
- Lok, J. B., Shao, H., Massey, H. C., Li, X. Transgenesis in Strongyloides and related parasitic nematodes: historical perspectives, current functional genomic applications and progress towards gene disruption and editing. Parasitology. 144 (3), 327-342 (2017).
- Farboud, B., Meyer, B. J. Dramatic enhancement of genome editing by CRISPR/Cas9 through improved guide RNA design. Genetics. 199 (4), 959-971 (2015).
- Cheong, M. C., et al. Identification of a nuclear receptor/coactivator developmental signaling pathway in the nematode parasite Strongyloides stercoralis. Proceedings of the National Academy of Sciences of the United States of America. 118 (8), 2021864118 (2021).
- Nolan, T. J., Megyeri, Z., Bhopale, V. M., Schad, G. A. Strongyloides stercoralis: the first rodent model for uncomplicated and hyperinfective strongyloidiasis, the Mongolian gerbil (Meriones unguiculatus). Journal of Infectious Diseases. 168 (6), 1479-1484 (1993).
- Li, X., et al. Transgenesis in the parasitic nematode Strongyloides ratti. Molecular and Biochemical Parasitology. 179 (2), 114-119 (2011).
- Viney, M. E. Exploiting the life cycle of Strongyloides ratti. Parasitology Today. 15 (6), 231-235 (1999).
- Stoltzfus, J. D., Massey, H. C., Nolan, T. J., Griffith, S. D., Lok, J. B. Strongyloides stercoralis age-1: a potential regulator of infective larval development in a parasitic nematode. PLoS ONE. 7 (6), 38587 (2012).
- Castelletto, M. L., Massey, H. C., Lok, J. B. Morphogenesis of Strongyloides stercoralis infective larvae requires the DAF-16 ortholog FKTF-1. PLoS Pathogens. 5 (4), 1000370 (2009).
- Douglas, B., et al. Transgenic expression of a T cell epitope in Strongyloides ratti reveals that helminth-specific CD4+ T cells constitute both Th2 and Treg populations. PLoS Pathogens. 17 (7), 1009709 (2021).
Przedruki i uprawnienia
Zapytaj o uprawnienia na użycie tekstu lub obrazów z tego artykułu JoVE
Zapytaj o uprawnieniaThis article has been published
Video Coming Soon
Copyright © 2025 MyJoVE Corporation. Wszelkie prawa zastrzeżone