
A subscription to JoVE is required to view this content. Sign in or start your free trial.
Method Article
Performing Human Skeletal Muscle Xenografts in Immunodeficient Mice
In This Article
Summary
Complex human diseases can be challenging to model in traditional laboratory model systems. Here, we describe a surgical approach to model human muscle disease through the transplantation of human skeletal muscle biopsies into immunodeficient mice.
Abstract
Treatment effects observed in animal studies often fail to be recapitulated in clinical trials. While this problem is multifaceted, one reason for this failure is the use of inadequate laboratory models. It is challenging to model complex human diseases in traditional laboratory organisms, but this issue can be circumvented through the study of human xenografts. The surgical method we describe here allows for the creation of human skeletal muscle xenografts, which can be used to model muscle disease and to carry out preclinical therapeutic testing. Under an Institutional Review Board (IRB)-approved protocol, skeletal muscle specimens are acquired from patients and then transplanted into NOD-Rag1null IL2rγnull (NRG) host mice. These mice are ideal hosts for transplantation studies due to their inability to make mature lymphocytes and are thus unable to develop cell-mediated and humoral adaptive immune responses. Host mice are anaesthetized with isoflurane, and the mouse tibialis anterior and extensor digitorum longus muscles are removed. A piece of human muscle is then placed in the empty tibial compartment and sutured to the proximal and distal tendons of the peroneus longus muscle. The xenografted muscle is spontaneously vascularized and innervated by the mouse host, resulting in robustly regenerated human muscle that can serve as a model for preclinical studies.
Introduction
It has been reported that only 13.8% of all drug development programs undergoing clinical trials are successful and lead to approved therapies1. While this success rate is higher than the 10.4% previously reported2, there is still significant room for improvement. One approach to increase the success rate of clinical trials is to improve laboratory models used in preclinical research. The Food and Drug Administration (FDA) requires animal studies to show treatment efficacy and assess toxicity prior to Phase 1 clinical trials. However, there is often limited concordance in treatment outcomes between animal studies and clinical trials3. In addition, the need for preclinical animal studies can be an insurmountable barrier for therapeutic development in diseases that lack an accepted animal model, which is often the case for rare or sporadic diseases.
One way to model human disease is by transplanting human tissue into immunodeficient mice to generate xenografts. There are three key advantages to xenograft models: First, they can recapitulate the complex genetic and epigenetic abnormalities that exist in human disease that may never be reproducible in other animal models. Second, xenografts can be used to model rare or sporadic diseases if patient samples are available. Third, xenografts model the disease within a complete in vivo system. For these reasons, we hypothesize that treatment efficacy results in xenograft models are more likely to translate to trials in patients. Human tumor xenografts have already been successfully utilized to develop treatments for common cancers, including multiple myeloma, as well as personalized therapies for individual patients4,5,6,7.
Recently, xenografts have been used to develop a model of human muscle disease8. In this model, human muscle biopsy specimens are transplanted into the hindlimbs of immunodeficient NRG mice to form xenografts. The transplanted human myofibers die, but human muscle stem cells present in the xenograft subsequently expand and differentiate into new human myofibers which repopulate the engrafted human basal lamina. Therefore, the regenerated myofibers in these xenografts are entirely human and are spontaneously revascularized and innervated by the mouse host. Importantly, fascioscapulohumeral muscular dystrophy (FSHD) patient muscle tissue transplanted into mice recapitulates key features of the human disease, namely expression of the DUX4 transcription factor8. FSHD is caused by overexpression of DUX4, which is epigenetically silenced in normal muscle tissue9,10. In the FSHD xenograft model, treatment with a DUX4-specific morpholino has been shown to successfully repress DUX4 expression and function, and may be a potential therapeutic option for FSHD patients11. These results demonstrate that human muscle xenografts are a new approach to model human muscle disease and test potential therapies in mice. Here, we describe in detail the surgical method for creating human skeletal muscle xenografts in immunodeficient mice.
Protocol
All use of research specimens from human subjects was approved by the Johns Hopkins Institutional Review Board (IRB) to protect the rights and welfare of the participants. All animal experiments were approved by the Johns Hopkins University Institutional Animal Care and Use Committee (IACUC) in accordance with the National Institutes of Health (NIH) Guide for the Care and Use of Laboratory Animals. Male NOD-Rag1null IL2rγnull (NRG) host mice (8-12 weeks old) are used to carry out xenograft experiments. These mice are housed in ventilated racks and are given HEPA-filtered, tempered, and humidified air as well as reverse osmosis filtered hyperchlorinated water. Mice are provided water and an irradiated antibiotic diet (Table of Materials) ad libitum, and the facility provides 14 h of light to 10 h of dark as controlled by central timer.
1. Equipment Preparation
- Acquire NOD-Rag1null IL2r γnull (NRG) mice, 8-12 weeks of age.
- Autoclave surgical equipment: scissors, forceps, needle holder, surgical stapler (Table of Materials), wound clips, surgical wipes (Table of Materials), and beaker (Figure 1A).
- Prepare 50 mL of muscle media (20% fetal bovine serum, 2% chick embryo extract, 1% antibiotic/antimycotic in Hams F10 Medium). Keep all chemicals/drugs/solutions used for surgery at room temperature unless stated differently in the protocol.
- Prepare a 1 mL syringe with a 26 G needle that is 3/8 inches long containing 2 mg/mL analgesic (Table of Materials), and place on ice. The analgesic can be diluted to the proper concentration using sterile phosphate buffered saline (PBS).
2. Surgical Preparation
- Obtain a human muscle biopsy under an IRB-approved protocol from patients whose muscles display strength > 4-/5 on the MRC (Medical Research Council) scale12. Place the research specimen in a 100 mm x 15 mm Petri dish containing muscle media.
NOTE: The MRC scale is used in clinical practice as an assessment of muscle strength with 0 showing no contraction, 5 showing normal power, and 4 (4- to 4+) showing movement against resistance12. We have found that muscles with mild to moderate weakness (MRC > 4-/5) typically show disease pathology but are not extensively replaced by fatty tissue or fibrosis, both of which impede xenograft regeneration. In the case of autopsy tissue where a recent MRC score is not available, muscle quality can be accessed via gross observation. Muscle biopsies that are pale pink in appearance or have large areas of fatty tissue are not likely to xenograft successfully. - Remove any remaining fascia or fatty tissue from the specimen with surgical scissors using a stereo microscope and light source to assist visualization.
- Dissect the muscle biopsy into approximately 7 mm x 3 mm x 3 mm pieces with surgical scissors using the stereo microscope and a light source. Ensure fibers are arranged longitudinally within the specimen.
- Place the Petri dish containing dissected muscle on ice. On average, the xenografts are kept in media for 4 hours while surgeries are being performed. However, biopsies have been stored in media for 24 h prior to xenografting, and this delay did not appear to negatively impact transplantation or regeneration.
- Place synthetic, non-absorbable sutures (Table of Materials) in a 100 mm x 15 mm Petri dish containing 70% ethanol.
- Set up a dual procedure anesthesia circuit: arrange the Mapleson E breathing circuit on the stereo microscope and place the induction chamber in a biosafety cabinet (Figure 1A,B).
- Obtain the weight of the NRG mouse by placing in an autoclaved beaker on a scale, and transfer to the induction chamber. Induce anesthesia under 3% isoflurane. Once the appropriate anesthetic depth is achieved—as assessed by observation of respiratory rate, muscle relaxation, and lack of voluntary movement—reduce the vaporizer setting to 1.5% for the remainder of the surgery.
- Transfer the mouse from the induction chamber to the Mapleson E breathing circuit and apply ophthalmic ointment to eyes.
- Remove hair overlying the tibialis anterior (TA) from ankle to knee with a trimmer, followed by a 1 min treatment with hair removal lotion (Table of Materials) (Figure 2A).
- Disinfect the surgical site by swabbing the leg with povidone-iodine solution. Then wash away the remaining povidone-iodine with 70% ethanol.
- Inject the mouse subcutaneously with analgesic, such as carprofen, (Table of Materials) at a dose of 5 mg/kg.
3. Xenograft Surgery
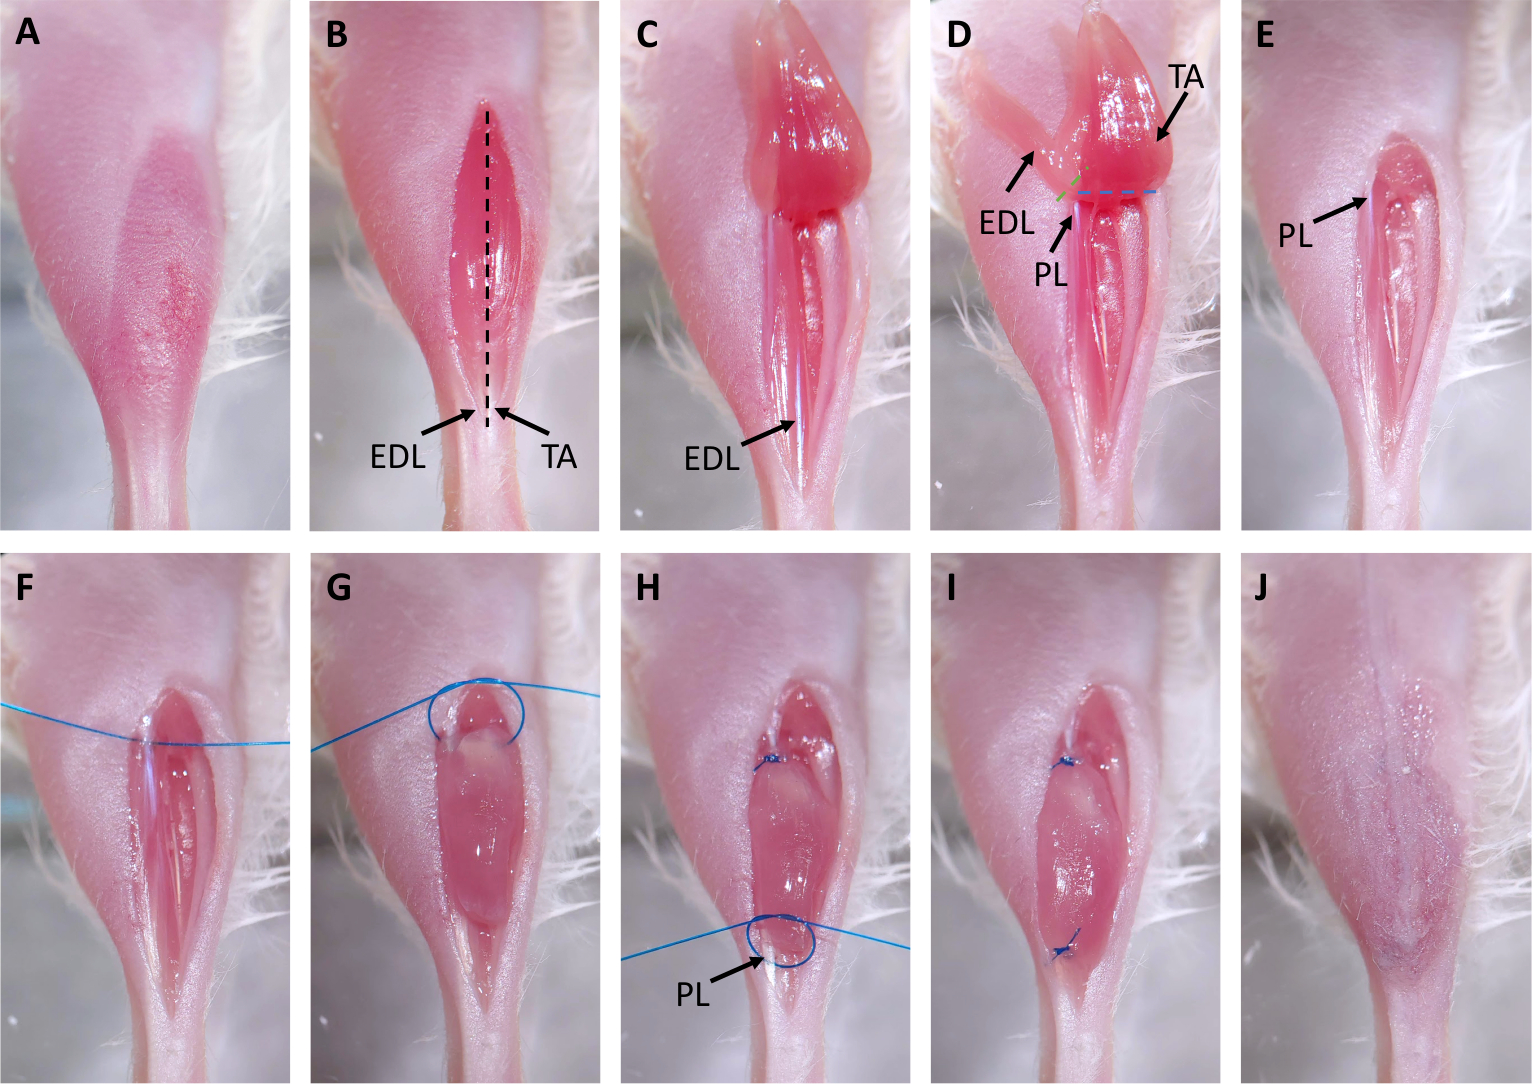
- Tape down the leg and make a straight incision over the tibilalis anterior (TA) muscle with scissors and iris forceps originating at the distal tendons and terminating below the knee (Figure 2B).
- Separate skin from muscle using blunt dissection with surgical scissors.
- Cut through the epimysium of the TA muscle with scissors starting at the tendon and ending at the knee.
NOTE: This is a very superficial cut (less than 0.5 mm; Figure 2B, black dashed line), and the underlying TA should not be damaged in the process as this would make removal more challenging. When performed correctly, the muscle fibers will visibly relax. - Cut the distal tendon of the TA with scissors, grab the tendon with iris forceps, and pull the TA up toward the knee (Figure 2C).
- Cut the distal tendon of the extensor digitorum longus (EDL) with scissors and pull the EDL up toward the knee (Figure 2D). Once the proximal tendon of the peroneus longus (PL) muscle is visible, remove the EDL with scissors (Figure 2D, green dashed line).
- Remove the TA with scissors (Figure 2D, blue dashed line) and use a surgical wipe wetted with PBS and slight pressure to achieve hemostasis (Figure 2E).
- Thread a suture through proximal peroneus longus (PL) tendon and trim, leaving approximately 1.5 inch of thread on either side of the tendon (Figure 2F).
- Perform the first half of a two-hand surgical square knot, but do not tighten: this will form a circle. Place a xenograft in this circle and tighten the loop to secure the xenograft. Complete the other half of the square knot (Figure 2G,H). This will suture the xenograft to the proximal tendon of the PL.
- Thread suture through distal PL tendon and repeat the square knot technique from step 3.8 to tie the xenograft to the distal tendon (Figure 2H,I).
NOTE: The medial tarsal artery and vein can lie close to or on top of the distal tendon of the PL. Do not place sutures through or around these vessels. It is easy to tell if a suture has been improperly placed as vessels will blanch or bleed. If this occurs, remove the suture and place in a different location. - Pull skin over xenografted muscle, seal with surgical glue, and place 2-3 surgical staples over the incision (Figure 2J).
- Place mouse in a clean cage on a heated pad to recover. Monitor mouse until fully conscious and periodically over the next few days for signs of local systemic infection and to ensure the surgical site is not reopened.
NOTE: A single dose of analgesic as described in step 2.11 is typically sufficient for pain relief. However, the mice should also be monitored for persistent pain (e.g. lameness, ruffled coat, hunched posture), and, if necessary, re-dosed with analgesic at 24 h post-operatively.
4. Xenograft Collection
NOTE: Xenografts are typically collected between 4 to 6 months post-surgery. However, collections have been performed up to 12 months post-surgery.
- Place a covered beaker containing 200 mL of 2-methylbutane in a box containing dry ice for a minimum of 30 min before xenograft collection.
- Induce anesthesia under 3% isoflurane in induction chamber. Once the appropriate anesthetic depth is achieved, reduce the vaporizer setting to 1.5% for the remainder of the surgery.
- Transfer the mouse from the induction chamber to the Mapleson E breathing circuit arranged on a stereo microscope.
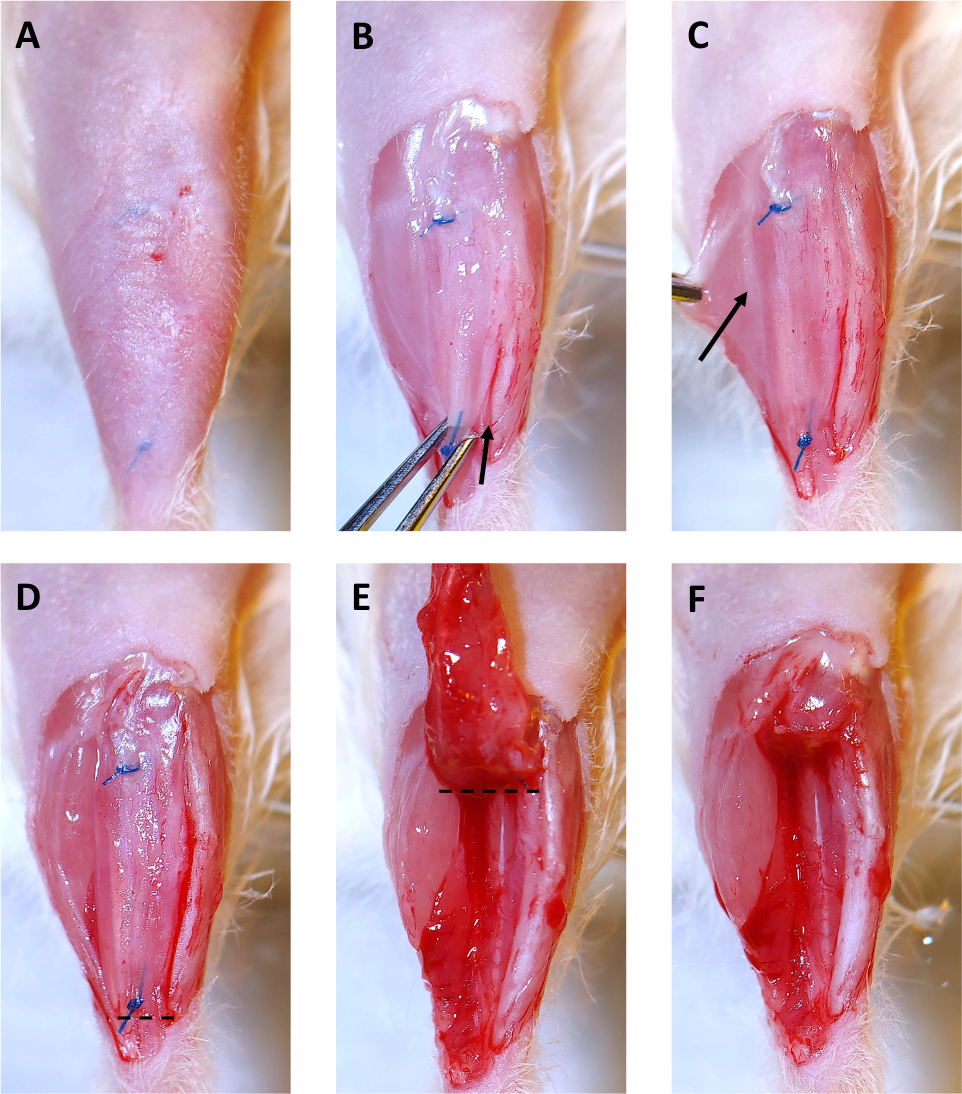
- Remove hair overlying the tibialis anterior from ankle to knee with a trimmer and hair removal lotion. The sutures holding the xenograft in place can be seen through the skin (Figure 3A).
- Tape down the leg and use scissors and iris forceps to open skin over the xenograft until both sutures are visible (Figure 3B). Skin overlying the xenograft can be removed as shown to make removal of the xenograft easier.
- Use a scalpel to cut between the xenograft and the tibia (Figure 3B, arrow denotes initial site and direction of incision). This will free one side of the xenograft.
- Use a scalpel to cut between the PL muscle and the gastrocnemius muscle (Figure 3C, incision along epimysium labeled with arrow). The PL will be removed with the xenograft.
- Cut below the distal suture and through the distal tendon of the PL (Figure 3D, cut along dotted line).
- Remove the xenograft and PL by grabbing the suture with iris forceps and deflecting it toward the knee while using scissors to cut it away from the underlying muscle (Figure 3E).
- Cut above the proximal suture with scissors to remove the xenograft and PL (Figure 3F, cut along dotted line in 3E).
- Place the specimen on a small piece of cardboard or plastic, and pin as close to the sutures as possible. While pinning the specimen, gently stretch the muscle to ensure that the fiber orientation is maintained during the snap freezing process. After the pins are securely in place, slide the muscle up the pins so it rests just above the cardboard.
NOTE: Alternatively, one end of the xenograft can be mounted in tragacanth on a cork, or it can be submerged entirely in optimal cutting temperature (O.C.T.) compound in a cryomold. With care, muscle conformation can be retained with both methods. - Snap freeze the xenograft in pre-cooled 2-methylbutane.
- Store xenograft at -80 °C.
- Immediately following xenograft collection, euthanize mice in accordance with American Veterinary Medical Association guidelines:
- Place mice in a sealed chamber with an appropriate waste gas scavenging system. Use isoflurane at a concentration of 3-4% to induce anesthesia.
- Once the appropriate anesthetic depth is achieved—as assessed by observation of respiratory rate, muscle relaxation, and lack of voluntary movement—increase the vaporizer setting to 5% to induce death. Leave the mice in the chamber for an additional 2 min after breathing has ceased. Death is verified by observing that the mice fail to recover within 10 min after overdose of isoflurane.
- Finally, perform cervical dislocation on the mice.
NOTE: In the case of bilaterally xenografted mice, the contralateral xenograft can be saved for a later collection. To perform a survival collection, open the skin overlying the xenograft with a single straight cut with surgical scissors, and remove the xenograft as described in steps 4.6 to 4.10. Then close the skin over the empty tibial compartment using surgical glue and staples. Treat the mouse with analgesic as described in step 2.11 and place the mouse in clean cage on heated pad to recover. Monitor the mouse until fully conscious and periodically over the next few days for signs of local systemic infection and to ensure the surgical site is not reopened.
5. Xenograft Immunohistochemistry
- Use a cryostat to cut 10 to 12 μm sections from the collected xenograft onto positively charged slides (Table of Materials).
- Fill staining jar with methanol and pre-cool at -20 °C for 30 min.
- Place slides in ice cold methanol for 10 min to fix and permeabilize the xenograft sections.
- Place slides in staining jar and wash 3x with phosphate buffered saline (PBS) for 5 min.
- Block with anti-mouse IgG (Table of Materials) for 2 h at 4 °C.
- Blot with primary antibodies, such as spectrin, lamin A/C, and embryonic myosin (Table of Materials) in PBS supplemented with 2% goat serum overnight at 4 °C.
- Place slides in a staining jar and wash 3x with phosphate buffered saline (PBS) for 5 min.
- Blot with fluorescent-dye conjugated secondary antibodies (Table of Materials) in PBS supplemented with 2% goat serum for 1 h at room temperature.
- Place slides in staining jar and wash 3x with phosphate buffered saline (PBS) for 5 min.
- Place mounting medium (Table of Materials) over xenografts sections, place coverslip on top, and use nail polish to seal the coverslip.

Figure 2: Xenograft Surgery. (A) Hair is removed from surgical site. (B) An incision is made over the tibialis anterior (TA). The distal tendons of the TA and extensor digitorum longus (EDL) are marked with arrows. The black dashed line indicates where the epimysium will be cut in step 3.3. (C) The distal tendon of the TA is cut and the muscle is pulled up to the knee. (D) The tendon of the EDL is cut and the EDL is pulled up to the knee. This exposes the proximal tendon of the peroneus longus (PL) marked with an arrow. Dashed lines indicate where to cut with scissors to remove the EDL (green) and PL (blue). (E) The EDL and TA are removed. (F) A suture is placed through the proximal tendon of the PL. (G) The xenograft is placed in the empty tibial compartment and sutured to the proximal PL tendon using a two-hand surgical square knot. (H) A suture is placed through the distal tendon of the PL, marked with an arrow, and another two-hand surgical square knot is used to suture the xenograft to the distal tendon. (I) The xenograft is fully transplanted and sutured to the PL. (J) The skin is closed with surgical glue. Please click here to view a larger version of this figure.

Figure 3: 4 Month Xenograft Collection. (A) Hair is removed from surgical site. Sutures are visible under skin. (B) The skin overlying the xenograft is removed. Then the xenograft is grabbed with the iris forceps at the distal suture and gently pulled upward. Starting at the ankle, a scalpel is used to cut along the tibia and free the xenograft. The arrow shows the beginning of the incision along the tibia. (C) By pulling the gastrocnemius muscle to the side, a faint white line of epimysium separating the peroneus longus (PL) muscle and the gastrocnemius (shown by the arrow) becomes visible. Use the scalpel to cut along this line to separate the PL from the other leg muscles. (D) The right side of the xenograft, and the PL are now free from the other muscles in the leg and are ready for removal. The dashed line indicates where to cut with surgical scissors to start removing the xenograft and PL. (E) After cutting below the distal suture, deflect the xenograft toward the knee. The dashed line indicates where to cut with surgical scissors to remove the xenograft and PL from the tibial compartment. (F) The empty tibial compartment with the xenograft and PL successfully removed. Please click here to view a larger version of this figure.
Results
As demonstrated by Yuanfan Zhang et al., this surgical protocol is a straightforward method to produce human skeletal muscle xenografts8. Regenerated xenografts become spontaneously innervated and display functional contractility. In addition, muscle xenografted from FSHD patients recapitulates changes in gene expression observed in FSHD patients8.
In our experience, approximately 7 out of 8 xenografts performed from control patient specimens wil...
Discussion
Patient-derived xenografts are an innovative way to model muscle disease and carry out preclinical studies. The method described here to create skeletal muscle xenografts is rapid, straightforward, and reproducible. Unilateral surgeries can be performed in 15 to 25 minutes, or bilaterally in 30 to 40 minutes. Bilateral xenografts can provide additional experimental flexibility. For instance, researchers can perform localized treatment of one xenograft, with the other left as a control. The NRG mice are resistant to surgi...
Disclosures
The authors declare that they have no competing financial interests.
Acknowledgements
This work was supported by The Myositis Association and the Peter Buck Foundation. We would like to thank Dr. Yuanfan Zhang for sharing her expertise and training in the xenograft surgical technique.
Materials
| Name | Company | Catalog Number | Comments |
| 100 mm x 15 mm Petri dish | Fisher Scientific | FB0875712 | |
| 2-Methylbutane | Fisher | O3551-4 | |
| 20 mm x 30 mm micro cover glass | VWR | 48393-151 | |
| Animal Weighing Scale | Kent Scientific | SCL- 1015 | |
| Antibiotic-Antimycotic Solution | Corning, Cellgro | 30-004-CI | |
| AutoClip System | F.S.T | 12020-00 | |
| Castroviejo Needle Holder | F.S.T | 12565-14 | |
| Chick embryo extract | Accurate | CE650TL | |
| CM1860 UV cryostat | Leica Biosystems | CM1860UV | |
| Coplin staining jar | Thermo Scientific | 19-4 | |
| Dissection Pins | Fisher Scientific | S13976 | |
| Dry Ice - pellet | Fisher Scientific | NC9584462 | |
| Embryonic Myosin antibody | DSHB | F1.652 | recommended concentration 1:10 |
| Ethanol | Fisher Scientific | 459836 | |
| Fetal Bovine Serum | GE Healthcare Life Sciences | SH30071.01 | |
| Fiber-Lite MI-150 | Dolan-Jenner | Mi-150 | |
| Forceps | F.S.T | 11295-20 | |
| Goat anti-mouse IgG1, Alexa Fluor 488 | Invitrogen | A-21121 | recommended concentration 1:500 |
| Goat anti-mouse IgG2b, AlexaFluor 594 | Invitrogen | A-21145 | recommended concentration 1:500 |
| Gum tragacanth | Sigma | G1128 | |
| Hams F-10 Medium | Corning | 10-070-CV | |
| Histoacryl Blue Topical Skin Adhesive | Tissue seal | TS1050044FP | |
| Human specific lamin A/C antibody | Abcam | ab40567 | recommended concentration 1:50-1:100 |
| Human specific spectrin antibody | Leica Biosystems | NCLSPEC1 | recommended concentration 1:20-1:100 |
| Induction Chamber | VetEquip | 941444 | |
| Iris Forceps | F.S.T | 11066-07 | |
| Irradiated Global 2018 (Uniprim 4100 ppm) | Envigo | TD.06596 | Antibiotic rodent diet to protect again respiratory infections |
| Isoflurane | MWI Veterinary Supply | 502017 | |
| Kimwipes | Kimberly-Clark | 34155 | surgical wipes |
| Mapleson E Breathing Circuit | VetEquip | 921412 | |
| Methanol | Fisher Scientific | A412 | |
| Mobile Anesthesia Machine | VetEquip | 901805 | |
| Mouse on Mouse Basic Kit | Vector Laboratories | BMK-2202 | mouse IgG blocking reagent |
| Nail Polish | Electron Microscopy Sciences | 72180 | |
| NAIR Hair remover lotion/oil | Fisher Scientific | NC0132811 | |
| NOD-Rag1null IL2rg null (NRG) mice | The Jackson Laboratory | 007799 | 2 to 3 months old |
| O.C.T. Compound | Fisher Scientific | 23-730-571 | |
| Oxygen | Airgas | OX USPEA | |
| PBS (phosphate buffered saline) buffer | Fisher Scientific | 4870500 | |
| Povidone Iodine Prep Solution | Dynarex | 1415 | |
| ProLong™ Gold Antifade Mountant | Fisher Scientific | P10144 (no DAPI); P36935 (with DAPI) | |
| Puralube Ophthalmic Ointment | Dechra | 17033-211-38 | |
| Rimadyl (carprofen) injectable | Patterson Veterinary | 10000319 | surgical analgesic, administered subcutaneously at a dose of 5 mg/kg |
| Scalpel Blades - #11 | F.S.T | 10011-00 | |
| Scalpel Handle - #3 | F.S.T | 10003-12 | |
| Stereo Microscope | Accu-scope | 3075 | |
| Superfrost Plus Microscope Slides | Fisher Scientific | 12-550-15 | |
| Suture, Synthetic, Non-Absorbable, 30 inches long, CV-11 needle | Covidien | VP-706-X | |
| 1ml Syringe (26 gauge, 3/8 inch needle) | BD Biosciences | 329412 | |
| Trimmer | Kent Scientific | CL9990-KIT | |
| Vannas Spring Scissors, 8.0 mm cutting edge | F.S.T | 15009-08 | |
| VaporGaurd Activated Charcoal Filter | VetEquip | 931401 | |
| Wound clips, 9 mm | F.S.T | 12022-09 |
References
- Wong, C. H., Siah, K. W., Lo, A. W. Estimation of clinical trial success rates and related parameters. Biostatistics. , 1-14 (2018).
- Hay, M., Thomas, D. W., Craighead, J. L., Economides, C., Rosenthal, J. Clinical development success rates for investigational drugs. Nature Biotechnology. 32, 40-51 (2014).
- Perel, P., et al. Comparison of treatment effects between animal experiments and clinical trials: systematic review. BMJ. 334, 1-6 (2007).
- Rubio-Viqueira, B., Hidalgo, M. Direct in vivo xenograft tumor model for predicting chemotherapeutic drug response in cancer patients. Clinical Pharmacology Therapeutics. 85, 217-221 (2009).
- Roberts, K. G., et al. Targetable Kinase-Activating Lesions in Ph-like Acute Lymphoblastic Leukemia. New England Journal of Medicine. 371, 1005-1015 (2014).
- Kim, J., et al. GDF11 Controls the Timing of Progenitor Cell Competence in Developing Retina. Science. 308, 1927-1930 (2005).
- Sako, D., et al. Characterization of the ligand binding functionality of the extracellular domain of activin receptor type IIB. Journal of Biological Chemisty. 285, 21037-21048 (2010).
- Zhang, Y., et al. Human skeletal muscle xenograft as a new preclinical model for muscle disorders. Human Molecular Genetics. 23, 3180-3188 (2014).
- Gabellini, D., Green, M. R., Tupler, R. Inappropriate Gene Activation in FSHD : A Repressor Complex Binds a Chromosomal Repeat Deleted in Dystrophic Muscle. Cell. 110, 339-348 (2002).
- Lemmers, R. J. L. F., et al. A Unifying Genetic Model for Facioscapulohumeral Muscular Dystrophy. Science. 329, 1650-1654 (2010).
- Chen, J. C. J., et al. Morpholino-mediated Knockdown of DUX4 Toward Facioscapulohumeral Muscular Dystrophy Therapeutics. Molecular Therapy. 24, 1405-1411 (2016).
- Medical Research Council. . Aids to the investigation of the peripheral nervous system. , (1943).
- Jones, R. A., et al. Cellular and Molecular Anatomy of the Human Neuromuscular Junction. Cell Reports. 21, 2348-2356 (2017).
Reprints and Permissions
Request permission to reuse the text or figures of this JoVE article
Request PermissionThis article has been published
Video Coming Soon
Copyright © 2025 MyJoVE Corporation. All rights reserved