
A subscription to JoVE is required to view this content. Sign in or start your free trial.
Method Article
A 3-D Tail Explant Culture to Study Vertebrate Segmentation in Zebrafish
In This Article
Summary
Here, we present the protocol for 3-D tissue culture of the zebrafish posterior body axis, enabling live study of vertebrate segmentation. This explant model provides control over axis elongation, alteration of morphogen sources, and subcellular resolution tissue-level live imaging.
Abstract
Vertebrate embryos pattern their major body axis as repetitive somites, the precursors of vertebrae, muscle, and skin. Somites progressively segment from the presomitic mesoderm (PSM) as the tail end of the embryo elongates posteriorly. Somites form with regular periodicity and scale in size. Zebrafish is a popular model organism as it is genetically tractable and has transparent embryos that allow for live imaging. Nevertheless, during somitogenesis, fish embryos are wrapped around a large, rounding yolk. This geometry limits live imaging of PSM tissue in zebrafish embryos, particularly at higher resolutions that require a close objective working distance. Here, we present a flattened 3-D tissue culture method for live imaging of zebrafish tail explants. Tail explants mimic intact embryos by displaying a proportional slowdown of axis elongation and shortening of rostrocaudal somite lengths. We are further able to stall axis elongation speed through explant culture. This, for the first time, enables us to untangle the chemical input of signaling gradients from the mechanistic input of axial elongation. In future studies, this method can be combined with a microfluidic setup to allow time-controlled pharmaceutical perturbations or screening of vertebrate segmentation without any drug penetration concerns.
Introduction
Metameric segmentation of organisms is widely used in nature. Repeated structures are essential for functionality of lateral organs such as vertebrae, muscles, nerves, vessels, limbs, or leaves in a body plan1. As a result of such physiological and geometric constraints of the axial symmetry, most phyla of Bilateria-such as annelids, arthropods, and chordates-exhibit segmentation of their embryonic tissues (e.g., ectoderm, mesoderm) antero-posteriorly.
Vertebrate embryos sequentially segment their paraxial mesoderm along the major body axis into somites with species-specific intervals, counts, and size distributions. Despite such robustness among individual embryos within a species, somite segmentation is versatile in between vertebrate species. Segmentation happens in a vast regime of time intervals (from 25 min in zebrafish to 5 h in humans), sizes (from ~20 µm in tail somites of zebrafish to ~200 µm in trunk somites of mice) and counts (from 32 in zebrafish to ~300 in corn snakes)2. More interestingly, fish embryos can develop in a wide range of temperatures (from ~20.5 °C up to 34 °C for zebrafish) while keeping their somites intact with proper size distributions by compensating for both segmentation intervals and axial elongation speeds. Beyond such interesting features, zebrafish stays as a useful model organism to study segmentation in vertebrates due to the external, synchronous and transparent development of a plenitude of sibling embryos as well as their accessible genetic tools. Adversely from a microscopy perspective, teleost embryos develop on a bulky spherical yolk, stretching and rounding the gastrulating tissue around it (Figure 1A). In this article, we present a flattened 3-D tissue explant culture for zebrafish tails. This explant system circumvents the spherical constraints of yolk mass, allowing access to high resolution live imaging of fish embryos for somite patterning.

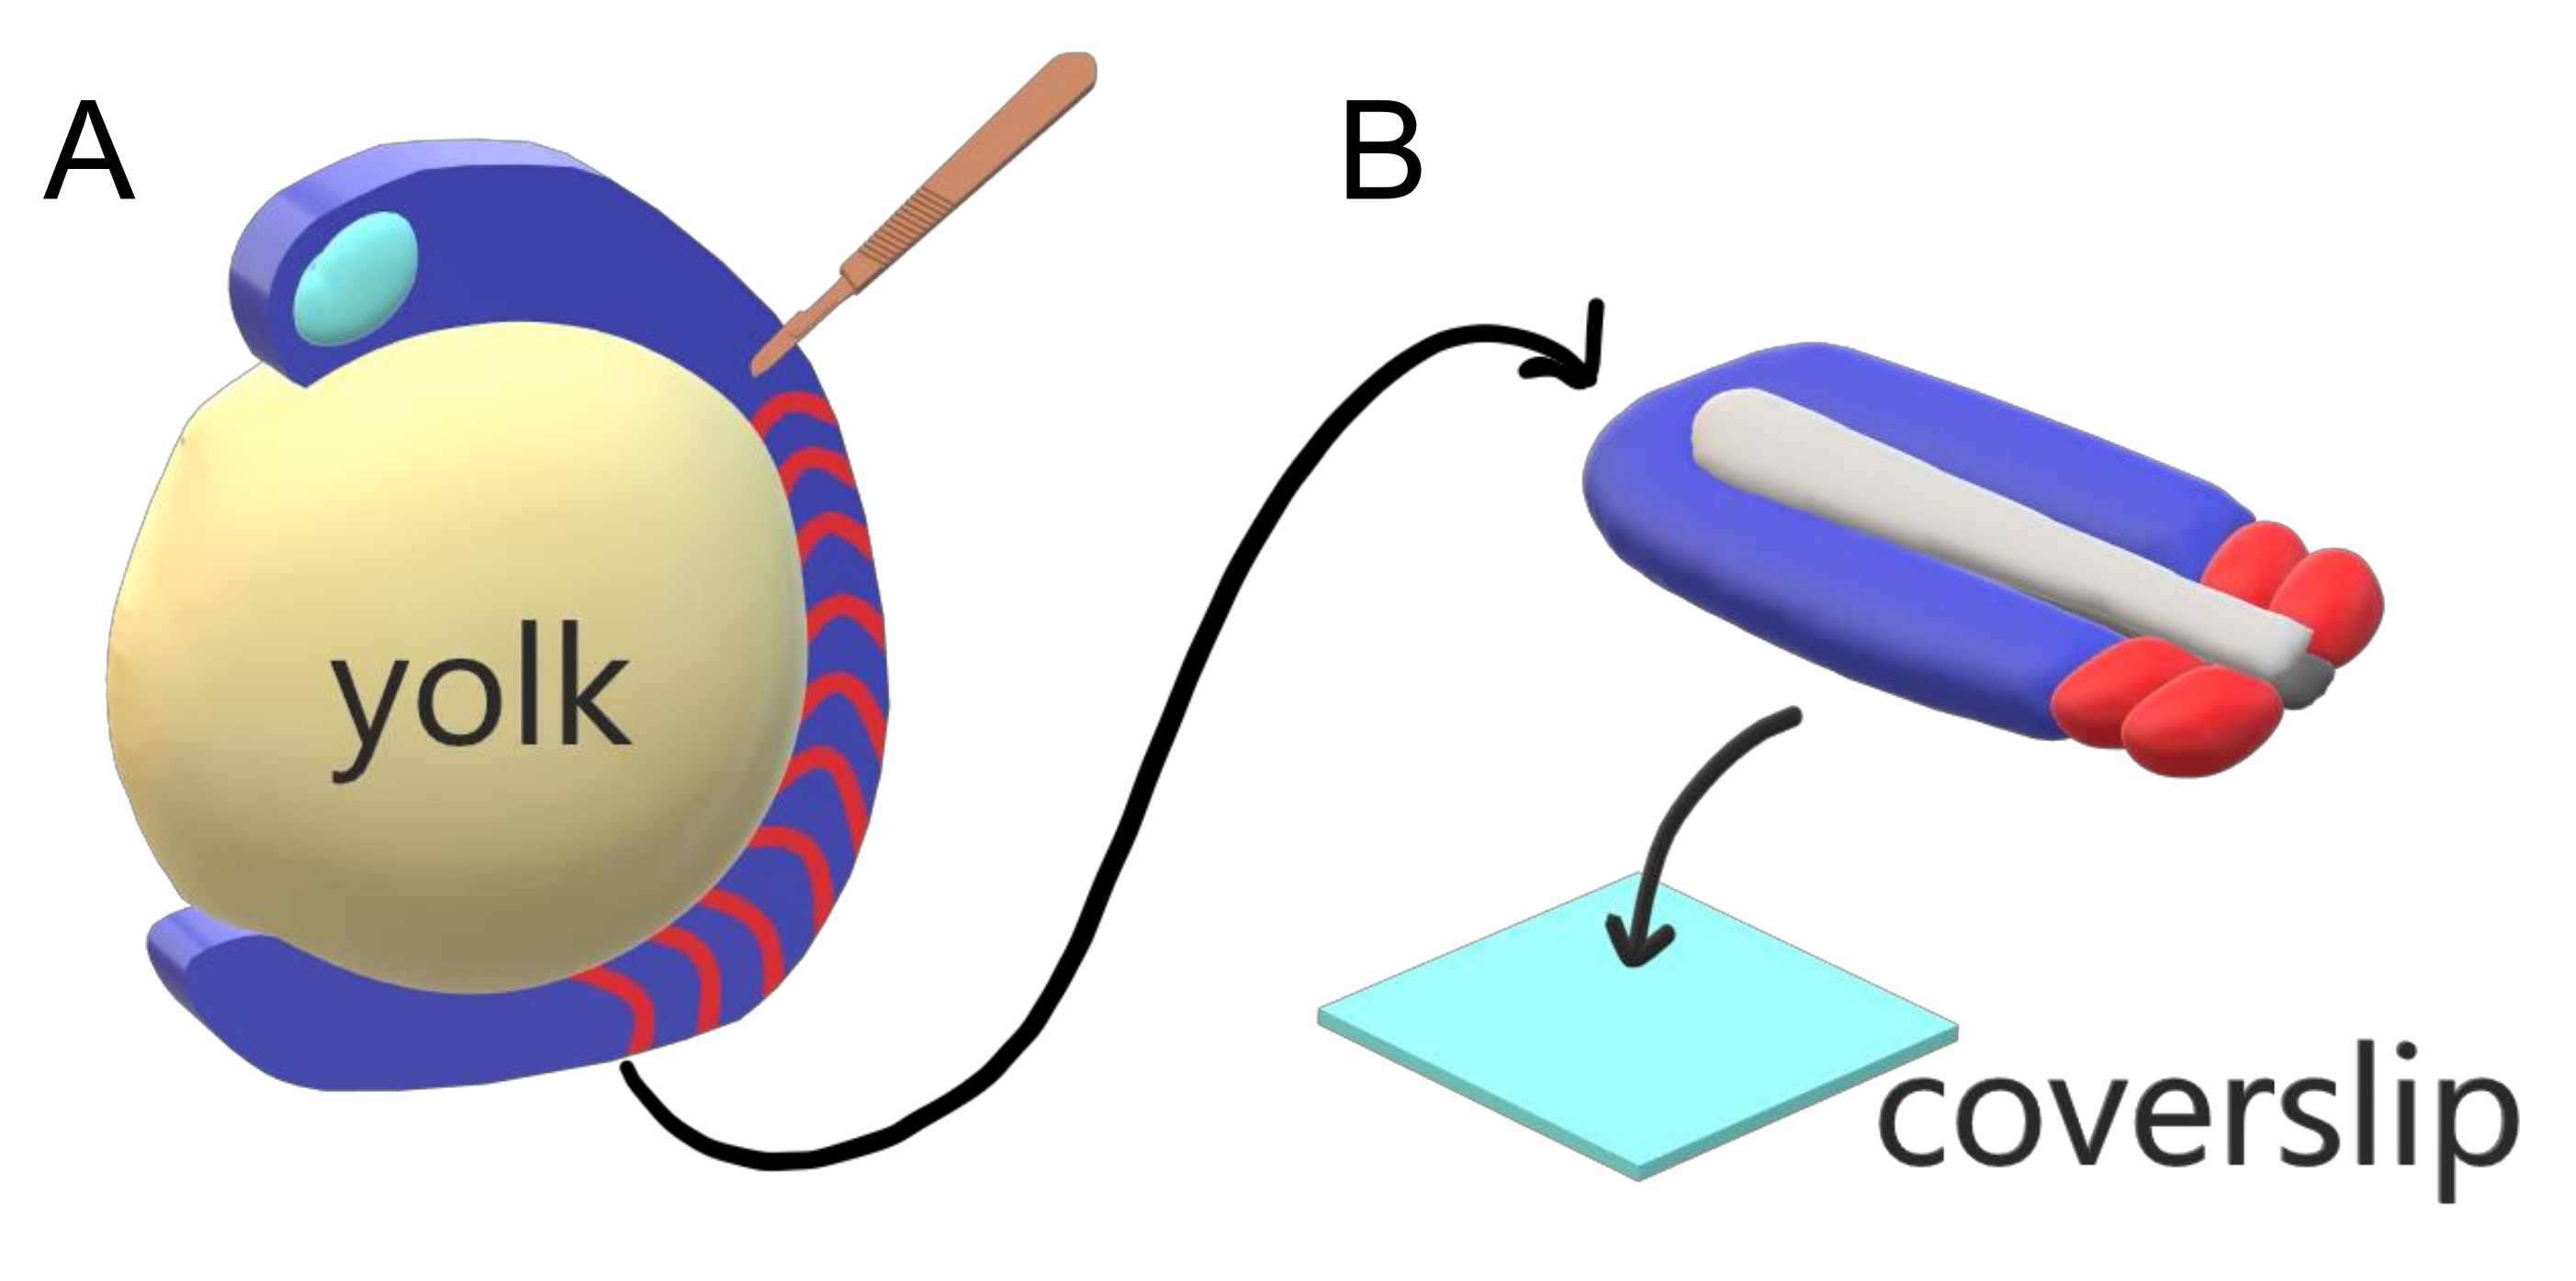
Figure 1: Slide Chamber Explant System for Zebrafish Embryos. (A) Zebrafish embryos have advantages for live imaging, such as the transparency of gastrulating embryonic tissue (blue), but the tissue forms around a bulky spherical yolk mass (yellow) which prevents near-objective, high-resolution imaging in intact embryos. Tail explants can be dissected starting with a microsurgical knife (brown) cut from the tissue anterior of somites (red) and continuing at the border with the yolk posteriorly. (B) Dissected tail explants can be placed on a coverslip (light blue) dorsoventrally; keeping neural tissue (light gray) on top and notochord (dark gray) at the bottom. Please click here to view a larger version of this figure.
Protocol
This protocol involves use of live vertebrate embryos younger than 1 day post-fertilization. All the animal experiments were performed under the ethical guidelines of Cincinnati Children's Hospital Medical Center; animal protocols were reviewed and approved by the Institutional Animal Care and Use Committee (Protocol # 2017-0048).
1. Embryo collection
- Set up pairs of zebrafish in crossing tanks the night before the embryo collection day. For precise staging control of embryo development, use barriers between mating pairs.
- Raise barriers before preferred spawning time and collect eggs within 15 minutes in a 100 mm Petri dish.
- Clean debris from the Petri dish. If more than 50 embryos are collected from a single clutch, split the clutch into multiple Petri dishes accordingly.
- Incubate embryos in fish system water at 28 °C until they reach 50% epiboly stage (5 hours post-fertilization). A standardized embryo growth medium such as E3 can also be used instead of the aquarium system water until step 3.2.
- Remove unfertilized eggs under a stereoscope and move the embryos to a 23.5 °C incubator overnight (O/N). Embryos should be at 8-10 somites stage the morning following collection day.
2. Tool preparation
- Sterilize the microsurgery knife blade, needle tips (used for dissection of the tissue), and glass Pasteur pipette by soaking in 100% ethanol (EtOH) and fire glazing.
- Use two layers of transparent tape (~100-120 µm thickness) on 25 mm x 75 mm microscope slides. Cut ~18 mm x 18 mm square wells in the center of each slide's tape covering with a scalpel.
- Wipe the prepared slide chambers with 70% EtOH. These wells will hold ~40 µL of medium.
3. Sample preparation
- Dechorionate embryos using the tip of two needle syringes under a stereoscope. Transfer embryos into a separate Petri dish with fish system water to rinse.
- Using a fire-glazed sterile glass Pasteur pipette, transfer embryos in a 6 cm Petri dish containing dissection medium (Leibovitz-15 cell culture medium with L-Glutamine without Phenol Red, 0.8 mM CaCl2 and 1× antibiotic-antimycotic solution).
NOTE: Continue to use a sterilized glass pipette for all transfers following this step.- Use a glass Petri dish for explanting procedure to avoid polystyrene chips during dissection.
- Put 50 µL of tissue growth medium (dissection medium, and 10% FBS) in the slide chamber.
- Stabilize an embryo for dissection under the stereoscope with a needle tip at the yolk-tissue intersection near the hindbrain.
- Keeping the embryonic tissue stable with a needle, use the microsurgical knife with the blade held at 45° to cut the tissue anterior to the hindbrain apart and peel the yolk off the embryonic tissue starting from the anterior and moving towards the tail bud (Figure 1A).
NOTE: Be careful to not lose the skin tissue while cleaning the yolk. The skin would easily peel off as a flanking single layer elastic tissue around the embryo during the dissection, so it is easy to recognize. - Once the yolk is fully removed from the embryonic body, cut the flanking skin tissue from the tailbud. Keeping the last formed 3-4 somites intact, cut the more anterior tissue out (full-axis explant).
- The yolk should come off mainly intact from this procedure. In case of a ruptured yolk, significant granules of yolk can stay attached to the ventral surface of the tissue. If so, use a lash tool to clean off remaining yolk granules gently.
NOTE: An imbalance of skin tissues on the lateral sides of an explant would not allow the tissue to maintain a straight growth direction. The explant instead will bend towards the side of more stretched skin. This imbalance can be corrected under the stereoscope by rupturing the skin layer with the aid of microsurgical knife. - For skinless explants, press on a tip of the skin layer with needle and peel the tissue explant off with the microsurgical knife. These explants will not elongate their body axis in culture.
- In addition to the full axis explants, alternative explants can be made at this step. For instance, dissect out already segmented somites using the microsurgical knife (full-PSM explants) or dissect the PSM into its half anteroposterior (half-PSM explants). Please see section 5.1 for an application of such alternative explants.
- The yolk should come off mainly intact from this procedure. In case of a ruptured yolk, significant granules of yolk can stay attached to the ventral surface of the tissue. If so, use a lash tool to clean off remaining yolk granules gently.
- Immediately transfer the dissected explant to a 22 mm x 22 mm coverslip on which the imaging will be performed.
- Arrange the explant flat on the dorsoventral axis, ventral side touching the coverslip (Figure 1B). Gently remove the excess media around the tissue explant using a 20 µL filtered tip pipette.
NOTE: Delayed transfer of dissected explants to the coverslip results in deformations of the tissue, as it is relieved from the geometric constraints of the yolk.
- Arrange the explant flat on the dorsoventral axis, ventral side touching the coverslip (Figure 1B). Gently remove the excess media around the tissue explant using a 20 µL filtered tip pipette.
- Swiftly and carefully flip the coverslip with the explant over the growth medium filled slide chamber.
- To prevent bubble formation, place a side of the square coverslip on the tape chamber and release the other side gently. Take care to not move/deform the explant in this step.
- Gently remove excess media bleeding out of the chamber by pressing the slide chamber on a laboratory tissue. The coverslip will sit stably on the slide chamber for live imaging, due to the surface tension of the liquid medium without any sealing.
- For long term culturing (>6 hours), use a bigger chamber. 22 mm x 50 mm rectangular coverslips together with two parallel lanes of tape layers on slides can be utilized in such cases. A ~1 mm wide gap can be left in between two tape lanes to facilitate air access into the growth medium.
- Repeat steps 3.3-3.8 to prepare more explants. Prepared explants will elongate their A-P body axis with an average of ~30 µm/h speed and segment their somites with ~40 min intervals at 25 °C (Figure 2A, Video 1).
- For non-elongating explants, apply gentle pressure to the sides of slide holding the sample in step 3.8.2 while sucking the excess media out on a laboratory tissue. Alternatively, explants can be cultured in single tape layer slide chambers. Also, chemically activating the slide chamber surface with Type I Collagen will result in non-elongating explants (Figure 2B, Video 2).
- Perform coating of the chamber with Type I Collagen in advance by fully covering the slide chambers with 15-20 mL of prediluted collagen solution at room temperature for 1 h. Use a laminar flow hood for this protocol to maintain sterility. Carefully rinse chambers with dissection medium at the end.
- For embryos older than 15 somite stage, mount the tail explant tissue laterally instead of a flat (dorsoventral) mount (Video 3). To prevent muscular twitching, include 0.004% tricaine solution in the culture media as an anesthetic agent3.
- For non-elongating explants, apply gentle pressure to the sides of slide holding the sample in step 3.8.2 while sucking the excess media out on a laboratory tissue. Alternatively, explants can be cultured in single tape layer slide chambers. Also, chemically activating the slide chamber surface with Type I Collagen will result in non-elongating explants (Figure 2B, Video 2).
4. Live image acquisition
- Image samples either on a dissection scope for widefield transmitted light imaging of somite segmentation sizes and periods, or with structured illumination/confocal/light sheet microscopy using transgenic reporter fish lines.
- Equilibrate the temperature of tissue explants with the imaging room temperature for at least 15 min.
- For more precise temperature control, use a commercial temperature control system mounted on an inverted microscope.
- Set the image acquisition frame intervals to 2 - 10 min depending on the biological process of interest.
NOTE: Zebrafish somite segmentation is a fast process, ranging between 20 - 55 min for viable temperatures of 30 °C to 21.5 °C in whole embryos. Explants will elongate and segment ~30% slower than the whole embryos.- Pay attention to leave enough delay between sets of channel acquisitions to avoid possible phototoxicity to live tissue. Do not expose the tissue to the excitation beam for more than half of the imaging duration and lower the beam intensity as much as possible.
NOTE: Accumulation of reactive oxygen species (ROS) is generally the major cause of phototoxicity in live samples4. Ascorbic acid as a ROS scavenger can be supplemented to growth medium at 4 mM concentration to buffer ROS activity and alleviate phototoxicity. Adverse effects of phototoxicity might be hard to notice during live imaging. Tail explants are advantageous in this aspect since some visual markers of phototoxicity such as mitotic arrest, impeded tissue development (i.e., formation of somites, tail elongation), and disintegrating tissue are easier to notice. Please refer to the provided reference4 for a detailed discussion.
- Pay attention to leave enough delay between sets of channel acquisitions to avoid possible phototoxicity to live tissue. Do not expose the tissue to the excitation beam for more than half of the imaging duration and lower the beam intensity as much as possible.
- Use single cell-stage RNA injected embryos to acquire 4-D images intended to be segmented and analyzed in cellular resolution level.
- Use 300 pg of RNA from in vitro transcribed membranes and nuclear fluorescent reporter marker plasmids such as pCS-membrane-ceruleanFP (Addgene plasmid #53749) or pCS-memb-mCherry (Addgene plasmid #53750) in combination with pCS2+ H2B-mTagBFP2 (Addgene plasmid #99267) or pCS2+ H2B-TagRFP-T (Addgene plasmid #99271) in injections. For a sample movie with cell membrane and nuclei markers please see Video 4.
NOTE: Average cell size of PSM tissue is about ~5 µm in diameter, of which nuclei comprises ~3 - 4 µm. A pixel size of ~0.5 µm and a z-sectioning of ~1 µm should be recorded for proper cell segmentation.
- Use 300 pg of RNA from in vitro transcribed membranes and nuclear fluorescent reporter marker plasmids such as pCS-membrane-ceruleanFP (Addgene plasmid #53749) or pCS-memb-mCherry (Addgene plasmid #53750) in combination with pCS2+ H2B-mTagBFP2 (Addgene plasmid #99267) or pCS2+ H2B-TagRFP-T (Addgene plasmid #99271) in injections. For a sample movie with cell membrane and nuclei markers please see Video 4.
5. Immunostaining of tail explants
NOTE: Tissues grown after various dissection scenarios (elongating, non-elongating, tail bud dissected, half PSM etc.) as flat-mounted tail explants5 can be recovered from slide chambers for further immunostaining quantifications of proteins of interest. Here, we present the protocol used for di-phosphorylated extracellular signal regulated kinase (ppERK) staining of explants as FGF signaling gradient readout.
- After formation of somites until the desired stage, cautiously shift the coverslip halfway to the corner of the slide chamber without lifting.
- With the help of ~100 µL of supplementary dissection medium in a glass Pasteur pipette, recover the explants from the slide and transfer into a 64-well cell culture plate.
NOTE: Beginning with this step, all solution replacements can be performed under a dissection scope with a separate glass pipette for fixed samples. This will ensure not losing explant tissues in wells or transferring them in between. - After transferring all explants, suck the excessive medium out of the wells one-by-one and put 100 µL of 4% paraformaldehyde in PBS (PFA) into each well.
CAUTION: PFA is a toxic solution with carcinogenic effects. Proper PPE should be used while handling. - Fix explants in a 64-well plate at room temperature for 1 h on a shaker.
- Tissue explants are more sensitive to deformations than whole embryos. Adjust the shaker speed accordingly.
- Wash the fixative out with 150 µL of PBS-Tw (0.1% Tween20 in PBS) three times. Collect the first wash in a specific "PFA Waste" container.
- Dehydrate explants in 4×5 min steps by replacing ~40 µL of solution each time with 100% methanol (MeOH).
CAUTION: MeOH is a toxic chemical which is volatile and flammable. Work in a well-ventilated space and use proper PPE for handling. - As the last step of dehydration, remove all solution from wells and replace with 100 µL of MeOH. Incubate at -20 °C for 15 min.
NOTE: Use a specific "MeOH Waste" container to collect the solutions until step 5.11. - Add 50 µL of MeOH and shake at room temperature for 5 min.
- Rehydrate explants in 4×5 min steps by replacing ~40 µL of solution each time with PBS-T (0.1% Triton-X 100 in PBS). Use a specific "MeOH Waste" container to collect the solutions.
- As the last step of rehydration, remove all solution from wells and replace with 100 µL of PBS-T.
- For tissue permeabilization treat explants with 1.5% Triton-X 100 in PBS for 20 min at room temperature on the shaker.
- Wash samples with MAB-D-T (0.1% Triton-X 100 detergent and 1% dimethyl sulfoxide (DMSO) in 150 mM NaCl 100 mM maleic acid buffer pH 7.5) 3×5 min.
CAUTION: DMSO is flammable and a toxic mutagen. Proper PPE should be used while handling. - Incubate explants in 100 µL/well serum blocking solution (2% fetal bovine serum in MAB-D-T) for 2 hours at room temperature.
- Replace all the blocking solution with 50-100 µL/well primary antibody solution (1:1000 dilution of monoclonal mouse antibody against ppERK in serum block). Incubate samples O/N (>16 h) at 4 °C on shaker.
- Wash the primary antibody solution with MAB-D-T 5×5 min.
- Incubate samples in secondary antibody solution (Alexa Fluor 597 goat anti-mouse IgG2b (1:200) and Hoechst 33342 (1:5000) in MAB-D-T) O/N at 4 °C on a shaker or for 3 h at room temperature.
NOTE: Beginning at this step, cover the 64-well plate with aluminum foil to avoid light exposure of secondary antibody treated samples.
CAUTION: Hoechst 33342 is a potential carcinogen. Proper PPE should be used while handling. - Wash the secondary antibody solution with PBS-Tw 3×5 min.
- Fix samples with PFA for 15 minutes at room temperature.
- Wash the fixative with PBS-Tw and equilibrate samples within 60% glycerol. Mount explants on microscope slides with nail polish and 60% glycerol for imaging. For representative immunostaining results please see Figure 3.
Results
This protocol enables flat geometric culturing of live zebrafish tail explants. Tissue culture presents three major advantages over whole embryos: 1) control of axis elongation speed, 2) control over various signaling (morphogen) sources by simple dissection, and 3) near-objective, high magnification and high NA live imaging.
Chemically untreated slide chambers allow the tail explant to elongate its major axis (Figure 2A) by the skin ectoderm wrapping around the t...
Discussion
This article presents a detailed protocol of a tissue culture explant technique we developed and used recently5 for zebrafish embryos. Our technique builds on the previous explant methods in chick8 and zebrafish9,10,11 model organisms. Tail explants prepared with this protocol can survive as long as >12 h in a simple slide chamber, continuing to elongate its major body axis and ...
Disclosures
The authors have nothing to disclose and declare no conflicts of interest.
Acknowledgements
We thank the AECOM Zebrafish Core Facility and Cincinnati Children's Veterinary Services for fish maintenance, the Cincinnati Children's Imaging Core for technical assistance, Didar Saparov for assistance with video production and Hannah Seawall for editing the manuscript. Research reported in this publication was supported by the National Institute of General Medical Sciences of the National Institutes of Health under Award Number R35GM140805 to E.M.Ö. The content is solely the responsibility of the authors and does not necessarily represent the official views of the National Institutes of Health.
Materials
| Name | Company | Catalog Number | Comments |
| 1 mL Sub-Q Syringe with PrecisionGlide Needle | Becton, Dickinson and Co. | REF 309597 | for dechorionating embryos and manipulations |
| 200 Proof Ethanol, Anhydrous | Decon Labs | 2701 | for immunostaining |
| Antibiotic Antimycotic Solution (100×) | Sigma-Aldrich | A5955 | for tissue dissection media |
| Calcium Chloride Anhydrous, Powder | Sigma-Aldrich | 499609 | for tissue dissection media |
| Dimethylsulfoxide | Sigma-Aldrich | D5879 | for immunostaining |
| Disposable Scalpel, #10 Stainless Steel | Integra-Miltex | MIL4-411 | for preparing tape slide wells |
| Ethyl 3-aminobenzoate methanesulfonate salt (Tricaine) | Sigma-Aldrich | 886-86-2 | (optional) for anesthesizing tissues older than 20 somites stage |
| Fetal Bovine Serum (FBS) | ThermoFisher | A3160601 | additional for tissue culture media |
| Goat anti-Mouse IgG2b, Alexa Fluor 594 | Invitrogen | Cat#A-21145; RRID: AB_2535781 | secondary antibody for immunostaining |
| L-15 Medium with L-Glutamine w/o Phenol Red | GIBCO | 21083-027 | for tissue dissection media |
| Methanol | Sigma-Aldrich | 179337 | for immunostaining |
| Microsurgical Corneal Knife 2.85 mm Angled Tip Double Bevel Blade | Surgical Specialties | 72-2863 | for tissue dissection |
| Mouse monoclonal anti-ppERK | Sigma-Aldrich | Cat#M8159; RRID:AB_477245 | for ppERK immunostaining |
| NucRed Live 647 ReadyProbes Reagent | Invitrogen | R37106 | (optional) for live staining of cell nuclei |
| Paraformaldehyde Powder, 95% | Sigma-Aldrich | 158127 | for fixation of samples for immunostaining |
| Rat Tail Collagen Coating Solution | Sigma-Aldrich | 122-20 | (optional) for chemically activating slide chambers |
| Stage Top Incubator | Tokai Hit | tokai-hit-stxg | (optional) for temperature control during live imaging |
| Transparent Tape 3/4'' | Scotch | S-9782 | for preparing tape slide wells |
| Triton X-100 | Sigma-Aldrich | X100 | for immunostaining |
| Tween 20 | Sigma-Aldrich | P1379 | for immunostaining |
| Zebrafish: Tg(actb2:2xMCP-NLS-EGFP) | Campbell et al., 2015 | ZFIN: ZDB-TGCONSTRCT-150624-4 | transgenic fish with nuclear localized EGFP |
| Zebrafish: Tg(Ola.Actb:Hsa.HRAS-EGFP) | Cooper et al., 2005 | ZFIN: ZDB-TGCONSTRCT-070117-75 | transgenic fish with cell membrane localized EGFP |
References
- Assheton, R. . Growth in length: Embryological Essays. , (1916).
- Gomez, C., et al. Control of segment number in vertebrate embryos. Nature. 454 (7202), 335-339 (2008).
- Westerfield, M. . The Zebrafish Book: a guide for the laboratory use of zebrafish (Danio rerio), 3rd edition. , (1995).
- Icha, J., Weber, M., Waters, J. C., Norden, C. Phototoxicity in live fluorescence microscopy, and how to avoid it. BioEssays. 39 (1700003), (2017).
- Simsek, M. F., Ozbudak, E. M. Spatial fold change of Fgf signaling encodes positional information for segmental determination in zebrafish. Cell Reports. 24 (1), 66-78 (2018).
- Dubrulle, J., Pourquié, O. fgf8 mRNA decay establishes a gradient that couples axial elongation to patterning in the vertebrate embryo. Nature. 427 (6973), 419-422 (2004).
- Diez del Corral, R., et al. Opposing FGF and Retinoid Pathways Control Ventral Neural Pattern, Neuronal Differentiation, and Segmentation during Body Axis Extension. Neuron. 40 (1), 65-79 (2003).
- Stern, H. M., Hauschka, S. D. Neural tube and notochord promote in vitro myogenesis in single somite explants. Developmental Biology. 167 (1), 87-103 (1995).
- Langenberg, T., Brand, M., Cooper, M. S. Imaging brain development and organogenesis in zebrafish using immobilized embryonic explants. Developmental Dynamics. 228 (3), 464-474 (2003).
- Picker, A., Roellig, D., Pourquié, O., Oates, A. C., Brand, M. Tissue micromanipulation in zebrafish embryos. Methods in molecular biology. 546 (11), 153-172 (2009).
- Manning, A. J., Kimelman, D. Tbx16 and Msgn1 are required to establish directional cell migration of zebrafish mesodermal progenitors. Developmental Biology. 406 (2), 172-185 (2015).
- Kimmel, C. B., Ballard, W. W., Kimmel, S. R., Ullmann, B., Schilling, T. F. Stages of embryonic development of the zebrafish. Developmental Dynamics. 203 (3), 253-310 (1995).
- Kaufmann, A., Mickoleit, M., Weber, M., Huisken, J. Multilayer mounting enables long-term imaging of zebrafish development in a light sheet microscope. Development. 139, 3242-3247 (2012).
Reprints and Permissions
Request permission to reuse the text or figures of this JoVE article
Request PermissionThis article has been published
Video Coming Soon
Copyright © 2025 MyJoVE Corporation. All rights reserved