
A subscription to JoVE is required to view this content. Sign in or start your free trial.
Method Article
Isolation of Regenerating Hepatocytes after Partial Hepatectomy in Mice
In This Article
Summary
Lipid-laden hepatocytes are inherent to liver regeneration but are usually lost upon density-gradient centrifugation. Here, we present an optimized cell isolation protocol that retains steatotic hepatocytes, yielding representative populations of regenerating hepatocytes after partial hepatectomy in mice.
Abstract
Partial hepatectomy has been widely used to investigate liver regeneration in mice, but the isolation of high yields of viable hepatocytes for downstream single-cell applications is challenging. A marked accumulation of lipids within regenerating hepatocytes is observed during the first 2 days of normal liver regeneration in mice. This so-called transient regeneration-associated steatosis (TRAS) is temporary but partially overlaps the major proliferative phase. Density-gradient purification is the backbone of most existing protocols for the isolation of primary hepatocytes. As gradient purification relies on the density and size of cells, it separates non-steatotic from steatotic hepatocyte populations. Therefore, fatty hepatocytes often are lost, yielding non-representative hepatocyte fractions.
The presented protocol describes an easy and reliable method for the in vivo isolation of regenerating hepatocytes regardless of their lipid content. Hepatocytes from male C57BL/6 mice are isolated 24-48 h after hepatectomy by a classic two-step collagenase perfusion approach. A standard peristaltic pump drives the warmed solutions via the catheterized inferior vena cava into the remnant, using a retrograde perfusion technique with outflow through the portal vein. Hepatocytes are dissociated by collagenase for their release from the Glisson's capsule. After washing and careful centrifugation, the hepatocytes can be used for any downstream analyses. In conclusion, this paper describes a straightforward and reproducible technique for the isolation of a representative population of regenerating hepatocytes after partial hepatectomy in mice. The method may also aid the study of fatty liver disease.
Introduction
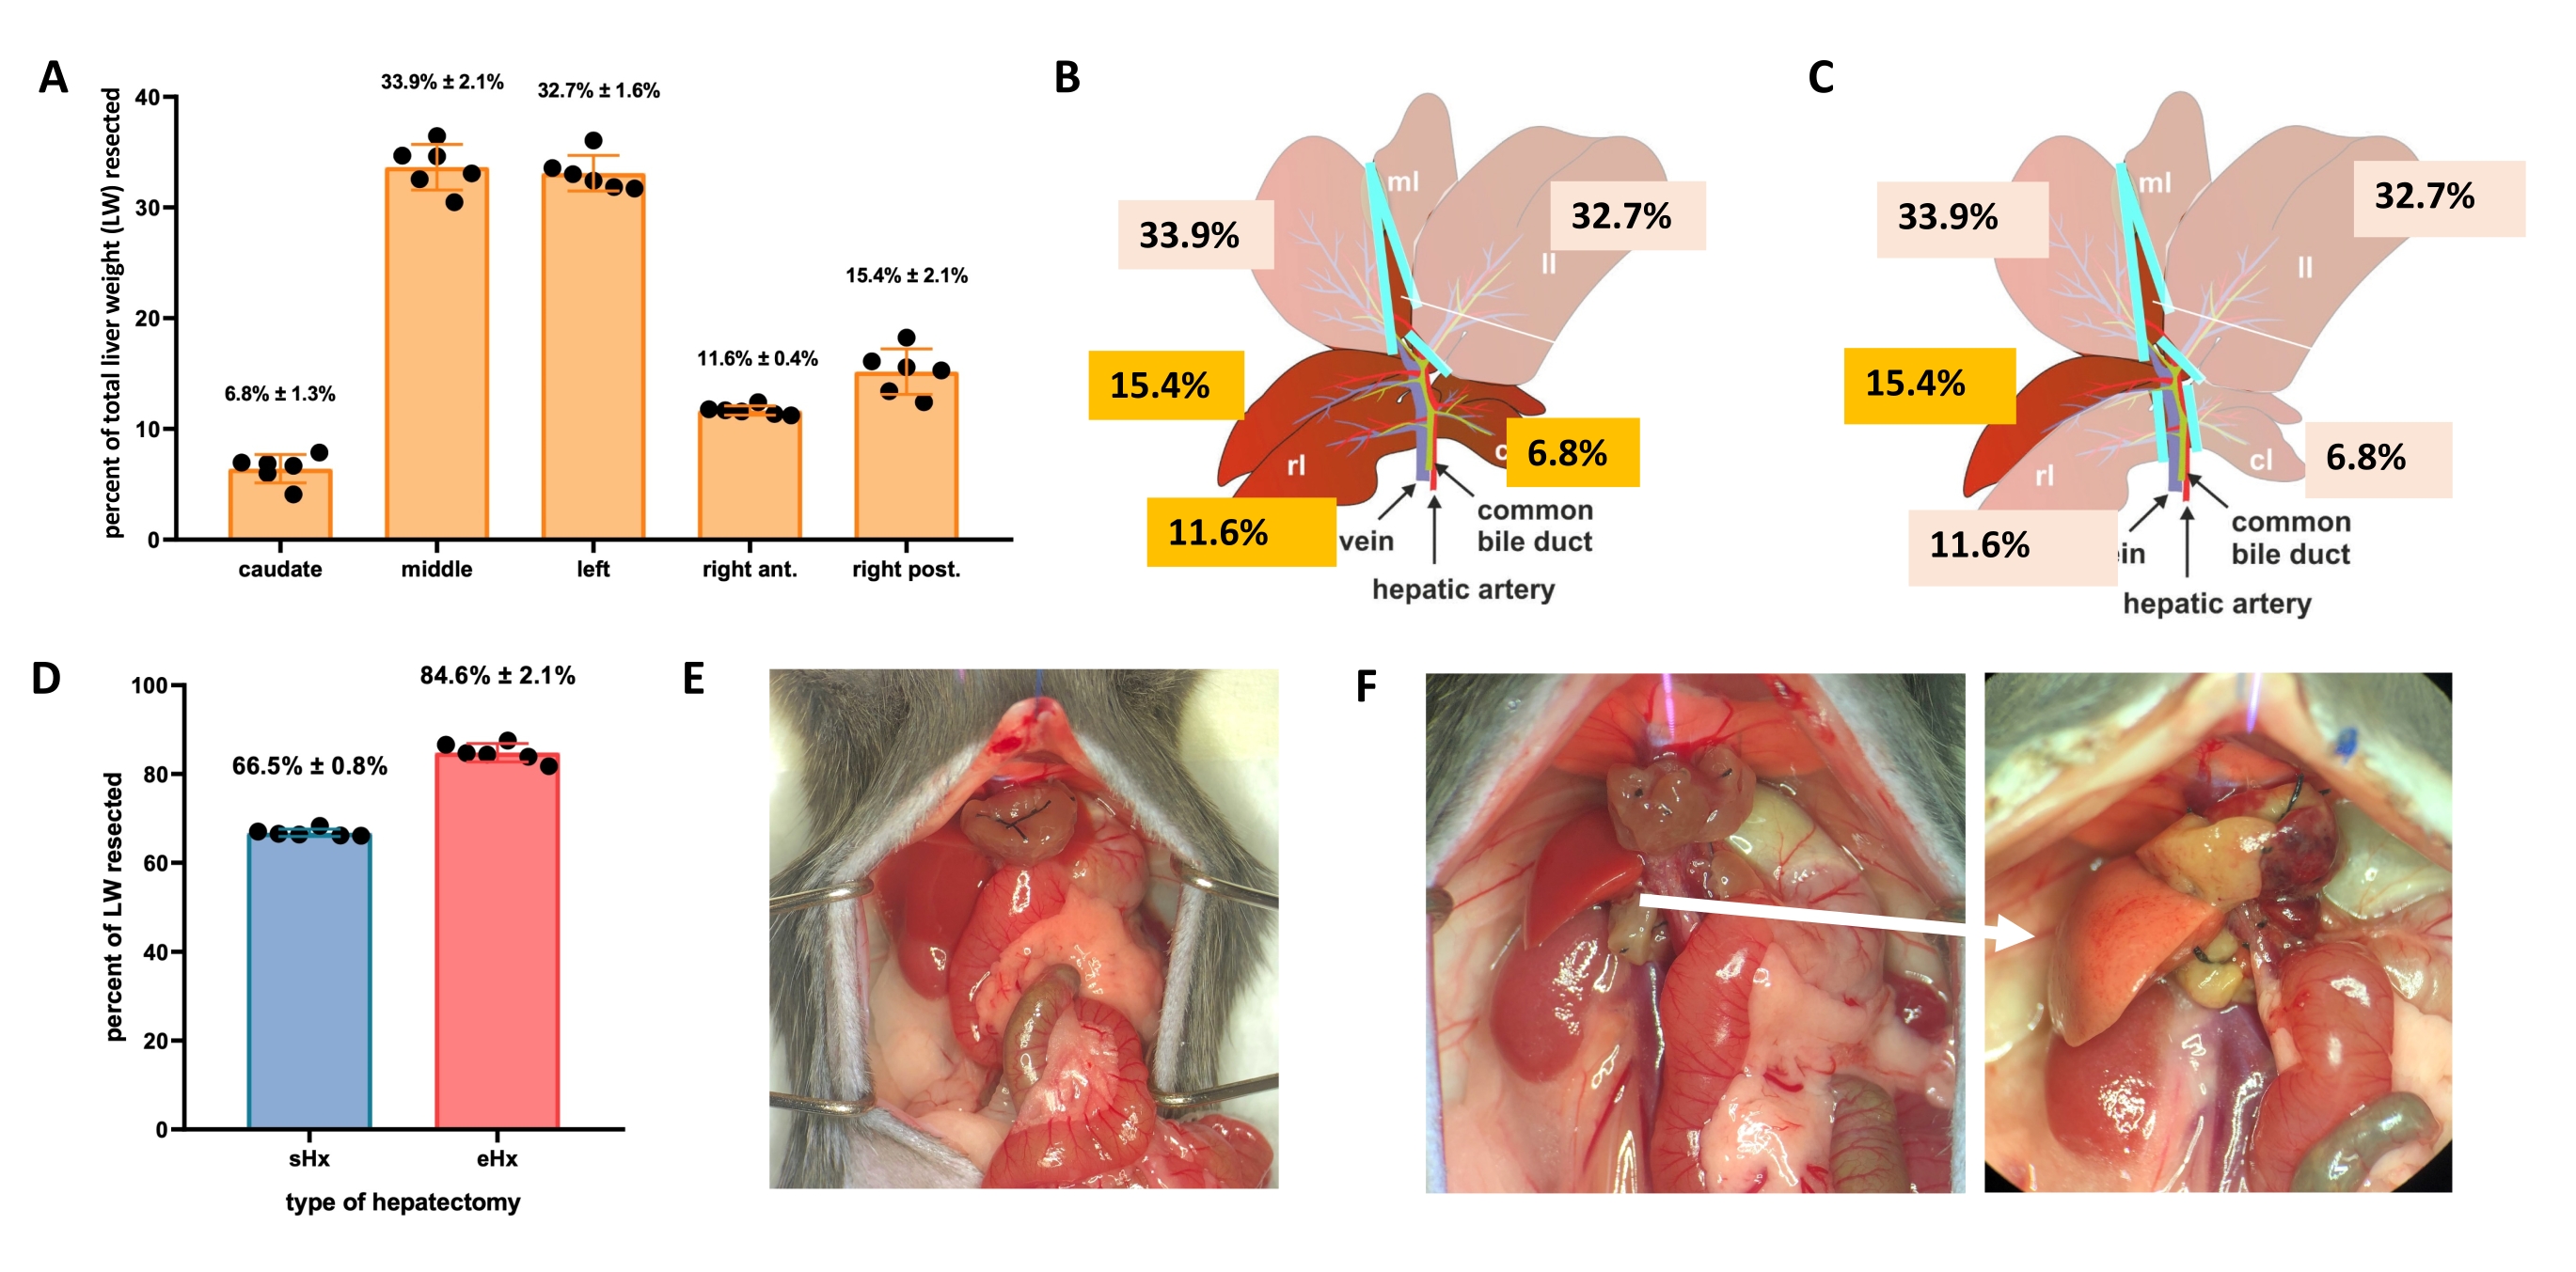
The liver can regenerate itself even after major tissue loss. This unique regenerative capacity is explicitly illustrated by the experimental model of partial (70%) hepatectomy, first described in rats by Higgins and Anderson in 19311. In this model, 70% of the liver is surgically removed from animals by clipping off larger liver lobes. The remaining lobes then grow through compensatory hypertrophy to restore the original liver mass within about 1 week after surgery, albeit without restoration of the original liver architecture2,3. Additional hepatectomies with varying amounts of tissue removal have been developed, such as 86%-extended hepatectomy where the liver remnant is too small to recover, eventually leading to posthepatectomy liver failure (PHLF) and subsequent death in 30%-50% of the animals4,5,6. These models enable the study of normal and failed liver regeneration, depending on the amount of resected tissue (Figure 1).
Although mouse models of hepatectomies have been used successfully for many years, only recently have more advanced analytical methods allowed for a deeper insight at the single-cell level. For most of these methods, however, the presence of individual hepatocytes is a basic prerequisite. Most protocols for the isolation of primary hepatocytes are based on a two-step collagenase perfusion technique and subsequent density-gradient purification to separate viable hepatocytes from debris and non-parenchymal, as well as dead cells7,8,9. This method was first described by Berry and Friend in 196910 and adapted by Seglen and colleagues in 197211,12. However, as gradient centrifugation relies on the density and size of cells, lipid-laden hepatocytes are often lost during standard purification. While such loss may be negligible for many research questions, it is a crucial aspect for early liver regeneration. During the first 2 days, hepatocytes within the regenerating mouse liver accumulate lipids, thereby growing in size and dipping in density. This transient regeneration-associated steatosis (TRAS) serves to provide regenerative fuel and is temporary, but partially overlaps the major proliferative phase and is unevenly distributed within the liver lobules - the functional units of the liver13,14. After extended 86%-hepatectomy, however, TRAS also occurs but persists, because regeneration is stalled and lipids are not being oxidized14. Therefore, gradient-purification of hepatocytes following 70%- or 86%-hepatectomies will yield non-representative fractions, as most lipid-laden hepatocytes are lost due to their low density15.
In this modified isolation protocol, hepatocytes from C57BL/6 mice are isolated 24-48 h after hepatectomy by a classic two-step collagenase perfusion approach. Usually, cannulation and perfusion of the remnant for cell isolation are done via the portal vein. However, portovascular resistance in small remnants left after major resection is high16, and thus perfusion is delicate. Because the vena cava remains unaffected by hepatectomies, perfusion can be easily performed in the retrograde direction via cannulation of the vena cava. A standard peristaltic pump drives the warmed solutions via the catheterized inferior vena cava into the liver remnant, using retrograde perfusion with outflow through the portal vein (Supplementary Figure S1). Hepatocytes are dissociated by collagenases and released from the Glisson's capsule. After washing and careful processing of viable hepatocytes by stepwise isolation using a low-speed centrifugation approach, the hepatocytes can be used for any downstream analyses.
Access restricted. Please log in or start a trial to view this content.
Protocol
All animal experiments were in accordance with Swiss Federal Animal Regulations and approved by the Veterinary Office of Zurich (n° 007/2017, 156/2019) assuring human care. Male C57BL/6 mice aged 10-12 weeks were kept on a 12 h day/night cycle with free access to food and water. Each experimental group consisted of six to eight animals. See the Table of Materials for details related to all materials, equipment, and reagents used in this protocol.
1. Partial hepatectomy in mice
- For standard hepatectomy (70%), ligate and resect the left lateral lobe, the right portion of the median lobe, and the left portion of the median lobe (Figure 1B). For extended hepatectomy (86%)4, also remove the caudate lobes and the right anterior lobe (Figure 1C).
- NOTE: Standard hepatectomy is a procedure that has been used in liver regeneration research for many years. Protocols for this procedure are available3,17, including the video-assisted protocol of Mitchell and Willenbring18. Further details for the techniques used here for hepatectomies can be found in Supplementary File 1.

Figure 1: Standard (70%) and extended (86%) hepatectomy in mice. (A) The five mouse liver lobes and their respective contributions to the total liver weight. (B) Schematic illustration of 70%-hepatectomy in mice. The dark lobes represent the future liver remnant. (C) Schematic illustration of 86%-hepatectomy in mice. The dark lobes represent the future liver remnant. (D) Precise volume of resected tissue post 70%- and 86%-hepatectomy. (E) Mouse abdomen immediately after 70%-hepatectomy; (F) mouse abdomen immediately (left) and 48 h (right) after 86%-hepatectomy. Note the pale color of the steatotic remnant (white arrow). n = 6-7/group. Abbreviations: sHx = standard hepatectomy; eHx = extended hepatectomy; LW = liver weight. Please click here to view a larger version of this figure.
2. Preparation of the perfusion solutions
- Prepare the perfusion, digestion, and preservation buffers (see Table 1).
- Adjust the pH of all buffer solutions at 37 °C by adding sodium hydroxide (NaOH) or hydrogen chloride (HCl) as needed. The optimal pH for the buffers is 7.4.
- Place the preservation buffer and Williams' Medium E on ice.
- Prepare the flow cytometry buffer and store it on ice.
Table 1: Solutions and buffers used for the digestion and purification of hepatocytes. Please click here to download this Table.
3. Preparation of perfusion equipment
- Warm the water bath to 42 °C and place the perfusion buffer (50 mL) and the digestion buffer (10-20 mL) in the water bath. Do not add collagenase to the digestion buffer yet.
- Prepare the peristaltic pump and insert the tubing. The complete perfusion setup is shown in Figure 2.
- Connect a 26 G IV cannula to the outlet end of the tubing using a Luer lock connector. Insert the inlet end of the tube into the prewarmed perfusion buffer tube in the water bath. Flush the tubing with 70% ethanol, followed by 50 mL of sterile sodium chloride (NaCl 0.9%). Prime the tubing with warm perfusion buffer (pump speed of 3 mL/min).
- Sedate the mouse using isoflurane inhalation anesthesia (800 mL/min O2, 3%-5% isoflurane for induction and 2% for maintenance during the procedure). Handle isoflurane under a laboratory hood and provide adequate ventilation.
- Administer buprenorphine subcutaneously 30 min before surgery at a dosage of 0.1 mg/kg body weight.
- To prevent hypothermia, place the sedated mouse on a warming pad and put a rolled cloth tissue underneath the upper abdomen to elevate the liver above the other organs and facilitate access to the inferior vena cava.
NOTE: Do not use tissue that is too thick as kinking of vessels is possible and perfusion efficacy would be affected. - Add eye ointment to prevent corneal damage.
- Before starting surgery, ensure that the animal is adequately anesthetized by testing the pedal withdrawal reflex (foot pad pinch on both hind feet). In case of a response, supply additional anesthesia and retest before starting the procedure.
- Clean the abdomen with 70% ethanol.
- Reopen the midline incision by cutting the suture and gently pulling the wound edges apart. If the hepatectomy is older than 24-48 h, remove the suture and cut the skin with scissors.
- Fix a 5-0 polypropylene suture to the sternum, pull it cranially, and fix it in this position. Use a retractor or simple clips to keep the abdomen open. The abdominal cavity has to be exposed as much as possible to optimize access and visualization.
- Move the intestines to the right using cotton swabs to reveal the portal vein and the vena cava. Use a wet cloth to retain the intestines.
- Place a heavy object of approximately 2 cm height (e.g., a silicone-coated weight ring for volumetric flasks) adjacent to the mouse hind legs (Supplementary Figure S2A). Place the tubing with the connected 26 G IV cannula on the object and position the needle carefully on top of the vena cava. Adjust the length of the tubing.
- Put the prepared collagenase stock solution into the prewarmed digestion buffer tube. Add 250 µL of the stock solution to 10 mL of digestion buffer. Prepare 10-20 mL of digestion buffer per animal. For larger animals or perfusion of whole livers, prepare up to 30 mL of digestion buffer.
NOTE: It is recommended to add the collagenase stock solution to the warmed digestion buffer approximately 30 min prior to the start of the digestion process.

Figure 2: Overview on the perfusion setup. (A) Surgical table with the equipment needed for the perfusion. (B) The materials needed for preparation of the liver, as well as hepatocyte extraction and isolation. Please click here to view a larger version of this figure.
4. Cannulation and perfusion
- Adjust the pump speed to 3 mL/min and turn on the pump. Let the prewarmed perfusion buffer reach the needle. Discard the first 2-3 mL of perfusion buffer.
- Perform cannulation of the inferior vena cava.
- While the buffer is running through the needle, insert the 26 G IV cannula at a shallow angle into the vena cava below the kidney. Ensure that the needle bevel points upward.
- Use a cotton swab to gently pull the vena cava caudally below the puncture site so that the provided tension facilitates the insertion of the cannula into the vein. Look for blood in the flash chamber of the catheter when the needle enters the lumen.
- Advance the needle an additional 2-3 mm to ensure that the tip of the plastic catheter also has entered the vein.
- Slide the plastic catheter over the needle and into the vena cava another 5 mm. Remove the needle slowly and very carefully.
NOTE: Fixing the cannula with a ligature is not recommended. This step is time-consuming as the vessel must first be dissected for this purpose. If the cannula is loosely positioned and supported with an object, no further fixation is necessary (see perfusion setup in Supplementary Figure S2). To stabilize the cannulation site and prevent backflow, a single drop of monomeric n-butyl-cyanoacrylate can be added onto the cannulation site.
- When blood drops out of the cannula, fill it with warm perfusion buffer using a syringe.
- Reattach the tube to the cannula, still running at a pump speed of 3 mL/min. Let the perfusion buffer enter the liver.
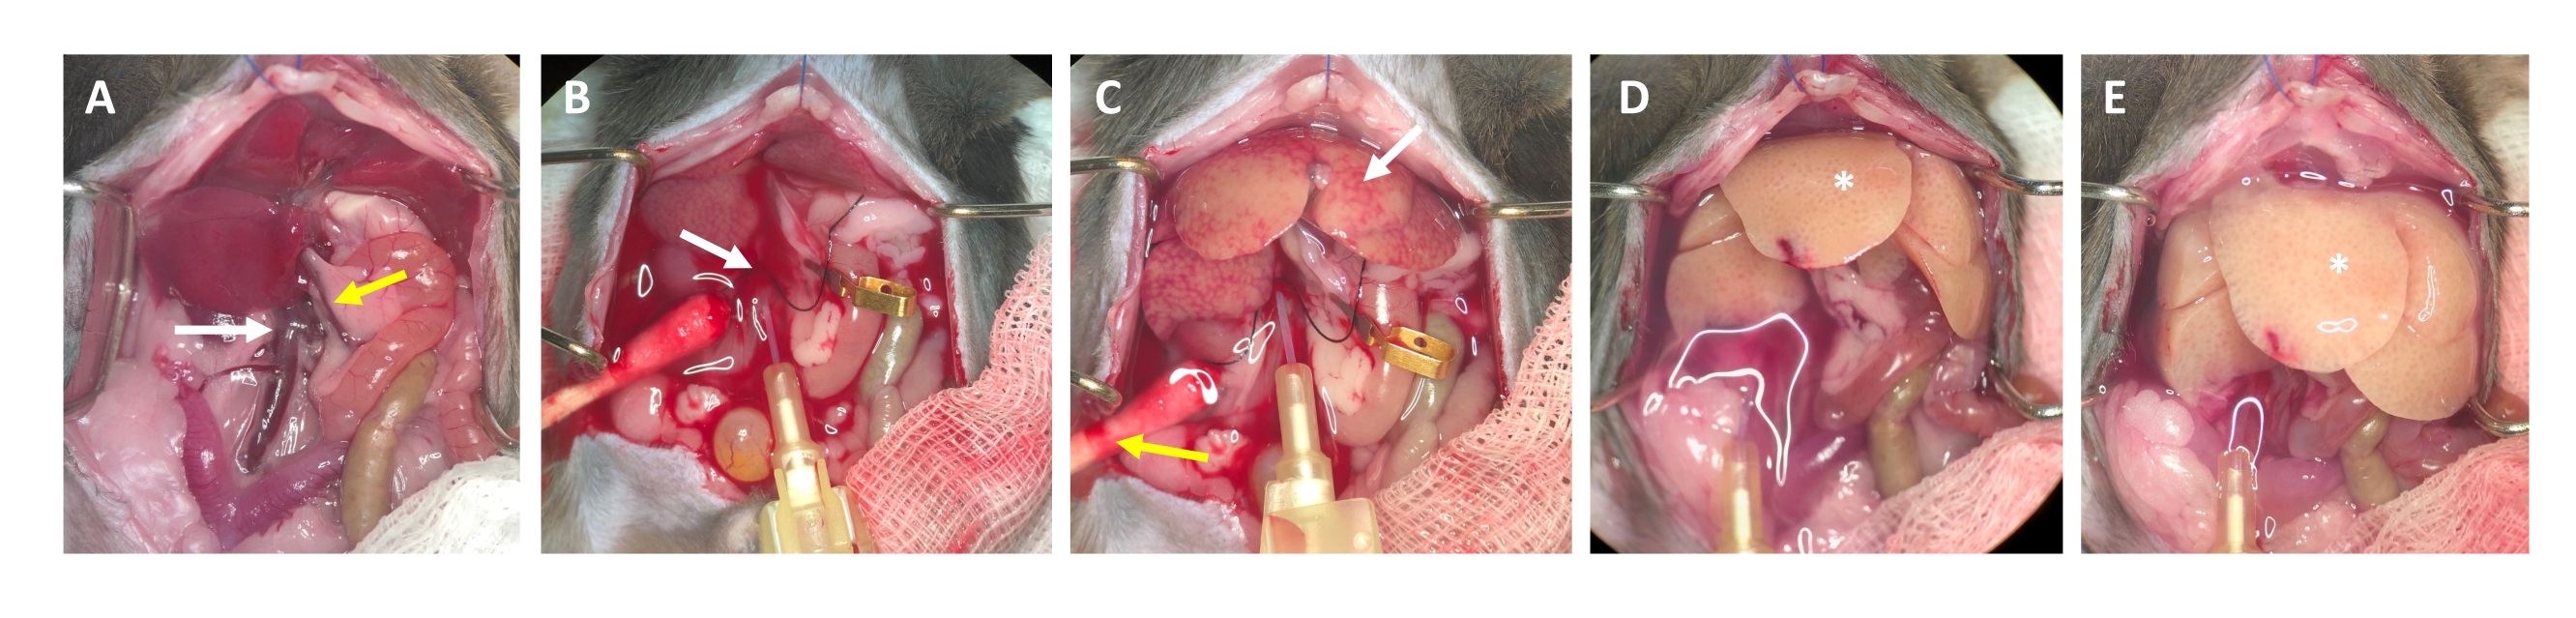
- After 2-3 s, look for white spots forming in the liver and/or expansion/swelling of the portal vein, which indicate that the perfusion buffer is flowing through the liver and entering the liver lobules from the central vein (Figure 3).
- Wait for the portal vein to visibly swell within 1-2 s after the appearance of white spots on the liver surface. Cut the portal vein with scissors as distally as possible from the liver hilus. Use a micro vessel clip to label (not occlude) the cutting site (Figure 3B).
NOTE: This simplifies assessment of the flow through the liver during the perfusion process. The liver clears of blood instantly and turns yellow-white within a few seconds (Figure 3C). An additional cut through the skin on the right side of the abdominal opening facilitates the outflow of the blood as well as the perfusion solution (Figure 3B and Supplementary Figure S2B,C). - Increase the flow up to 4-7 mL/min depending on the weight of the animal, liver size, and the extent of the prior hepatectomy.
- Clamp the portal vein with tweezers or vascular clamp for 7-10 s. Make sure no fluid is passing through.
NOTE: The liver swells visibly during clamping and relaxes upon release. This is crucial to flush the whole liver and clear it of any remaining blood. - Perform a second clamp after approximately 30 s and make sure that the liver swells and relaxes. Continue with flushing the animal until the buffer flowing out of the portal vein is clear, but at least for 3-4 min.
NOTE: The pump speed depends on the tube as well as the size of the liver. It must be evaluated individually. - At this point of the procedure, euthanasia should have occurred secondary to exsanguination. Confirm that systemic circulation has stopped (no heartbeat or flickering of the heart). To ensure death, bilateral pneumothorax is performed at this stage of the procedure as secondary physical method of euthanasia.
NOTE: Reduce the pump speed slightly if systemic circulation has stopped (no heartbeat or flickering of heart).

Figure 3: Perfusion process from cannulation to digestion. (A) Anatomy of the mouse liver with the inferior vena cava (white arrow) and the portal vein (yellow arrow). (B) Cannulation of the inferior vena cava. The cannula is secured with a ligature (white arrow), and the location of the outflow through the opened portal vein is marked (not clamped) with a micro vessel clamp. (C) Note the appearance of patchy structures before the perfusion buffer has cleared the liver from all remaining blood (white arrow). The skin is incised (yellow arrow) and a cotton swab is placed to ensure drainage of blood and perfusion fluid. Intermittent clamping can be performed with a vascular clamp or tweezers. (D) The liver should be cleared of all blood (*). After the collagenase-containing digestion buffer has entered the liver, it will no longer relax after clamping and the liver lobes will increase in size. (E) After a while, a bubbly appearance on the surface of the liver can be observed (*). Please click here to view a larger version of this figure.
5. Digestion
- Pause the perfusion pump and quickly transfer the inlet tubing from the perfusion buffer to the prewarmed digestion buffer. Restart the pump.
- Before the digestion buffer reaches the liver, clamp the portal vein one more time for 3-4 s. Ensure that the liver relaxes upon release of the clamp and the perfusion fluid remains clear.
NOTE: The digestion buffer contains phenol red and is easily distinguishable from the clear perfusion buffer. This allows for easy tracking within the tube. - As soon as the digestion buffer has reached the liver, clamp the portal vein once again with a micro vessel clip.
NOTE: When clamping, the liver swells but does not relax upon release of the clamp. This is normal. - To facilitate the digestion process, close the superior vena cava with a vascular clamp directly below the diaphragm to allow the digestion buffer to pass from the inferior vena cava to the liver to the outflow through the opened portal vein.
NOTE: This clamping ensures that the systemic circulation is bypassed and unnecessary contact with residual blood components/inhibitors is prevented. This step is optional, as it is difficult to approach the superior vena cava behind the enlarged liver tissue after sham surgery, but access is much easier in hepatectomized mice. - Digest for approximately 4 min at a flow rate of 5 mL/min. As digestion progresses, look for signs of the liver beginning to swell and small clear/transparent sections on the surface of the liver. Furthermore, observe that the liver takes on the texture of a wet piece of cloth and appears almost soggy (Figure 3E). Probe the consistency by carefully touching with a damp cotton swab.
- Continue with the perfusion until a marked difference in the surface texture of the liver can be observed. Observe that the liver assumes a very light color and a bubbly appearance (Figure 3E), and the Glisson's capsule (i.e., the liver sack) separates from the parenchyma. Stop the digestion process as soon as the liver has acquired these properties, as over-digestion can damage the hepatocytes. Remove the needle before air gets into the liver.
NOTE: Usually 10-20 mL of digestion buffer is needed to reach sufficient digestion. This depends on the animal's size, extent of hepatectomy, tubing setup, and quality of the collagenase solution. If needed, increase the perfusion time rather than the perfusion speed. Too much pressure in the vascular system can cause the liver to burst and the perfusion/digestion fluid might be lost to the retroperitoneal space.
6. Preparation of the liver
- Remove the liver gently from the abdominal cavity. Be very careful as it is now very flimsy and fragile.
- Grasp the central connective tissue between the lobes using forceps and slightly lift it upward, using it as an anchor point.
- Cut all the connections of the liver to other organs, remove the gall bladder, and place the liver in the ice-cold preservation buffer.
NOTE: Ideally, hepatocyte extraction and further processing should take place immediately to maintain the viability of hepatocytes. However, if necessary, the liver can be stored for a short time at 4 °C (e.g., for transport). This delay should not exceed 30-40 min.
7. Hepatocyte extraction
- Transfer the liver to a 10 cm Petri dish and add 10 mL of ice-cold Williams' Medium E.
- Rupture the Glisson's capsule with fine-tip tweezers in a few locations along the liver surface. Grasp a central part (e.g., connective tissue at the liver hilus) with two pairs of tweezers and slowly pull them apart, allowing the capsule to tear without damaging the hepatocytes. Release the cells by gently shaking the capsule (Supplementary Figure S3).
NOTE: Ideally, the liver tears apart easily and releases the cells. Do not apply force. A cell scraper can help to completely remove all cells and increase cell yield. Do not cut the liver into pieces with scissors. - Filter 5 mL of liver pulp through a 100 µm cell strainer into a 50 mL tube. Rinse the filter with 10 mL of fresh ice-cold medium. Filter the remaining 5 mL of pulp through the cell strainer.
NOTE: Use a 25 mL serological pipette to transfer the liver pulp with the dissociated hepatocytes (Figure 4A). Smaller pipettes with smaller openings increase the shear stress and irreversibly damage the hepatocytes. - Add a total of 30 mL of cold medium to rinse the Petri dish, filter it, and add the suspension to the 50 mL tube until it is full. All isolated cells are now in suspension (Figure 4B).

Figure 4: Purification by gentle centrifugation. (A) Liver homogenate left after the extraction step. (B) Microscopic view (20x magnification) of the homogenate; note the marked contamination with debris. (C) Purification centrifugation steps and (D) microscopic views of the supernatants to be discarded. (E) Microscopic view of the purified hepatocyte fraction. Scale bars = 100 µm. Please click here to view a larger version of this figure.
8. Hepatocyte isolation
- Spin at 50 × g for 5 min at 4 °C (lowest acceleration and lowest brake possible).
NOTE: Hepatocytes are denser than non-parenchymal liver cells. Due to the low centrifugation force, only hepatocytes are pelleted, while other cells (e.g., immune cells, erythrocytes, and sinusoidal cells) remain in the supernatant. - Aspirate most of the supernatant, leaving 1 mL to resuspend the cells by gently swirling the tube.
- Add 40 mL of cold Williams' E medium and spin again at 50 × g for 10 min at 4 °C (low acceleration, low brake) to further remove dead hepatocytes and cell debris and pellet viable and fatty hepatocytes (Figure 4C).
- Discard most of the supernatant, leaving 1 mL to resuspend the cells by swirling the tube.
- Add 40 mL of cold Williams' E medium and spin again at 50 × g for 5 min at 4 °C (low acceleration, low brake).
- Aspirate most of the supernatant, leaving 1 mL to resuspend the cells by gently swirling the tube.
NOTE: Do not stop this process until cells are fixed or analyzed. Hepatocytes are very fragile and any delay in the perfusion, digestion, and purification process can damage the cells. - Determine the final cell concentration after the addition of trypan blue, using a Neubauer-improved counting chamber.
NOTE: Most debris and non-parenchymal cells have now been removed, resulting in a clean pellet of approximately 10-15 × 106 hepatocytes left after 70%-hepatectomy. - Depending on the desired concentration, add more ice-cold medium. Use the hepatocyte cell suspension for any downstream analysis or initiate a primary cell culture.
NOTE: At this stage, only few immune and non-parenchymal cells (<5%) remain in the suspension. If further purification is desired, perform a negative selection of CD31+ and CD45+ cells by magnetic- or fluorescence-activated cell sorting (MACS/FACS). To date, there is no reliable and robust surface marker for liver parenchymal cells.
9. Preparation of the isolated hepatocytes for flow cytometry
- Centrifuge the hepatocytes at 100 × g for 5 min.
- Discard the supernatant and add the desired amount of flow cytometry buffer, depending on the concentration of the cell suspension.
- Add 1 mL of cell suspension in a flow cytometry tube. Centrifuge for 5 min at 100 × g and discard the supernatant.
- Add 100-200 µL of the diluted Alexa Fluor 488 Zombie green viability dye (concentration 1:400) to the cells and shake them gently. Carefully resuspend the hepatocytes by manual shaking or using a vortex mixer at low speed (maximum 2-3) for 2 s.
NOTE: Do not use small pipette tips to resuspend the cells. They are very fragile and the applied shear stress causes damage and reduces cell viability. If pipetting is not avoidable, use a 1,000 µL pipette after cutting off the smallest part from the tip to enlarge the diameter and pipette the cells very slowly. - Place the tubes on ice or store them at room temperature, depending on the desired staining. Incubate the cells for 20-30 min in the dark.
- Add 2 mL of flow cytometry buffer and wash the cells 3x. Centrifuge the cells after each washing step at 100 × g for 5 min.
- Add 2 mL of fixation buffer (1:1 4% PFA and PBS). Carefully resuspend the hepatocytes by manual shaking or using a vortex mixer at low speed (maximum 2-3) for 2 s.
- Fix the cells for 30 min.
- Centrifuge at 100 × g for another 5 min, discard the supernatant, and add flow cytometry buffer.
NOTE: Cells can be stored in flow cytometry buffer prior to analysis up to 72 h after isolation.
10. Analyzing hepatocytes with flow cytometry
- Analyze the hepatocytes using a fluorescence-activated cell sorter.
NOTE: Consider the relatively large size of hepatocytes and adjust the voltages. Start with a low voltage and do not go higher than 350 V for forward scatter (FSC) and 220 V for side scatter (SSC).- Adjust the voltages for FSC and SSC to the estimated large size of the cells. Identify the hepatocyte population and record all events using SSC-A and FSC-A (Figure 5A).
- Observe that debris and non-parenchymal cells are displayed at the bottom left corner of the FSC versus SSC density plot and are excluded (Figure 5A).
- As doublet cells can affect the analysis, construct a side scatter height (SSC-H) versus side scatter area (SSC-A) density plot to exclude doublets, as shown in Figure 5B.
- Select the final hepatocyte population by gating CD31- (endothelial marker) and CD45- (immune marker) cells (Figure 5C).
Access restricted. Please log in or start a trial to view this content.
Results
TRAS peaks at 16 h post hepatectomy and gradually vanishes 32-48 h after standard hepatectomy, but persists beyond 48 h after extended hepatectomy. Macroscopically, TRAS is readily visible as a pale complexion of the liver remnant (Figure 1F) and can be observed in hepatectomized mice between 16 h and 48 h after surgery.
The estimated final yield is 10-15 × 106 hepatocytes after 70%-hepatectomy and 4-9 × 10⁶ after extended 86%-hepatectomy i...
Access restricted. Please log in or start a trial to view this content.
Discussion
The published protocol provides a reliable and straightforward method to isolate a high yield of normal and steatotic murine hepatocytes for single-cell downstream analyses or bulk analysis of cells following FACS sorting. The distinct advantage over density-gradient purification is that the cellular lipid content has essentially no impact on the effective yield of hepatocytes. Thus, the fraction of steatotic hepatocytes will be retained and included in downstream analyses. This is not only crucial for the study of steat...
Access restricted. Please log in or start a trial to view this content.
Disclosures
The authors declare that they have no competing interests.
Acknowledgements
This study was supported by the Swiss National Fond (project grant 310030_189262).
Access restricted. Please log in or start a trial to view this content.
Materials
| Name | Company | Catalog Number | Comments |
| Reagents | |||
| Alexa Fluor 488 Zombie green | BioLegend | 423111 | Amine-reactive viability dye |
| Attane Isoflurane ad us. vet. 99.9% | Provet AG | QN01AB06 | CAUTION: needs ventilation |
| EDTA solution | Sigma-Aldrich | E8008-100ML | - |
| Ethanol | Sigma-Aldrich | V001229 | Dilute with water to 70% |
| Fetal bovine serum (FCS) | Gibco | A5256701 | - |
| Hanks' Balanced Salt Solution (HBSS), Ca2+, Mg2+, phenol red | Sigma-Aldrich | H9269-6x600ML | For digestion/preservation |
| Hanks' Balanced Salt solution (HBSS), w/o Ca2+, w/o Mg2+, no phenol red | Sigma-Aldrich | H6648-6x500ML | For perfusion buffer |
| HEPES solution, 1 M | Sigma-Aldrich | 83264-100ML-F | - |
| Histoacryl tissue adhesive (butyl-2-cyanoacrylate) | B. Braun | 1050052 | For stabilization of cannulation site |
| Hoechst 33258 Staining Dye Solution | Abcam | ab228550 | - |
| Liberase Research Grade | Roche | 5401119001 | Lyophilized collagenases I/II |
| NaCl 0.9% 500 mL Ecotainer | B. Braun | 123 | - |
| Paralube Vet Ointment | Dechra | 17033-211-38 | - |
| Phosphate buffered saline (PBS) | Gibco | A1286301 | - |
| Sudan IV – Lipid staining | Sigma-Aldrich | V001423 | - |
| Temgesic (Buprenorphine hydrochloride), Solution for Injection 0.3 mg/mL | Indivior Europe Ltd. | 345928 | Narcotics. Store securely. |
| Trypan blue, 0.4%, sterile-filtered | Sigma-Aldrich | T8154 | For cell counting |
| Williams’ Medium E | Sigma-Aldrich | W4128-500ML | - |
| Materials | |||
| 25 mL serological pipette, Greiner Cellstar | Merck | P7865 | - |
| 50 mL Falcon tubes | TPP | - | - |
| BD Neoflon, Pro IV Catheter 26 G | BD Falcon | 391349 | - |
| Cell scraper, rotating blade width 25 mm | TPP | 99004 | - |
| Falcon Cell Strainer 100 µm Nylon | BD Falcon | 352360 | - |
| Fenestrated sterile surgical drape | - | - | Reusable cloth material |
| Filling nozzle for size 16# tubing (ID 3.1 mm) | Drifton | FILLINGNOZZLE#16 | To go into the tubes |
| Flow cytometry tubes, 5 mL | BD Falcon | 352008 | - |
| Male Luer to Barb, Tubing ID 3.2 mm | Drifton | LM41 | Connection tube to syringe |
| Petri dishes, 96 x 21 mm | TPP | 93100 | - |
| Prolene 5-0 | Ethicon | 8614H | To retract the sternum |
| Prolene 6-0 | Ethicon | 8695H | For skin suture |
| Prolene 8-0 | Ethicon | EH7470E | Ligature gall bladder |
| Tube 16#, WT 1.6 mm, ID 3.2 mm, OD 6.4 mm | Drifton | SC0374T | Perfusion tube |
| Equipment | |||
| BD LSRFortessa Cell Analyzer Flow Cytometer | BD | - | - |
| Isis rodent shaver | Aesculap | GT421 | - |
| Isofluran station | Provet | - | - |
| Low-speed centrifuge – Scanspeed 416 | Labogene | - | - |
| Neubauer-improved counting chamber | Marienfeld | - | - |
| Oxygen concentrator – EverFlo | Philips | 1020007 | 0 – 5 L/min |
| Pipetboy – Pipettor Turbo-Fix | TPP | 94700 | - |
| Shenchen perfusion pump – YZ1515x | Shenchen | YZ1515x | - |
| Surgical microscope – SZX9 | Olympus | - | - |
| ThermoLux warming mat | Thermo Lux | - | - |
| Vortex Genie 2, 2700 UpM | NeoLab | 7-0092 | - |
| Water bath – Precision GP 02 | Thermo scientific | - | Adjust to 42 °C |
References
- Higgins, G., Anderson, R. Experimental pathology of liver. I. Restoration of liver of white rat following partial surgical removal. Archives of Pathology & Laboratory Medicine. 12, 186-202 (1931).
- Taub, R. Liver regeneration: from myth to mechanism. Nature Reviews Molecular Cell Biology. 5 (10), 836-847 (2004).
- Nevzorova, Y. A., Tolba, R., Trautwein, C., Liedtke, C. Partial hepatectomy in mice. Lab Animal. 49, 1 Suppl 81-88 (2015).
- Lehmann, K., et al. Liver failure after extended hepatectomy in mice is mediated by a p21-dependent barrier to liver regeneration. Gastroenterology. 143 (6), 1609-1619 (2012).
- Makino, H., et al. A good model of hepatic failure after excessive hepatectomy in mice. Journal of Surgical Research. 127 (2), 171-176 (2005).
- Lizardo Thiebaud, M. J., Cervantes-Alvarez, E., Navarro-Alvarez, N. Liver Pathology. Gayam, V., Engin, O. , IntechOpen. (2019).
- Charni-Natan, M., Goldstein, I. Protocol for primary mouse hepatocyte isolation. STAR Protocols. 1 (2), 100086(2020).
- Smedsrød, B., Pertoft, H. Preparation of pure hepatocytes and reticuloendothelial cells in high yield from a single rat liver by means of Percoll centrifugation and selective adherence. Journal of Leukocyte Biology. 38 (2), 213-230 (1985).
- Mederacke, I., Dapito, D. H., Affò, S., Uchinami, H., Schwabe, R. F. High-yield and high-purity isolation of hepatic stellate cells from normal and fibrotic mouse livers. Nature Protocols. 10 (2), 305-315 (2015).
- Berry, M. N., Friend, D. S. High-yield preparation of isolated rat liver parenchymal cells: a biochemical and fine structural study. Journal of Cell Biology. 43 (3), 506-520 (1969).
- Seglen, P. O. Preparation of rat liver cells. I. Effect of Ca 2+ on enzymatic dispersion of isolated, perfused liver. Experimental Cell Research. 74 (2), 450-454 (1972).
- Seglen, P. O. Preparation of isolated rat liver cells. Methods in Cell Biology. 13, 29-83 (1976).
- Trotter, N. L. A fine structure study of lipid in mouse liver regenerating after partial hepatectomy. Journal of Cell Biology. 21 (2), 233-244 (1964).
- Kachaylo, E., et al. PTEN down-regulation promotes β-oxidation to fuel hypertrophic liver growth after hepatectomy in mice. Hepatology. 66 (3), 908-921 (2017).
- Jung, Y., Zhao, M., Svensson, K. J. Isolation, culture, and functional analysis of hepatocytes from mice with fatty liver disease. STAR Protocols. 1 (3), 100222(2020).
- Dold, S., et al. Portal hyperperfusion after extended hepatectomy does not induce a hepatic arterial buffer response (HABR) but impairs mitochondrial redox state and hepatocellular oxygenation. PLoS One. 10 (11), 0141877(2015).
- Boyce, S., Harrison, D. A detailed methodology of partial hepatectomy in the mouse. Laboratory Animals. 37 (11), 529-532 (2008).
- Mitchell, C., Willenbring, H. A reproducible and well-tolerated method for 2/3 partial hepatectomy in mice. Nature Protocols. 3 (7), 1167-1170 (2008).
- Chen, T., Oh, S., Gregory, S., Shen, X., Diehl, A. M. Single-cell omics analysis reveals functional diversification of hepatocytes during liver regeneration. JCI Insight. 5 (22), (2020).
- Chembazhi, U. V., Bangru, S., Hernaez, M., Kalsotra, A. Cellular plasticity balances the metabolic and proliferation dynamics of a regenerating liver. Genome Research. 31 (4), 576-591 (2021).
- Fiegel, H. C., Kaufmann, P. M., Kneser, U., Kluth, D., Rogiers, X. Priming of hepatocytes for cell culture by partial hepatectomy prior to cell isolation. Journal of Tissue Engineering. 6 (6), 619-626 (2000).
- Roche, Liberase TM Research Grade. , (2020).
- Giugliano, S., et al. Hepatitis C virus infection induces autocrine interferon signaling by human liver endothelial cells and release of exosomes, which inhibits viral replication. Gastroenterology. 148 (2), 392-402 (2015).
- Shetty, S., et al. Common lymphatic endothelial and vascular endothelial receptor-1 mediates the transmigration of regulatory T cells across human hepatic sinusoidal endothelium. The Journal of Immunology. 186 (7), 4147-4155 (2011).
- Edwards, S., Lalor, P. F., Nash, G. B., Rainger, G. E., Adams, D. H. Lymphocyte traffic through sinusoidal endothelial cells is regulated by hepatocytes. Hepatology. 41 (3), 451-459 (2005).
- Helling, T. S. Liver failure following partial hepatectomy. HPB. 8 (3), 165-174 (2006).
- Saran, U., Humar, B., Kolly, P., Dufour, J. F. Hepatocellular carcinoma and lifestyles. Journal of Hepatology. 64 (1), 203-214 (2016).
- Park, W. Y., et al. Sugar-sweetened beverage, diet soda, and nonalcoholic fatty liver disease over 6 years: the Framingham Heart Study. Clinical Gastroenteroly and Hepatology. , (2021).
- Pocha, C., Kolly, P., Dufour, J. F. Nonalcoholic fatty liver disease-related hepatocellular carcinoma: a problem of growing magnitude. Seminars in Liver Disease. 35 (3), 304-317 (2015).
- Roeb, E. Excess body weight and metabolic (dysfunction)-associated fatty liver disease (MAFLD). Visceral Medicine. 37 (4), 273-280 (2021).
Access restricted. Please log in or start a trial to view this content.
Reprints and Permissions
Request permission to reuse the text or figures of this JoVE article
Request PermissionThis article has been published
Video Coming Soon
Copyright © 2025 MyJoVE Corporation. All rights reserved