A subscription to JoVE is required to view this content. Sign in or start your free trial.
Methods Article
Preparation and Implantation of Electrodes for Electrically Kindling VGAT-Cre Mice to Generate a Model for Temporal Lobe Epilepsy
In This Article
Summary
This report describes the methods to generate a model of temporal lobe epilepsy based on the electrical kindling of transgenic VGAT-Cre mice. Kindled VGAT-Cre mice may be useful in determining what causes epilepsy and for screening novel therapies.
Abstract
It was discovered that electrical kindling of VGAT-Cre mice led to the spontaneous motor and electrographic seizures. A recent paper focused on how unique VGAT-Cre mice were used in developing spontaneous recurring seizures (SRS) after kindling and a likely mechanism - insertion of Cre into the VGAT gene - disrupted its expression and reduced GABAergic tone. The present study extends these observations to a larger cohort of mice, focusing on key issues such as how long the SRS continues after kindling and the effect of the animal's sex and age. This report describes the protocols for the following key steps: making headsets with hippocampal depth electrodes for electrical stimulation and for reading the electroencephalogram; surgery to affix the headset securely on the mouse's skull so that it does not fall off; and key details of the electrical kindling protocol such as duration of the pulse, frequency of train, duration of train, and amount of current injected. The kindling protocol is robust in that it reliably leads to epilepsy in most VGAT-Cre mice, providing a new model to test for novel antiepileptogenic drugs.
Introduction
Epilepsy is a major neurological disorder with significant economic and human burdens. NINDS estimates there are 3 million Americans with epilepsy. Approximately 0.6 million of these patients have temporal lobe epilepsy (TLE)1. Unfortunately, medical treatment of TLE fails in one-third of the patients because of ineffectiveness, development of drug resistance, or intolerance to side effects2. Clearly, there is a significant need to develop novel therapies for TLE, a conclusion shared by the American Epilepsy Society Basic Science Committee, the International League Against Epilepsy Working Group for Preclinical Epilepsy Drug Discovery, and the National Advisory Neurological Disorders and Stroke Council3,4.
Current animal models of temporal lobe epilepsy use either chemoconvulsants (e.g., kainate, pilocarpine) or prolonged electrical stimulation to induce a long-lasting status epilepticus5,6,7. Many animals die during the procedure (10%-30% in rats, up to 90% in mice8). Animals that survive and develop epilepsy show extensive neuronal death throughout the brain9,10. This death triggers a cascade of responses, beginning with the activation of microglia, astrocytes, and infiltrating monocytes. Neuronal responses include circuit reorganization (e.g., mossy fiber sprouting), birth of new neurons that fail to integrate properly into circuits (e.g., ectopic granule cells), and intrinsic changes that lead to hyperexcitability (e.g., upregulation of Na+ channels). An epilepsy model without significant neuronal death will facilitate the search for new antiepileptic drugs.
While testing the GABA hypothesis of epilepsy, it was discovered that treating VGAT-Cre mice with a mild electrical kindling protocol led to the spontaneous motor and electrographic seizures11. In general, the electrical kindling of rodents does not lead to spontaneous seizures that define epilepsy, although it can, in cases of over-kindling11. VGAT-Cre mice express Cre recombinase under the control of the vesicular GABA transporter (VGAT) gene, which is specifically expressed in GABAergic inhibitory neurons. It was found that insertion of Cre disrupted the expression of VGAT at the mRNA and protein levels, thus impairing GABAergic synaptic transmission in the hippocampus. It was concluded that kindled VGAT-Cre mice could be useful to study the mechanisms involved in epileptogenesis and for screening novel therapeutics11. The present report provides the methods used in generating the model in detail.
Protocol
Animal use followed ARRIVE12 guidelines and was approved by the Animal Care and Use Committee of the University of Virginia.
1. Making headsets with two bipolar electrodes (Figure 1)

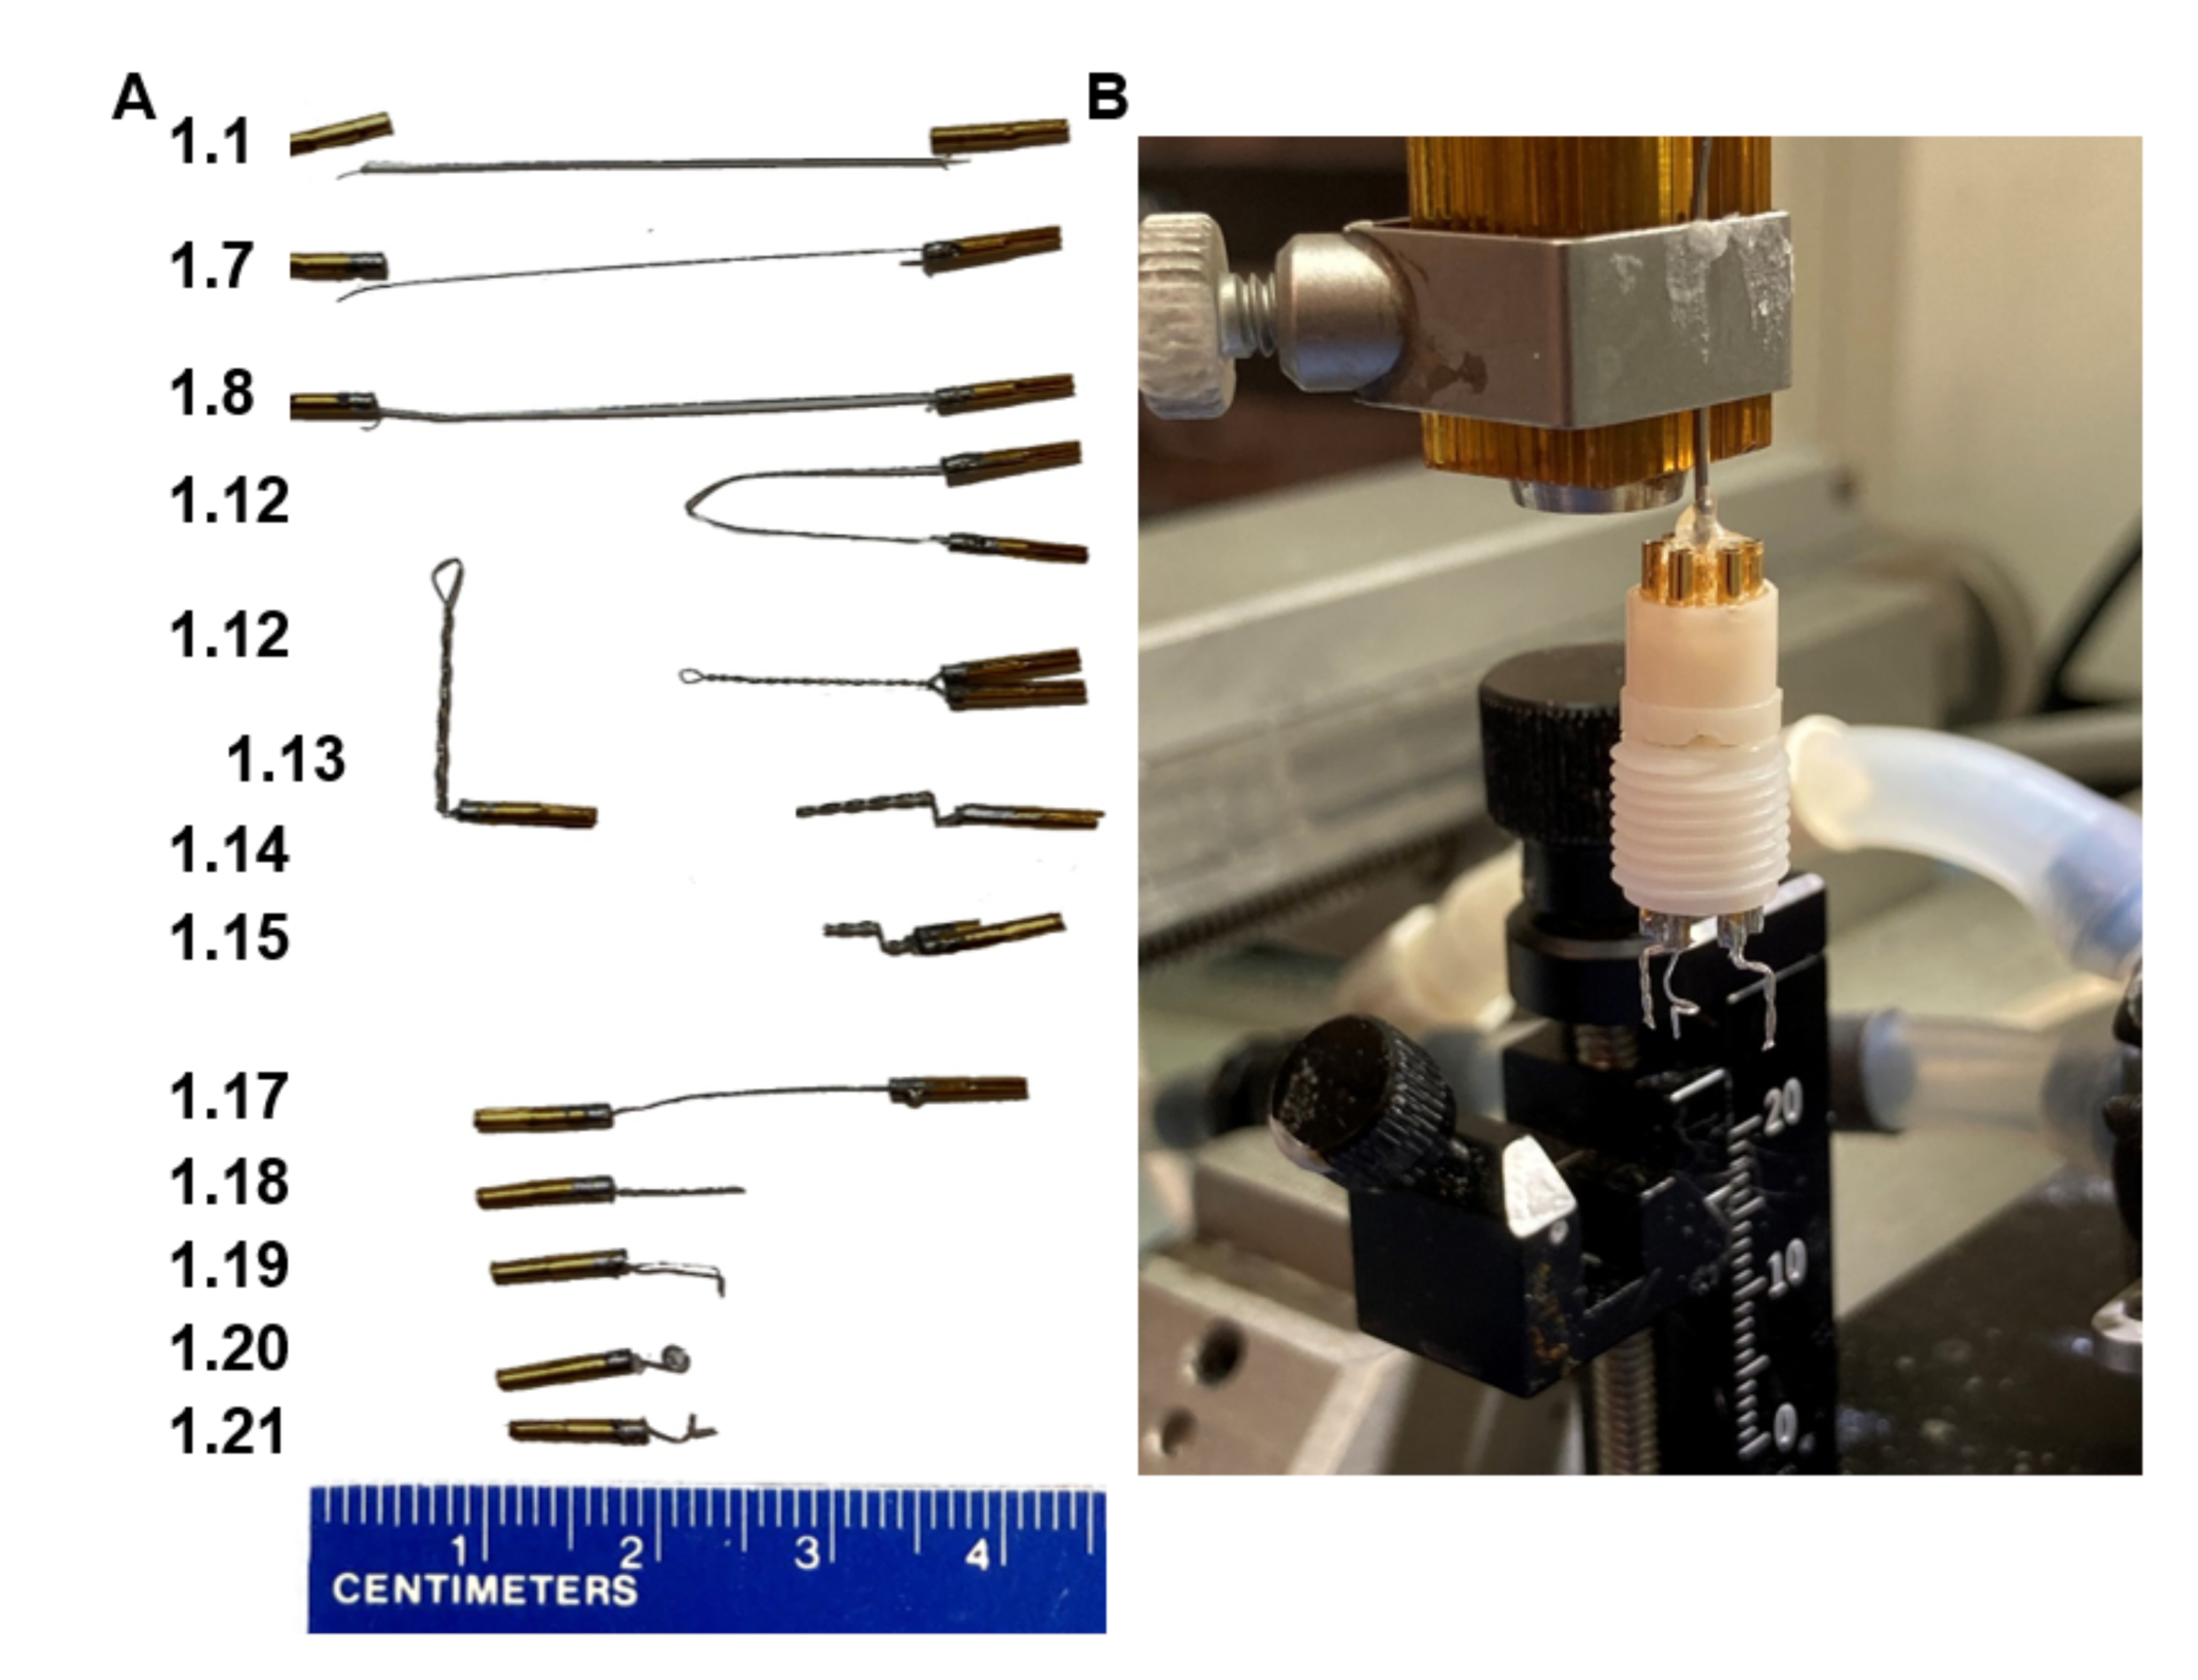
Figure 1: Key steps in EEG headset fabrication. (A) Appearance of the electrodes at the various steps in the protocol (numbers in the left match step). (B) A picture of the final product mounted in a homemade holder that fits the stereotaxic frame. Note, the holder ends with a collar pin assembly that fits into the headset pedestal. Please click here to view a larger version of this figure.
- Cut 3.5 cm of stainless polytetrafluoroethylene-coated stainless-steel wire.
- Strip about 1 mm of the insulation coat off the wire on both ends. Do not have too much of the wire stripped.
- Put two pins on a vise holder with the bottom part of the pin that has a longer slit facing down.
- Apply flux onto the stripped ends of the wire and onto the tops of the pins.
- Tin the stripped part of the wire with just enough solder to coat it.
- Add a minimal amount of solder to the top of the pin without overflowing onto the sides.
- Place one end of the stripped ends of the wire into the pin as deep as it will allow while the solder is melted.
NOTE: There is a side hole where the wire can come out - do not let the wire come out of the pin. All of the stripped wire must stay within the pin. - Repeat steps 1.6-1.7 for the second pin, now with the other stripped ends of the wire.
- Let the pins sit for 30 s to set, remove them from the vise holder, and then pull on them to make sure that the connection between the wire and the pins is strong and holds.
- Rinse the pins in cold water, and then dry.
- Verify conductance between pin 1 and pin 2 using an ohmmeter.
- Bring the pins at the ends of the wire together; hold them parallel and close. Clamp a hemostat to the center of the wire. Then, rotate the hemostat, so the wire twists around itself fairly tight. Remove the hemostat.
- Clamp a forceps onto the twisted wire 2 mm below the pins and bend the wire at 90˚.
- Push the same wire again 90˚ back over the forceps creating another bend 1 mm from the first.
- Cut the twisted wire at a 45° angle below the bend at 3.5 mm with small sharp scissors.
- Prepare two of these bipolar (double-pin twisted) electrodes for each headset (optional, second is back-up in case of electrical problems with the first).
- Prepare one single reference electrode by cutting a wire with pins soldered on both ends into two (steps 1.1-1.17, Figure 1A).
- Cut the wire at 7 mm.
- Bend the end 1 mm below the tip.
- Then, cover the bent 1 mm tip of the wire with forceps and rotate the wire tight around the forceps to create a small loop (1 mm in diameter).
- Bend the loop perpendicular to the straight part of the wire to make the wire tip point outward again.
- Assemble the two bipolar electrodes and the single reference electrode into the six-pin pedestal in a way that the bipolar electrodes are side by side with 6 mm distance between them, and that the reference electrode is placed in the middle outer hole (Figure 1B).
NOTE: An alternative method is to implant the electrodes, cement them in place, and then insert their pins into the pedestal.
2. Stereotaxic electrode implantation
- Sterilize all surgical tools and the six-pin electrode assembly by autoclaving before the surgery. A sterile surgical field must be maintained during the surgery, and sterile surgical gloves must be used. Sterile drapes (e.g., Press n’ Seal) are recommended to cover the animal except for the surgical area.
- Use 8-week-old VGAT-Cre mice (age-matched, both male and female) for surgeries 4 weeks after weaning. Record the weight of the animal before surgery to allow the measurement of post-surgical weight loss.
- Use a certified isoflurane vaporizer or a low-flow anesthesia system equipped with a precision syringe pump, integrated digital vaporizer, and feedback heat pad.
NOTE: Low-flow systems are capable of delivering anesthesia at low flow rates proportionate to the animal's size into either an induction chamber or through a nose cone on the stereotaxic frame (70 mL/min, isoflurane concentration in air is 4% for induction and 2% for surgery). Using less anesthesia not only benefits the animal during surgeries but also reduces the risk of lab personnel's exposure to isoflurane. - Place the anesthetized animal on a heated pad warmed to 37 °C to keep it warm during surgery. If using a feedback-controlled temperature system, insert the lightly lubricated temperature probe into the rectum of the animal for temperature monitoring during surgery.
- Mount the animal onto the stereotaxic frame by gently placing ear bars into the ears and the front upper teeth into the incisor bar. Place the nose cone over the nose for proper anesthesia delivery. Make sure that the head is leveled and centered and cannot be moved when slightly probed.
- Subcutaneously inject 0.5 mL of normosol for hydration.
- Apply ocular lubricant to prevent corneal drying.
- Monitor for the depth of anesthesia by the absence of the withdrawal reflex after pinching a hindlimb toe, and then decrease isoflurane to 1.5%-2.0% during surgery.
- Remove hair at and around the surgical area by plucking or using clippers (shaving) or depilatory cream, and disinfect the skin with three cycles of alternating application of iodine and ethanol, finishing with iodine. Removing hair away from the surgical site is recommended only if there are means to maintain anesthesia at that location. If necessary, use alcohol-dipped cotton tip applicators to remove hair from the immediate area surrounding the head. Inject 0.05 mL of the local analgesic bupivacaine (0.25%) subcutaneously.
- Make an incision on the skull using a scalpel, and then cut out a part of the skin with sharp surgical scissors, exposing the skull. Pushing the skin aside, using a cotton swab, clean the skull from all the muscles and underlying tissues obstructing the view.
NOTE: To stop accidental bleeding, apply pressure over the bleeding site with a sterile cotton swab until it stops. - Clean the skull with hydrogen peroxide using sterile cotton swabs to make the skull sutures and both bregma and lambda visible.
- Dry the skull thoroughly, and then apply one drop of self-etching dental adhesive using its applicator. Brush it into the skull, wait 60 s, and cure with a dental UV light for 40 s. A glossy surface indicates that the adhesive has been effectively cross-linked with the skull.
NOTE: This step is critical for secure attachment of the headset. - Use a 0.031" drill bit (0.79 mm) to drill two burr holes bilaterally for implantation of hippocampal depth electrodes (approximately 5,000 rpm). Drill one extra burr hole for the reference electrode above the cerebellum behind the lambda.
NOTE: When drilling, take care to lower the drill slowly and avoid drilling into the brain. - The coordinates for the electrodes are as follows (from bregma in mm): hippocampal electrodes at 3 mm posterior, 3 mm lateral, and 3 mm depth; and cerebellar reference electrode at 6 mm posterior, 0 mm lateral, and 0 mm depth (subdural).
- To increase the accuracy, use a stereotaxically mounted drill, zero the stereotaxic manipulator X/Y axis when touching bregma - this is the point of reference for the coordinates.
- Assemble a headset by inserting all the electrodes in the six-pin pedestal, making sure the pins are pushed all the way into the pedestal. Mount the pedestal into the electrode holder on a stereotaxic frame (Figure 1B).
- Align electrodes above the corresponding burr holes. Stereotaxically implant twisted bipolar stainless-steel wire electrodes in the right and left hippocampus and reference electrode into the cerebellum by slowly lowering the headset and guiding the electrodes into the burr holes.
- When the hippocampal twist electrode is right above the hole, zero the Z axis and slowly lower to -3.0 mm.
- Cover the skull surface and electrodes with dental cement and fill in the space between the skull surface and the bottom of the pedestal. The skin edges will be adjacent to the dental cement such that no underlying tissue will remain exposed. Wait for the cement to dry and harden. Then detach the electrode holder from the stereotaxic arm and remove the holder from the pedestal.
- Inject 0.1 mL of ketoprofen (1 mg/mL, SC) for analgesia and a second dose of 0.5 mL of normosol (SC) for hydration and remove the animal from the stereotaxic frame.
- Place an isothermal pad preheated to 37 °C inside an empty vivarium cage covered with a paper towel. Once it is fully awake, place the animal in a clean cage with bedding and soft food, and return it to the vivarium. Animals are housed singly from this point on to prevent chewing on each other’s headsets. Wire bar hoppers are not used to avoid headsets getting stuck, and instead, water bottles are tied to the underside of the cage tops, and chow is present in the bedding.
- Feed the animal some soft food for 72 h after surgery, and monitor for weight loss and body condition score. Dehydrated animals may be administered 0.5 mL of normosol subcutaneously if dehydrated (weight loss, increased skin turgor, sunken eyes). Ketoprofen can be given subcutaneously once daily for 2 more days following surgery (follow the analgesia regimen according to the local IACUC guidelines). Allow animals to fully recover in their cages for 4-7 days before transferred to the EEG recording system.
3. Electrical kindling protocol
- Hook-up the mice to the EEG recording system using a flexible cable that fits the sockets on the mouse head and commutator (see the Table of Materials list). Allow the animals to acclimate for one day before proceeding with the electrical stimulation protocol below. Monitor their overall health and acclimation on a daily basis, and remove them from the system when there are signs of illness, distress, and/or continuous body weight loss exceeding 25%
- Connect both leads from the stimulating electrode to the output of a constant current stimulator.
NOTE: It is very helpful to have a circuit board that switches these electrodes away from the EEG recorder and to the stimulator. - Set the stimulator to deliver 1 ms pulses at 50 Hz for a 2 s train duration.
- Set the output of the stimulator at 20 microamps (µA) and deliver the 1st pulse.
- Monitor the EEG for a characteristic after-discharge of high-frequency spikes that outlast the electrical stimulation pulse.
- If no discharge is observed, then increase the amount of current injected in 20 µA increments until an after-discharge is triggered. The amount of current required is the After-Discharge Threshold (ADT).
- Typical ADTs are 20-50 µA. If no discharge is observed even after increasing to 200 µA, then troubleshooting electrical connections and headset wiring with a high sensitivity ohmmeter is required. If the problem is in the stimulating electrode, then try stimulating with the other depth electrodes.
- Animals are kindled by stimulating either 2x or 6x per day using a current that is 1.5x the ADT value for that mouse.
- Monitor the behavioral response to the stimulation, which rises from the change of state to bilateral tonic-clonic seizures with falling. Score using a modified Racine class system11. To avoid evoked fatal tonic seizures, kindling should be paused if successive stimuli lead to escalating severity and length of seizures up to modified Racine score 6 (running and jumping)
Results
Animals
The model was originally developed using VGAT-Cre mice (Slc32a1tm2(cre)Lowl/J)13 on a mixed background. However, it has also been applied to the VGAT-Cre strain that is congenic with C57BL/6J. No difference has been observed in epilepsy that develops between the strains. Both strains express Cre recombinase under the control of the vesicular GABA transporter promoter. These mice were generated by knocking in an IRES-Cre cassette after the stop codon in the...
Discussion
This report describes a protocol where electrical kindling of mice leads to epilepsy. Since the stimulating electrode is placed in the hippocampus, this is a focal limbic epilepsy that models temporal lobe epilepsy (TLE) in patients. A critical step in this protocol is to use VGAT-Cre mice, which due to insertion of an IRES-Cre recombinase cassette in the Vgat gene, shows impaired inhibitory GABA currents11. C57BL/6 do not develop epilepsy after kindling with this protocol, although it is...
Disclosures
The authors have no conflicts to disclose.
Acknowledgements
The authors thank John Williamson for helpful discussions on this protocol. This work was supported by NIH/NINDS grant NS112549.
Materials
| Name | Company | Catalog Number | Comments |
| 16 Channel Extracellular Differential AC Amplifier (115V/60Hz) | AD Instruments | AM3500-115-60 | Alternate EEG amplifier |
| 363/CP PLUG COLLAR, PINS SLEEVE | P1 Technologies | 363SLEEVPIN0NL | For electrode holder |
| Cable, 363-363 5CM - 100CM W/MESH 6TCM | P1 Technologies | 363363XXXXCM004 | mouse-to-commutator cable |
| CCTV cameras Qcwox HD Sony IR LED | Sony | QC-SP316 | |
| Commutator SL6C/SB (single brush) | P1 Technologies | 8BSL6CSBC0MT | formerly Plastics One, Inc. |
| Current amplifier | A-M Systems | Model 2100 | |
| Dental cement | Stoelting | 51459 | |
| Drill bits, #75, OD 0.310" LOC 130 PT | Kyocera | 105-0210.310 | |
| E363/0 SOCKET CONTACT SKEWED | P1 Technologies | 8IE3630XXXXE | pins for connector |
| iBond Self Etch glue | Kulzer | CE0197 | |
| MS363 PEDESTAL 2298 6 PIN WHITE | P1 Technologies | 8K000229801F | EEG headset connector |
| Ohmeter | Simpson | 260 | High sensitivity |
| PowerLab 16/35 and LabChart Pro | AD Instruments | PL3516/P | Alternate EEG software |
| SomnoSuite | Kent Scientific Corp. | SS-01 | anesthesia unit & RightTemp monitoring |
| Stereotactic drill and micromotor kit | Foredom Electric Co. | K.1070 | |
| Stereotactic frame | David Kopf Instruments | Model 940 | |
| Teflon-coated wire for depth electrode, OD 0.008' | A-M Systems | 791400 | |
| VGAT-Cre mice on congenic C57BL/6J background | The Jackson Laboratory | 000664 |
References
- Lekoubou, A., Bishu, K. G., Ovbiagele, B. Nationwide trends in medical expenditures among adults with epilepsy: 2003-2014. Journal of the Neurological Sciences. 384, 113-120 (2018).
- Hauser, W. A., Hesdorffer, D. C. Epilepsy: Frequency, Causes, and Consequences. Epilepsy Foundation of America. , (1990).
- Galanopoulou, A. S., et al. Identification of new epilepsy treatments: issues in preclinical methodology. Epilepsia. 53 (3), 571-582 (2012).
- Kehne, J. H., Klein, B. D., Raeissi, S., Sharma, S. The National Institute of Neurological Disorders and Stroke (NINDS) Epilepsy Therapy Screening Program (ETSP). Neurochemical Research. 42 (7), 1894-1903 (2017).
- Buckmaster, P. S. Laboratory animal models of temporal lobe epilepsy. Comparative Medicine. 54 (5), 473-485 (2004).
- Levesque, M., Avoli, M., Bernard, C. Animal models of temporal lobe epilepsy following systemic chemoconvulsant administration. Journal of Neuroscience Methods. 260, 45-52 (2016).
- Loscher, W. Critical review of current animal models of seizures and epilepsy used in the discovery and development of new antiepileptic drugs. Seizure. 20 (5), 359-368 (2011).
- Buckmaster, P. S., Haney, M. M. Factors affecting outcomes of pilocarpine treatment in a mouse model of temporal lobe epilepsy. Epilepsy Research. 102 (3), 153-159 (2012).
- Wang, L., Liu, Y. H., Huang, Y. G., Chen, L. W. Time-course of neuronal death in the mouse pilocarpine model of chronic epilepsy using Fluoro-Jade C staining. Brain Research. 1241, 157-167 (2008).
- Dey, D., et al. A potassium leak channel silences hyperactive neurons and ameliorates status epilepticus. Epilepsia. 55 (2), 203-213 (2014).
- Straub, J., et al. Characterization of kindled VGAT-Cre mice as a new animal model of temporal lobe epilepsy. Epilepsia. 61 (10), 11 (2020).
- Kilkenny, C., Browne, W. J., Cuthill, I. C., Emerson, M., Altman, D. G. Improving bioscience research reporting: the ARRIVE guidelines for reporting animal research. PLoS Biology. 8 (6), 1000412 (2010).
- Vong, L., et al. Leptin action on GABAergic neurons prevents obesity and reduces inhibitory tone to POMC neurons. Neuron. 71 (1), 142-154 (2011).
- Vora, S. R., Camci, E. D., Cox, T. C. Postnatal ontogeny of the cranial base and craniofacial skeleton in male C57BL/6J mice: A reference standard for quantitative analysis. Frontiers in Physiology. 6, (2016).
- Lothman, E. W., Bertram, E. H., Bekenstein, J. W., Perlin, J. B. Self-sustaining limbic status epilepticus induced by 'continuous' hippocampal stimulation: electrographic and behavioral characteristics. Epilepsy Research. 3 (2), 107-119 (1989).
- Lothman, E. W., Williamson, J. M. Influence of electrical stimulus parameters on afterdischarge thresholds in the rat hippocampus. Epilepsy Research. 13 (3), 205-213 (1992).
- Lewczuk, E., et al. Electroencephalography and behavior patterns during experimental status epilepticus. Epilepsia. 59 (2), 369-380 (2018).
- Wenker, I. C., et al. Postictal death is associated with tonic phase apnea in a mouse model of sudden unexpected death in epilepsy. Annals of Neurology. 89 (5), 1023-1035 (2021).
- Morimoto, K., Fahnestock, M., Racine, R. J. Kindling and status epilepticus models of epilepsy: rewiring the brain. Progress in Neurobiology. 73 (1), 1-60 (2004).
Reprints and Permissions
Request permission to reuse the text or figures of this JoVE article
Request PermissionThis article has been published
Video Coming Soon
Copyright © 2025 MyJoVE Corporation. All rights reserved