
A subscription to JoVE is required to view this content. Sign in or start your free trial.
Method Article
Neural Stem Cell Reactivation in Cultured Drosophila Brain Explants
In This Article
Summary
A method to reactivate quiescent neural stem cells in cultured Drosophila brain explants has been established. Using this method, the role of systemic signals can be uncoupled from tissue-intrinsic signals in the regulation of neural stem cell quiescence, entry and exit.
Abstract
Neural stem cells (NSCs) have the ability to proliferate, differentiate, undergo apoptosis, and even enter and exit quiescence. Many of these processes are controlled by the complex interplay between NSC intrinsic genetic programs with NSC extrinsic factors, local and systemic. In the genetic model organism, Drosophila melanogaster, NSCs, known as neuroblasts (NBs), switch from quiescence to proliferation during the embryonic to larval transition. During this time, larvae emerge from their eggshells and begin crawling, seeking out dietary nutrients. In response to animal feeding, the fat body, an endocrine organ with lipid storage capacity, produces a signal, which is released systemically into the circulating hemolymph. In response to the fat body-derived signal (FBDS), Drosophila insulin-like peptides (Dilps) are produced and released from brain neurosecretory neurons and glia, leading to downstream activation of PI3-kinase growth signaling in NBs and their glial and tracheal niche. Although this is the current model for how NBs switch from quiescence to proliferation, the nature of the FBDS extrinsic cue remains elusive. To better understand how NB extrinsic systemic cues regulate exit from quiescence, a method was developed to culture early larval brains in vitro before animal feeding. With this method, exogenous factors can be supplied to the culture media and NB exit from quiescence assayed. We found that exogenous insulin is sufficient to reactivate NBs from quiescence in whole-brain explants. Because this method is well-suited for large-scale screens, we aim to identify additional extrinsic cues that regulate NB quiescence versus proliferation decisions. Because the genes and pathways that regulate NSC proliferation decisions are evolutionarily conserved, results from this assay could provide insight into improving regenerative therapies in the clinic.
Introduction
Stem cells are of great interest because of their potential for use in regenerative medicine1,2. Many animals, especially those that are long-lived, maintain stem cells within their adult tissues. These resident stem cells function to maintain tissue homeostasis and are utilized for repair following physical injury or disease3,4. Most stem cells in adult animals are quiescent, a relatively dormant state characterized by cell cycle arrest and inactivation of growth signaling5. In response to extrinsic cues, stem cells exit from quiescence, enter the cell cycle and begin generating daughter progeny specific to their tissue type. For example, in order to mount an effective immune response, antigen-presenting cells induce quiescent naive T cells to enter cell cycle and clonally expand6. In response to skeletal muscle damage, muscle satellite stem cells enter the cell cycle and generate daughter myoblasts to replace damaged myofibrils5,7. While it is clear that quiescent stem cells respond to extrinsic signals, in many cases, the nature of the extrinsic cue remains unclear as well as the mechanism of cue-induced stem cell activation. Gaining a better understanding of how quiescent stem cells respond to extrinsic cues and enter the cell cycle will aid in the development of better stem cell therapies in the clinic and increase scientific knowledge.
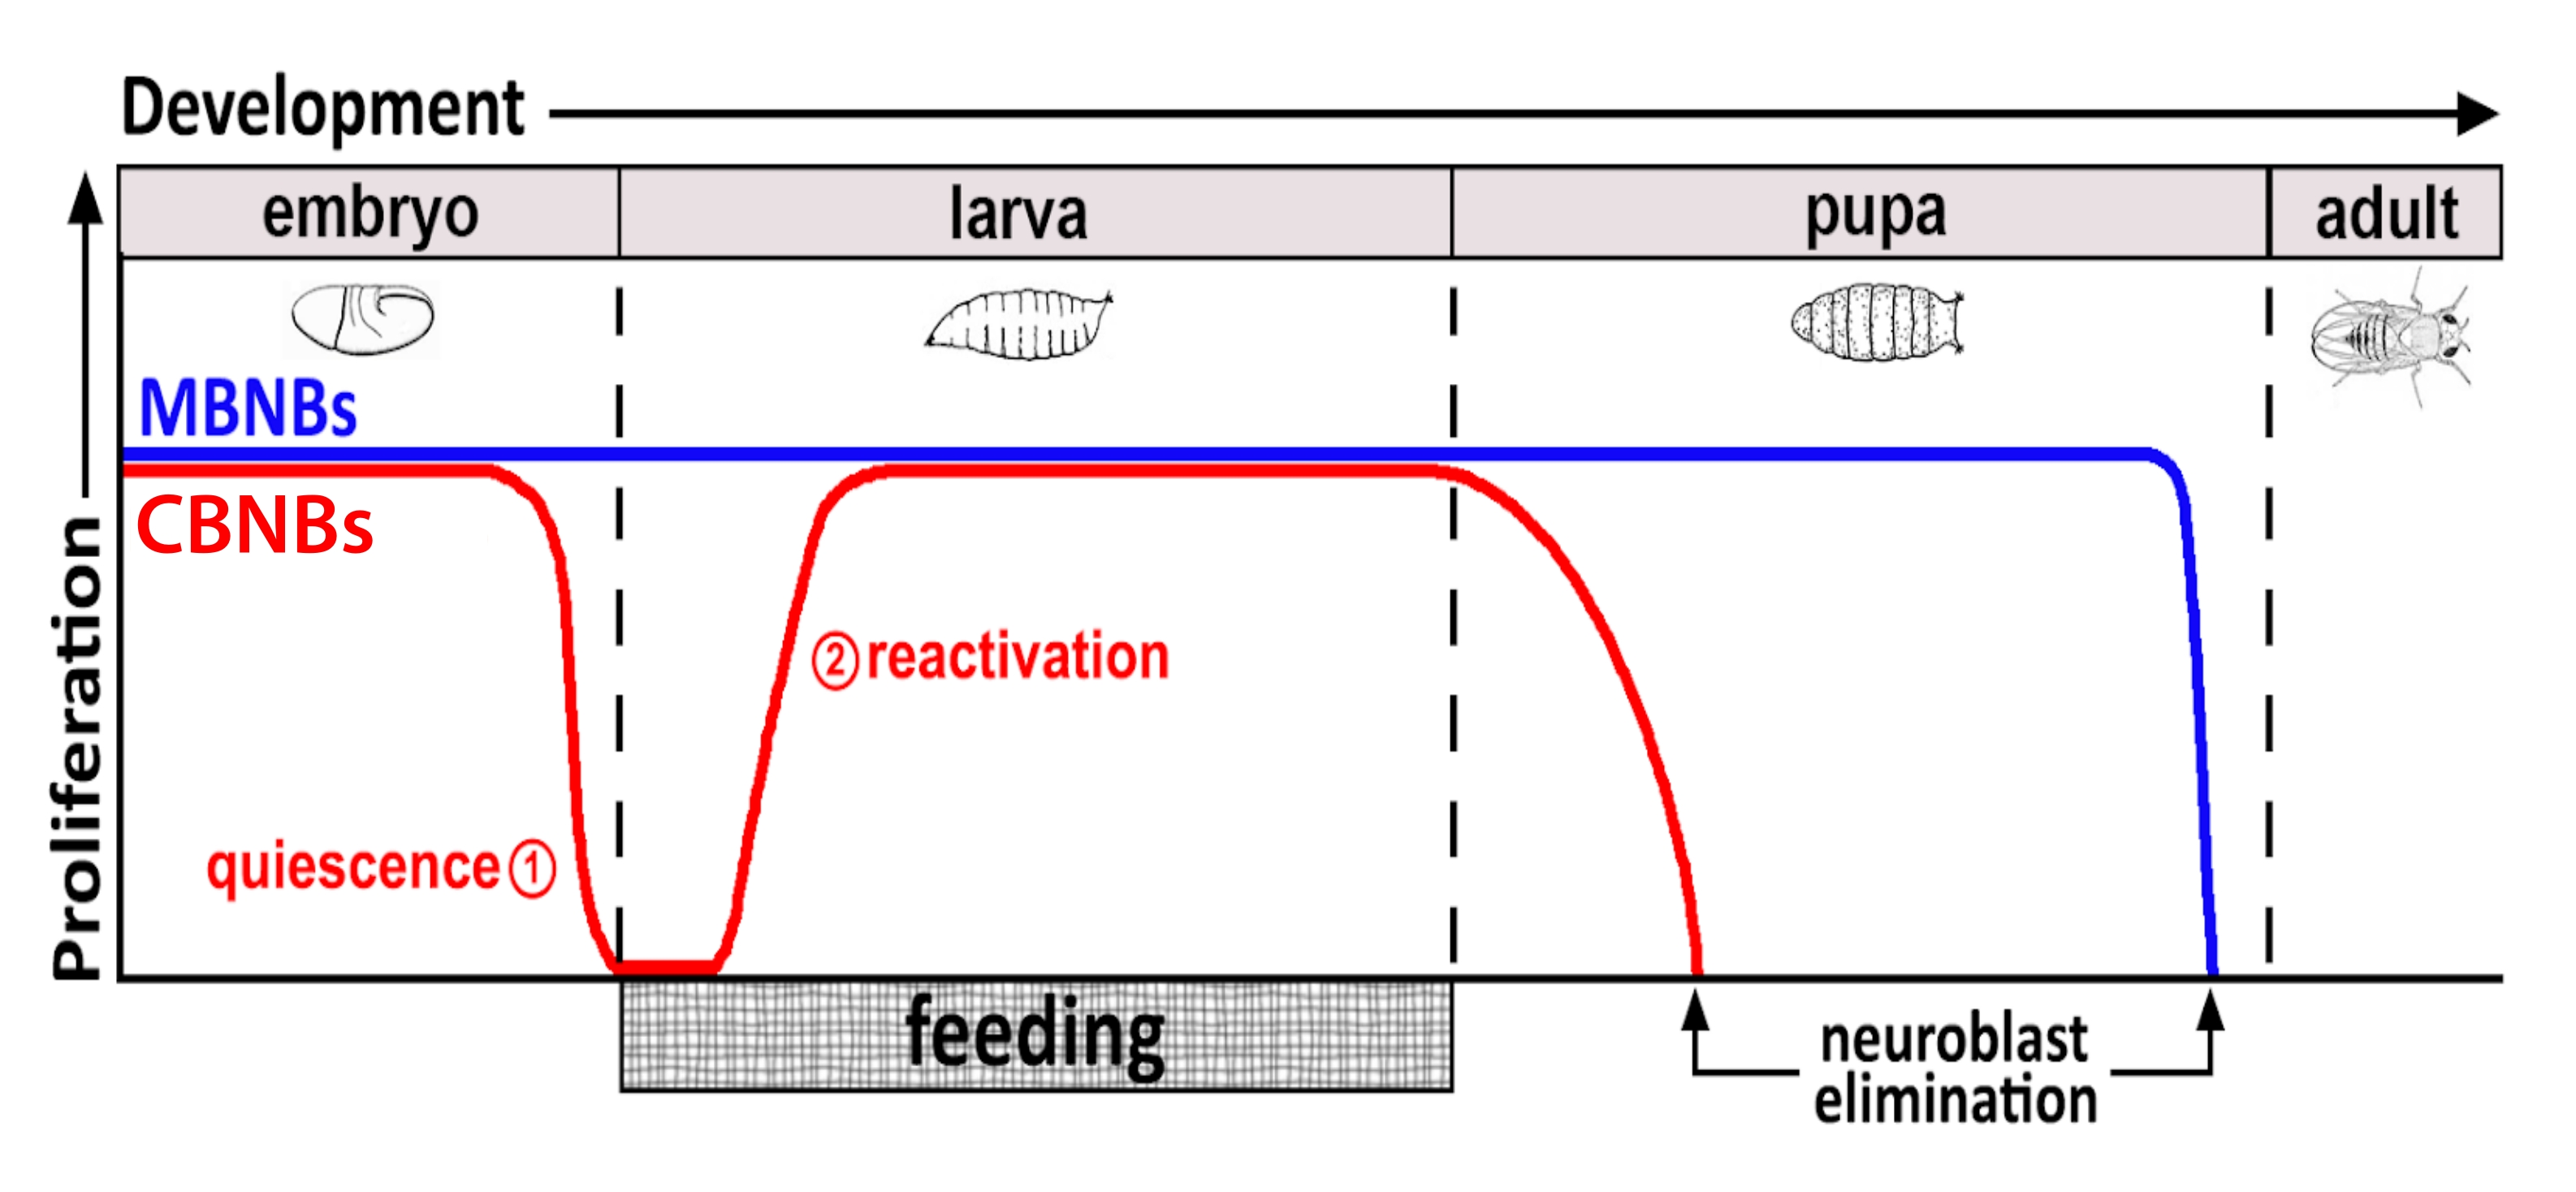
For decades now, model organisms have been used to uncover the genes and cell signaling pathways that regulate stem cell proliferation during development and in adulthood. In Drosophila, neural stem cells (NSCs), known as neuroblasts (NBs), divide throughout development to generate all neurons and glia that ultimately integrate, forming the neural circuity required for brain function8,9. Like other stem cells, NBs divide asymmetrically to self-renew and, in some cases, symmetrically to expand the stem cell pool. NBs are specified during embryogenesis and most enter quiescence towards the end, coincident with declining maternal nutrient stores (Figure 1). After embryogenesis is complete, larvae hatch and begin feeding. In response to animal feeding, NBs reactivate from quiescence and resume cell divisions10,11,12,13,14,15,16. Because the Drosophila CNS is relatively simple and because NBs enter and exit quiescence at defined times, using Drosophila to investigate the regulation of quiescence, entry and exit, proves ideal.

Figure 1: Relative proliferation of CB NBs (central brain neuroblasts, red) and MB NBs (mushroom body neuroblasts, blue) over developmental time. At the end of embryogenesis, most NBs (red line) cease proliferation and enter quiescence. Quiescence continues until freshly hatched larvae consume their first complete meal. The time points of focus for this methodology are denoted in red circles (1, quiescence and 2, reactivation). MB NBs (blue) are a subset of central brain NBs that divide continually throughout development (4 per brain hemisphere). Please click here to view a larger version of this figure.
In response to animal feeding, PI3-kinase and TOR growth signaling pathways become active in NBs and in their glial and tracheal niche10,11,15,16. When dietary nutrients are withdrawn or when levels of PI3-kinase are reduced, NBs fail to reactivate and growth of glia and trachea are also reduced10,11,15,16. The current model posits that NB reactivation is coupled to larval growth by the fat body, which releases a systemic signal in response to animal feeding12,17,18. This signal, which remains elusive, likely promotes the expression and release of Drosophila insulin-like peptide (Dilps) in the brain, which leads to the downstream activation of PI3-kinase in NBs and their glial and tracheal niche. To better understand the nature of the systemic cue(s), we developed a method to reactivate quiescent NBs in cultured brain explants. With this method, reactivation of NBs can be assayed in the absence of whole animal systemic cues. Exogenous factors can be resupplied to the culture media and NB reactivation assayed based on the incorporation of the thymidine analog, EdU. Using this method, we determined that exogenous insulin is sufficient to reactivate quiescent NBs in brain explants. Future work will be aimed at identifying additional factors that, when added back, either positively or negatively regulate NB quiescence in brain explants.
Protocol
1. Drosophila larvae collection
NOTE: Prepare the yeast plate, grape paste, and the Fly condo before starting:
- Yeast paste: In a small container, mix 5 g of active dry yeast with 10 mL of water to form a paste that has the consistency of peanut butter. Cover the yeast paste with plastic wrap and use a rubber band to firmly attach it to the container.
NOTE: Fresh yeast paste will expand in its container and will pop off the lid unless firmly attached. Yeast paste will last for several days at room temperature (RT). - Grape plates: Follow the recipe for making grape plates (Table 1). If using plates stored at 4°C, make sure to pre-warm plates before use by placing them at RT for 1 h.
- Mix water (750 mL) and agar (18.75 g) in a 4 L flask, swirl, and autoclave for 20 min (liquid cycle).
- Mix the grape juice (250 mL) and sucrose (25 g) in a 1 L flask with a large stir bar on a heated plate (low heat). When the sucrose is dissolved, turn off the heat, wait until the flask can be touched before adding Tegosept (10%, 4 mL) and Propionic acid (5 mL). Keep the stir bar on.
- When the autoclaving is complete, let it cool until the flask can be touched (~60 °C), then mix in the grape juice mix.
- Combine all solutions in one flask and let stir on the plate.
- Pipette the solution into lids of small-sized Petri dishes (35 mm). Pipette roughly 9 mL per lid or until a convex dome is obtained.
- OPTIONAL: Flame the lids to get rid of any bubbles.
- When the plates solidify, stack the grape plates into a box with an airtight lid and place the box at 4 °C. Plates can be stored for up to 1 month.
- Fly condo: Punch ~20 holes into a 6-ounce square bottom polypropylene Drosophila bottle using an 18 G needle.
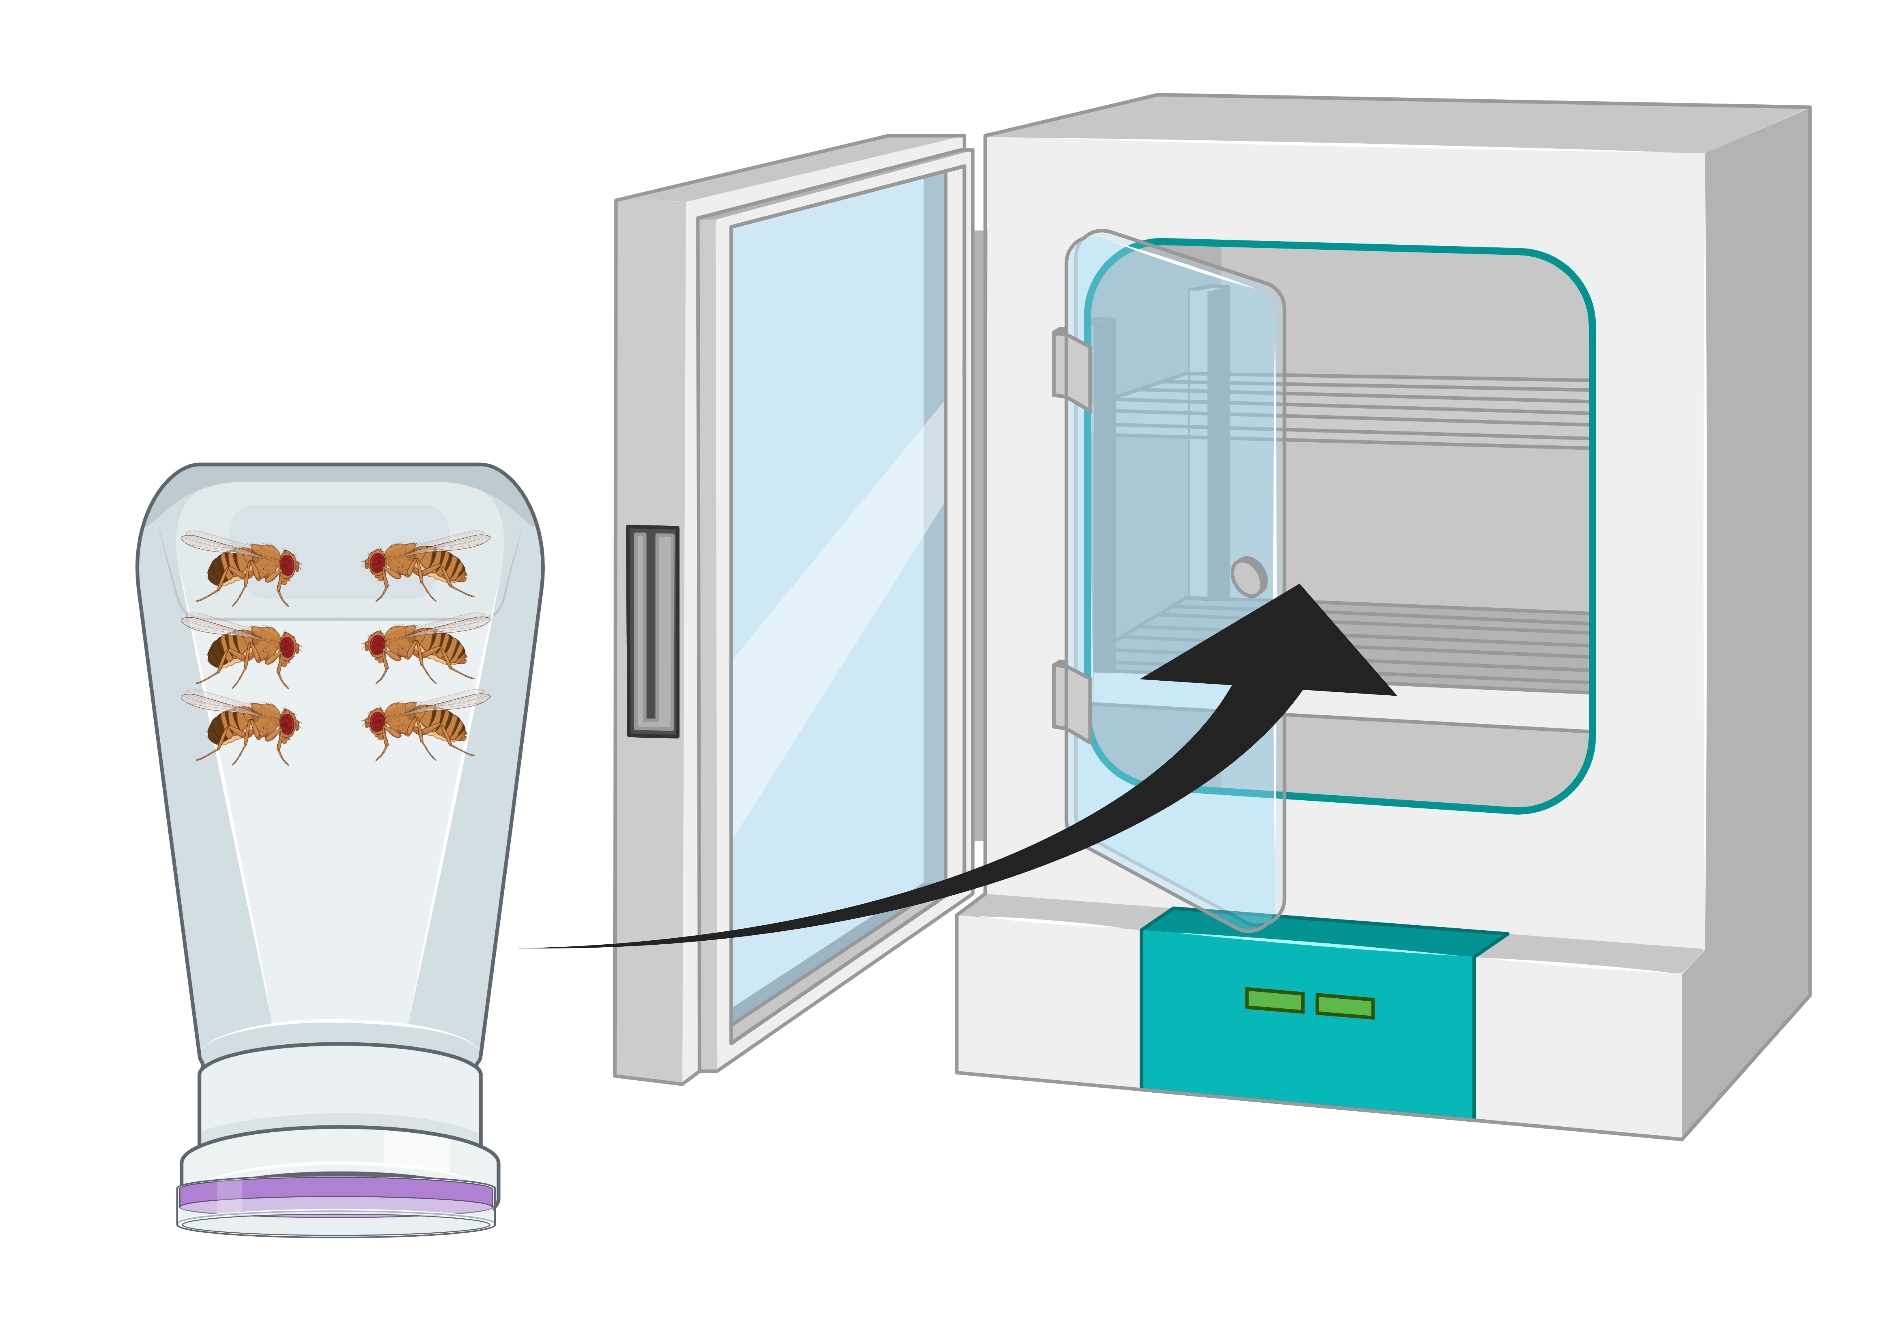
- Transfer adult flies (~100 OregonR or any genotype) to a fly condo and cap the condo with a grape agar plate topped with a dab of yeast paste. Place the dab towards the center of the plate and affix the plate to the condo with lab tape.
- Invert the container so that the grape agar plate is on the bottom and place it in a 25 °C incubator for 24 h (Figure 2).

Figure 2: Visual representation of inverted fly bottle (condo) with male and female Drosophila adults. The plastic bottle has small punctures, generated with an 18 G needle, for oxygen exchange. The mouth of the bottle is sealed with an agar grape juice cap and is inverted and stored in a 25 °C incubator. Please click here to view a larger version of this figure.
- After 24 h, change the grape agar plate and replace it with a new plate topped with yeast paste. Quickly switch the two plates while continuously tapping the condo lightly on the bench so that the adult flies do not escape.
- Examine the plate by eye and assess the number of embryos on the plate. Drosophila embryos are oblong and white with two string-like appendages.
- If there are very few embryos on the plate (less than 100), discard the plate (scrape out the agar into the fly trash and save the plastic lid for reuse). In many cases, adult females will not lay many embryos on the first night in a new condo. If this is the case, give the adult flies another 24 h to acclimate.
- If there is a large number of embryos on the plate (at least 100), keep it, and carefully remove the yeast paste using a flat bottom spatula.
- Once the yeast paste is removed, use a metal pick to manually remove all larvae from the grape plate under a dissecting microscope. When looking at the plate under a dissecting microscope, crawling larvae should be observed as well as embryos.
- Remove all larvae by brushing the metal pick towards the side of one larva. Larvae are sticky and will stick to the pick. Once one larva is on the pick, additional larvae can be easily picked up by using the larva on the tool to attach more.
NOTE: Larvae like to stick to each other. At this point, it does not matter if larvae get damaged. These larvae will be discarded. - After picking and removing all larvae, place the plate back into the 25 °C incubator. Ensure to place the plate in a larger container that can be sealed. Place wet paper towels in the bottom of the larger container to keep in moisture.
- After 30-60 min, take the plate back to the dissecting microscope and now, carefully pick ~20-25 larvae from the same grape agar plate to ensure that the picked larvae are freshly hatched within a 30-60 min window of time.
- Submerge the tip of the tool with the 20-25 freshly hatched larvae into a Petri dish (60 mm) filled with 1-2 mL of 1x Phosphate Buffered Saline (PBS) for 2 min.
- After 2 min, tip the dish at an angle to pool the liquid at the bottom. Using a small paintbrush, brush the larvae out of the liquid up the bottom of the Petri dish.
- Collect all larvae on the paintbrush and transfer the larvae to a new Petri dish (60 mm) containing 1-2 mL of 70% ethanol. Repeat steps 1.15 to collect larvae with a paintbrush and transfer them to a new Petri dish with 1-2 mL of 1x PBS.
2. Culture media and tool preparation
- Spray the bench and work area with 70% ethanol and let dry.
- Spray the dissection tools, forceps, and two glass watch dishes, with 70% ethanol and let them dry on the bench.
- Make the supplemented Schneider's media (SSM, Table 2) and place it on ice.
- Pipette 1 mL of SSM into each of the glass watch dishes.
- Using a micropipette with a sterile tip, transfer the freshly hatched larvae from the plate of PBS to the SSM in the first glass watch dish. Using a micropipette with a sterile tip, transfer the freshly hatched larvae to the SSM in the second glass watch dish.
3. Dissections and brain cultures
- Once the larvae are in the second glass watch dish with SSM, dissect the brains out of the larvae using forceps and a dissecting microscope. Adjust the magnification as needed.
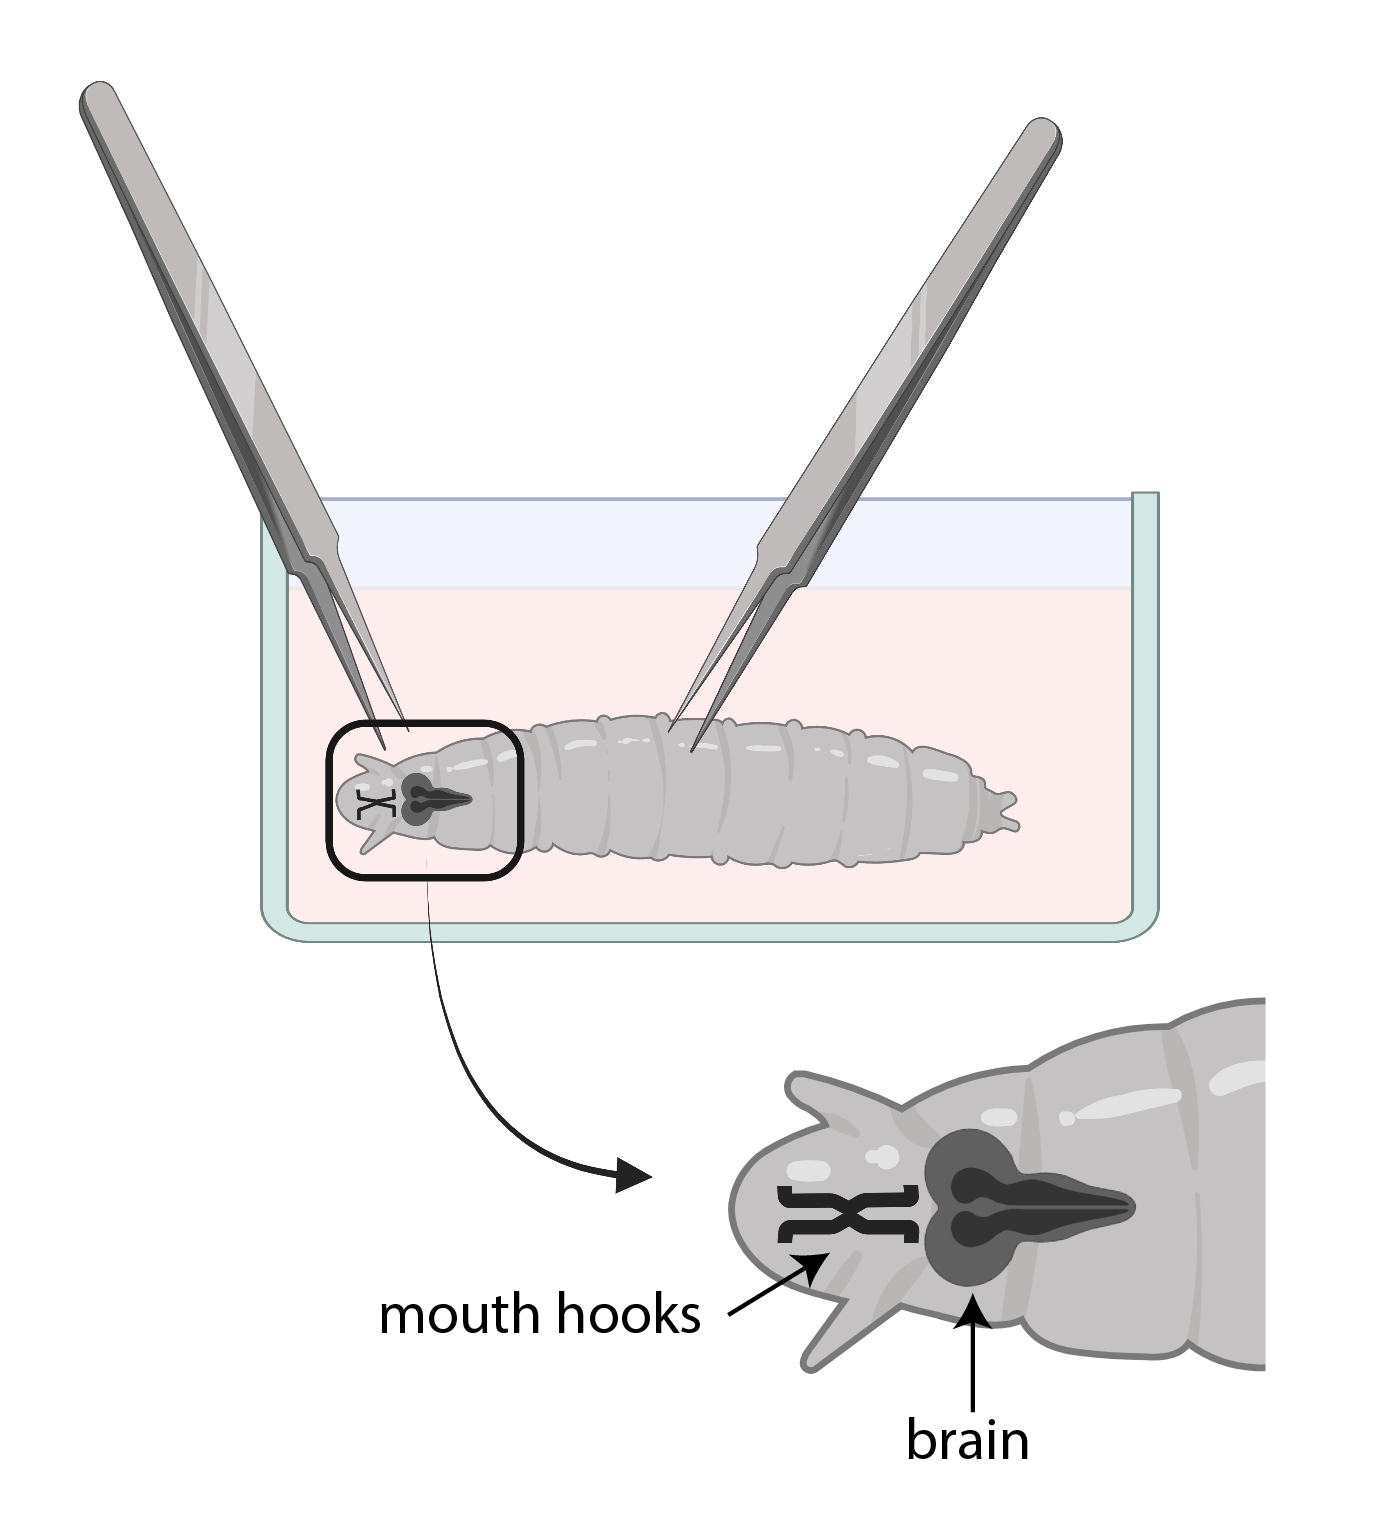
- Use one forceps to grab the mouth hooks and with the other, gently grab the body halfway down and pull in the opposite direction (Figure 3) to split the larva into two pieces.
NOTE: The brain will be located right behind the mouth hooks. Note that there may be other tissues surrounding the brain. Be very careful when removing these tissues as it can result in damaging the brain

Figure 3: Drosophila larvae in a glass watch dish with SSM. Forceps are properly positioned for dissection. The location of the larval brain (dark grey) is posterior to the mouth hooks (black), and both are shown inside the larva. Please click here to view a larger version of this figure.
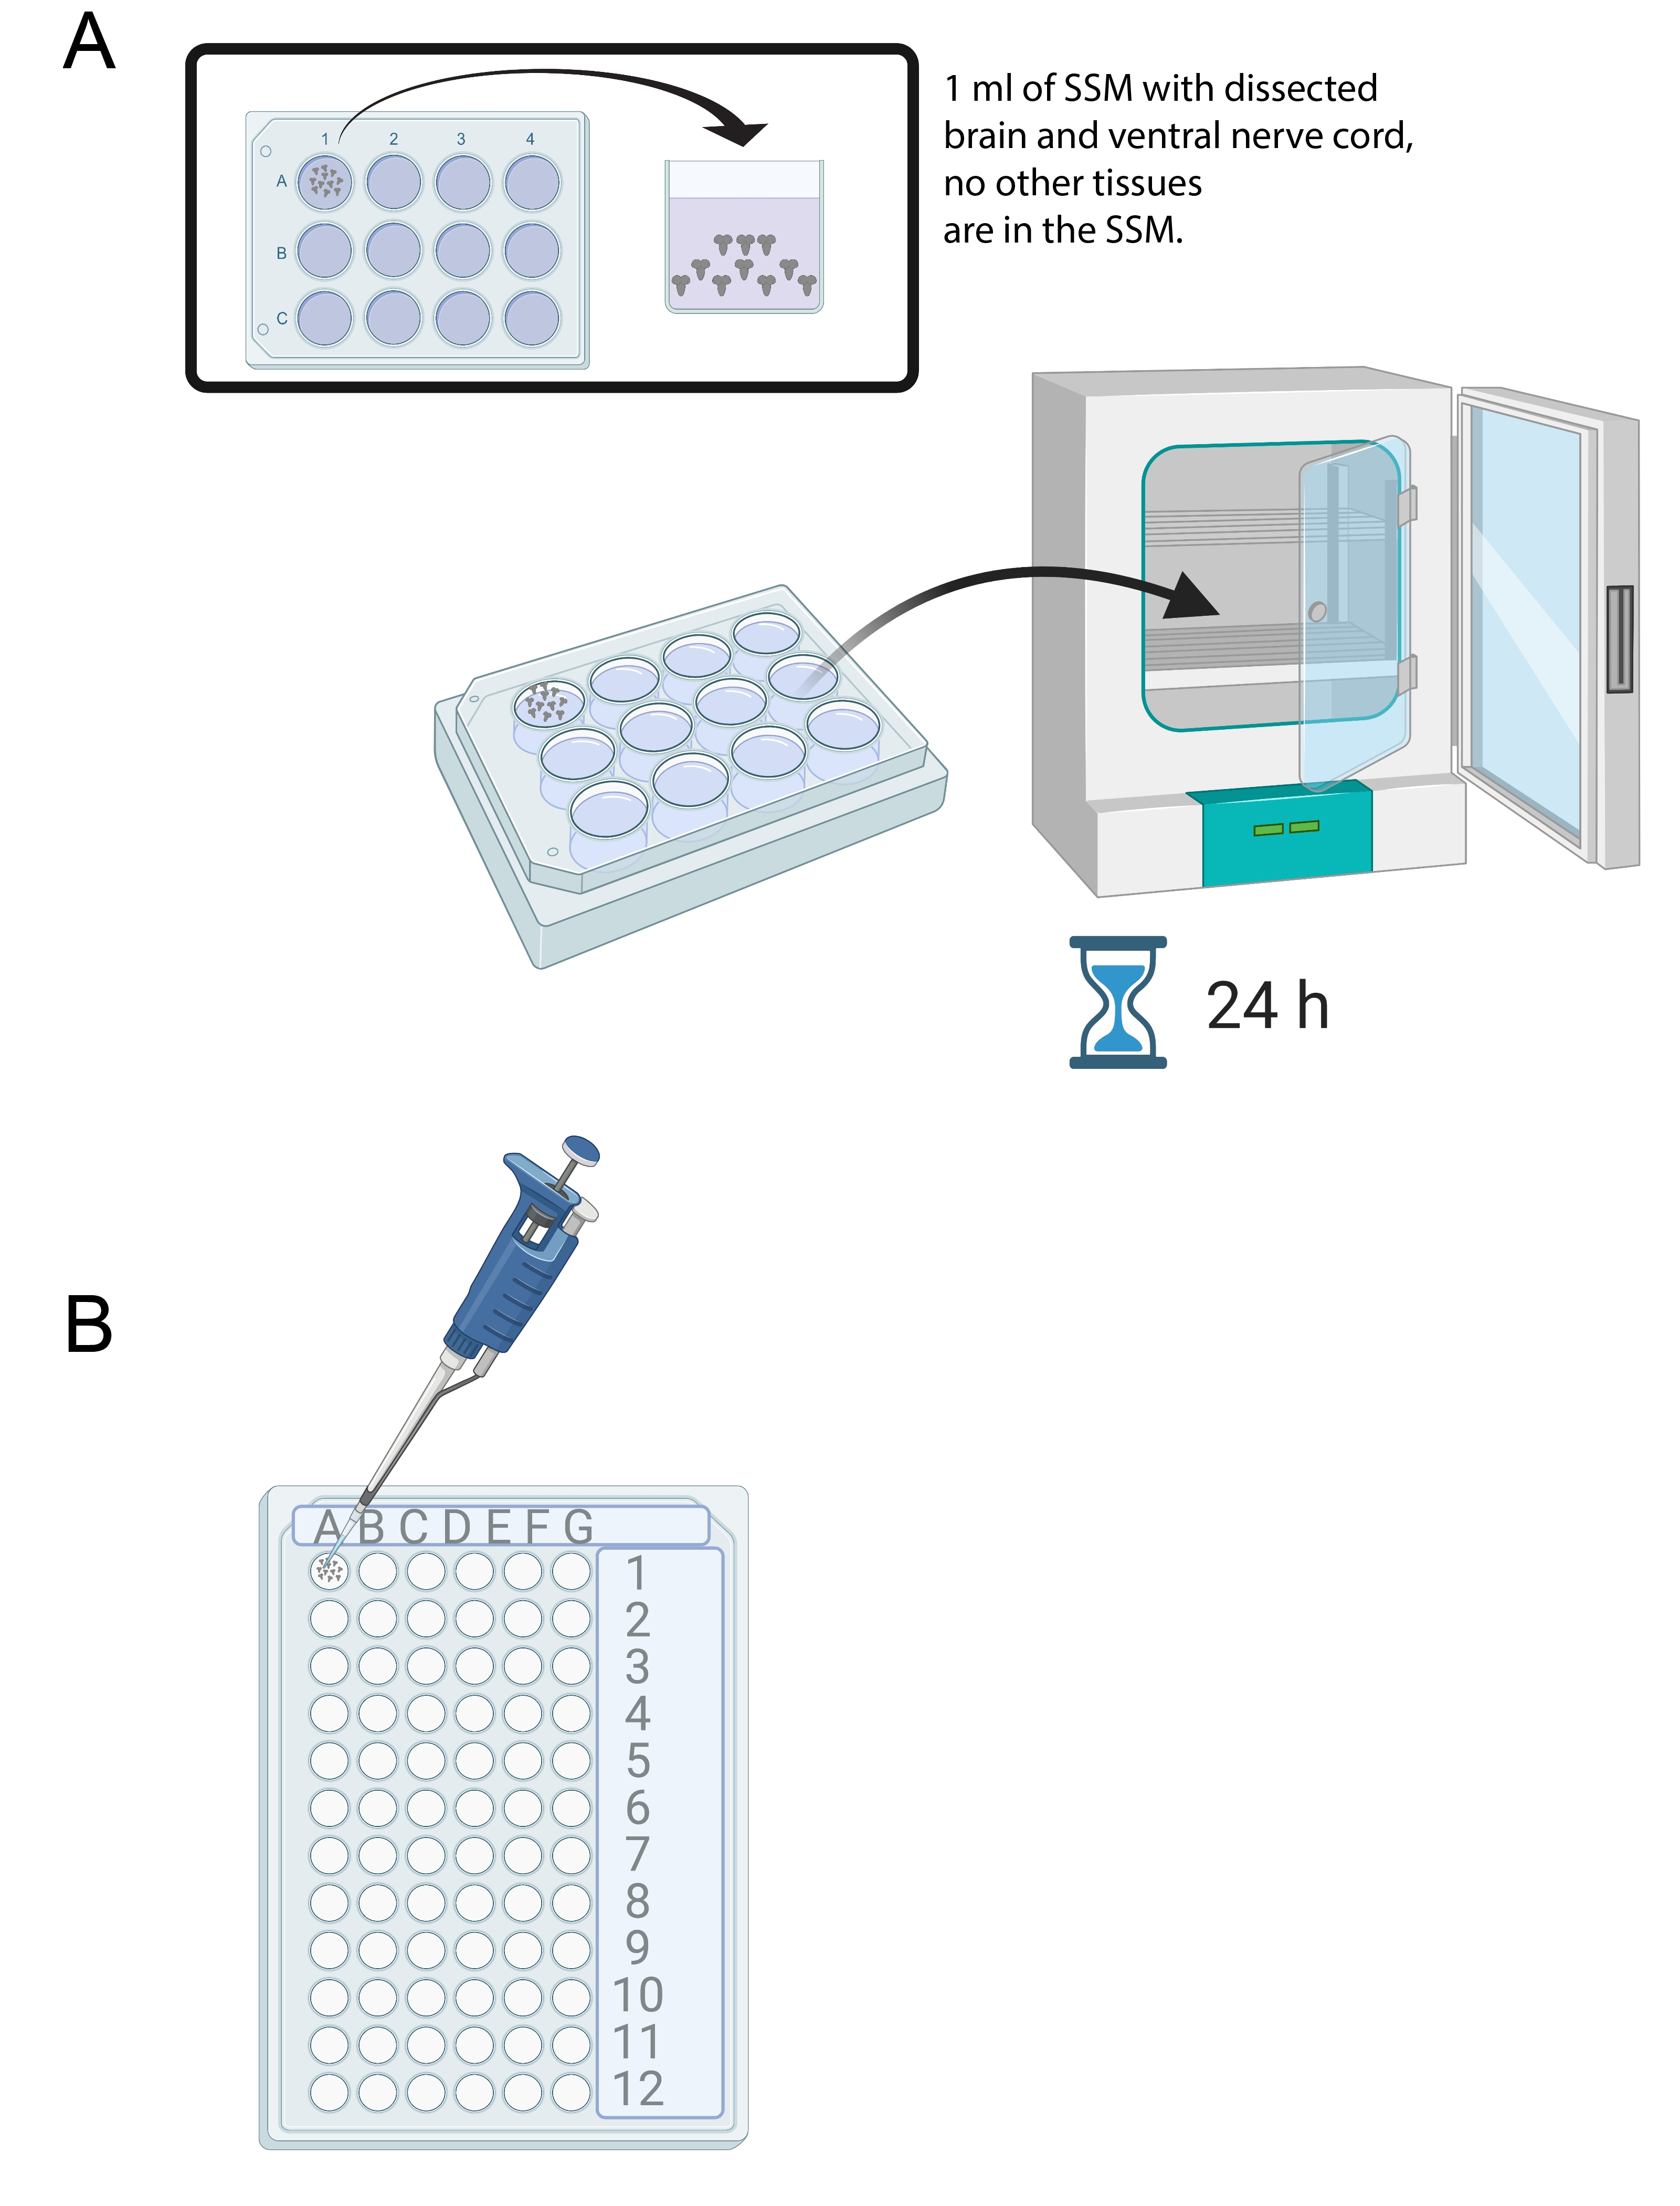
- Once 15-20 brains have been dissected, add 1 mL of SSM into one well of a sterile 12-well culture tray. Transfer the freshly dissected brains into the SSM using a micropipette and a sterile tip (Figure 4A).
- Place the brains in the SSM media in the 12-well culture tray into an incubator at 25 °C for 24 h (Figure 4A).

Figure 4: Brain culture and immunostaining. (A) Whole brains in a 12-well culture dish containing 1 mL of SSM. The culture dish is then placed in a 25 °C incubator for 24 h. (B) 72-well mini tray that holds brain explants during immunostaining. Brains are washed and solutions transferred using a P20 micropipette set to 10 μL. Please click here to view a larger version of this figure.
4. Proliferation assay, brain fixation, and antibody staining
- The following day, make 1 mL of EdU SSM solution. Pipette 10 μL of a 10 mM stock of 5-Ethynyl-2′-deoxyuridine (EdU) with 990 μL of SSM (final EdU concentration equals 0.1 mM) into a sterile microcentrifuge tube and mix. After the 24 h incubation is complete, pipette the 1 mL of EdU SSM into one well of the sterile 12-well culture tray.
- Transfer the brains using a micropipette with a sterile tip from the well containing SSM only to the new well containing the EdU SSM solution. Incubate for 1 h at 25 °C.
- Next, transfer the EdU-labeled brains to another well in the same culture tray containing 1 mL of fixative (4% paraformaldehyde, see Table 3 for recipe) for 20 min.
CAUTION: Paraformaldehyde is a biological hazard and must be disposed of properly. - After fixation, quickly transfer the brains to the wells of a 72-well mini tray using a micropipette. Each well can hold 10 brains and 10-15 µL of liquid (Figure 4B). Once the brains are transferred to the mini tray (no more than 10 brains per well), remove the fix and rinse the brains 3 times in 10 µL of 1x PBT (phosphate buffer, pH 7.4 containing 0.1% Triton-X 100).
NOTE: Rinsing means pipetting 10 µL of 1x PBT on the brains, removing, and repeating 3 times. - Next, wash the brains 3 times for 10 min each, again in 10 µL 1x PBT. Ensure that the brains are covered with some liquid at all times.
- After the washes are complete, pipette 10 µL of blocking solution (1x PBT with 10% normal goat serum) onto the brains. Cover the tray and seal it using a strip of parafilm around the edge.
- Once sealed, place the mini tray into a sealed box with wet towels to provide a moist environment to prevent evaporation. Place the box containing the tray at 4 °C overnight.
- The following day, make a primary antibody solution.
NOTE: In this protocol, rabbit anti-scribble was used to label cell membranes and rat anti-deadpan to label neuroblasts, although any number of other primary antibodies could be used.- To make the primary antibody solution, first, make dilutions of primary antibodies in the blocking solution. For example, rabbit anti-scribble is used at a final concentration of 1:1000. Therefore, first, dilute the rabbit anti-scribble antibody at 1:100 (1 µL of antibody plus 99 µL of blocking solution). Rat-deadpan is used at a final concentration of 1:100. Therefore, first, dilute the rat-deadpan antibody at 1:10 (1 µL of antibody plus 9 µL of blocking solution).
NOTE: These dilutions can be stored long term at 4 °C if sodium azide (0.05%) is also added to inhibit bacterial growth. - Next, count the number of wells that contain brains. The number of wells determines the volume of primary antibody solution to make. For example, if there are 2 wells of brains, prepare 20 µL of primary antibody solution (for 10 wells, 100 µL, etc.). To make a 20 µL primary antibody solution, add 2 µL of each primary antibody dilution and 16 µL of the blocking solution.
NOTE: The final concentration of each of the primary antibodies is 1:1000 and 1:100, respectively. In short, make the first dilution of primary antibodies at a concentration so that the second dilution is always 1:10 to arrive at the respective final concentrations. In this case, 1:1000 for rabbit anti-scribble and 1:100 for rat anti-deadpan.
- To make the primary antibody solution, first, make dilutions of primary antibodies in the blocking solution. For example, rabbit anti-scribble is used at a final concentration of 1:1000. Therefore, first, dilute the rabbit anti-scribble antibody at 1:100 (1 µL of antibody plus 99 µL of blocking solution). Rat-deadpan is used at a final concentration of 1:100. Therefore, first, dilute the rat-deadpan antibody at 1:10 (1 µL of antibody plus 9 µL of blocking solution).
- Remove the blocking solution with the micropipette set to 10 µL and pipette 10 µL of primary antibody solution into each well.
- Cover and seal the tray using parafilm and place it back into the sealed box with wet towels. Incubate overnight at 4 °C.
NOTE: Shaking is not required and is strongly discouraged. Antibodies will penetrate the brains without shaking or mixing. - The following day, remove the primary antibody solution using a micropipette and rinse the brains 3 times with 10 µL of 1x PBT. Next, wash the brains 4 times with 10 µL of 1x PBT for 10 min each. During the 10 min washes, prepare the secondary antibody solution.
- To make the secondary antibody solution, choose secondary antibodies that recognize the primary antibodies. In this protocol, goat anti-rabbit Alexa Fluor 488 and goat anti-rat Alexa 555 were used.
- Pipette 1 µL of each of the secondary antibodies into a microcentrifuge tube with 298 µL of the blocking solution to make the final concentration 1:300 for each secondary antibody.
- After the last 10 min wash, remove the 1x PBT and pipette 10 µL of the secondary antibody solution into each well. Seal the tray using parafilm and place it back into the box with moist towels. Incubate overnight at 4 °C.
NOTE: Do not worry about removing every last µL in the wells between rinses, washes, or when adding primary and secondary antibody solutions. The brains will always remain submerged in a few µL of liquid, which is just fine. - The following day, remove the secondary antibody solution using a micropipette and rinse the brains 3 times with 10 µL each of 1x PBT. Next, wash the brains 4 times with 10 µL each of 1x PBT for 10 min each.
- During the 10 min washes, prepare the EdU reaction mix to detect EdU incorporation. Prepare the EdU reaction mix according to the manufacturers' guidelines.
- After the final wash, remove the 1x PBT and pipette 10 µL of the EdU reaction mix into each well with brains. Seal the microwell plate with parafilm and cover with aluminum foil. Leave plate on the bench for 30 min.
- After 30 min, rinse the brains 3 times with 10 µL each of 1x PBT and wash the brains 3 times with 10 µL each of 1x PBT for 5 min each.
- After the last wash, remove the 1x PBT and pipette 10 µL of a glycerol-based mounting media solution. Seal the plate and place at 4 °C overnight.
5. Mounting and imaging the brains
- The following day, prepare microscope slides (25 mm x 75 mm x 1 mm): Glue (e.g., superglue) one 22 mm x 22 mm x 1 mm square cover glass to each end of the microscope slide to create a 'bridge' over which the larger 22 mm x 50 mm x 1 mm coverslip will be placed to make a space between the slide and the larger coverslip (Figure 5A). This space will allow the brain just enough movement to be correctly oriented while preventing it from being crushed.

Figure 5: Schematic showing microscope slide, orientation, and cell types in the larval brain. (A) Visual representation of microscope slide upon which a larval brain is mounted and is ready to be imaged. (B) A guideline is also shown to use for tissue orientation. (C) Microscope slide ready for imaging on a confocal microscope. (D) Cartoon showing some of the cell types in the larval brain. Please click here to view a larger version of this figure.
- After gluing the 22 mm x 22 mm x 1 mm cover glasses to the microscope slide, pipette 9.3 µL of the glycerol-based mounting media solution containing one brain from a well of the microwell plate and place it onto the center of the slide (Figure 5A).
NOTE: Larval brains may adhere to the pipette tip, so be careful. To avoid adhesion, begin by aspirating the antifade and then aspirating the single brain towards the end of the 9.3 µL volume. - Once the brain is on the slide, gently place the 22 mm x 50 mm x 1 mm coverslip on top. Position the brain as seen in Figure 5B. Gently move the coverslip around to orient the brain. The sample is then ready for imaging.
- Use a confocal microscope equipped with high magnification and a high numerical aperture objective (Figure 5C) to acquire the best images. For example: 60x or 63x, 1.4 NA oil-immersion lens.
- Image the brains with the dorsal surface closest to the coverslip (and objective). Acquire the Z stacks through the entire brain hemisphere starting at the ventral surface (furthest away from the objective) at 1 µm intervals or Z step size.
NOTE: Lasers used depend on the secondary antibodies. In this protocol, the laser lines used were 488 nm to detect Scribble staining, 555 nm to detect Deadpan, and 633 nm to detect EdU.
- Image the brains with the dorsal surface closest to the coverslip (and objective). Acquire the Z stacks through the entire brain hemisphere starting at the ventral surface (furthest away from the objective) at 1 µm intervals or Z step size.
6. Data analysis
- Use Fiji open-source software to analyze brain hemispheres and use the Fiji cell counter plugin to count the cells.
Results
Freshly hatched OregonR wild-type brains were dissected and cultured for 24 h in supplemented Schneider's media (SSM) with insulin. Tissues were fixed and stained according to the protocol. Primary antibodies generated against Deadpan (Dpn) to detect NBs and Scribble to label cell membranes were used. The thymidine analog 5-Ethynyl-2′-deoxyuridine (Edu) was added to detect S-phase entry and NB reactivation. We found large sized Edu positive and Dpn positive NBs after 24 h in culture (Figure...
Discussion
The method described here to culture brain explants can be carried out in most lab environments. The tools required, as well as the procedure and data collection, are simple and straightforward. With this method, one can test a variety of hypotheses, including those related to the cell signaling cascades and extrinsic factors that regulate NB reactivation and proliferation. Here, using wild-type OregonR animals, we found that exogenous insulin was sufficient to reactivate NBs from quiescence independent of other animal-s...
Disclosures
The authors have no competing interests.
Acknowledgements
We acknowledge the LSAMP Bridges to Doctorate program for funding (CNK) as well as NIH/NIGMS (R01-GM120421 and R35-GM141886). We are grateful to Dr. Conor Sipe for Figure 1. We also thank all Siegrist lab members for their continued support and mentorship. We especially thank Chhavi Sood and Gary Teeters for their careful reading of the manuscript and for providing comments.
Materials
| Name | Company | Catalog Number | Comments |
| 10 µL Pipette tips | Denville Sci | P2102 | |
| 1000 µL Pipette tips | Denville Sci | P2103-N | |
| 1000 µL Pipettor | Gilson | P1000 | |
| 16% paraformaldehyde (10 x 10 mL) | Electron Microscopy Sciences | 2912.60.0000 | Used for Fixation of Larval Brains |
| 20 µL Pipette | Gilson | P20 | |
| 200 µL Pipette tips | Denville Sci | 1158U56 | |
| 24-well multiwell culture plates | Fisher Scientific | 50-197-4477 | |
| 35 mm Petri dishes | Fisher Scientific | 08-757-100A | Grape Plate Ingredients |
| 4 °C refrigerator | Fisher Scientific | Provides an ideal temperature for >24 h incubations in antibody solution | |
| 63x Objective | Lecia | ||
| Active dry yeast | Most supermarkets | ||
| Agarose | Fisher Scientific | 214010 | Grape Plate Ingredients |
| Click-iT EdU Cell Proliferation Kit for Imaging, Alexa Fluor 647 dye | Thermo Fisher Scientific | C10340 | to label proliferating cells |
| Confocal Microscope | Leica | SP8 | |
| Coverslips 22 mm x 22 mm x 1 mm , 10 pack of 4 oz | Fisher Scientific | 12-544-10 | Two Coverslips are super glued to the ends of the microscope slide. This creates a space that allows for the brains to float in antifade while being imaged. |
| Coverslips, 22 mm x 50 mm x 1 mm | Fisher Scientific | 12-545E | The coverslip is placed on two square coverslips on the microscope slide ensuring that the brain in the antifade does not move while imaging. |
| Dissecting microscope | Zeiss | Stemi 2000 | |
| Ethanol 200 proof (100%), Decon Labs, 1 gallon bottle | Fisher Scientific | 2701 | Used to wash off the larvae before the 24 hr hold in culture medium |
| Fetal Bovine Serum (10%) | Sigma | F4135-100ML | Supplement for cell culture media. |
| Fine forceps for dissection | Fine Science Tools | 11295-20 | Forcepts used in disections. They work best when sharpened. |
| Fly Bottles for Crossing | Genessee Scientific | 32-130 | This bottle is used as a container that lets the flies lay eggs on the grape plate. |
| Glass Dissection Dish (3 well) | These are no longer available | ||
| Glutathione | Sigma | G6013 | Provides oxidative protection during cell culture. |
| Goat Serum | Sigma | G9023- 10ML | Blocking Agent |
| Grape Plates | Made in house | Made in house | Grape juice/agarose plates for collecting freshly hatched eggs |
| Image J | Imagej.net/fiji/downloads | Free Download: https://fiji.sc | Imaging platform that is used to count cells and Edu reactivation |
| Incubator | Thermo Fisher Scientific | Ensures that the temperature, humidity, and light exposure is exactly the same throughout experiment. | |
| Insulin | Sigma | I0516 | Independant variable of the experiment |
| Laminar flow hood | For aliquoting culture media | ||
| L-Glutamine | Sigma | G7513 | Provides support during cell culture |
| Nunc 72-well Microwell Mini Trays | Fisher Scientific | 12-565-154 | Immunostaining steps are performed in this tray |
| Parafilm | Fisher Scientific | S37440 | Film used to seal plates in order to prevent evaporation |
| Pen-Strep | Sigma | P4458-100ml | Antibiodics used to prevent bacterial contamination of cells during culture. |
| Phosphate Buffer, pH7.4 | Made in house | Made in house | Solvent used to wash the brains after fixing and staining steps |
| Pick | Fine Science Tools | 10140-01 | Used to pick larvae off of the grape plate |
| Propionic acid | Fisher Scientific | A-258 | Grape Plate Ingredients |
| Rabbit 405 | Abcam | ab175653 | Antibodies used for immunostaining |
| Rat 555 | Abcam | ab150166 | Antibodies used for immunostaining |
| Rb Scribble | A Gift from Chris Doe | Antibodies used for immunostaining | |
| Rt Deadpan | Abcam | ab195173 | Antibodies used for immunostaining |
| Schneiders Culture Medium | Life Tech | 21720024 | Contains nutrients that help the cells grow and proliferate |
| SlowFade Diamond Antifade (5 x 2 mL) | Life Tech | S36963 | Reagent that provides protection against fading fluorophores |
| Sterile Water | Autoclave Milli-Q water made in house | Needed for Solutions | |
| Sucrose | Fisher | S2-12 | Grape Plate Ingredients |
| Superfrost Microscope Slides | Fisher Scientific | 12-544-7 | |
| Superglue | Most supermarkets | ||
| Tegosept | Genesee Scientific | 20-259 | Grape Plate Ingredients |
| Triton-X 100 | Sigma | T9284-100ML | PBT |
| Welch's 100% grape grape juice | Most supermarkets | Grape Plate Ingredients |
References
- Suman, S., Domingues, A., Ratajczak, J., Ratajczak, M. Z. Potential clinical applications of stem cells in regenerative medicine. Advances in Experimental Medicine and Biology. 1201, 1-22 (2019).
- Tabar, V., Studer, L. Pluripotent stem cells in regenerative medicine: challenges and recent progress. Nature Reviews Genetics. 15, 82-92 (2014).
- Daley, G. Q. Stem cells and the evolving notion of cellular identity. Philosophical Transactions of the Royal Society of London. Series B, Biological Sciences. 370, 20140376 (2015).
- Rodrigues, M., Kosaric, N., Bonham, C. A., Gurtner, G. C. Wound healing: A cellular perspective. Physiological Reviews. 99, 665-706 (2019).
- van Velthoven, C. T. J., Rando, T. A. Stem cell quiescence: Dynamism, restraint, and cellular idling. Cell Stem Cell. 24, 213-225 (2019).
- Chapman, N. M., Boothby, M. R., Chi, H. Metabolic coordination of T cell quiescence and activation. Nature Reviews Immunology. 20, 55-70 (2020).
- Wosczyna, M. N., Rando, T. A. A muscle stem cell support group: Coordinated cellular responses in muscle regeneration. Developmental Cell. 46, 135-143 (2018).
- Homem, C. C., Knoblich, J. A. Drosophila neuroblasts: a model for stem cell biology. Development. 139, 4297-4310 (2012).
- Kang, K. H., Reichert, H. Control of neural stem cell self-renewal and differentiation in Drosophila. Cell and Tissue Research. 359, 33-45 (2015).
- Chell, J. M., Brand, A. H. Nutrition-responsive glia control exit of neural stem cells from quiescence. Cell. 143, 1161-1173 (2010).
- Sousa-Nunes, R., Yee, L. L., Gould, A. P. Fat cells reactivate quiescent neuroblasts via TOR and glial insulin relays in Drosophila. Nature. 471, 508-512 (2011).
- Britton, J. S., Edgar, B. A. Environmental control of the cell cycle in Drosophila: nutrition activates mitotic and endoreplicative cells by distinct mechanisms. Development. 125, 2149-2158 (1998).
- Lin, S., et al. Extremes of lineage plasticity in the Drosophila brain. Current biology : CB. 23, 1908-1913 (2013).
- Sipe, C. W., Siegrist, S. E. Eyeless uncouples mushroom body neuroblast proliferation from dietary amino acids in Drosophila. Elife. 6, 26343 (2017).
- Speder, P., Brand, A. H. Systemic and local cues drive neural stem cell niche remodelling during neurogenesis in Drosophila. Elife. 7, 30413 (2018).
- Yuan, X., Sipe, C. W., Suzawa, M., Bland, M. L., Siegrist, S. E. Dilp-2-mediated PI3-kinase activation coordinates reactivation of quiescent neuroblasts with growth of their glial stem cell niche. PLoS Biology. 18, 3000721 (2020).
- Colombani, J., et al. A nutrient sensor mechanism controls Drosophila growth. Cell. 114, 739-749 (2003).
- Geminard, C., Rulifson, E. J., Leopold, P. Remote control of insulin secretion by fat cells in Drosophila. Cell Metabolism. 10, 199-207 (2009).
- Siller, K. H., Serr, M., Steward, R., Hays, T. S., Doe, C. Q. Live imaging of Drosophila brain neuroblasts reveals a role for Lis1/dynactin in spindle assembly and mitotic checkpoint control. Molecular Biology of the Cell. 16, 5127-5140 (2005).
- Prithviraj, R., Trunova, S., Giniger, E. Ex vivo culturing of whole, developing Drosophila brains. Journal of Visualized Experiments: JoVE. (65), e4270 (2012).
- Bostock, M. P., et al. An immobilization technique for long-term time-lapse imaging of explanted drosophila tissues. Frontiers in Cell and Developmental Biology. 8, 590094 (2020).
- Datta, S. Activation of neuroblast proliferation in explant culture of the Drosophila larval CNS. Brain Research. 818, 77-83 (1999).
Reprints and Permissions
Request permission to reuse the text or figures of this JoVE article
Request PermissionThis article has been published
Video Coming Soon
Copyright © 2025 MyJoVE Corporation. All rights reserved