
Aby wyświetlić tę treść, wymagana jest subskrypcja JoVE. Zaloguj się lub rozpocznij bezpłatny okres próbny.
Method Article
Serial Block-Face Scanning Electron Microscopy (SBEM) for the Study of Dendritic Spines
W tym Artykule
Podsumowanie
Serial Block-Face Scanning Electron Microscopy (SBEM) is applied to image and analyze dendritic spines in the murine hippocampus.
Streszczenie
Three-dimensional electron microscopy (3D EM) gives a possibility to analyze morphological parameters of dendritic spines with nanoscale resolution. In addition, some features of dendritic spines, such as volume of the spine and post-synaptic density (PSD) (representing post-synaptic part of the synapse), presence of presynaptic terminal, and smooth endoplasmic reticulum or atypical form of PSD (e.g., multi-innervated spines), can be observed only with 3D EM. By employing serial block-face scanning electron microscopy (SBEM) it is possible to obtain 3D EM data easier and in a more reproducible manner than when performing traditional serial sectioning. Here we show how to prepare mouse hippocampal samples for SBEM analysis and how this protocol can be combined with immunofluorescence study of dendritic spines. Mild fixation perfusion allows us to perform immunofluorescence studies with light microscopy on one half of the brain, while the other half was prepared for SBEM. This approach reduces the number of animals to be used for the study.
Wprowadzenie
Most of the excitatory synapses in the central nervous system are located on dendritic spines - small protrusions of a neuronal membrane. These protrusions form confined biochemical compartments that control intracellular signal transduction. Structural plasticity of dendritic spines and synapses is closely related to the functional changes in synaptic efficacy that underlie such important processes as learning and memory1,2. It is important to note that electron microscopy (EM) is the only technique that allows to determine if a dendritic spine has a presynaptic input. EM resolution is also needed to study ultrastructural details such as shape of a postsynaptic density (PSD), representing a postsynaptic part of a synapse, or dimensions of a dendritic spine, as well as the size and shape of an axonal bouton. Additionally, with EM it is possible to visualize synapses and their surroundings.
Thanks to advances in imaging and computing technologies it is possible to reconstruct entire neural circuits. Volume electron microscopy techniques, such as serial section transmission electron microscopy (ssTEM), serial block-face scanning electron microscopy (SBEM), and focused ion beam scanning electron microscopy (FIB-SEM) are commonly used for neuronal circuit reconstructions3.
In our studies, the SBEM method is successfully employed to investigate the structural plasticity of dendritic spines and PSDs in samples of the mouse hippocampus and organotypic brain slices 4,5. The SBEM is based on the installation of a miniature ultramicrotome inside the scanning electron microscope chamber6,7,8,9. The top of the sample block is imaged, and then the sample is cut at a specified depth by the ultramicrotome, revealing a new block-face, which is again imaged and then the process is repeated8. As a result, only the image of a block-face is left while the slice which has been cut is lost as debris. That is why SBEM is called a destructive technique, meaning it is not possible to image the same place again. However, the advantage of the destructive on-block methods is that they do not suffer from warping problems and section loss that can significantly affect the data quality and the data analysis3. Moreover, SBEM gives the possibility to image a relatively large field of view ( > 0.5 mm × 0.5 mm) at high resolution3.
To employ SBEM, samples have to be prepared according to a dedicated, highly contrasting protocol due to the backscattered electron detector used for acquiring images. We show here how to perform sample preparation according to the protocol based on a procedure developed by Deerinck10 (National Center for Microscopy and Imaging Research (NCMIR) method), using reduced osmium-thiocarbohydrazide-osmium (rOTO) stains developed in the 1980s8,11. In addition, we introduce a two-step fixation approach, with mild fixation perfusion that allows to use the same brain both for immunofluorescence studies with light microscopy and SBEM.
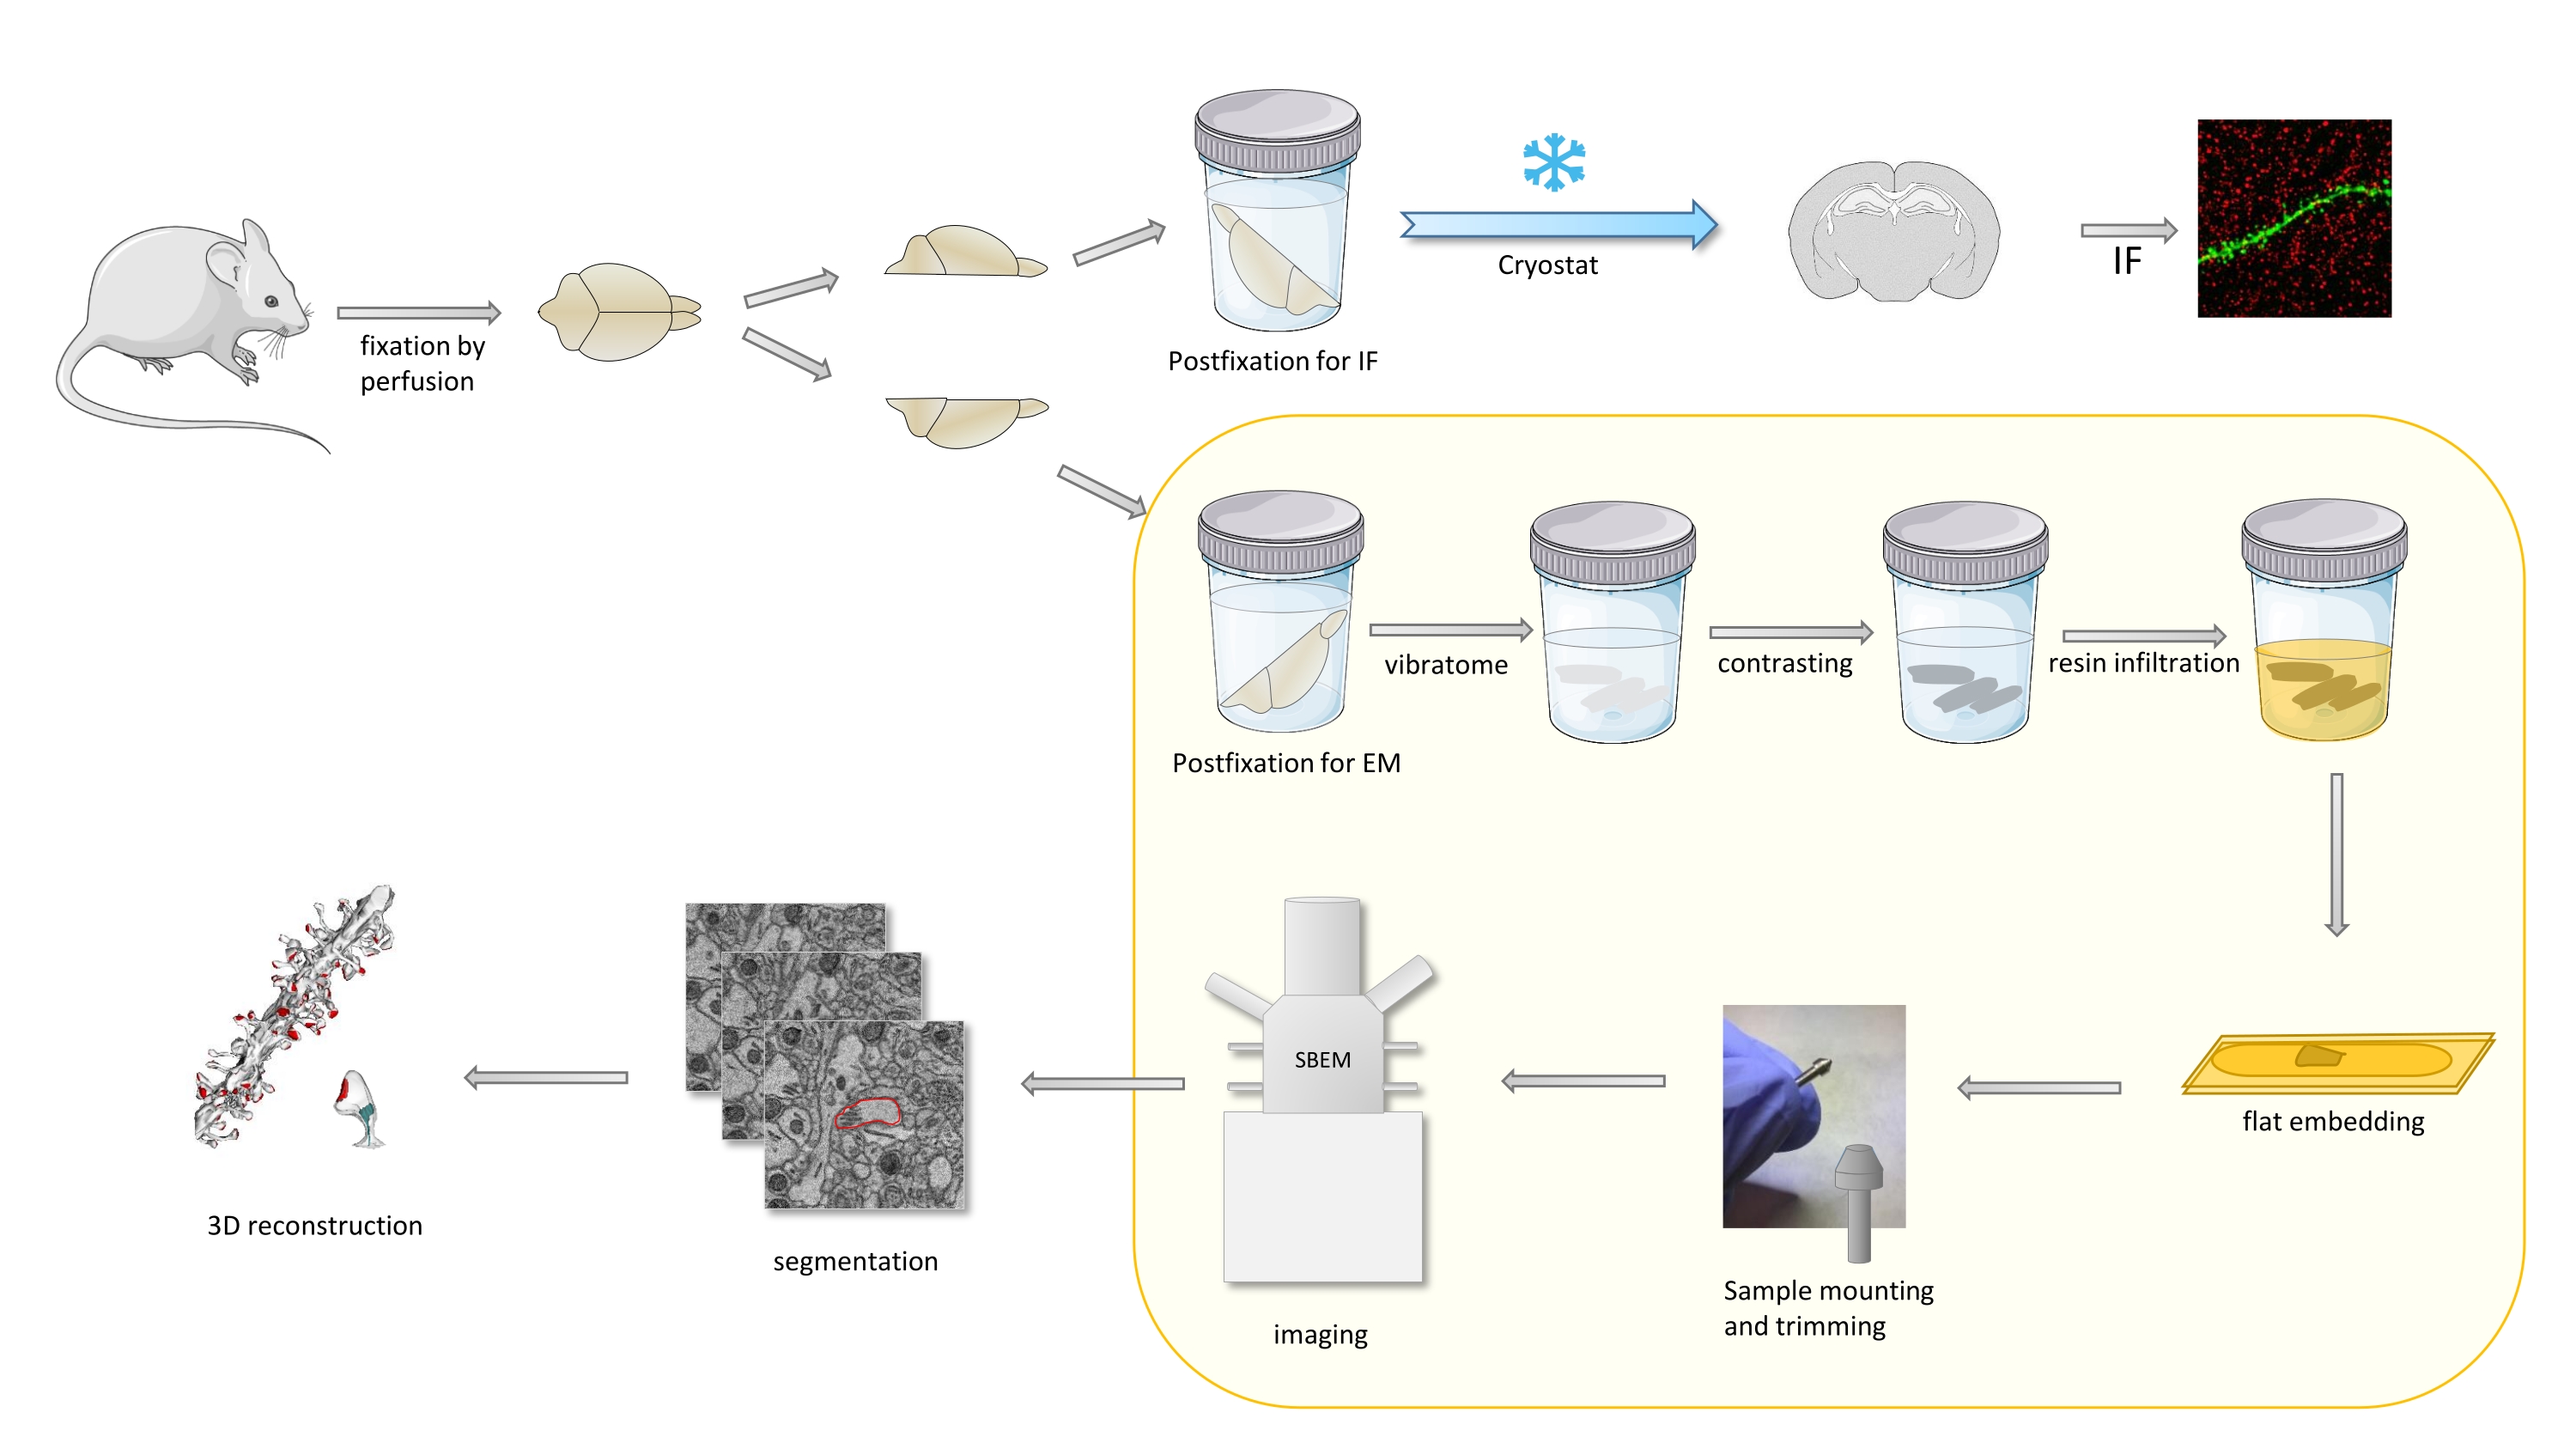
In the protocol a mouse brain is primarily fixed with a mild fixative, and then cut into halves, and one hemisphere is postfixed and prepared for immunofluorescence (IF), while the other for EM studies (Figure 1).

Figure 1. Schematic representation of the workflow for the dendritic spines preparation for the analysis with SBEM. Mice were sacrificed and perfused with a mild primary fixative. The brain was cut into halves, and one hemisphere was postfixed with immunofluorescence (IF)-dedicated fixative, cryoprotected, sliced using a cryostat and processed for IF studies, while the other hemisphere was postfixed with EM fixative, sliced with the vibratome and prepared for EM studies. Brain slices for SBEM studies were contrasted, flat embedded in resin, then a CA1 region of the hippocampus was mounted to the pin, and imaged with SBEM (Figure 1). The part of the protocol highlighted in a yellow box was featured in the video. Please click here to view a larger version of this figure.
Protokół
The research was performed in compliance with Nencki Institute guidelines and permission of the Local Ethical Committee. The studies were carried out in accordance with the European Communities Council Directive of 24 November 1986 (86/609/EEC), Animal Protection Act of Poland and approved by the first Local Ethics Committee in Warsaw. All efforts were made to minimize the number of animals used and their suffering.
CAUTION: All procedures described below must be carried out in a laboratory fume hood. Due to the hazardous nature of the reagents used. Personal safety measures such as gloves, lab coat, safety glasses and a face mask are required.
1. Preparation of the fixative for perfusion (2% wt/vol paraformaldehyde (PFA) and 0.5% vol/vol glutaraldehyde (GA) in 0.1 M phosphate buffer (PB), pH 7.4)
NOTE: Prepare the fixative solution on the same day as it will be used and do not store it longer than for 3 hours. In case of time shortage, prepare 2% PFA in 0.1 M PB the day before, store it at 4 °C and add fresh GA shortly before the perfusion.
- Take 400 mL of sterile double distilled water (ddH2O) and heat it to 60 °C using a stirring hot plate. Then add 20 g of PFA. Add drops of 1 M NaOH until PFA is fully dissolved and allow the mixture to cool down.
- Add 500 mL of 0.2 M PB (pH 7.4).
- Filter the solution to remove any deposit and cool it to 4 °C.
- Just before perfusion, add 20 mL of 25% GA to the solution and then top up the volume with ddH2O to 1 L.
2. Preparation of postperfusion fixative for SBEM (2% wt/vol PFA and 2.5% vol/vol GA in 0.1 M PB, pH 7.4)
- Take 50 mL of the fixative for perfusion (2% PFA and 0.5% GA in 0.1 M PB).
- Add 5 mL of 25% GA.
3. Preparation of postperfusion fixative for IF staining (4% PFA in phosphate buffered saline (PBS))
- Dissolve a tablet of 1x PBS (pH 7.4) in a purified and deionized water (H2O) according to manufacturer instructions.
- Use a stirring hot plate to heat the solution to 60 °C and add 40 g of PFA.
- Add drops of 1 M NaOH until the PFA is fully dissolved and allow the mixture to cool.
- Adjust the pH of the solution to 7.5 with 1 M HCl then top up the volume with H2O to 1 L.
- Filter the solution to remove any deposits.
4. Transcardial perfusion of animals
NOTE: All PFA and GA wastes must be collected and stored for disposal according to the local regulations. Anesthesia and perfusion should follow the local regulations. In the described protocol adult 3-month-old and 20±1-month-old female Thy1-GFP(M) mice (Thy1-GFP +/-)12 expressing green fluorescence protein (GFP) in a sparsely distributed population of glutamatergic neurons were used but any other can be used as well. Animals were bred as heterozygotes with the C57BL/6J background in the Animal House of the Nencki Institute of Experimental Biology.
- Before perfusion anesthetize a mouse by administration of a ketamine/xylazine mixture (up to 90 mg/kg body weight ketamine and 10 mg/kg body weight xylazine) via intraperitoneal injection (27-gauge needle).
- Assess whether the depth of anesthesia is sufficient by checking the reflex to pain stimuli (pinching) and the corneal reflex (squinting).
- After 20 minutes perform an intraperitoneal injection (27-gauge needle) of sodium pentobarbital (50 mg/kg body weight).
- Perfuse a mouse according to a perfusion surgery protocol described by Gage et al.13 (see point 4; Figure 5-6). Using a perfusion pump start with a 0.1 M phosphate buffer, pH 7.4 (30 mL) for 3 minutes and continue with 2% PFA and 0.5% GA in 0.1 M PB, pH 7.4 for 6 minutes (80 mL).
- Gently dissect the brain from the skull and divide it in half (see Figure 9-10 in Gage et al., 201213). Place one piece in a vial containing fixative for SBEM and the second into the vial with 4% PFA/PBS for IF staining.
- Keep the hemispheres in the fixative at 4 °C overnight.
5. Brain slices preparation for electron microscopy
- Choose the vibratome settings (blade travel speed: 0.075 mm/s, cutting frequency: 80 Hz).
- Place the slice chamber into the holder, attach it to the vibratome and surround it with ice. Then place a razor blade into the vibratome blade holder.
- Use a spoon, or similar object and place the chilled brain (dorsal surface up) on a tough cutting surface (e.g., a glass Petri dish lid). To prepare a coronal slice of the hippocampus make a perpendicular cut between the cerebral hemisphere and the cerebellum with a razor blade or scalpel, thus removing the cerebellum. The olfactory bulb can also be removed.
- Apply cyanoacrylate glue on the dry platform of the vibratome.
- Pick up the brain with forceps and carefully dry it on filter paper.
- Glue the hemisphere to the platform close to the cutting blade with the rostral tip upwards. Attach the platform to the holder and immediately fill it up with ice-cold 0.1 M PB, pH 7.4. If the perpendicular cut is properly made, the hemisphere will stand straight up providing 90° angle required to make a symmetric coronal cut containing the hippocampus. Assure that the brain is covered with PB.
- Position the vibratome blade in front of the hemisphere and lower it to the coronal side of the hemisphere. Lower the blade to 400 µm further in the caudal direction and start slicing. Continue slicing until the first two slices are completely separated from the tissue block.
- Retract the blade and lower another 100 µm, then slice again.
- When the hippocampus becomes visible (use the mouse brain atlas Paxinos and Franklin, 200414) collect the slices with the small paintbrush or widened plastic Pasteur pipette.
- Transfer the slices into a 12-well plate filled with cold 0.1 M PB, pH 7.4.
- Dissect the hippocampus in a glass Petri dish filled with 0.1 M PB, pH 7.4 using a razor blade or scalpel, and put it into glass vials with the same phosphate buffer.
NOTE: For long-term storage of the slices supplement 0.1 M PB with 0.05% sodium azide (NaN3).
6. Brain sample preparation for immunostaining
- After overnight fixation in 4% PFA/PBS solution in a fume hood, put the brain tissue into the cryopreservation solution (30% sucrose in PBS with 0.05% NaN3) and keep it at 4 °C for 2 days (until sunk).
- Prepare an antifreeze solution (15% sucrose/30% ethylene glycol/0.05% NaN3/PBS).
- Set the cabinet temperature of the cryostat at -19 °C and make sure that the temperature is reached before proceeding further. During sectioning, ensure that the cabinet temperature remains between -18 °C and -20 °C.
- Use a spoon, or similar object and place the chilled brain (dorsal surface up) on a tough cutting surface (e.g., a glass Petri dish lid). To prepare a coronal slice of the hippocampus make a perpendicular cut between the cerebral hemisphere and the cerebellum with a razor blade or scalpel, thus removing the cerebellum.
- Select a pre-cooled specimen disc, cover it with a medium for freezing on a freeing shelf and using forceps fix the hemisphere to the disc with a rostral tip upwards and wait until the specimen is completely frozen. Insert the specimen disc into a specimen head.
- Install a blade in a blade holder inside the cryo-chamber and cut 40 µm thick slices.
- Transfer slices with a small paintbrush to the 96-well plate filled with cold anti-freeze solution and gently unroll the sections (collect a slice after each round of slicing to prevent them from getting lost in the slice chamber).
NOTE: Brains or sections can be stored in an antifreeze solution at -20 °C for a long time.
7. Immunostaining of brain slices
NOTE: All staining steps were performed in a 24-well plate on a platform shaker.
- Wash the slices with PBS three times, each time for 6 minutes.
- Incubate slices in 300 µL of blocking solution (5% normal donkey serum (NDS)/0.3% Triton X-100) for 1 hour with gentle shaking on a rotator.
- Incubate the slices with the primary antibody against PSD-95 diluted 1:500 in 5% NDS/0.3% Triton X-100/PBS (300 µL per well) overnight at 4 °C. The final concentration of the primary antibody is 2 µg/mL.
- Wash the slices with 0.3% Triton X-100/PBS at room temperature (RT) three times, each time for 6 minutes.
- Incubate slices with the secondary antibody diluted 1:500 in 300 µL of 0.3% Triton X-100/PBS for 90 minutes. The final concentration of the secondary antibody is 4 µg /mL.
- Wash the slices with PBS three times, each time for 6 minutes.
- Mount the slices on slides using a mounting medium and then close them with a cover slide.
- Examine the specimens using a confocal microscope (63 × oil objective, NA 1.4, pixel size 0.13 µm × 0.13 µm).
NOTE: For long-term storage: keep the samples at 4 °C, protect them from light.
8. SBEM sample preparation
CAUTION: Due to the hazardous nature of reagents used all the procedures described below must be carried out in a laboratory fume hood. Before using these chemicals read carefully the Material Safety Data Sheets provided by the manufacturers and ask the safety officer about the local rules to ensure safe handling and waste disposal.
- Sample contrasting
NOTE: Slices washings and room temperature incubation should be carried out with mild shaking (e.g., on a platform shaker). Autoclave degassed water was used.- Wash the slices with cold 0.1 M PB, pH 7.4 five times, each time for 3 minutes.
- Prepare a 1:1 mixture of 4% aqueous osmium tetroxide and 3% potassium ferrocyanide (1:1 by vol). The final product will turn brown. Immerse the samples in this mixture, place them on ice, and from this stage onwards it is important to protect them from light. Incubate them with gentle shaking for 1 hour.
- Meanwhile prepare a thiocarbohydrazide (TCH) solution. Mix 10 mL of double-distilled H2O (ddH2O) and 0.1 g of TCH and place it into an oven set at 60 °C for 1 hour. It is important to swirl the solution from time to time (e.g., every 10 minutes). When ready, cool it to room temperature.
- Wash the slices with ddH2O five times, each time for 3 minutes.
- Filter TCH solution using a 0.22 µm syringe filter and immerse the sample in filtered solution. The slices will turn black. Incubate them for 20 minutes at room temperature.
- Wash the samples with ddH2O five times, each time for 3 minutes.
- Incubate the samples with a 2% aqueous solution of OsO4 for 30 minutes at room temperature.
- Wash the samples with ddH2O five times, each time for 3 minutes.
- Place the samples in filtered 1% aqueous uranyl acetate and incubate them at 4 °C overnight. Use 0.22 µm syringe filter for filtration.
- Prepare L-aspartic acid solution by mixing 0.4 g of L-aspartic acid and 80 mL of ddH2O, adjust the pH to 3.8 for easier dissolving, and then top up with water to 100 mL.
- Next day, begin with Walton's lead aspartate15 preparation. Mix 0.066 g of lead nitrate with 10 mL of L-aspartic acid solution (point 8.1.10) pre-warmed to 60 °C and adjust pH to 5.5 (measured at 60 °C) with 1 M NaOH. Close the vial with lead aspartate and leave it at 60 °C for 30 minutes in a water bath. The solution should be clear. If it turns cloudy, it must be discarded and a new one needs to be prepared.
- In the meantime, wash the samples with degassed ddH2O five times, each time for 3 minutes. Then keep them in the oven set at 60 °C for 30 minutes.
- Immerse the samples in the freshly prepared lead aspartate solution and incubate them in the oven set at 60 °C for 20 minutes.
- Wash the samples with degassed ddH2O five times, each time for 3 minutes.
- Dehydration and resin embedding
- Prepare epoxy resin. Weigh the ingredients (33.3 g of component A/M, 33.3 g of component B, and 1 g of component D) and mix the resin well (e.g., shake it on a rotary shaker in a 15 mL tube) for at least 30 minutes before adding 16 drops of accelerator DMP 30. Stir again for another 10 minutes.
NOTE: Weigh the ingredients under the fume hood. This amount of components gives approximately 60 mL of resin what is enough for 15 vials with samples. You can prepare less or store the rest of the resin in a syringe at 4 °C and utilize it the next day. Remember to seal the tip of the syringe. - Prepare vials with graded dilutions of ethanol (30%, 50%, 70%, 90%, 100%, 100% ethanol in water and 100% dried on a molecular sieve).
- Mix the resin with 100% ethanol in 1:1 proportion to obtain 50% resin. Mix it well.
- Dehydrate the samples for 5 minutes in each dilution of ethanol starting from 30% and ending with 100% anhydrous ethanol dried on molecular sieve. Remember, the samples must never dry completely.
- Infiltrate the samples first in 50% resin for 30 minutes, next in 100% resin for one hour, and then again in 100% resin overnight. Perform all infiltration steps with constant slow shaking.
- The next day, place the samples in fresh 100% resin for one hour and then embed them between fluoropolymer embedding sheets. Degrease pieces of embedding sheet with ethanol, and flat embed the samples between two layers of it, using two glass slides as support. Try to avoid air bubbles in resin on or close to the sample.
- Cure the samples in the oven at 70 °C for at least 48 hours.
- Prepare epoxy resin. Weigh the ingredients (33.3 g of component A/M, 33.3 g of component B, and 1 g of component D) and mix the resin well (e.g., shake it on a rotary shaker in a 15 mL tube) for at least 30 minutes before adding 16 drops of accelerator DMP 30. Stir again for another 10 minutes.
- Trimming and mounting
- Separate embedding sheets and cut a piece of the embedded sample (approximately 1 mm x 1 mm) with a razor blade. Transfer it to a parafilm. This will minimize the danger of losing the sample due to electrostatics.
- Take an aluminum pin that has been degreased with ethanol. Mix a conductive epoxy well and use a little amount of it to mount the sample to the pin. Cure conductive epoxy at 70 °C for 10 minutes.
- Trim each side of the sample block with the diamond knife and then polish the face of the block until the tissue is exposed.
NOTE: At this step, confirm the presence of a region of interest by collecting some sections and performing toluidine blue staining16 or checking under the electron microscope. - Reduce the size of the sample as much as possible. Then ground the sample to the pin with conductive paint and cure it (for 24 hours at room temperature or in the oven at 65 °C for 40 minutes).
- To minimize charging artifacts, sputter coat the samples with a thin layer of gold or gold/palladium.
9. SBEM imaging
- Place the pin with a sample into the chamber of the serial block-face scanning electron microscope. Align the sample to the knife. Close the chamber and set the parameters.
- Collect a stack of images at desired magnification, pixel size, slice thickness, accelerated voltage (EHT), aperture, pressure, etc.
NOTE: The parameters depend on the sample and the goal of the experiment. Exemplary initial imaging settings are included in the table of materials.
10. 3D reconstructions
NOTE: For the steps mentioned below we use open-access software e.g. FijiJ17 (ImageJ version 1.49b), Microscopy Image Browser (MIB)18 and Reconstruct19 but various other software can be employed.
- Convert digital micrograph (dm) files into TIFF format. First import the image sequence (in FijiJ: File > Import > Image sequence > Choose 8 Bit Format) and then save as TIFF (in FijiJ: File > Save As > Image Sequence > Choose Tiff).
- Adjust brightness and contrast of the stack of images (in FijiJ: Image > Adjust > Brightness/Contrast) and, if necessary, denoise it (use DenoisEM plugin for FijJ20 : Plugins > DenoiseEM > Denoise).
- Align the stack (in FijiJ: Plugins > StagReg or MIB: Dataset > Alignment Tools).
- Segment dendritic spines and synapses (In MIB or Reconstruct software, comprehensive tutorials are available (See Table of Materials for details).
Wyniki
Using the method described above high contrast, good resolution images of the mouse brain tissue can be obtained. A large field of view provided by the SBEM technique facilitates precise selection of the region of interest. The large image of the CA1 region of the hippocampus was taken to measure the length of stratum radiatum (SR) (Figure 2A) and to set the imaging precisely in the center (Figure 2B). Next, the stack of images was acquired and the obje...
Dyskusje
There are many variations of the primary NCMIR method described by Deerinck in 201010. The basic principles remain the same but, depending on the type of material studied, slight changes are implemented. It was described previously that different resins can be used to embed specimens for SBEM and for example in the case of plants, Spurr's is the resin of choice due to its low viscosity that allows better infiltration through the cell walls22,
Ujawnienia
The authors have nothing to disclose.
Podziękowania
SBEM imaging, light microscopy imaging and electron microscopy sample preparation were performed with the use of the equipment of Laboratory of Imaging Tissue and Function which serves as an imaging core facility at the Nencki Institute of Experimental Biology.
For preparation of Figure 1, the image of a mouse (Souris_02), and a vial from the https://smart.servier.com/ was used.
This work was supported by the National Science Centre (Poland) Grant Opus (UMO-2018/31/B/NZ4/01603) awarded to KR.
Materiały
| Name | Company | Catalog Number | Comments |
| Anesthetic: | |||
| Ketamine/xylazine mixture (Ketamina/Sedazin) | Biowet Pulawy, Pulawy, Poland | ||
| Sodium pentobarbital (Morbital) | Biowet Pulawy, Pulawy, Poland | ||
| Fixatives: | |||
| Glutaraldehyde (GA) | Sigma-Aldrich,St. Louis, MI, USA | G5882 | Grade I, 25% in H2O, specially purified for use as an electron microscopy fixative |
| Hydrochloric acid (HCl) | POCH, Gliwice, Poland | 575283115 | pure p.a. |
| Paraformaldehyde (PFA) | Sigma-Aldrich,St. Louis, MI, USA | 441244 | prilled, 95% |
| Phosphate buffered saline (PBS), pH 7.4 | Sigma-Aldrich,St. Louis, MI, USA | P4417-50TAB | tablets |
| Sodium hydroxide (NaOH) | Sigma-Aldrich,St. Louis, MI, USA | S5881 | reagent grade,  98%, pellets (anhydrous) 98%, pellets (anhydrous) |
| Sodium phosphate dibasic (Na2HPO4) | Sigma-Aldrich,St. Louis, MI, USA | S3264 | |
| Sodium phosphate monobasic (NaH2PO4) | Sigma-Aldrich,St. Louis, MI, USA | S3139 | |
| Perfusion: | |||
| Large blunt/blunt curved scissors (~14.5 cm) | Fine Science Tools, Foster City, CA, USA | 14519-14 | |
| Micro-spatula (double 2" flat ends, one rounded, one tapered to 1/8") | Fine Science Tools, Foster City, CA, USA | 10091-12 | |
| Needle tip, 15 GA, blunt (perfusion needle) | KD Medical GmbH Hospital Products, Berlin, Germany | KD-FINE 900413 | 1.80 x 40 mm |
| Pair of fine (Graefe) tweezers | Fine Science Tools, Foster City, CA, USA | 11050-10 | |
| Perfusion pump | Lead Fluid | BQ80S | |
| Plastic vials | Profilab, Warsaw, Poland | 534.02 | plastic vials with blue cap for tissue storage, 20 ml, 31 x 48 mm |
| Straight iris scissors (~9 cm) | Fine Science Tools, Foster City, CA, USA | 14058-11 | |
| Brain slices preparation for EM: | |||
| 12-well plate | NEST, Rahway, NJ, USA | 712001 | |
| Cyanoacrylic glue | Fenedur, Montevideo, Uruguay | ||
| Glass vials | Electron Microscopy Sciences, Hatfield, PA, USA | 72632 | 20 ml Scintillation Vial, a pack of 100 |
| Pasteur pipette | VWR, Radnor, PA, USA | 612-4545 | LDPE, disposable, 7.5 ml |
| Razor blade | Wilkinson Sword, London, UK | Classic double edge safety razor blades | |
| Scalpel blade | Swann-Morton, Sheffield, UK | No. 20 | |
| Vibratome | Leica Microsystems, Vienna, Austria | Leica VT1000 S | |
| Brain slices preparation for IF: | |||
| 96-well plate | NEST, Rahway, NJ, USA | 701101 | |
| Criostat | Leica Microsystems, Vienna, Austria | Leica CM 1950 | |
| Ethylene glycol | Bioshop, Burlington, Canada | ETH001 | |
| Low-profile disposable blade 819 | Leica Biosystems Inc., USA | 14035838925 | |
| Scalpel blade | Swann-Morton, Sheffield, UK | No. 20 | |
| Sodium azide (NaN3) | POCH, Gliwice, Poland | 792770426 | |
| Sucrose | POCH, Gliwice, Poland | 772090110 | |
| Tissue freezing medium for cryosectioning, OCT-Compound | Leica Biosystems, Switzerland | 14020108926 | |
| Immunostaining: | |||
| 24-well plate | NEST, Rahway, NJ, USA | 702001 | |
| Anti-Post Synaptic Density Protein 95 Antibody | Merck-Millipore, Burlington, MA, USA | MAB1598 | |
| Confocal microscope | Zeiss, Göttingen, Germany | Zeiss Spinning Disc microscope (63 × oil objective, NA 1.4, pixel size 0.13 µm × 0.13 µm) | |
| Cover slide | Menzel Glaser, Braunschweig, Germany | B-1231 | 24 x 60 mm |
| Donkey anti-Mouse IgG (H+L) Highly Cross-Adsorbed Secondary Antibody, Alexa Fluor 555 | Invitrogen, Carlsbad, CA, USA | A31570 | |
| Fluoromount-G Mounting Medium, with DAPI | Invitrogen, Carlsbad, CA, USA | 00-4959-52 | |
| Microscope slide | Thermo Scientific, Waltham, MA, USA | AGAA00008 | SuperFrost |
| Normal donkey serum (NDS) | Jackson ImmunoResearch Laboratories, West Grove, PA, USA | 017-000-121 | |
| Shaker | JWElectronic, Warsaw, Poland | KL-942 | |
| TritonT X-100 Reagent Grade | Bioshop, Burlington, Canada | TRX506 | |
| Electron microsocpy sample preparation | |||
| Potassium hexacyanoferrate(II) trihydrate | POCH, Gliwice, Poland | 746980113 | |
| Aclar 33C Film | Electron Microscopy Sciences, Hatfield, PA, USA | 50425 | Fluoropolymer Film embedding sheet |
| DMP-30, 2,4,6-Tris(dimethylaminomethyl)phenol | Sigma-Aldrich,St. Louis, MI, USA | T58203 | Epoxy embedding medium accelerator |
| Durcupan ACM single component A, M | Sigma-Aldrich,St. Louis, MI, USA | 44611 | Durcupan ACM single component A, M epoxy resin |
| Durcupan ACM single component B | Sigma-Aldrich,St. Louis, MI, USA | 44612 | Durcupan ACM single component B, hardener 964 |
| Durcupan ACM single component D | Sigma-Aldrich,St. Louis, MI, USA | 44614 | Durcupan ACM single component D , plasticizer |
| Ethyl alcohol absolute | POCH, Gliwice, Poland | 64-17-5 | Ethyl alcohol absolute 99.8 % pure P.A.-BASIC |
| Genlab laboratory oven | Wolflabs, York, UK | Mino/18/SS | Oven Genlab MINO/18/SS 18l volume, no fan circulation, no digital display, standard temperature gradient, standard recovery rate, no timer, 250°C maximum temperature, 240V electrical supply |
| L-Aspartic acid | Sigma-Aldrich,St. Louis, MI, USA | A-9256 | reagent grade, 98% (HPLC) |
| Lead (II) nitrate | Sigma-Aldrich,St. Louis, MI, USA | 467790 | 99.95% trace metals basis |
| Osmium tetroxide | Sigma-Aldrich,St. Louis, MI, USA | 75632 | for electron microscopy, 4% in H2O |
| pH meter | Elmetron, Zabrze, Poland | CP-5-5 | |
| Rotator | BioSan, Józefów, Poland | Multi Bio RS-24 | rotator Multi Bio RS-24 |
| Sodium hydroxide (NaOH) | Sigma-Aldrich,St. Louis, MI, USA | S5881 | reagent grade, 98%, pellets (anhydrous) |
| Sunflower mini shaker | Grant bio, Shepreth,UK | PD-3D | |
| Syringe filter | Millipore, Burlington, MA, USA | SLGP033NB | 0,22 µm pore size |
| Thiocarbohydrazide | Sigma-Aldrich,St. Louis, MI, USA | 88535 | purum p.a., for electron microscopy, 99.0% (N) |
| Uranyl acetate | Serva, Heidelberg, Germany | 77870 | Uranyl acetate·2H2O, research grade |
| Water bath | WSL, Swietochlowice, Poland | LWT | |
| Specimen mounting for SBEM | |||
| 96-well culture plate | VWR, Radnor, PA, USA | 734-2782 | 96-well plates, round bottom, non treated |
| AM Gatan 3View stub handling tweezers | Micro to Nano, Haarlem, Netherlands Netherlands | 50-001521 | |
| Binocular | OPTA-TECH, Warsaw, Poland | X2000 | |
| Conductive glue | Chemtronics, Georgia, USA | CW2400 | conductive eopxy |
| Gatan 3View sample pin stubs | Micro to Nano, Haarlem, Netherlands Netherlands | 10-006003 | |
| Parafilm | Sigma-Aldrich,St. Louis, MI, USA | P7793 | roll size 20 in. × 50 ft |
| Pelco conductive silver paint | Ted Pella, Redding, CA, USA | 16062-15 | PELCO® Conductive Silver Paint, 15g |
| Razor blades double edge | Electron Microscopy Sciences, Hatfield, PA, USA | 72000 | Stainless Steel "PTFE" coated. PERSONNA brand .004" thick, wrapped individually, 250 blades in a box. |
| Scanning Electron Microscope | Zeiss, Oberkochen, Germany | Sigma VP with Gatan 3View2 chamber, acceleration voltage 2.5 kV, variable pressure 5 Pa, aperture 20 µm, dwell time 6 µs, slice thickness 60 nm, magnification 15 000 x, image resolution 2048 x 2048 pixels, pixel size 7.3 nm | |
| trim 90° diamond knife | Diatome Ltd., Nidau, Switzerland | DTB90 | |
| Ultramicrotome | Leica Microsystems, Vienna, Austria | Leica ultracutR | |
| Software | webpage | tutorials | |
| FijiJ | https://fiji.sc/ | ||
| Microscopy Image Browser | http://mib.helsinki.fi/ | http://mib.helsinki.fi/tutorials.html | |
| Reconstruct | https://synapseweb.clm.utexas.edu/software-0 | https://synapseweb.clm.utexas.edu/software-0) | |
| Animals | |||
| Mice | Adult 3-month old and 20±1 month old female Thy1-GFP(M) mice (Thy1-GFP +/-) (Feng et al.,2000) which express GFP in a sparsely distributed population of glutamatergic neurons. Animals were bred as heterozygotes with the C57BL/6J background in the Animal House of the Nencki Institute of Experimental Biology. |
Odniesienia
- Bosch, M., Hayashi, Y. Structural plasticity dendritic spines. Current Opinion in Neurobiology. 22 (3), 383-388 (2012).
- Borczyk, M., Radwanska, K., Giese, K. P. The importance of ultrastructural analysis of memory. Brain Research Bulletin. 173, 28-36 (2021).
- Wanner, A. A., Kirschmann, M. A., Genoud, C. Challenges of microtome-based serial block-face scanning electron microscopy in neuroscience: challenges of SBEM in neuroscience. Journal of Microscopy. 259 (2), 137-142 (2015).
- Śliwińska, M. A., et al. Long-term Memory Upscales Volume of Postsynaptic Densities in the Process that Requires Autophosphorylation of αCaMKII. Cerebral Cortex. 30 (4), 2573-2585 (2020).
- Borczyk, M., Śliwińska, M. A., Caly, A., Bernas, T., Radwanska, K. Neuronal plasticity affects correlation between the size of dendritic spine and its postsynaptic density. Scientific Reports. 9 (1), 1693 (2019).
- Leighton, S. B. SEM images of block faces, cut by a miniature microtome within the SEM - a technical note. Scanning Electron Microscopy. , 73-76 (1981).
- Denk, W., Horstmann, H. Serial Block-Face Scanning Electron Microscopy to Reconstruct Three-Dimensional Tissue Nanostructure. PLoS Biology. 2 (11), 329 (2004).
- Smith, D., Starborg, T. Serial block face scanning electron microscopy in cell biology: Applications and technology. Tissue and Cell. 57, 111-122 (2019).
- Titze, B., Genoud, C. Volume scanning electron microscopy for imaging biological ultrastructure: Volume scanning electron microscopy. Biology of the Cell. 108 (11), 307-323 (2016).
- Deerinck, T. J., Bushong, E. A., Thor, A., Ellisman, M. H. . NCMIR methods for 3D EM: A new protocol for preparation of biological specimens for serial block face scanning electron microscopy. , 6-8 (2010).
- Willingham, M. C., Rutherford, A. V. The use of osmium-thiocarbohydrazide-osmium (OTO) and ferrocyanide-reduced osmium methods to enhance membrane contrast and preservation in cultured cells. Journal of Histochemistry & Cytochemistry. 32 (4), 455-460 (1984).
- Feng, G., et al. Imaging Neuronal Subsets in Transgenic Mice Expressing Multiple Spectral Variants of GFP. Neuron. 28 (1), 41-51 (2000).
- Gage, G. J., Kipke, D. R., Shain, W. Whole Animal Perfusion Fixation for Rodents. Journal of Visualized Experiments. (65), e3564 (2012).
- Paxinos, G., Franklin, K. B. J. . The mouse brain in stereotaxic coordinates. , (2004).
- Walton, J. Lead aspartate, an en bloc contrast stain particularly useful for ultrastructural enzymology. Journal of Histochemistry & Cytochemistry. 27 (10), 1337-1342 (1979).
- Mercer, E. H. a scheme for section staining in electron microscopy. Journal of the Royal Microscopical Society. 81 (3-4), 179-186 (1963).
- Schindelin, J., et al. Fiji: an open-source platform for biological-image analysis. Nature Methods. 9 (7), 676-682 (2012).
- Belevich, I., Joensuu, M., Kumar, D., Vihinen, H., Jokitalo, E. Microscopy Image Browser: A Platform for Segmentation and Analysis of Multidimensional Datasets. PLOS Biology. 14 (1), 1002340 (2016).
- Fiala, J. C. Reconstruct: a free editor for serial section microscopy. Journal of Microscopy. 218 (1), 52-61 (2005).
- Roels, J., et al. An interactive ImageJ plugin for semi-automated image denoising in electron microscopy. Nature Communications. 11 (1), 771 (2020).
- Radwanska, K., et al. Mechanism for long-term memory formation when synaptic strengthening is impaired. Proceedings of the National Academy of Sciences. 108 (45), 18471-18475 (2011).
- Kittelmann, M., Hawes, C., Hughes, L. Serial block face scanning electron microscopy and the reconstruction of plant cell membrane systems: SBFSEM Methods for Plant Cells. Journal of Microscopy. 263 (2), 200-211 (2016).
- Fendrych, M., et al. Programmed Cell Death Controlled by ANAC033/SOMBRERO Determines Root Cap Organ Size in Arabidopsis. Current Biology. 24 (9), 931-940 (2014).
- Russell, M. R. G., et al. 3D correlative light and electron microscopy of cultured cells using serial blockface scanning electron microscopy. Journal of Cell Science. 130 (1), 278-291 (2017).
- Płachno, B. J., Świątek, P., Jobson, R. W., Małota, K., Brutkowski, W. Serial block face SEM visualization of unusual plant nuclear tubular extensions in a carnivorous plant (Utricularia, Lentibulariaceae). Annals of Botany. 120 (5), 673-680 (2017).
- Genoud, C., Titze, B., Graff-Meyer, A., Friedrich, R. W. Fast Homogeneous En Bloc Staining of Large Tissue Samples for Volume Electron Microscopy. Frontiers in Neuroanatomy. 12, (2018).
- Puhka, M., Joensuu, M., Vihinen, H., Belevich, I., Jokitalo, E. Progressive sheet-to-tubule transformation is a general mechanism for endoplasmic reticulum partitioning in dividing mammalian cells. Molecular Biology of the Cell. 23 (13), 2424-2432 (2012).
- Gluenz, E., Wheeler, R. J., Hughes, L., Vaughan, S. Scanning and three-dimensional electron microscopy methods for the study of Trypanosoma brucei and Leishmania mexicana flagella. Methods in Cell Biology. 127, 509-542 (2015).
- Starborg, T., et al. Using transmission electron microscopy and 3View to determine collagen fibril size and three-dimensional organization. Nature Protocols. 8 (7), 1433-1448 (2013).
- Hughes, L., Borrett, S., Towers, K., Starborg, T., Vaughan, S. Patterns of organelle ontogeny through a cell cycle revealed by whole-cell reconstructions using 3D electron microscopy. Journal of Cell Science. 130 (3), 637-647 (2017).
- Bojko, A., et al. Improved Autophagic Flux in Escapers from Doxorubicin-Induced Senescence/Polyploidy of Breast Cancer Cells. International Journal of Molecular Sciences. 21 (17), 6084 (2020).
- Knott, G. W., Holtmaat, A., Trachtenberg, J. T., Svoboda, K., Welker, E. A protocol for preparing GFP-labeled neurons previously imaged in vivo and in slice preparations for light and electron microscopic analysis. Nature Protocols. 4 (8), 1145-1156 (2009).
- Glauert, A. M., Lewis, P. R. . Biological specimen preparation for transmission electron microscopy. , (2014).
- Genoud, C. Altered Synapse Formation in the Adult Somatosensory Cortex of Brain-Derived Neurotrophic Factor Heterozygote Mice. Journal of Neuroscience. 24 (10), 2394-2400 (2004).
Przedruki i uprawnienia
Zapytaj o uprawnienia na użycie tekstu lub obrazów z tego artykułu JoVE
Zapytaj o uprawnieniaThis article has been published
Video Coming Soon
Copyright © 2025 MyJoVE Corporation. Wszelkie prawa zastrzeżone