
A subscription to JoVE is required to view this content. Sign in or start your free trial.
Method Article
Isolation, Characterization, and Total DNA Extraction to Identify Endophytic Fungi in Mycoheterotrophic Plants
In This Article
Erratum Notice
Summary
The current article aims to provide detailed and adequate protocols for the isolation of plant-associated endophytic fungi, long-term preservation of isolates, morphological characterization, and total DNA extraction for subsequent molecular identification and metagenomic analyses.
Abstract
Mycoheterotrophic plants present one of the most extreme forms of mycorrhizal dependency, having totally lost their autotrophic capacity. As essential as any other vital resource, the fungi with which these plants intimately associate are essential for them. Hence, some of the most relevant techniques in studying mycoheterotrophic species are the ones that enable the investigation of associated fungi, especially those inhabiting roots and subterranean organs. In this context, techniques for identifying culture-dependent and culture-independent endophytic fungi are commonly applied. Isolating fungal endophytes provides a means for morphologically identifying them, analyzing their diversity, and maintaining inocula for applications in the symbiotic germination of orchid seeds. However, it is known that there is a large variety of non-culturable fungi inhabiting plant tissues. Thus, culture-independent molecular identification techniques offer a broader cover of species diversity and abundance. This article aims to provide the methodological support necessary for starting two investigation procedures: a culture-dependent and an independent one. Regarding the culture-dependent protocol, the processes of collecting and maintaining plant samples from collection sites to laboratory facilities are detailed, along with isolating filamentous fungi from subterranean and aerial organs of mycoheterotrophic plants, keeping a collection of isolates, morphologically characterizing hyphae by slide culture methodology, and molecular identification of fungi by total DNA extraction. Encompassing culture-independent methodologies, the detailed procedures include collecting plant samples for metagenomic analyses and total DNA extraction from achlorophyllous plant organs using a commercial kit. Finally, continuity protocols (e.g., polymerase chain reaction [PCR], sequencing) are also suggested for analyses, and techniques are presented here.
Introduction
Endophytic fungi are, by definition, those that inhabit the interior of plant organs and tissues in inconspicuous infections (i.e., without causing harm to their host)1,2. These fungi can neutrally or beneficially interact with host plants, may confer resistance to pathogens and unfavorable environmental conditions, and may contribute to the synthesis of beneficial compounds for the plant (e.g., growth factors and other phytohormones)1,3. Mycorrhizal endophytes are fungi that establish mycorrhizal associations with the plant, taking part in nutrient transfer4. In Orchidaceae, the interaction with mycorrhizal endophytes is fundamental for seed germination in the vast majority of species, and seedling establishment in all the plants in the family5. In such contexts, mycoheterotrophic orchids represent a case of total dependence regarding their mycorrhizal partners, as they depend on mineral nutrients and carbon compounds transference by these fungi during their whole life cycle6. Therefore, the isolation and identification of associating fungi is a fundamental base when investigating mycoheterotrophic life strategies. Moreover, little is known about the roles of fungal endophytes in mycoheterotrophic plants or even the real diversity of these fungi7,8.
The investigation of endophytic fungi may be conducted via different techniques, traditionally described as culture-independent or -dependent, for instance: (a) direct observation, (b) fungal isolation and morphological and/or molecular identification, and (c) total DNA extraction of plant tissues and molecular identification9. In direct observation (a), endophytic fungi may be investigated while still in the interior of plant cells and tissues by light or electron microscopy9, as different microscopy protocols are detailed by Pena-Passos et al.10. By isolation methods (b), fungal endophytes can be characterized according to their colonies, hyphae, and reproductive or resistance structure morphology. Also, via isolation techniques, it is possible to conduct the molecular identification of isolates through DNA extraction, amplification of molecular identification sequences (barcodes or fingerprints), and sequencing11. The latter technique (c) enables the molecular identification of endophytic fungi per DNA extraction while in the interior of plant tissues (metabarcoding), followed by library preparation and sequencing12.
Moreover, fungal isolates may be applied in symbiotic germination trials, using seeds from autotrophic or mycoheterotrophic orchids. An example of such an application is the investigation conducted by Sisti et al.13, describing the germination and initial stages of protocorm development in Pogoniopsis schenckii, a mycoheterotrophic orchid, in association with some of its isolates, comprising non-mycorrhizal endophytic fungi. The applied symbiotic germination protocol is detailed and presented in a video by Pena-Passos et al.10. Isolating fungi in association with different plant organs allows diverse investigation focuses regarding the nature of plant-fungal interactions (e.g., to comprehend either ecological or physiological aspects of the association, as well as inquiries into the nutrient transference from fungi to the plant)9.
The methodologies presented in section 1 are based on a collection of subterranean organ samples, as these organs present the most difficulties in collection, and they are of major interest since mycorrhizal endophytes colonize them. However, both included protocols (steps 1.1 and 1.2) may be applied to other mycoheterotrophic plant organs (e.g., rhizomes, floral stems, and fruits). The collection methodology described in step 1.1 is designated for isolating endophytic fungi (section 2) for morphological characterization (sections 4 and 5) and/or total DNA extraction for isolate identification (section 6). On the other hand, the collection methodology described in step 1.2 is exclusively assigned to total DNA extraction of plant tissues for metabarcoding techniques (section 7). In section 3, four methods for filamentous fungi storage and preservation are presented, two for short-term storage (3-6 months) and the other two adequate for long-term storage (>1 year). The morphological characterization (sections 4 and 5) may be associated with molecular identification to reinforce it and provide important information on fungal macro- and micromorphology. Figure 1 summarizes the collective methodologies described thereafter.

Figure 1: Schematic summarization of the presented methods. Plant collection and fungal isolation, preservation, and molecular identification by culture-dependent and -independent methodologies. Please click here to view a larger version of this figure.
Protocol
1. Plant sample collection
- Sample collection for culture-dependent methods
- Carefully dig the subterranean organs; these can be roots, stems, rhizomes, or storage organs of the plant to be collected. Apart from highly compact soils, collect these samples by hand.
NOTE: The use of tools such as trowels or scoops in this step is ill-advised, as it can damage the fragile structures of mycoheterotrophic plants and may cause tissue contamination by non-endophytic fungi. - Collect as many subterranean organs as possible. Maintain the samples in paper bags inside a cooled container (e.g., polystyrene foam box or thermal bag with ice). If aerial organs are also collected, transport them separately from the subterranean ones.
- Carefully dig the subterranean organs; these can be roots, stems, rhizomes, or storage organs of the plant to be collected. Apart from highly compact soils, collect these samples by hand.
- Sample collection for culture-independent methods
- Carefully dig the roots of the plant to be collected under the same recommendations pointed out in the NOTE from step 1.1.1.
- Collect as many subterranean organs as possible. Maintain the collected samples in cryotubes inside liquid nitrogen (desirable option) or use centrifuge tubes surrounded by dry ice (alternative option). Maintain aerial organs separately, if collected.
2. Isolation of endophytic fungi associated with plant organs14
NOTE: Every material, solution, and reagent used in this section must be sterile. Ones that cannot be purchased already sterilized should be autoclaved at 121 °C for 20 min.
- Superficial disinfestation of plant organs
- Wash the collected samples (step 1.1.2) in running water and remove as much substrate and other debris that the samples could have as possible.
- Inside a laminar flow hood, maintain the washed samples submersed in 70% ethanol for 1 min (a beaker or a glass jar can be used).
- Transfer the samples to another container with sodium hypochlorite with 2% active chlorine for 3 min.
- Change the samples to a container with 70% ethanol and maintain submersed for 1 min. Afterward, wash the samples sequentially in two containers with distilled water.
- Installation of plant fragments in culture medium
NOTE: Every step detailed in step 2.2 must be conducted inside a laminar flow hood.- Before installation, prepare Petri dishes (8-10 cm in diameter) with 19.5 g/L potato dextrose agar culture medium (PDA) + 7 g/L bacteriological agar + 3 mL/L antibiotics (e.g., streptomycin, penicillin, tetracycline, ampicillin).
- Maintain the Petri dishes with the culture medium at 36 °C for 24 h before using them to ensure there is no contamination. Discard dishes contaminated with bacteria or fungi colonies.
NOTE: The addition of antibiotics in the medium is essential in this step, as the organs are highly infected by bacteria that may inhibit fungal growth. Verify whether the antibiotics may be heated during autoclaving; some antibiotics must be added after cooling the medium to around 36 °C (before placing it in the dishes). - Immediately after superficial disinfestation of the samples and still inside a laminar flow hood, in PDA, inoculate some drops of the distilled water from the last container used to wash the samples. This step is important to evaluate the efficacy of superficial disinfestation of samples.
- In an empty autoclaved dish, place the samples and use a flamed scalpel and forceps to section the samples to a thickness of around 0.2 cm.
- Section cylindrical samples longitudinally in two halves if desired to amplify the surface in contact with the medium. To better expose fruits and other more spherical organs, chop up or slice the structures thoroughly. The seeds can also be important fungal sources, so ensure the sectioned fruit exposes them to the medium.
NOTE: Only healthy organs, without tissue damage or signals of possible diseases or pathogenic infections, ought to be used in fungal endophyte isolation. - Distribute five fragments of the subterranean organs in the Petri dishes with PDA + antibiotic. Ensure the fragments are as far away from each other as possible, and are also not touching the dish edges. Do not array any fragments on the medium. Prepare replicates of each organ installed, as a precaution in case of contamination.
- Seal the Petri dishes with cling film and store them in the dark at 25-27 °C (preferably in an incubator) for 5 days.
- Isolation frequency (IF) calculus11
- After 5 days of organ fragment incubation, calculate the IF, according to the number of incubated fragments that present fungal colonies growing divided by the total of incubated fragments, as represented in the following equation:

- After 5 days of organ fragment incubation, calculate the IF, according to the number of incubated fragments that present fungal colonies growing divided by the total of incubated fragments, as represented in the following equation:
- Purification of fungal isolates by striating and subculturing
NOTE: Every step detailed in step 2.4 must be conducted inside a laminar flow hood.- Prepare Petri dishes (5 cm in diameter) with 5-7 g/L agar-agar (AA; bacteriological agar only). Maintain the dishes for 24 h at 36 °C to eliminate possibly contaminated ones.
- Identify each grown fungal colony with a code and delimit its margins on the bottom side of the dish (can be done with a permanent marker). Differentiate the colonies by color, growth pattern, texture, and margin format.
- With an autoclaved wooden toothpick, using the fine tip, recuperate a tiny amount of mycelium from a fungal colony. Concentrate preferably on the colony margins and choose an area as far as possible from another colony, avoiding recuperating more than one type of colony at once.
- Using the same toothpick with mycelium at the tip, striate the AA producing three striae (grooves). Ensure each stria is at a distance of 1 cm from another and the dish edges. Write the appropriate code (using sticker paper and pencil), seal the dishes, and maintain them incubated in the dark at 25-27 °C for 3 days.
- Prepare Petri dishes (8 cm in diameter) with 39 g/L PDA. It is not necessary to add antibiotics at this stage.
- After incubating the AA dishes, meticulously observe them against light (from a lamp or a window), aiming to identify fine hyphae forming individual colonies. Delimit the area of an individual colony per dish, using a permanent marker on the bottom side of the Petri dish.
- In a laminar flow hood, use an autoclaved toothpick to cut a portion of the medium containing the colony and transfer the cut volume to the center of a new PDA dish.
- Identify the Petri dishes with the codes of the isolates, seal the dishes with cling film, and maintain them in the dark at 25-27 °C for 7-14 days.
3. Preservation of purified fungal isolates
NOTE: Every material, solution, and reagent used in this section must be sterile. Ones that cannot be purchased already sterilized should be autoclaved at 121 °C for 20 min.
- Preservation with Castellani's method or in mineral oil (3-6 months)11,15
- Prepare 2 mL microcentrifuge tubes with 0.5 mL of distilled water or containing 0.5 mL of mineral oil (depending on the chosen method). Ensure the tubes are autoclaved empty, and the autoclaved water and oil are added to the tubes inside a laminar flow hood.
- In a laminar flow hood, place the Petri dishes with purified isolates already grown in PDA (39 g/L) for 7-14 days. Using an autoclaved toothpick, cut small cuboids (0.5 cm x 0.5 cm in upper area) of medium containing the mycelium margins.
- Place four to six cuboids in the microcentrifuge tubes with distilled water (Castellani's method) or mineral oil. Store the tubes in the dark, at 25 °C for as long as needed, observing the time limitations of the method.
NOTE: Avoid adding too many cuboids to the tubes and making them full, which may increase contamination chances. It is possible to maintain the tubes refrigerated, which may favor the preservation of some isolates for longer. Currah et al.16 recommend storing replicates of mycorrhizal fungi isolates from tropical orchids both refrigerated and at 25 °C, as they can be lost when in cold storage. - Recuperate a cuboid and place it in the center of a new PDA dish to grow a stored isolate.
- Cryopreservation in unhulled rice grains (>1 year)17
- Wash unhulled rice grains in running water and cook them until the rice hull starts to open. Distribute the cooked grains in glass test tubes with a screw cap and autoclave twice with an interval of 24 h in between.
- In a laminar flow hood, place the Petri dishes with purified isolates already grown in PDA (39 g/L) for 7-14 days. Using an autoclaved toothpick, recuperate five small hyphae fragments from the mycelium margins and inoculate them in the tube containing autoclaved rice grains.
NOTE: Inoculating hyphae at different points and depths of the tube guarantees that the isolate colonizes the unhulled rice grains in less time. - Incubate the tubes in the dark at 25-27 °C for 14 days. Agitate the tubes by vortexing them every 3 days to keep the grains individualized.
- After observing fungal growth in the rice grains, distribute the grains in an autoclaved Petri dish lined with filter paper to absorb humidity, over the paper so the grains can dry. Store in the dark at 25-27 °C for 2-3 days.
- Prepare cryotubes with 1/3 silica gel at the bottom and 1/3 glass wool above the silica. Finally, distribute 1/3 of the rice grains with grown fungal mycelium. Store at -20 °C for 24 h.
- After 24 h, store the cryotubes at -80 °C for as long as needed, observing the time limitations of the method.
- Cryopreservation in vermiculite using a cryoprotectant (>1 year)18
- Prepare a liquid culture medium composed of 0.2% yeast extract and 2% glucose in distilled water. Adjust the pH to 5 and autoclave it.
- Distribute 0.2 g of vermiculite (use fine granulometry) in cryotubes with a screw cap and autoclave them. Add 0.8 mL of autoclaved liquid medium to the cryotubes containing vermiculite.
- In a laminar flow hood, place the Petri dishes with purified isolates already grown in PDA (39 g/L) for 7-14 days. Using an autoclaved toothpick, recuperate three to five hyphae fragments from the mycelium margins and inoculate along the tube containing vermiculite + liquid culture medium. Remember to identify the cryotubes with the respective isolate code.
NOTE: Inoculating hyphae in different points and depths of the cryotube guarantees that the isolate colonizes the vermiculite in less time. - Store the cryotubes in the dark at 25-27 °C until colonization of most of the vermiculite grains can be observed, which usually takes around 14 days.
- Prepare a cryoprotectant solution composed of 5% glycerol and 5% trehalose in distilled water and autoclave it. Let the solution cool before using it.
- After the vermiculite in cryotubes is colonized by the respective fungal isolate, distribute 0.4 mL of cryoprotectant in each tube and keep the cryotubes refrigerated at 4 °C for 48 h. Afterward, maintain the cryotubes at -80 °C for as long as needed, observing the time limitations of the method.
4. Macromorphological characterization of filamentous fungi (colony morphology)
- Maintain a photographic register of the mycelium grown in each Petri dish with 39 g/L PDA for 7-14 days. Remember to register both sides of the colony, upper and underside (reverse). If the dishes are going to be readily used in section 6 or not maintained, open the dishes when photographing them to obtain better photos.
- If interested in quantitative data on colony morphology, subculture replicates of the isolates and maintain them in the same growing conditions and for a constant period to register the colony diameter and calculate the growth rate (usually in mm/h).
NOTE: More sophisticated quantitative results can be achieved by using different types of culture media for comparison19 and by considering the statistics tools to treat data. - Observe the colonies under a stereomicroscope as well to identify morphological characteristics and photograph in magnification. Evaluate the colonies according to their macromorphological characteristics, as detailed in the results section. Consult diverse bibliographical sources to help categorize and relate the macromorphology to molecular and/or morphological identification.
5. Micromorphological characterization of filamentous fungi (hyphal morphology)
NOTE: The micromorphological techniques are compared in the discussion section, considering their possible uses and disadvantages.
- Grow the isolates on Petri dishes with 39 g/L PDA for 7-14 days. For evaluating putative orchid mycorrhizal fungi, grow the isolates on 17 g/L corn meal agar (CMA; or another nutrient-limiting medium) for 3-7 days19.
- Tease mount
- Work inside a laminar flow hood. Place a drop of a chosen stain (step 5.5) on a clean glass slide.
- Using an autoclaved toothpick or another sterile material, carefully remove some hyphae from the grown isolate and place them in the drop of stain. Place a coverslip (preferably at an initial angle of 45° to avoid air bubbles) and analyze under a light microscope.
- Adhesive tape mount
NOTE: This technique is usually applied in fungal cultures to be readily used in section 6 or not maintained, since the adhesive tape cannot be autoclaved, and contaminations may occur after executing the method.- Place a drop of a chosen stain (step 5.5) on a clean glass slide. Cut a strip of transparent adhesive tape in a size that fits the glass slide and the central stain drop well.
- Direct the sticky surface of the strip to the mycelium surface. Do not press, and try to collect some hyphae without sticking too many of them.
- Stick the tape to the glass slide, ensuring the stain is in contact with the collected hyphae. Place a drop of water above the tape and place a coverslip. Analyze the slide under a light microscope.
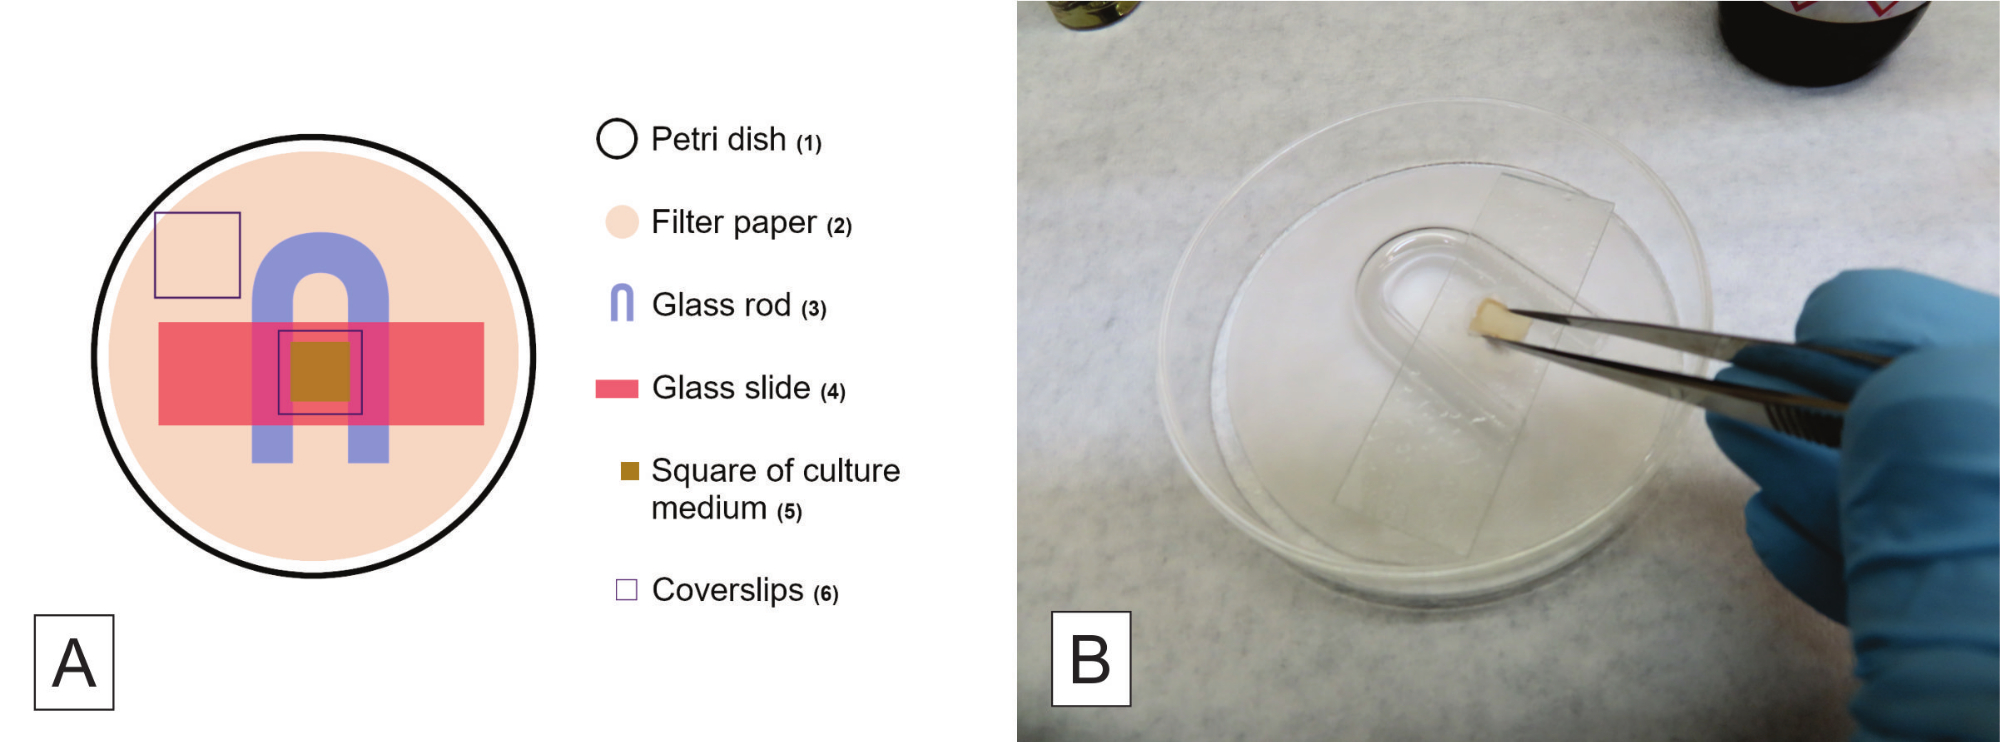
- Slide culture of filamentous fungi20
- Inside a large Petri dish (>9 cm in diameter, preferably), place: filter paper at the bottom part, a U-shaped glass rod or an adaptation (the aim is to provide an elevation for the glass slide), one glass slide, and two coverslips. Higher Petri dishes facilitate the manipulation. Autoclave these kits of Petri dishes, one for each isolate.
- Prepare a small volume of 39 g/L PDA or 17 g/L CMA, add 10 g/L bacteriological agar, and autoclave (the volume for one Petri dish is enough for more than 30 isolates). The culture media used in the slide culture must be harder than usual media. Autoclave 100 mL of distilled water.
- Work inside a laminar flow hood. Place the liquid medium in a Petri dish, producing a layer around 0.5 cm high. Let the medium solidify. Once solid, use a sterile scalpel to cut squares of the medium that are 1 cm x 1 cm in dimension.
- Open the Petri dish kit inside a laminar flow hood and use flamed forceps to organize the material autoclaved inside the dish. Arrange the material in the numbered order, as seen in Figure 2A, placing a square of culture medium on the glass slide. Before placing the coverslip over the medium, proceed to step 5.4.5.
- Use an autoclaved toothpick to recuperate some hyphae from an isolate and carefully rub the four lateral faces of the medium placed on the glass slide. Place an autoclaved coverslip over the medium square using flamed forceps.
- Use a sterile pipette tip to place autoclaved water in the filter paper, to create a humid chamber. Use a volume to saturate the paper without placing water in excess. Seal the Petri dish with cling film and identify it with the respective isolate code. Maintain the dishes in the dark at 25-27 °C for 3-7 days.
- Evaluate hyphae growth in the glass slide and the coverslip. Two slides are produced from each slide culture kit, one using the glass slide with hyphae and the autoclaved coverslip, the second using the coverslip with hyphae and another glass slide.
- After hyphal growth is observed, carefully detach the square of medium from the glass slide (Figure 2B), mount the two slides using a chosen stain (step 5.5), and analyze under a light microscope. Remember to identify the isolate code on the slide. To produce semi-permanent slides, seal the coverslip with clear nail polish.
- To produce permanent slides, carefully wash the dye from adhered hyphae after staining and let the slide dry. Mount with a rapid mounting medium (for details, read Pena-Passos et al.10).
NOTE: The drawback of producing a permanent slide with this technique is that spores and structures not adhered to the glass may be washed.
- Staining methods and hyphae observation
- Lactophenol cotton blue (LPCB)21: Add 20 mL of lactic acid, 40 mL of glycerol, and 20 mL of distilled water. Dissolve 20 g phenol crystals in this solution by gently heating. Dissolve 0.05 g of methyl blue (cotton blue, or 2 mL of 1% aqueous solution). LPCB may also be easily purchased already prepared.
CAUTION: Phenol is highly toxic and volatile; manipulate it exclusively inside a fume hood and wear gloves. - Toluidine blue O10(TBO): Prepare 0.05% TBO in 0.1 M phosphate buffer (pH 6.8).
- Congo red22,23,24: Prepare a solution of 1% Congo red in distilled water and filter it. Incubate for 5-10 min. This dye can be also applied for fluorescence microscopy25.
- When observing and photographing fungal hyphae under a light microscope, consult diverse bibliographical sources to help identify structures (check the discussion).
- Lactophenol cotton blue (LPCB)21: Add 20 mL of lactic acid, 40 mL of glycerol, and 20 mL of distilled water. Dissolve 20 g phenol crystals in this solution by gently heating. Dissolve 0.05 g of methyl blue (cotton blue, or 2 mL of 1% aqueous solution). LPCB may also be easily purchased already prepared.

Figure 2: Procedures for slide culture of filamentous fungi. (A) Schematic configuration of a slide culture kit, where the numbers indicate the order of arranging the elements. (B) Detaching the square of the culture medium after hyphal growth is observed in the glass slide and the coverslip. Please click here to view a larger version of this figure.
6. Total DNA extraction from fungal isolates (homemade protocol26 with modifications 27)
NOTE: Every material, solution, and reagent used in this section must be sterile. Ones that cannot be purchased already sterilized should be autoclaved at 121 °C for 20 min. Wear gloves during the whole protocol and perform some stages inside a fume hood.
- Prepare the extraction buffer: 1% sodium dodecyl sulfate (SDS), 250 mM NaCl, 200 mM Tris-HCl (pH 8.0), and 25 mM ethylenediaminetetraacetic acid (EDTA). Grow the purified isolates in 39 g/L PDA for 7-14 days.
- Carefully scrape the mycelium from an isolate using a spatula or a spoon and transfer the fragments to an autoclaved mortar, avoiding transferring the culture medium with the hyphae aggregate. Using a porcelain pestle, grind the mycelium with liquid nitrogen to a fine powder. Do not let the mycelium being ground melt, adding nitrogen to avoid so.
- Add 1 mL of extraction buffer in a 2 mL microcentrifuge tube and place the ground sample until the 1.5 mL mark. Gently agitate the content of the tubes to homogenize.
- Agitate the tubes in a vortex for 5 s and place them in a thermoblock at 65 °C for 20 min. Carefully homogenize the content by inversion every 7-10 min.
- Centrifuge the tubes at 10,000 x g for 10 min at 4 °C. Transfer 800 µL from the superior phase to a new 2 mL microcentrifuge tube, add 800 µL of phenol to the tubes, and mix the content by inversion.
CAUTION: Phenol is a highly toxic and volatile reagent; it can cause erythema, gangrene, and tissue necrosis. When inhaled, it can cause dyspnea and cough. The systemic absorption can damage the liver, kidneys, and central nervous system. Manipulate phenol exclusively inside a fume hood and wear gloves.
NOTE: From the next step on, use gloves and conduct the protocol inside a fume hood. - Centrifuge the tubes at 10,000 x g for 10 min at 4 °C and transfer 800 µL from the superior phase to a new 2 mL tube, carefully avoiding transference of the inferior phase content.
- Add 400 µL of phenol and 400 µL of chloroform to the tubes and mix the content by inversion. Centrifuge them at 10,000 x g for 10 min at 4 °C.
CAUTION: Chloroform is a highly toxic and volatile reagent; it can cause irritation and injuries when in contact with the skin, and if inhaled, affects the central nervous and cardiorespiratory systems, liver, and kidneys. Manipulate chloroform exclusively inside a fume hood and wear gloves. - Recuperate 800 µL or less from the superior phase to a new 2 mL tube. Add 800 µL of chloroform, mix the content by inversion, and centrifuge at 10,000 x g for 10 min at 4 °C.
NOTE: In this step, no residues from the inferior phase must be transferred to new tubes. Thus, be extra careful when recuperating the superior phase. - Transfer 600-800 µL from the superior phase to a new 1.5 mL tube and add 450 µL of isopropanol. Mix the content by inversion and incubate at 25 °C for 5 min.
- Centrifuge the tubes at 10,000 x g for 5 min at 4 °C and discard the supernatant using a micropipette. Be careful not to discard the pellet deposited at the bottom of the tube.
- Add 500 µL of 80% ethanol and centrifuge for 5 min. Repeat twice in case the pellet is not clarified.
- Remove the ethanol using a micropipette and dry the pellet at 37 °C for 30-60 min. Add 30-50 µL of deionized water, eluting the pellet using a micropipette.
- Maintain the tubes at 4 °C overnight for complete DNA elution and freeze the content at -20 °C.
7. Total DNA extraction from plant organs for metabarcoding methodology (commercial kit)
NOTE: For the following methodology, it is necessary to purchase the commercial kit indicated in the Table of Materials as a soil DNA extraction kit. Every material, solution, and reagent used in this section must be sterile. Ones that cannot be purchased already sterilized should be autoclaved at 121 °C for 20 min. It is highly recommended to wear gloves during the whole protocol, and the steps can be conducted inside a laminar flow hood. The described protocol is modified from De Souza et al.12, from the protocol detailed by the manufacturer.
- Using porcelain pestles and mortars, grind the roots collected following step 1.2 in liquid nitrogen, reducing the samples to a fine powder. Add 0.3 g from the ground samples to the PowerBead tubes and gently agitate to homogenize.
- Add 60 µL of solution C1 (included in the kit) to the PowerBead tubes and mix the content by inversion. Using a tissue homogenizer and cell lyser (Table of Materials), tie the tubes firmly to an adequate support, couple the support to the vortex, and start the equipment at maximum speed for 10-20 min.
NOTE: In case the C1 solution is precipitated, heat it at 60 °C until complete dissolution. - Centrifuge the tubes at 10,000 x g for 30 s at 25 °C. Transfer 500 µL of the supernatant to 2 mL microcentrifuge tubes. The transferred content may be particulate.
- Add 250 µL of solution C2 to the tubes and agitate in a vortex for 5 s. Incubate at 4 °C for 5 min and then centrifuge at 10,000 x g for 1-2 min at 25 °C.
- Transfer more than 600 µL of the supernatant to new 2 mL tubes, avoiding the pellet. Add 200 µL of solution C3 and agitate on a vortex for 5 s.
- Incubate at 4 °C for 5 min and then centrifuge at 10,000 x g for 1 min at 25 °C. In this stage, ensure the supernatant is not particulate.
- Transfer more than 750 µL of the supernatant to new 2 mL tubes, avoiding the pellet. Homogenize the solution C4 well, add 1,100 µL of solution C4 to the supernatant, and agitate in a vortex for 5 s.
- Load 675 µL from the content of the tubes in the MB Spin Columns, over the filter, and centrifuge at 10,000 x g for 1 min at 25 °C. Discard the liquid content.
- Repeat the previous step twice until all the content of each tube is processed. Then, add 500 µL of solution C5 in the center of the filter present at the superior column of the tube and centrifuge at 10,000 x g for 30 s at 25 °C.
- Discard the liquid content and centrifuge again under the same conditions as the previous step. Carefully transfer the superior column of the MB Spin Column to new 2 mL microcentrifuge tubes, avoiding dripping any liquid content in the column.
- Add 85-100 µL of solution C6 to the center of the filter and wait 1 min. Centrifuge at 10,000 x g for 30 s at 25 °C and discard the MB Spin Column. Store the tubes at -80 °C.
8. DNA quantification in a spectrophotometer (check the Table of Materials)
- Using the indicated spectrophotometer, open the software. Select the option Nucleic acid, choose the option DNA, and set the concentration to ng/µL.
- Add 1 µL of deionized water to the spectrophotometer detector and calibrate by selecting the option Blank. After reading, gently wipe the detector with soft tissue paper.
- Name the field sample with the isolate code of the sample to be read and place 1 µL of it in the equipment detector. Select the option Measure; a graph and a table with the results is generated.
- Repeat step 8.3 until all the samples have been read. It is recommended to save the table with the generated results for record and analysis: select the option Reports and the location where the .xml file will be saved.
- Add 5 µL of deionized water to the detector, wait several minutes, and gently wipe it with soft tissue paper.
Results
In the isolation protocol, considering there is contamination from the water used on the last wash and the contamination is also detected in the Petri dishes with inoculated fragments, different actions may be taken, depending on the type of contaminant (Table 1). This procedure must be repeated from the beginning in case of highly sporulating fungal contaminants, which also present accelerated growth, and intense-multiplying bacteria, resistant to the chosen antibiotics....
Discussion
The superficial disinfestation of plant samples is one of the most critical stages in the presented protocol. No contamination in the PDA dishes with drops from the last wash are highly desirable. Bacteria are frequently observed as contaminants in the isolation dishes, usually more than airborne sporulating fungi, considering endophytic bacteria are also common within plant tissues3,11. Thus, the addition of antibiotics in the culture medium when installing the ...
Disclosures
The authors have nothing to disclose and no conflict of interest.
Acknowledgements
We thank funding from FAPESP (2015/26479-6) and CNPq (447453/2014-9). JLSM thanks CNPq for productivity grants (303664/2020-7). MPP thanks Capes (master's degree scholarship, process 88887.600591/2021-00) and CNPq.
Materials
| Name | Company | Catalog Number | Comments |
| Adhesive tape | (from any company, for adhesive tape mount in micromorphological analyses) | ||
| Ampicillin | Sigma-Aldrich | A5354 | (for installation of plant fragments; other antibiotics may be used - check step 2.2.1) |
| Autoclave | (from any company, for materials sterilization in many steps) | ||
| Bacteriological agar | Sigma-Aldrich | A1296 | (for many steps) |
| C1, C2, C3, C4, C5, and C6 solutions | Qiagen | 12888-50 | (purchased with DNeasy PowerSoil kit) |
| Centrifuge | Merck/Eppendorf | 5810 G | (for total DNA extraction from fungal isolates) |
| Centrifuge tubes | Merck | CLS430828 | (for samples collection) |
| Chloroform | Sigma-Aldrich | C2432 | (for total DNA extraction from fungal isolates) |
| Congo red | Supelco | 75768 | (for hyphae staining) |
| Cryotubes | Merck | BR114831 | (for many steps) |
| Ethanol | Supelco | 100983 | It will be necessary to carry out the appropriate dilutions (for many steps) |
| Ethylenediaminetetraacetic acid (EDTA) | Sigma-Aldrich | 3609 | (for total DNA extraction from fungal isolates) |
| Filter paper | Merck | WHA10010155 | (for many steps) |
| Glass test tubes | Merck | CLS7082516 | (for cryopreservation in unhulled rice grains) |
| Glass wool | Supelco | 20411 | (for cryopreservation in unhulled rice grains) |
| Glucose | Sigma-Aldrich | G8270 | Or dextrose (for cryopreservation in vermiculite) |
| Glycerol | Sigma-Aldrich | G5516 | Or glycerin (for cryopreservation in vermiculite, for preparing LPCB) |
| Isopropanol | Sigma-Aldrich | 563935 | (for total DNA extraction from fungal isolates) |
| Lactic acid | Sigma-Aldrich | 252476 | (for preparing LPCB - hyphae staining) |
| Lactophenol blue solution (LPCB) | Sigma-Aldrich | 61335 | (for hyphae staining) |
| Laminar flow hood | (class I, from any company, for many steps) | ||
| Light microscope | (from any company, for hyphae observation) | ||
| MB Spin Columns | Qiagen | 12888-50 | (purchased with DNeasy PowerSoil kit) |
| Methyl blue (cotton blue) | Sigma-Aldrich | M5528 | (for preparing LPCB - hyphae staining) |
| Microcentrifuge tube (1.5 mL) | Merck | HS4323 | (for total DNA extraction from fungal isolates) |
| Microcentrifuge tube (2 mL) | Merck | BR780546 | (for many steps) |
| Mineral oil | (for preservation of fungal isolates) | ||
| Paper bags | Average size 150 mm x 200 mm (for samples collection) | ||
| Petri dish (Glass, 120 mm x 20 mm) | Merck/Pyrex | SLW1480/10D | (autoclavable, for fungi slide culture, prefer higher ones) |
| Petri dish (Glass, 50 mm x 17 mm) | Merck/Aldrich | Z740618 | (for purification of fungal isolates); alternatively: polystyrene petri dishes (sterile, γ-irradiated, non-autoclavable) |
| Petri dish (Glass, 80 mm x 15 mm) | Merck/Brand | BR455732 | (for installation of plant fragments); alternatively: polystyrene petri dishes (sterile, γ-irradiated, non-autoclavable) |
| Phenol | Sigma-Aldrich | P1037 | (for total DNA extraction from fungal isolates, for preparing LPCB) |
| Porcelain mortar | Sigma-Aldrich | Z247464 | (for total DNA extraction from fungal isolates) |
| Porcelain pestle | Sigma-Aldrich | Z247502 | (for total DNA extraction from fungal isolates) |
| Potato dextrose agar (PDA) | Millipore | P2182 | (for many steps) |
| PowerBead tubes | Qiagen | 12888-50 | (purchased with DNeasy PowerSoil kit) |
| Rapid mounting medium (Entellan) | Sigma-Aldrich | 1.0796 | (for fungi slide culture) |
| Silica gel | Supelco | 717185 | (for cryopreservation in unhulled rice grains) |
| Sodium chloride (NaCl) | Sigma-Aldrich | S9888 | (for total DNA extraction from fungal isolates) |
| Sodium dodecyl sulfate (SDS) | Sigma-Aldrich | L3771 | Lauryl sulfate sodium salt (for total DNA extraction from fungal isolates) |
| Sodium hypochlorite (w/ 2% active chlorine) | (commercial product, for superficial desinfestation) | ||
| Soil DNA extraction kit (DNeasy PowerSoil kit) | Qiagen | 12888-50 | (for total DNA extraction from plant organs) |
| Spectrophotometer - Nanodrop 2000/2000c | ThermoFisher Scientific | ND2000CLAPTOP | (for total DNA extraction from plant organs) |
| Stereomicroscope | (=dissecting microscope, from any company, for macromorphological analyses) | ||
| Tetracycline | Sigma-Aldrich | T7660 | (for installation of plant fragments) |
| Thermoblock | Merck/Eppendorf | EP5362000035 | (or from other companies) |
| Tissue homogenizer and cell lyzer | SPEX SamplePrep | 2010 Geno/Grinder - Automated Tissue Homogenizer and Cell Lyzer (for total DNA extraction from plant organs) | |
| Toluidine blue O | Sigma-Aldrich/Harleco | 364-M | (for hyphae staining) |
| Trehalose | Sigma-Aldrich | T9531 | (for cryopreservation in vermiculite) |
| Tris Base Solution (Tris) | Sigma-Aldrich | T1699 | (for total DNA extraction from fungal isolates) |
| Unhulled rice grains | (for cryopreservation) | ||
| U-shaped glass rod | (or an adaptation - check step 5.4.1, for fungi slide culture) | ||
| Vermiculite | Fine granulometry (for cryopreservation in vermiculite) | ||
| Vortexer | Sigma-Aldrich/BenchMixer | BMSBV1000 | (for total DNA extraction from fungal isolates) |
| Yeast extract | Sigma-Aldrich | Y1625 | (for cryopreservation in vermiculite) |
References
- de Azevedo, J. L. Endophytic microorganisms. Ecologia Microbiana. , 117-137 (1998).
- Stone, J. K., Bacon, C. W., White, J. F. An overview of endophytic microbes: endophytism defined. Microbial Endophytes. , 17-44 (2000).
- Schulz, B., Boyle, C. What are Endophytes. Microbial Root Endophytes. , 1-13 (2006).
- Smith, S. E., Read, D. J. . Mycorrhizal Symbiosis. , (2008).
- Rasmussen, H. N., Dixon, K. W., Jersáková, J., Těšitelová, T. Germination and seedling establishment in orchids: a complex of requirements. Annals of Botany. 116 (3), 391-402 (2015).
- Rasmussen, H. N., Rasmussen, F. N. Orchid mycorrhiza: implications of a mycophagous life style. Oikos. 118 (3), 334-345 (2009).
- Ma, X., Kang, J., Nontachaiyapoom, S., Wen, T., Hyde, K. D. Non-mycorrhizal endophytic fungi from orchids. Current Science. 109 (1), 72-87 (2015).
- Favre-Godal, Q., Gourguillon, L., Lordel-Madeleine, S., Gindro, K., Choisy, P. Orchids and their mycorrhizal fungi: an insufficiently explored relationship. Mycorrhiza. 30 (1), 5-22 (2020).
- Sun, X., Guo, L. -. D. Endophytic fungal diversity: review of traditional and molecular techniques. Mycology. 3 (1), 65-76 (2012).
- Pena-Passos, M., Sisti, L. S., Mayer, J. L. S. Microscopy techniques for interpreting fungal colonization in mycoheterotrophic plants tissues and symbiotic germination of seeds. Journal of Visualized Experiments. (183), e63777 (2022).
- Araújo, W. L., et al. . Endophytic microorganisms: Theoretical and Practical Aspects of Isolation and Characterization. 1st ed. 1, 257 (2014).
- de Souza, R. S. C., et al. Unlocking the bacterial and fungal communities assemblages of sugarcane microbiome. Scientific Reports. 6, 28774 (2016).
- Sisti, L. S., et al. The role of non-mycorrhizal fungi in germination of the mycoheterotrophic orchid Pogoniopsis schenckii Cogn. Frontiers in Plant Science. 10, 1589 (2019).
- Araújo, W. L., et al. Variability and interactions between endophytic bacteria and fungi isolated from leaf tissues of citrus rootstocks. Canadian Journal of Microbiology. 47 (3), 229-236 (2001).
- Castellani, A. Further researches on the long viability and growth of many pathogenic fungi and some bacteria in sterile distilled water. Mycopathologia. 20 (1-2), 1-6 (1963).
- Currah, R. S., Zelmer, C. D., Hambleton, S., Richardson, K. A. Fungi from orchid mycorrhizas. Orchid Biology: Reviews and Perspectives, VII. , 117-170 (1997).
- Freitas, E. F. S., et al. Diversity of mycorrhizal Tulasnella associated with epiphytic and rupicolous orchids from the Brazilian Atlantic Forest, including four new species. Scientific Reports. 10 (1), 7069 (2020).
- Sato, M., Inaba, S., Noguchi, M., Nakagiri, A. Vermiculite as a culture substrate greatly improves the viability of frozen cultures of ectomycorrhizal basidiomycetes. Fungal Biology. 124 (8), 742-751 (2020).
- Pereira, O. L., Kasuya, M. C. M., Borges, A. C., Araújo, E. F. D. Morphological and molecular characterization of mycorrhizal fungi isolated from neotropical orchids in Brazil. Canadian Journal of Botany. 83 (1), 54-65 (2005).
- Riddell, R. W. Permanent stained mycological preparations obtained by slide culture. Mycologia. 42 (2), 265-270 (1950).
- Walsh, T. J., Hayden, R. T., Larone, D. H. . Larone's Medically Important Fungi: A Guide to Identification. , (2018).
- Microscopy: Chemical Reagents. British Mycological Society Available from: https://www.britmycolsoc.org.uk/field_mycology/microscopy/reagents (2022)
- Senanayake, I. C., et al. Morphological approaches in studying fungi: Collection, examination, isolation, sporulation and preservation. Mycosphere. 11 (1), 2678-2754 (2020).
- Slifkin, M., Cumbie, R. Congo red as a fluorochrome for the rapid detection of fungi. Journal of Clinical Microbiology. 26 (5), 827-830 (1988).
- Raeder, U., Broda, P. Rapid preparation of DNA from filamentous fungi. Letters in Applied Microbiology. 1 (1), 17-20 (1985).
- Martins, M. K., et al. Molecular characterization of endophytic microorganisms. Endophytic microorganisms: theoretical and practical aspects of isolation and characterization. 1st edition. , 189-211 (2014).
- Rayner, R. W. A Mycological Colour Chart. Commonwealth Mycological Institute. , (1970).
- Kornerup, A., Wanscher, J. H. . Methuen Handbook of Colour. Methuen handbook of colour. , (1967).
- Ridgway, R. . Color Standards and Color Nomenclature. , (1912).
- McGinnis, M. R. . Laboratory Handbook of Medical Mycology. , (2012).
- Webster, J., Weber, R. . Introduction to Fungi. , (2007).
- Sridharan, G., Shankar, A. A. Toluidine blue: A review of its chemistry and clinical utility. Journal of Oral and Maxillofacial Pathology. 16 (2), 251-255 (2012).
- Smith, D., Onions, A. H. S. A comparison of some preservation techniques for fungi. Transactions of the British Mycological Society. 81 (3), 535-540 (1983).
- Ryan, M. J., Smith, D., Jeffries, P. A decision-based key to determine the most appropriate protocol for the preservation of fungi. World Journal of Microbiology and Biotechnology. 16 (2), 183-186 (2000).
- Lalaymia, I., Cranenbrouck, S., Declerck, S. Maintenance and preservation of ectomycorrhizal and arbuscular mycorrhizal fungi. Mycorrhiza. 24 (5), 323-337 (2014).
- Zettler, L. W., Corey, L. L. Orchid mycorrhizal fungi: isolation and identification techniques. Orchid Propagation: From Laboratories to Greenhouses-Methods and Protocols. , 27-59 (2018).
- Yu, S., Wang, Y., Li, X., Yu, F., Li, W. The factors affecting the reproducibility of micro-volume DNA mass quantification in Nanodrop 2000 spectrophotometer. Optik. 145, 555-560 (2017).
- Martos, F., et al. Independent recruitment of saprotrophic fungi as mycorrhizal partners by tropical achlorophyllous orchids. New Phytologist. 184 (3), 668-681 (2009).
- Schoch, C. L., et al. Nuclear ribosomal internal transcribed spacer (ITS) region as a universal DNA barcode marker for Fungi. Proceedings of the National Academy of Sciences. 109 (16), 6241-6246 (2012).
- White, T. J., Bruns, T., Lee, S., Taylor, J. Amplification and direct sequencing of fungal ribosomal RNA genes for phylogenetics. PCR Protocols: A Guide to Methods and Applications. 18 (1), 315-322 (1990).
- Sanger, F., Nicklen, S., Coulson, A. R. DNA sequencing with chain-terminating inhibitors. Proceedings of the National Academy of Sciences. 74 (12), 5463-5467 (1977).
- Ranjard, L., et al. Characterization of bacterial and fungal soil communities by automated ribosomal intergenic spacer analysis fingerprints: biological and methodological variability. Applied and Environmental Microbiology. 67 (10), 4479-4487 (2001).
- Metzker, M. L. Sequencing technologies-the next generation. Nature Reviews Genetics. 11 (1), 31-46 (2010).
Erratum
Formal Correction: Erratum: Isolation, Characterization, and Total DNA Extraction to Identify Endophytic Fungi in Mycoheterotrophic Plants
Posted by JoVE Editors on 1/01/1970. Citeable Link.
An erratum was issued for: Isolation, Characterization, and Total DNA Extraction to Identify Endophytic Fungi in Mycoheterotrophic Plants. The Authors section was updated from:
Juliana Lishcka Sampaio Mayer
to:
Juliana Lischka Sampaio Mayer
Reprints and Permissions
Request permission to reuse the text or figures of this JoVE article
Request PermissionThis article has been published
Video Coming Soon
Copyright © 2025 MyJoVE Corporation. All rights reserved