Methods Article
Long-Term Live Imaging of Drosophila Pupal Leg Development After Puparium Removal
In This Article
Summary
Here, a protocol is presented for long-term live imaging of the Drosophila leg during the pupal stage, involving complete removal of the puparium. This protocol can also be applied to other tissues.
Abstract
Over the past decades, significant progress has been made in understanding the mechanisms of cell fate determination. However, the process by which fate-determined cells form three-dimensional organismal shapes remains unclear. Recent advances in confocal microscopy have facilitated efforts to observe cell dynamics during development through live imaging. The Drosophila melanogaster pupa is ideal for live imaging due to its immobility, transparent pupal cuticle, and the availability of fluorescent reporter lines. A primary challenge for imaging is the puparium, the cuticle surrounding the pupa, which obstructs optical imaging. While previous methods involved either partial or complete removal of the puparium, maintaining pupal viability for extended periods after this procedure has remained challenging. Here, a simple method is presented for days-long live imaging of the Drosophila leg during the pupal stage, involving complete puparium removal. The method includes removing the puparium from a pupa adhered to double-sided tape, followed by assembling a small chamber on a glass-bottom dish to enclose the pupa and a drop of water. This setup is straightforward, reliable, and supports extended pupal survival by preventing desiccation. Long-term live imaging of the Drosophila pupa has significantly contributed to capturing how the adult leg undergoes dramatic three-dimensional structural changes over 2-3 days. These changes include the transient formation of an intriguing structure (the Parthenon-like structure) by epithelial cells, rapid tissue narrowing, joint formation, and bristle elongation. This method is applicable to the observation of various tissues and can potentially be combined with other techniques, such as optical gene induction, to advance the understanding of cell dynamics during the final shape formation of tissues in the pupal stage.
Introduction
Despite the considerable progress over the past several decades in elucidating the mechanism of cell fate determination, how fate-determined cells build up three-dimensional organismal shapes is still elusive. Thanks to the technological improvements in confocal microscopy, the attempts to unveil the cell dynamics during development by live imaging have been increasing in recent years1,2. The Drosophila melanogaster pupa has been favored for live imaging because of its suitable features: immobility, transparency of the pupal cuticle, and availability of fluorescent reporter lines3,4,5. The biggest obstacle to performing live imaging of the Drosophila pupa is the puparium (pupal case), the deformed and tanned final instar larval cuticle surrounding the pupa. To avoid optical obstruction, the puparium was partially or completely removed in previously reported methods1,2,3,4,5,6,7,8,9,10. Complete removal of the puparium maximizes the observation area and applicability to various tissues. However, the pupa without its puparium typically dies within about a half day, presumably due to desiccation. Therefore, maintaining pupal moisture is crucial for extended live imaging. While the exact duration of pupal survival after complete puparium removal in previous methods is unclear, reported examples typically lasted up to about 20 h. Since the pupal stage lasts about four days, a method for even longer live imaging was expected to contribute to capturing the entire process of tissue shape formation.
The Drosophila adult leg is an excellent model for studying the process of three-dimensional tissue shape formation. It derives from the disc-shaped primordia (leg disc) formed during larval stages. Regions corresponding to each segment in the adult leg are determined by the prepupal stage11. Then, the leg disc protrudes from the central part to make a bloated tubular structure around 11 h after puparium formation (APF). How this tissue, with its simple shape, achieves its final shape of the adult leg in subsequent stages has remained unclear for a long time. Several studies approaching this issue have been published12,13,14. Since they observed fixed or cultured tissues, continuous changes in individual cells could not be traced, and the information obtained was somewhat fragmented. To fully understand the shaping process, it is essential to observe the changes in individual cells continuously through long-term live imaging.
A recent study unveiled the dynamic deformation of three-dimensional structures in tissue and cellular levels by long-term live imaging (Figure 1). The most intriguing finding in this study is the transient formation of an unexpectedly complex structure by epithelial cells. This structure, named the "Parthenon-like structure," features apicobasal projections and basal mesh-like connections of epithelial cells. Importantly, the formation and disappearance of this structure coincides with rapid tissue narrowing15. Subsequent shape formation, including joint formation and bristle elongation, proceeded for 2-3 days. Long-term live imaging effectively captured the whole story of these days-long sequential events.
This article provides a step-by-step method for performing days-long live imaging of the Drosophila leg during the pupal stage with complete removal of the puparium. The method is easy to follow and can be applied to various other tissues.
Protocol
This protocol uses Drosophila melanogaster strains expressing fluorescent reporters15. The details of the reagents and equipment used in the study are listed in the Table of Materials.
1. Preparation of the pupa
- With a paintbrush, collect white pupae of the desired strain of Drosophila melanogaster from vials and put them in dishes or empty vials (Figure 2A).
NOTE: In this study, "white pupae" refers to the stage between when the larva becomes completely immobile and before the puparium gets brown. This stage lasts about 30 min at 25 °C. - Incubate white pupae for at least 14 h at 25 °C until they develop into the stage to be observed (Figure 2B).
NOTE: The puparium can be removed only after the pupal cuticle has been fully formed at 12-13.5 h APF and easily removed only after 14 h APF. - Wipe the glue and fly food away from the puparium with a paintbrush soaked in distilled water.
NOTE: The ventral side of the puparium should be especially clean to achieve sufficient adhesion to the double-sided tape in later steps. - Place the pupae on cleaning wipes for several minutes to dry.
NOTE: Remaining moisture on the puparium would prevent a good adhesion to a double-sided tape. - Fix a piece of double-sided tape on a glass slide.
- Place the dried pupae on a double-sided tape with the ventral side down (Figure 2C).
- Gently push the dorsal side of the pupae with a dried paintbrush to achieve better adhesion to the double-sided tape.
- Under a stereo microscope, carefully open the operculum with a pair of forceps (Figure 2 D,E).
NOTE: The operculum is the anterodorsal region of the puparium from where the adult fly comes out, thus opening easily. - From the edge of the opened operculum, insert one of the tips of the forceps into the space between the pupa and the puparium (Figure 2F).
NOTE: Be careful not to damage the pupal cuticle with the tip of the forceps. - Grasp the puparium with forceps and pull it outward until it breaks open.
- Lift the torn fragments of the puparium with forceps and adhere them to double-sided tape (Figure 2G).
- Repeat steps 1.10-1.11 until the puparium's opening reaches the posterior end, leaving a small portion of the puparium (Figure 2 H,I).
NOTE: If fluid came out from a pupa, it would have been damaged (Figure 2K). To observe normal development, avoid imaging damaged pupae.
2. Imaging setup
- Put 1 µL of distilled water or silicone oil (when using a silicon immersion lens) on the bottom of a glass-bottom dish.
- Soak a paintbrush in the distilled water and gently scoop up the pupa (Figure 2J).
- Place the pupa with the ventral side down on the distilled water or silicone oil (Figure 2L).
- With a micropipette, put 10 µL of the distilled water near the edge of the glass portion of the glass-bottom dish (Figure 2L).
- Place a circle of silicone grease with a syringe around the edge of the glass portion of the glass-bottom dish (Figure 2M).
- Put a coverslip on the silicone grease to seal it (Figure 2M). The assembly is illustrated in Figure 2N.
NOTE: Ensure there are no gaps between the coverslip and the silicone grease.
3. Confocal imaging
- Turn on an inverted confocal laser microscope and imaging software.
- Place the dish on the stage accepter of an inverted confocal microscope.
- Find the pupae with a low magnification objective lens in the bright field observation. Ensure that the pupae don't show any leakage of the body fluid.
- Center the desired area of the pupa to observe in the region of interest (ROI).
NOTE: The anterolateral sides of the tarsus in the first and second legs, and the ventral side of the tarsus in the third leg, are oriented towards the ventral side of the pupa. Therefore, the longitudinal section of the tarsus along the dorsoventral axis can be observed in the first and second legs, whereas those along the anteroposterior axis can be observed in the third leg. - Change the objective lens to the one for live imaging.
NOTE: If a water immersion lens is used, the water between the lens and the glass-bottom dish will dry out during the long-term observation. A no-immersion or silicone oil immersion lens is recommended. - Adjust the conditions for desired observation and start data acquisition.
NOTE: To prevent any harm to the pupa, the laser powers should be minimal as far as clear images can be obtained. Minimizing ROI and increasing step size are helpful in saving time for Z stack acquisition. The future transformation of the tissue should be considered when deciding the depth of the Z stack. In the case of leg observation at 15-25 h APF, since the leg narrows very much, the nearest part to the coverslip (lateral epithelium) rapidly moves deeper. Considering this movement, extra deep Z stacks should be set from the first. An example of the confocal microscope setting for live imaging of the leg tarsal region from 15-30 h APF is provided in Supplementary File 1. Fluorescence fading is unavoidable during long-term live imaging. To mitigate this issue, it is advisable to use minimal laser power. The ImageJ plugin "AutoEnhance"16 is recommended for processing live imaging data to compensate for fading effects.
Results
Here, an example of 44-h live imaging of the developing Drosophila adult leg in the pupal stage is described. Flies expressing His2Av-mRFP17 (labeling nuclei) and sGMCA18 (GFP-tagged actin-binding protein Moesin, labeling actin) were collected at the white pupal stage and incubated for 15 h at 25 °C. The puparium was removed and mounted according to the protocol (Figure 2). Z stack images of the tarsus and pretarsus, near the tip of the leg, were successfully obtained every 15 min from 16 h to 60 h APF at room temperature (not strict, but near 25 °C). The first half of the series of images is shown in Figure 3, the latter half in Figure 4, and the movie of the whole in Movie 1. As the leg tissue rapidly narrowed, the epithelial cells transiently formed an intriguing structure, the Parthenon-like structure, characterized by its apicobasal projections and basal connections (Figure 3). The reduction of the epithelial thickness was observed even after the outline was almost completed (Figure 4). The whole process is overviewed in Figure 1.
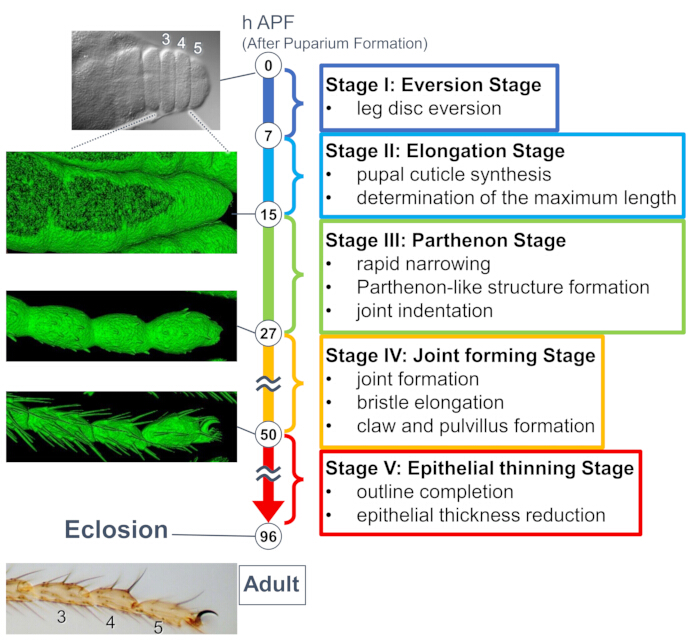
Figure 1: The overview of the final shape formation of the Drosophila adult tarsus during the pupal stage. The entire process was divided into five stages based on the morphological changes at both tissue and cellular levels observed in long-term live imaging experiments. Representative photos or surface-rendered images (sGMCA signal) corresponding to several time points are shown on the left side. Brief descriptions of the events in each stage are written on the right side. This figure has been modified from Hiraiwa et al.15. See also Movie 1. Please click here to view a larger version of this figure.
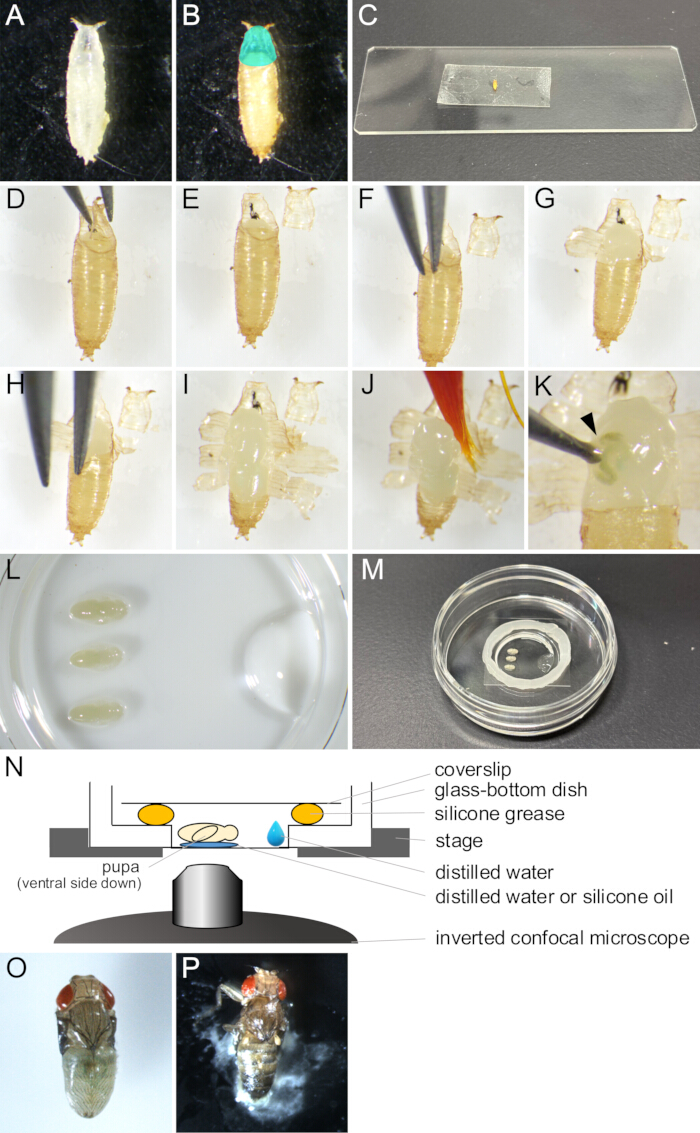
Figure 2: Puparium removal and mount assembly for live imaging. (A) A white pupa collected in a dish. (B) The pupa showed in (A) after incubating for 15 h at 25 °C. The region colored cyan indicates the operculum. (C) A photograph showing a pupa adhered to a piece of double-sided tape. (D-J) Series of images showing the puparium removal procedure. (D) The operculum is lifted with forceps. (E) The operculum is removed. (F) A forceps tip is inserted between the pupal cuticle and the puparium. (G) The puparium is partially opened. (H) A forceps tip is inserted again. (I) The puparium opened, leaving only a small portion of the posterior end. (J) The pupa being lifted by a paintbrush. (K) An example of body fluid leakage of the pupa. The fluid coming out from the wound poked by a forceps tip is indicated by an arrowhead. (L-N) Images and illustrations showing mount assembly. (L) An image viewing from the upside showing placed pupae and distilled water on the bottom of a glass-bottom dish. (M) The dish after the mount assembly completion. Silicone grease was put along the edge around the glass portion, and a coverslip was placed on the grease to seal it. (N) Schematic drawing of the mounting assembly of the Drosophila pupa for long-term live imaging. (O) A mounted pupa developed nearly adult. (P) A mounted pupa eclosing. Please click here to view a larger version of this figure.
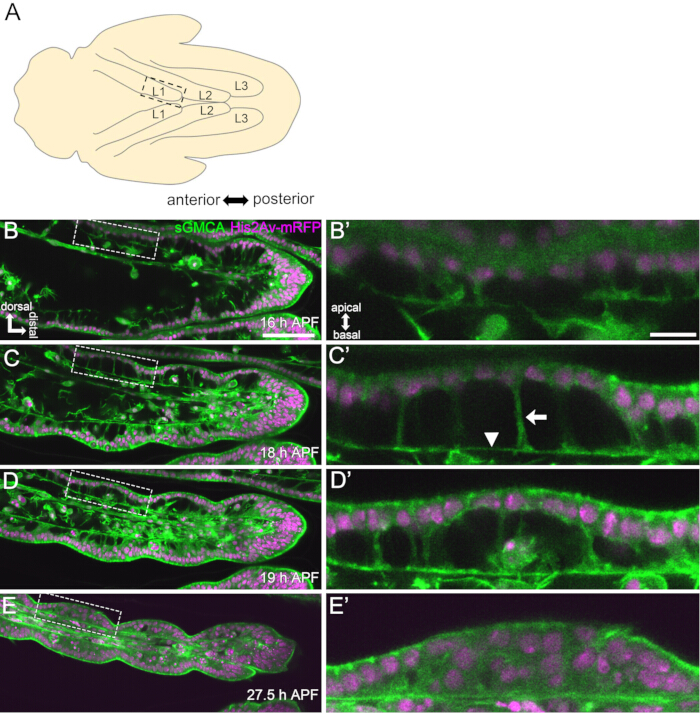
Figure 3: Dynamic shape changes in the tarsal epithelial cells in 16-27.5 h APF. (A) An illustration of the pupa seen from the ventral side. The dashed rectangle corresponds to the region observed in (B-E). L1: first leg, L2: second leg, L3: third leg. (B,C,D,E) Stills from the live imaging of the distal part of the tarsus in the sGMCA (green) and His2Av-mRFP (magenta) expressing fly. The tissue rapidly narrows, and the indentation of joint regions progresses. (B',C',D',E') Magnification of regions surrounded by the dashed lines in (B,C,D,E), respectively. The arrow and the arrowhead in (C') show an example of apicobasal projections and the position of basal connections, respectively. The Parthenon-like structure starts to form in (B'), is fully formed in (C'), starts to disappear in (D'), and becomes difficult to see in (E'). Distal is to the right and dorsal to the top in all figures. Stages are shown at the lower right corners in (B,C,D,E). Scale bars: B,C,D,E: 50 µm; B',C',D',E': 10 µm. This figure has been modified from Hiraiwa et al.15. See also Movie 1. Please click here to view a larger version of this figure.
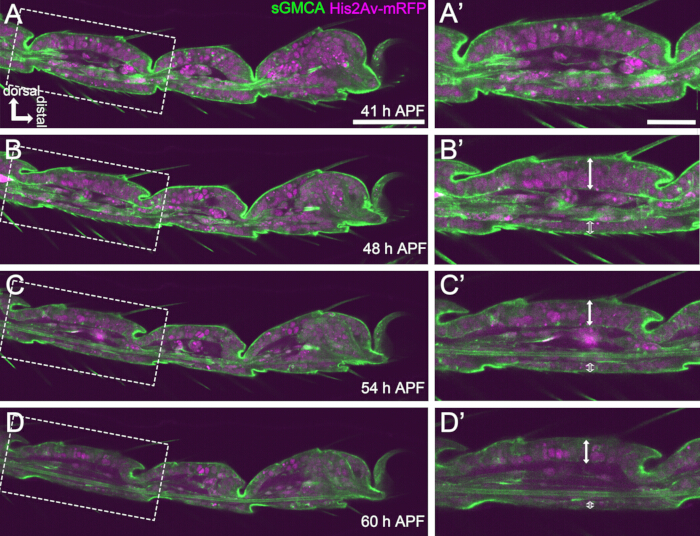
Figure 4: Shape changes in the tarsal epithelial cell layer in 41-60 h APF. (A,B,C,D) Still images from the same sequential dataset of live imaging as Figure 3. Dashed rectangles in (A,B,C,D) are magnified in (A',B',C',D'), respectively. By around 48 h APF (A-B'), the external shape formation, such as elongation of bristles, claws, and pulvilli, is almost complete. The bottom of the invaginated joint moved proximally, and then, the ball-and-socket structure formation progressed after around 54 h APF. The morphological difference between the dorsal and ventral epithelium became apparent (double arrows and open double arrows in B',C',D'). After 54 h APF (C-D'), the epithelial layer decreased its thickness without hardly changing the outline of segments. Dorsal is to the top and distal to the right in all figures. Scale bars: A,B,C,D: 50 µm; A',B',C',D': 20 µm.This figure has been cited from Hiraiwa et al.15. See also Movie 1. Please click here to view a larger version of this figure.
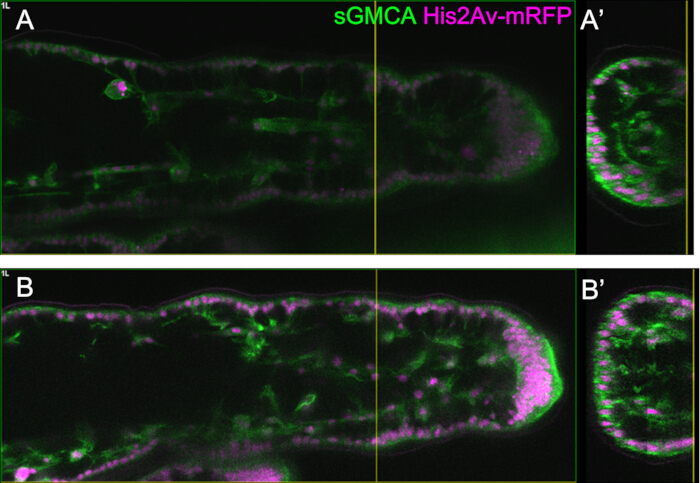
Figure 5: An example of the leg observation using the Bright Z function. (A,B) Images of the corresponding region, depth, and stage of the third leg of the sGMCA (green) and His2Av-mRFP (magenta) expressing fly, with (B) or without (A) using the Bright Z function. (A) An XY plane at 59.1 µm deep extracted from the observation of the tarsal region in the third leg at 16 h APF acquired without using the Bright Z function. (A') The cross-sectional view corresponds to the yellow vertical line in (A). The vertical line in (A') indicates the focal plane of (A). (B) An XY plane at 61.6 µm deep extracted from the observation of the tarsal region in the third leg at 16 h APF acquired using the Bright Z function. Both PMT voltage and laser power were adjusted. The visibility of the image is improved compared to (A). (B') The sectional view corresponds to the yellow vertical line in (B). The yellow vertical line in (B') indicates the focal plane of (B). Please click here to view a larger version of this figure.
Supplementary File 1: An example of the confocal microscope setting for live imaging of the leg tarsal region from 15-30 h APF. Please click here to download this file.
Movie 1: Long-term live imaging of the distal part of the tarsus for 44 h. The sGMCA (green) and His2Av-mRFP (magenta) expressing fly were used. The most representative XY plane was extracted from the same dataset as Figure 3 and Figure 4. Arrowheads indicate examples of future joint regions. Rapidly moving cells in the tissue are macrophage-like cells. The string-like signal extending along the tarsal segments is a part of the septum. The time stamp shows hh: mm. Distal is to the right, and dorsal to the top. This movie has been adapted from Hiraiwa et al.15Please click here to download this file.
Discussion
In this article, a detailed protocol for long-term live imaging of the Drosophila leg in the pupal stage is provided. The leg imaginal disc protrudes from the central part to form a tubular structure, and then the final shape formation of the adult leg occurs in the pupal stage in a manner that had been elusive. Previous attempts to observe this process were mainly by fixed staining, tissue culture, and scanning electron microscope12,13,14. These methods could not track continuous changes in individual cells, and only fragmentary information was obtained. With the method described in this study, the final shape formation process of the tarsal region can be successfully observed as the days-long sequential live imaging by a confocal microscope, and changes in individual cells can be tracked continuously. Intriguing cell dynamics revealed by this live imaging have been described in detail in the recent report15.
For successful long-term live imaging, it is crucial to maintain the viability of the pupa and ensure that its development remains unaffected. In the method described here, the puparium-removed pupa developed into the pharate adult and the adult in many cases (Figure 2O,P). The timings of morphological changes of the developing tarsus observed by this method were consistent with previous reports12,13,14. Furthermore, the epithelial cells showed changes like the thickness reduction even in 48-60 h APF (32-44 h after mounting) (Figure 4B'-D'). These facts suggest that the pupa remains intact and experiences nearly no disruption or delay in its normal development during long-term live imaging using the method described here. Please note that the viability of the puparium-removed pupa subjected to live imaging can vary depending on the timing of the puparium removal, handling in the procedure, the extent of phototoxicity in the imaging, and fly strains used.
One of the critical steps to guarantee the intactness of the pupa and its development is removing the puparium without harming the pupa. Stable adhesion of the pupa to the double-sided tape and careful handling of forceps are the keys to success. Preventing dehydration of the pupa is also crucial. In this regard, avoiding any gaps between the coverslip and the silicone grease is critical.
To avoid desiccation of the pupa, many previous methods involved the partial removal of the puparium1,2,3,4,5,6,7. For observing the entire pupa, however, complete removal of the puparium is favored. Although the maximum survival time of the pupa is not known, several methods in which the puparium is fully removed have been reported8,9,10. The most common approach to provide moisture for the pupa in these methods is the use of moistened filter paper. Compared to the previous methods, the one described here provides moisture by putting a drop of water in a simpler and easier way. Additionally, many previous methods involve mounting the pupa on a glass slide. When mounting the puparium-removed pupa onto a glass slide, there can be a problem where pressing the coverslip against the pupa causes stress to the pupa, or a tilted coverslip introduces noise, distortions, and lack of clarity in the images. The method described here employs a glass-bottom dish, which eliminates the need to press the coverslip against the pupa, allowing for observation of the tissues as close to their natural state as possible. Since there is no need to adjust the angle of the cover glass, the setup is stable, easy to handle, and more reliable. Therefore, this method requires almost no specialized skills, allowing even beginners to successfully perform live imaging.
The major limitations of this method are the depth of observations and time resolutions. Under the conditions for observing the tarsus, clear images can only be obtained up to about 40 µm deep. The use of the Bright Z function helps address this issue. For instance, as shown in Figure 5, increasing laser power and PMT voltage as the depth increases by employing the Bright Z function improved the quality of images at deeper positions. However, increasing the laser power comes with a trade-off involving phototoxicity and signal fading. Therefore, it is necessary to find the optimal conditions that align with the purpose of the observation. The time resolution also matters when observing rapidly moving cells and tissues. Reduction of slices and narrowing ROI are the leading solutions for this issue. Using up-to-date equipment with improved detector sensitivity or a spinning disk confocal microscope may improve the time resolution. Another limitation relates to the stage of the pupa. The puparium can be removed only after the pupal cuticle has been fully formed at 12-13.5 h APF19and can be easily removed only after 14 h APF. The earlier stages than 12 h APF can be partially observed by mounting the pupa without removing the puparium15, even though obtaining clear images is difficult due to rapid tissue movements and optical obstacles by the puparium in this condition.
Troubleshooting
Difficulty in the puparium removal
While removing the puparium, adhesion of the ventral side of the puparium to the double-sided tape is important. Glue and food must be removed from the puparium surface, and subsequent drying is important since wet surfaces prevent good adhesion. Notably, the double-sided tape in the material table has stronger adhesion on the inner side. The inner (stronger) side should be used to adhere the pupa. Cutting the puparium with dissection scissors instead of tearing it with forceps is helpful when the puparium removal is difficult.
Fluid leakage from the pupa
It is critical to remove the puparium without harming the pupa. Leakage of the pupal body fluid indicates damage to the pupa (Figure 2K). Such pupa should be avoided from live imaging. To prevent pupal damage while the puparium is removed, in addition to careful handling, using forceps with relatively broad tips is recommended.
Poor image quality
When the fluorescent signal is too weak, there are many ways to adjust the brightness, such as increasing the PMT voltage, opening the pinhole (C.A.), slowing down the scan speed, and increasing the laser power. Please be reminded that every method has side effects: increasing the PMT voltage may increase noise, opening the pinhole reduces Z-axis resolution, slowing down the scan speed elongates scan time, and increasing the laser power increases the risk of phototoxicity and bleaching. Appropriate settings must be found depending on the region of interest, the kinds and expression levels of fluorescent reporters, and the desired length of the live imaging. Overall, the laser power is recommended to be minimized for long-term live imaging.
Fading of fluorescence
The fading of fluorescence is inevitable in long-term live imaging. Minimal use of laser power is advised to avoid this problem. To compensate for fading, the ImageJ plugin "AutoEnhance"16 is recommended when processing the acquired live imaging data.
Thanks to the complete removal of the puparium, this method is highly applicable to other tissues just by modifying the ROI and orientation of the pupa. Indeed, even though these are not live imaging, the proximal part of the leg, the proboscis, the head epithelium near the antenna, and the epithelium of the dorsal thorax were observed by this method in Hiraiwa et al.15. Such applicability to a wide range of tissues may facilitate further integration with other techniques, such as optical induction of genes. This method may also be applicable to cyclorrhaphan (puparium-forming) species other than Drosophila. Furthermore, it could potentially be used for other insect species if they have a transparent pupal cuticle. This article provides detailed instructions for Drosophila researchers to perform live imaging of the pupa to capture cell dynamics in live tissues.
Disclosures
The authors declare no competing interests.
Acknowledgements
We are grateful to Dr. Masayuki Miura (The University of Tokyo) and Dr. Yuya Fujisawa (The University of Tokyo) for technical advice, and we thank the Bloomington Stock Center for fly resources.
Materials
| Name | Company | Catalog Number | Comments |
| 35 mm/glass base dish | IWAKI | 3911-035 | |
| Cleaning wipes | NIPPON PAPER CRECIA | S-200 | |
| Dumont #3c Forceps | Fine Science Tools | 11231-20 | |
| Dumont #5SF | Fine Science Tools | 11252-00 | |
| Eppendorf Research plus 2-20 µL | Eppendorf | 3123000098 | |
| Fly strain: His2Av-mRFP, sGMCA | Bloomington Drosophila Stock Center | 59023 | |
| FV3000 | EVIDENT | inverted confocal microscope | |
| FV31S-SW | EVIDENT | software for FV3000 | |
| G40L | Shin-Etsu Silicone | silicone grease | |
| Micro Cover Glass 18 x 18 mm 0.13-0.17 mm | MATSUNAMI | C018181 | |
| Micro Slide Glass 76 x 26 mm 0.9-1.2 mm | MATSUNAMI | S7213 | |
| NEO-SABLE Size 0 round, fine | Pentel | XZBNR-0 | paintbrush |
| SIL300CS-30CC | EVIDENT | silicone oil | |
| Stereomicroscope System SZX7 | EVIDENT | ||
| Terumo syringe 50 mL | Terumo | SS-50ESZ | |
| Transparent double sided tape | Scotch | 665-1-12 | Since the inner layer has stronger adhesion than the outer layer, the inner layer should be used to fix pupae. |
| UPLSAPO10x | EVIDENT | ||
| UPLSAPO40XS | EVIDENT | silicone immersion lens | |
| Vannas Spring Scissors - 2.5mm Cutting Edge | Fine Science Tools | 15000-08 | optional |
References
- Koto, A., Kuranaga, E., Miura, M. Temporal regulation of Drosophila IAP1 determines caspase functions in sensory organ development. J Cell Biol. 187 (2), 219-231 (2009).
- Ninov, N., Martín-Blanco, E. Live imaging of epidermal morphogenesis during the development of the adult abdominal epidermis of Drosophila. Nat Protoc. 2 (12), 3074-3080 (2007).
- Chiba, M., et al. Activatable photosensitizer for targeted ablation of lacZ-positive cells with single-cell resolution. ACS Cent Sci. 5 (11), 1676-1681 (2019).
- Umetsu, D., et al. Local increases in mechanical tension shape compartment boundaries by biasing cell intercalations. Curr Biol. 24 (16), 1798-1805 (2014).
- Tran, N. V., et al. Programmed disassembly of a microtubule-based membrane protrusion network coordinates 3D epithelial morphogenesis in Drosophila. EMBO J. 43 (6), 568-594 (2024).
- Hellerman, M. B., Choe, R. H., Johnson, R. I. Live-imaging of the Drosophila pupal eye. J Vis Exp. (95), e52120 (2015).
- O'Connor, J. T., Shannon, E. K., Hutson, M. S., Page-McCaw, A. Mounting Drosophila pupae for laser ablation and live imaging of the dorsal thorax. STAR Protoc. 3 (2), 101396 (2022).
- Ziserman, D., Roegiers, F. Live-cell imaging of sensory organ precursor cells in intact Drosophila pupae. J Vis Exp. (51), e2706 (2011).
- Tögel, M., Pass, G., Paululat, A. In vivo imaging of Drosophila wing heart development during pupal stages. Int J Dev Biol. 57 (1-2), 13-24 (2013).
- Weavers, H., Franz, A., Wood, W., Martin, P. Long-term in vivo tracking of inflammatory cell dynamics within Drosophila pupae. J Vis Exp. (136), e57871 (2018).
- Kojima, T. Developmental mechanism of the tarsus in insect legs. Curr Opin Insect Sci. 19, 36-42 (2017).
- Mirth, C., Akam, M. Joint development in the Drosophila leg: Cell movements and cell populations. Dev Biol. 246 (2), 391-406 (2002).
- Mirth, C. Ecdysteroid control of metamorphosis in the differentiating adult leg structures of Drosophila melanogaster. Dev Biol. 278 (1), 163-174 (2005).
- Tajiri, R., Misaki, K., Yonemura, S., Hayashi, S. Dynamic shape changes of ECM-producing cells drive morphogenesis of ball-and-socket joints in the fly leg. Development. 137 (12), 2055-2063 (2010).
- Hiraiwa, S., et al. Unveiling the cell dynamics during the final shape formation of the tarsus in Drosophila adult leg by live imaging. Dev Genes Evol. , (2024).
- . ImageJ plugin page Available from: https://signaling.riken.jp/en/en-tools/imagej/629/ (2024)
- Pandey, R., Heidmann, S., Lehner, C. F. Epithelial re-organization and dynamics of progression through mitosis in Drosophila separase complex mutants. J Cell Sci. 118 (4), 733-742 (2005).
- Kiehart, D. P., Galbraith, C. G., Edwards, K. A., Rickoll, W. L., Montague, R. A. Multiple forces contribute to cell sheet morphogenesis for dorsal closure in Drosophila. J Cell Biol. 149 (2), 471-490 (2000).
- Ashburner, M. . Drosophila: A Laboratory Handbook. , (1989).
Reprints and Permissions
Request permission to reuse the text or figures of this JoVE article
Request PermissionThis article has been published
Video Coming Soon
Copyright © 2025 MyJoVE Corporation. All rights reserved