
A subscription to JoVE is required to view this content. Sign in or start your free trial.
Method Article
Isolation of Primary Rat Hepatocytes with Multiparameter Perfusion Control
* These authors contributed equally
In This Article
Summary
This protocol details the use of a special intravenous catheter, standardized sterile disposable tubing, temperature control complemented by real-time monitoring, and an alarm system for two-step collagenase perfusion procedure to improve the consistency in the viability, yield, and functionality of isolated primary rat hepatocytes.
Abstract
Primary hepatocytes are widely used in basic research on liver diseases and for toxicity testing in vitro. The two-step collagenase perfusion procedure for primary hepatocyte isolation is technically challenging, especially in portal vein cannulation. The procedure is also prone to occasional contamination and variations in perfusion conditions due to difficulties in the assembly, optimization, or maintenance of the perfusion setup. Here, a detailed protocol for an improved two-step collagenase perfusion procedure with multiparameter perfusion control is presented. Primary rat hepatocytes were successfully and reliably isolated by taking the necessary technical precautions at critical steps of the procedure, and by reducing the operational difficulty and mitigating the variability of perfusion parameters through the adoption of a special intravenous catheter, standardized sterile disposable tubing, temperature control, and real-time monitoring and alarm system. The isolated primary rat hepatocytes consistently exhibit high cell viability (85%-95%), yield (2-5 x 10⁸ cells per 200-300 g rat) and functionality (albumin, urea and CYP activity). The procedure was complemented by an integrated perfusion system, which is compact enough to be set up in the laminar flow hood to ensure aseptic operation.
Introduction
Primary hepatocytes are important tools for liver-related basic research, disease treatment, and application such as drug testing. The current gold standard for primary hepatocyte isolation is the two-step collagenase perfusion procedure1,2,3 introduced by Seglen in the 1970s4. However, this procedure is technically challenging and has a high failure rate when performed by novice surgeons. Even when a perfusion is considered successful, drastic differences in hepatocyte viability (typically 60%-95%) and yield (0.5-5 x 10⁸ per 200-300 g rat) may be observed between isolations. This influences the quality and scale of downstream experiments. Apart from the technical procedure, the perfusion setup used for the isolation, either commercially available or custom built, is a contributing factor. Attention must be given to the assembly, optimization, and maintenance of the perfusion setup. The purpose of this protocol is to improve the success rate and stability between isolations of primary rat hepatocytes through multiparameter perfusion control of the technical procedure and perfusion setup of the two-step collagenase perfusion procedure.
From the technical aspect, the most difficult step in the procedure is the portal vein cannulation. As for the other steps, if good practice is observed and general precautions are taken, the stability of the isolation can be improved. Therefore, understanding of the reasoning for each step is important so that the surgeon could respond to various variables that may occur during the procedure.
Various protocols for the isolation of hepatocytes and liver non-parenchymal cells from rat and mouse have been published1,2,5,6,7,8,9. The perfusion setups used in these protocols had several disadvantages, which include the reuse of perfusion tubing, problems with temperature control, need for routine optimization of perfusion parameters, and/or usage of unsuitable type of intravenous (IV) catheter for portal vein cannulation. The reuse of perfusion tubing will increase the chances of contamination, especially if the tubing was not cleaned and disinfected properly. Reuse of tubing without routine replacement will also expose the perfusion setup to problems such as leaky tubing or connectors, clogged bubble trap and constricted tubing, all of which will substantially reduce the perfusate pressure and flow rate, thus, affecting liver digestion efficiency. Without a constant heat source in some setups for temperature control, pre-warmed buffers will cool down over time, leading to low collagenase activity and digestion. Although other setups utilize a jacketed glass condenser connected to a water circulator to warm the buffer, they are bulky and require careful cleaning. Temperature, pressure, and flow rate of buffer exiting the catheter must be measured and optimized before the start of isolation toensure stable perfusion condition. Even after optimization, the parameters could still change halfway during isolation due to the actions of the operator, thereby leading to suboptimal perfusion and digestion. Most types of IV catheter are not suitable for portal vein cannulation because they do not allow continuous perfusion during cannulation. They are unable to immediately inform the surgeon when the cannulation is successful. Furthermore, it is challenging to secure the portal vein on the soft catheter without deforming it.
Here, we address these problems using standardized disposable sterile tubing, a silicone heater jacket for precise and stable temperature control, real-time monitoring and alarm system with data storage and management and use of a special IV catheter, which allows continuous perfusion while puncturing portal vein during cannulation. To the best of our knowledge, we are the first group to combine all these features into an integrated perfusion system (IPS) that is compact, making it highly portable and able to be fit into a laminar flow hood to ensure aseptic operation.
Protocol
All procedures and animal housing were carried out under protocol numbers R15-0027 and R19-0669 in accordance with the requirements of the Institutional Animal Care and Use Committee (IACUC) of the National University of Singapore.
1. Preparation of solutions and surgical instruments
- Prepare buffers and cell culture media in Table 1 using ultrapure water.
- Pre-warm the calcium-free buffer and collagenase buffer to 37 °C in a water bath before use.
- Autoclave the following surgical instruments and lab equipment: a pair of sharp-blunt surgical scissors, a pair of blunt-blunt surgical scissors, a pair of curved surgical scissors, two pairs of tooth-tissue forceps, two pairs of curved forceps, two vein clips, a 5 cm long 3-0 silk surgical suture, a 100 µm nylon mesh filter, a 400 mL beaker, and a stage (floating microcentrifuge tube rack).
2. Setting up the IPS (see Figure 1)
- Wipe down the laminar flow hood with 70% ethanol. Wipe down the IPS with 70% ethanol and move it into the laminar flow hood. Sterilize by UV for >15 min before switching on the hood.
CAUTION: Exposure to UV light can cause painful eyes and skin burns. Ensure that the sash is fully closed when the UV light is turned on. - Assemble a new set of disposable tubing onto the IPS. Wrap the tubing downstream of the peristaltic pump in a silicone heater jacket. Assemble the perfusion monitor on the tubing downstream of the silicone heater jacket.
- Ensure that the roller clamps for both tubing inlets are completely loosened. Connect each tubing inlet to the tapered end of a sterile 2 mL aspiration pipette. Leave both aspiration pipettes (inlets) and the IV catheter (outlet) in a 1 L bottle with calcium-free buffer to allow recirculation of the buffer during subsequent priming steps.

Figure 2: Self-test interface. Please click here to view a larger version of this figure.
- Switch on the IPS. Perform the following operations on the touch screen control panel. The software will perform a comprehensive self-test every time it is started.
CAUTION: The IPS is an electrical equipment which is connected to an external power source. Liquid spills on the IPS or power cables may produce electrical hazards.- Ensure that self-test status is displayed on the screen (Figure 2). Components that have passed the self-test will be shown in green; those that have failed will be shown in red. After rectification, tap the Testing icon to repeat the self-test again or tap the Enter System icon to enter directly into the operation interface.
- Tap anywhere on the screen to log in to the operation interface.
- At the upper-left corner of the operation interface (Figure 3), tap either of the circular arrow icons to set the direction of rotation for the peristaltic pump. At the right panel of the interface, tap the up/down arrow icons to set values for the corresponding parameters. Set the flow to constant flow mode; temperature of the heater jacket to 42 °C (to be adjusted to ensure that the temperature of the perfusate is maintained at 37 °C); and pump speed to 38 rpm for a flow rate of ~33 mL/min.
- At the lower-right panel of the operation interface, check for the status of the bubble alarm, perfusion stop alarm, and mute icon.
- Check for the temperature, pressure, and flow rate of the perfusate in the left panel. Manually set the intervals by clicking on the up-down arrows at the top and bottom of the columns. Check for the real-time data shown as values at middle of the columns. The color of the column will turn from green to red if the real-time data moves beyond the set range.
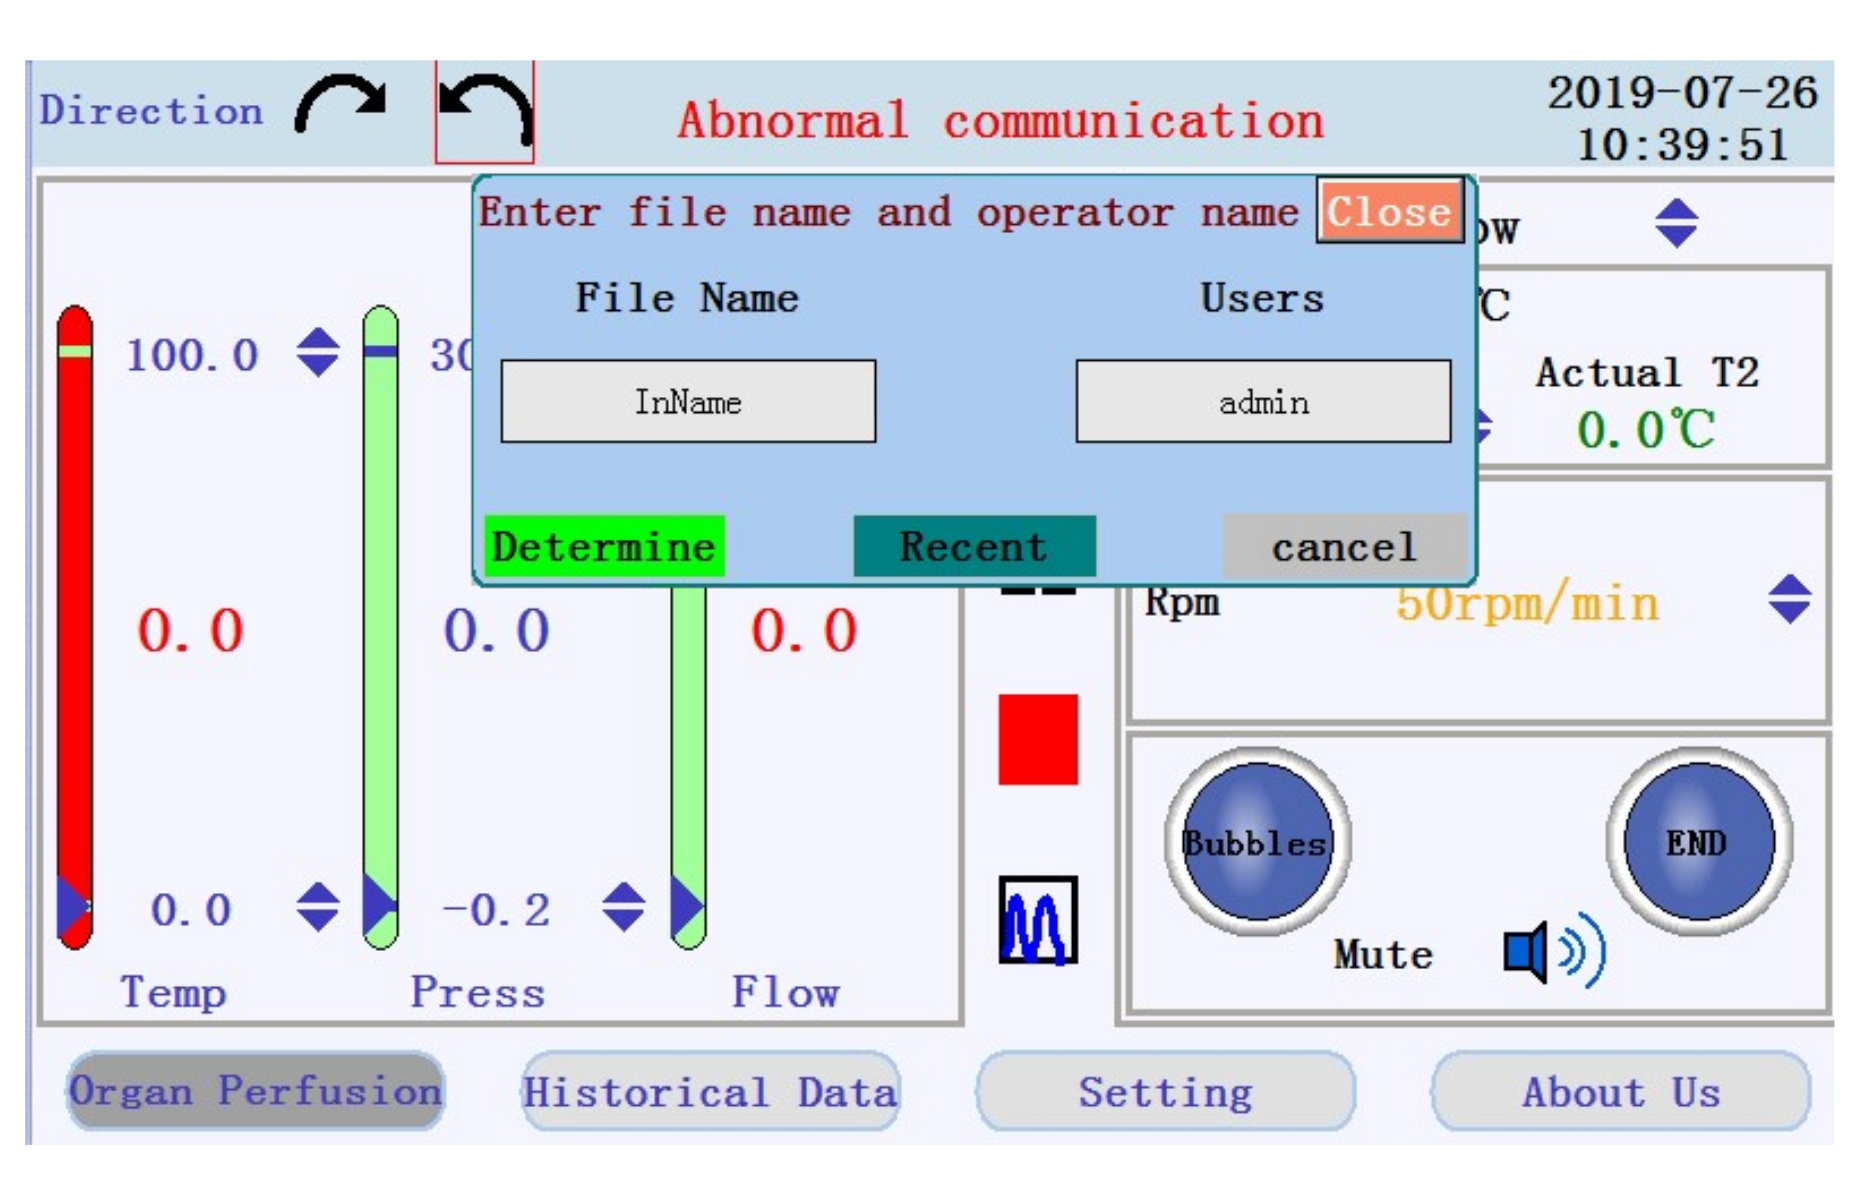
- Locate the icons to start, pause, and stop the perfusion, and the icon to switch from real-time data display to chart mode in the middle panel. Tap the start icon to begin the perfusion and prime the tubing with calcium-free buffer. A new log will be created. Enter the filename and username into the popup window (Figure 4).

Figure 3: Operation interface. Please click here to view a larger version of this figure.

Figure 4: Popup window prompting for filename and username. Please click here to view a larger version of this figure.
- Fill the drip chamber to half full. Ensure that there are no trapped air pockets in the tubing during priming.
- Remove any bubble that forms downstream of the bubble filter by flicking on the tubing to detach the bubble and allow it to be flushed out.
NOTE: Bubbles may form along the tubing as the buffer is warmed up by the heater jacket. - Fill a 400 mL beaker with 200 mL of collagenase buffer. Put the stage on top of the beaker. Without introducing any air into the tubing, completely tighten the roller clamp for one of the tubing inlets and move the aspiration pipette for the inlet into the beaker.
3. Animal procedure
- Prepare a young adult male Wistar rat around 200-300 g in body weight.
NOTE: This protocol was optimized for rats around 200-300 g in body weight. Male rats are preferred since hormonal changes during the estrous cycle in female rats will affect hepatocyte function. - Anesthesia
- Draw up the required volume of anti-coagulant heparin (5,000 IU/mL; 0.2 mL/100 g body weight) and rat anesthesia ketamine/xylazine cocktail (37.5 mg/mL ketamine, 5 mg/mL xylazine; 0.2 mL/100 g body weight) into 1 mL syringes with 27 G needle.
CAUTION: Anesthesia and heparin are harmful substances. Be careful when handling sharps. - Restrain the rat. Intraperitoneally inject heparin followed by ketamine/xylazine cocktail into the lower-right quadrant of the abdomen.
NOTE: The caecum has a higher probability of being located at the left. Avoid puncturing the caecum during injection to reduce the risk of contamination. - After 10 min, check the depth of anesthesia by assessing pedal reflex on both feet of the rat. Continue to check from time to time and wait until the rat no longer responds to toe pinches. Additional anesthesia can be injected, as necessary.
- Draw up the required volume of anti-coagulant heparin (5,000 IU/mL; 0.2 mL/100 g body weight) and rat anesthesia ketamine/xylazine cocktail (37.5 mg/mL ketamine, 5 mg/mL xylazine; 0.2 mL/100 g body weight) into 1 mL syringes with 27 G needle.
- Place the rat in a supine position with limbs outstretched on an aluminum foil-covered polystyrene platform on top of a tray. Tape the feet of the rat and pin the tape securely onto the platform with 27 G needles.
- Disinfect the chest and abdomen by spraying and drenching them with 70% ethanol. Shaving prior to disinfection is optional. Put the rat in the hood. Continue the next step while the fur is still wet.
NOTE: Drenching with 70% ethanol also keeps dander and fur dust to a minimum. - Separate the skin from the muscle.
- With a pair of tooth-tissue forceps in one hand, lift the skin near the base of the abdomen. With a pair of sharp-blunt surgical scissors in the other hand, cut the tented skin. Push the sharp end of the scissors underneath the skin and make a midline incision on the skin from just above the hind legs to just below the fore legs.
- While pulling up and lightly stretching the skin with the forceps, cut any connective tissue holding the skin onto the muscle in the chest and abdomen. To reduce the risk of contamination, prevent loose fur from falling onto the muscle. To remove built-up loose fur on the scissors, wipe them off on the disinfected outer side of skin.
- Make lateral incisions on the skin, from midline to both sides of the rat at slightly above the hind legs and slightly below the fore legs. Push the flaps of skin to the sides to expose the muscle.
- Cut open the abdominal muscle to expose the organs.
- With a new pair of tooth-tissue forceps in one hand, lift the muscle near the base of the abdomen. With a pair of blunt-blunt surgical scissors in the other hand, carefully cut through the muscle without nicking any of the organs. Make a midline incision on the muscle from slightly above the hind legs to the sternum.
- Make lateral incisions on the muscle, from midline to both sides of the rat at slightly above the hind legs and just below the rib cage, without nicking any of the organs. Push the flaps of muscle to the sides to expose the organs. Ensure that the lateral incisions of the skin and muscle reach the sides of the rat to allow blood and buffers to flow out from the abdominal cavity at later steps.
- Portal vein cannulation
- With the back of curved forceps, gently push the intestines to the right. Gently flip up the liver lobes to expose the portal vein.
- Use a 3-0 silk surgical suture to make a very loose ligature around the portal vein close to the liver, just before the vein branches left and right into different liver lobes. Do not tighten the ligature to avoid disrupting blood flow through the portal vein. A very thin membrane underneath the bile duct will need to be broken through with the tip of the curved forceps before the suture can pass underneath and be looped around the portal vein (and bile duct).
- Using the tips of two pairs of curved forceps, carefully puncture a hole through the tissue underneath the portal vein, without damaging the portal vein. Do this about 2-3 cm upstream of the first ligature, at just before the gastric vein branches off from the portal vein. The tissue is thinner at this specific location.
- Carefully stretch the hole larger with the forceps. This hole will allow the forceps to support up the portal vein during cannulation.
- Reduce the pump speed to 4 rpm for a flow rate of ~3 mL/min. Ensure that the outflow of calcium-free buffer from the IV catheter is reduced to a slow drip.
NOTE: Pressure build-up in the liver will cause hepatocyte death. A lower flow rate should slow down the pressure build-up in the liver upon successful insertion of the cannula into the portal vein at a later step. - Gently support up the portal vein using forceps. With the other hand, hold onto the IV catheter with the bevel of the needle facing up. Direct the needle into the portal vein at a 10-20° angle and slowly advance until the whole bevel is inside the vein. Once the needle is inserted correctly into the portal vein, the liver will start to blanch and lose its dark red color.
NOTE: The whole bevel of the needle must be inserted into the vein to create a hole large enough for the insertion of the cannula. However, do not insert the needle too deep in to avoid over puncturing the vein. - Advance the cannula over the needle and into the vein. Then, retract the needle until it is 2-3 mm behind the cannula; just enough so that the sharp tip is safely within the cannula. Use the thumb and middle finger to hold onto the catheter and use the index finger to pull back the wing to retract the needle.
- Quickly secure the portal vein onto the catheter with a vein clip. Do not clip directly on the side hole of the needle to avoid disrupting perfusate flow. Instead, clip below it.
- Immediately cut the infrahepatic inferior vena cava (IVC) to prevent pressure build-up in the liver. By now the infrahepatic IVC and adjacent blood vessels will be obscured by blood from the portal vein. To ensure that the IVC was correctly cut and severed, observe for blood spurting out in pulses; blood will only trickle out from adjacent vessels.
NOTE: Taking too long to cut the infrahepatic IVC after cannulation or failure to cut it before moving on to the next step will cause hepatocyte death. The animal is euthanized under anesthesia by exsanguination (through the cutting of the IVC) during this step. The procedure should continue while blood loss is ongoing. Death can be confirmed by visual observation of cessation of heartbeat/respiration when the chest cavity is opened at a later step. - Increase the pump speed to 38 rpm for a flow rate of ~33 mL/min. Flush the liver three times by closing the IVC with forceps for 2-3 s (but not for too long) and re-opening it.
NOTE: During flushing, the liver will slightly expand before returning to normal. Flushing facilitates the permeation of perfusate throughout the whole liver. After flushing, the liver should be wholly light brown in color. - Ensure that the cannula tip is placed at before the point where the portal vein branches into different liver lobes, to ensure perfusion of all liver lobes. If necessary, unclip the portal vein and adjust the position of the cannula. Re-clip afterwards.
- Tighten the loose ligature around the portal vein, at slightly upstream of the branching point. Make three knots on where the soft cannula is supported by the hard metal needle, in between of the bevel and side hole. Ensure that the knots fix the cannula in position, securing it to the portal vein, and prevent backflow of buffers.
- Resect the whole liver intact.
- Perfuse the liver with calcium-free buffer at the flow rate of ~33 mL/min for the next 12 min (see Figure 5A). In the meantime, perform liver resection. Perfusion time can be extended if necessary but ensure that the calcium-free buffer does not run out.
- Using a pair of curved scissors, carefully detach the portal vein from the intestines by cutting the mesentery that connects them together. Do not nick the gastrointestinal tract (esophagus, stomach, and small and large intestines) to ensure that no contamination occurs.
NOTE: This is to prevent the portal vein from tearing when the liver is moved around during resection. - Detach the liver from the gastrointestinal tract by cutting connective tissues, pancreas and mesentery that connects the liver to the gastrointestinal tract. To detach, always cut with scissors and do not pull to tear. Again, do not nick or cut the gastrointestinal tract.
- Gently flip down the liver to expose the diaphragm. Cut the diaphragm following the walls of the ribs. Ensure that most of the diaphragm remains connected to the liver. Be careful not to poke or bruise the liver.
- Once the chest cavity is opened, two ducts can be seen: the whitish suprahepatic IVC on the left, and the yellowish esophagus on the right. Clip the suprahepatic IVC and cut it just above the clip. Clipping the suprahepatic IVC is optional. It prevents the chest cavity from getting flooded.
NOTE: Visually observe for cessation of heartbeat/respiration to confirm animal death. - The esophagus is surrounded by the diaphragm. To isolate the esophagus from the diaphragm, cut through the diaphragm from the right towards the esophagus. Cut any remaining connective tissues that connect the esophagus and stomach to the liver and diaphragm.
- Push away the gastrointestinal tract to the right. Transfer the vein clip from the suprahepatic IVC to the infrahepatic IVC; buffer will now perfuse out from the suprahepatic IVC.
NOTE: During perfusion, the cannula and infrahepatic IVC will be covered by the liver. Strong buffer outflow from the suprahepatic IVC will help the surgeon to rule out perfusion leakages. - Cut any remaining diaphragm that connects the liver to the chest cavity. Cut off tissues connecting the liver to the abdominal cavity. Be careful not to cut the infrahepatic IVC above the clip to avoid detaching the clip from the liver.
- To ensure that the liver is completely resected, carefully lift the liver by holding on to the diaphragm with forceps. If there are any remaining tissues connecting the liver to the abdominal cavity, cut them off. If the kidney and spleen are still connected to the liver, detach them.
4. Liver perfusion and digestion
- If the resection was completed early, wait until the liver has been perfused with calcium-free buffer for 12 min.
- Change the perfusion buffer to collagenase buffer. Completely loosen the roller clamp for collagenase buffer before completely tightening the roller clamp for calcium-free buffer (see Figure 5B). Once the collagenase buffer reaches the liver through the tubing, flush the liver three times by closing the suprahepatic IVC for 2-3 s and re-opening it.
- Carefully move the liver to the stage on top of the beaker for recirculation of collagenase buffer. Move the liver by holding onto the diaphragm with forceps while supporting the catheter. Avoid tugging on the catheter to prevent accidental catheter detachment.
NOTE: If the catheter detaches and the portal vein is too damaged for re-cannulation, cannulate the suprahepatic IVC and allow the buffer to perfuse out from the portal vein. Ensure that the infrahepatic IVC remains clipped. - Digest the liver for 12 min. Observe for the appearance of translucent spots/network as the liver starts to lose its smooth brown texture. The liver will get bigger and softer as it gets digested. Once the liver has a mushy consistency, stop the perfusion. Digestion time can be extended, if necessary.
NOTE: If the Glisson's capsule has been broken, the collagenase buffer in the beaker might turn cloudy due to escaped liver cells.
5. Hepatocyte isolation
- Carefully remove the cannula by cutting off the portal vein. Carefully remove the clip. Transfer the liver to a 150 mm dish containing 60 mL of cold Dulbecco's Modified Eagle Medium (DMEM).
- Gently tap the liver using the backside of the curved forceps to break and peel off the Glisson's capsule. Then, gently sway the liver side to side in DMEM to release liver cells. Continue to do this until liver cells are fully dissociated into the DMEM.
NOTE: Occasionally the whole liver or certain lobes will only be partially digested. By not scraping the liver which will forcibly remove, and damage undissociated hepatocytes, a higher and more consistent cell viability can be obtained. - Gently rock the 150 mm dish until the liver cells are distributed well in DMEM. To remove tissue pieces and cell clumps, pour the cell suspension through a 100 μm pore size nylon mesh filter placed over a new 150 mm dish. Rinse the old dish with 30 mL of DMEM and transfer the suspension to the mesh filter. Gently tap on the mesh filter to allow trapped single liver cells to pass through.
- Remove the mesh filter and gently rock the new 150 mm dish until the liver cells are distributed well. Divide the suspension equally into 4 x 50 mL tubes. Rinse the dish with 30 mL of DMEM and divide the suspension equally into the same tubes. Make sure each tube has an equal volume of cell suspension.
- Centrifuge the 4 x 50 mL tubes of cell suspension at 50 x g for 2 min at 4 °C. Carefully aspirate the supernatant without disturbing the loose pellet. Discard the supernatant. Add 20 mL of DMEM into each tube and gently rock the tubes to resuspend the cell pellet. Combine the cell suspension from four tubes into two.
- Centrifuge the 2 x 50 mL tubes at 20 x g for 2 min at 4 °C. Aspirate and discard the supernatant. Add 20 mL of DMEM into each tube and gently rock the tubes to resuspend the cell pellet. Combine cell suspension from two tubes into one. Keep the cells on ice until use.
- Prepare trypan blue solution by mixing 400 μL of 1x PBS with 50 μL of trypan blue. Add 50 μL of hepatocyte suspension into the trypan blue solution. Count the number of viable and dead hepatocytes with a hemocytometer under the light microscope.
6. Hepatocyte culture
- Perform all cell culture steps in the hood. Add 1 mL collagen coating solution into a 35 mm dish and incubate for 4 h. Rinse the dishes three times with 1x PBS.
- Dilute hepatocyte suspension in hepatocyte culture medium to a concentration of 0.8 million cells/mL. Add 1 mL of diluted hepatocyte suspension into the 35 mm dish.
NOTE: Hepatocytes are sensitive to shear stress during pipetting. Consider using wide bore pipette tips. - Rock the dish to distribute the hepatocytes evenly. Incubate at 37 °C, 5% CO2 for 3-4 h to allow the hepatocytes to attach.
- For sandwich culture.
- Remove hepatocyte culture medium. Rinse once with 1 mL hepatocyte culture medium to remove unattached cells. Add 1 mL of collagen overlay solution. Add collagen overlay solution onto the walls of the dish to avoid introducing bubbles into the solution.
- Incubate at 37 °C, 5% CO2 for overnight to allow collagen gelation.
- Add 1 mL of fresh hepatocyte culture medium. Incubate at 37 °C, 5% CO2.
- For monolayer culture.
- After step 6.3, remove hepatocyte culture medium. Rinse once with 1 mL hepatocyte culture medium to remove the unattached cells.
- Add 1 mL of fresh hepatocyte culture medium. Incubate at 37 °C, 5% CO2.
- Assess hepatocyte purity and function by performing immunostaining for hepatocyte-specific marker and functional assays as described previously10,11.
Results
A surgeon could tell whether liver perfusion is going on smoothly by observing the outcome after certain steps. The first outcome can be observed upon cannulation, cutting of the infrahepatic IVC, and restoring the perfusion flow rate. The liver should have completely changed color from dark red to brown, while maintaining its volume. If the liver looks slightly deflated and has a reddish tint or blotches of red, it means that the perfusion flow rate was set wrongly (too low), or the portal vein was not cannulated correc...
Discussion
There are a few points that are particularly important to observe for two-step collagenase perfusion procedure in general. Firstly, special care must be given when resecting the liver. Ensure that the gastrointestinal tract is not damaged as leakage of the contents will result in bacterial contamination. In addition, avoid damaging the Glisson's capsule, which covers the surface of the liver during the animal procedure. If the tear is large enough, it might allow premature release of disassociated hepatocytes into th...
Disclosures
Zhou Yan and Hanry Yu declare competing interests as they hold equity in Vasinfuse, which manufactures and markets the Integrated Perfusion System. Hanry Yu holds equity in Histoindex, Invitrocue, Osteopore, Pishon Biomedical, Ants Innovate, and Synally Futuristech that have no competing interests with the information reported here.
Acknowledgements
This work is supported in part by MOE ARC (MOE2017-T2-1-149); NUHS Innovation Seed Grant 2017 (NUHSRO/2017/051/InnovSeed/02); Mechanobiology Institute of Singapore (R-714-106-004-135); and Institute of Bioengineering and Nanotechnology, Biomedical Research Council, Agency for Science, Technology and Research (A*STAR) (Project Numbers IAF-PP H18/01/a0/014, IAF-PP H18/01/a0/K14 and MedCaP-LOA-18-02) funding to Hanry Yu. Ng Chan Way is a research scholar of the National University of Singapore. We would like to thank Confocal Microscopy Unit & Flow Cytometry Unit of the National University of Singapore for help and advice in hepatocyte purity analysis.
Materials
| Name | Company | Catalog Number | Comments |
| Material/Equipment | |||
| 1 mL syringe | Nipro | ||
| 27G needle | Nipro | ||
| Black braided silk non-absorbable, non-sterile surgical suture | Look | SP117 | |
| Bochem 18/10 stainless steel forceps, sharp tip contain bent round tip | Bochem | 10333511 | |
| Disposable Perfusion Set | Vasinfuse | BPF-112 | |
| Floating circular 1.5 mL microcentrifuge tube rack | Sigma-Aldrich | R3133 | |
| German Standard Tissue Forceps, Serrated / 1×2 teeth , 14.5cm | Walentech | ||
| Greiner Cellstar aspirating pipette | Merck | GN710183 | |
| Haemocytometer | |||
| Integrated Perfusion System | Vasinfuse | IPS-001 | |
| Iris Scissors curved, stainless, 11cm | Optimal Medical Products Pte Ltd | CVD | |
| Light microscope with 10X lens | Olympus | ||
| Mesh Sheet 100µM Nylon | Spectra-Teknic(s) Pte Ltd | 06630-75 | |
| Operating Scissors, BL/BL, 13cm | Optimal Medical Products Pte Ltd | STR – BL/BL | |
| Operating Scissors, SH/BL, 13cm | Optimal Medical Products Pte Ltd | STR – SH/BL | |
| Reverse force hemostatic clip | Shanghai Jin Zhong Pte Ltd | XEC230 | |
| Water bath | Grant | ||
| Reagents/Chemicals | |||
| 10X Phosphate buffered saline (PBS) | Sigma-Aldrich | ||
| Bovine serum albumin (BSA) | Sigma-Aldrich | A9056 | |
| CaCl2·2H2O | Merck | 137101 | |
| Collagenase Type IV | Gibco | 17104019 | |
| Dexamethasone | TCI | D1961 | |
| DMEM | Gibco | 31600-034 | |
| Glutamax | Gibco | 35050061 | |
| HEPES | Invitrogen | 11344-041 | |
| Insulin | Sigma-Aldrich | 1-9278 | |
| KCl | VWR | VWRC26764.298 | |
| KH2PO4 | Sigma-Aldrich | P5379 | |
| Linoleic acid | Sigma-Aldrich | L9530 | |
| NaCl | Sigma-Aldrich | S5886 | |
| NaHCO3 | Sigma-Aldrich | S8875 | |
| NaOH | Merck | 106462 | |
| Penicillin-Streptomycin | Sigma-Aldrich | P4333 | |
| Type I bovine collagen | Advanced BioMatrix | 5005-100ml | |
| William’s E Media | Sigma-Aldrich | W1878 |
References
- Shen, L., Hillebrand, A., Wang, D. Q. H., Liu, M. Isolation and primary culture of rat hepatic cells. Journal of Visualized Experiments: JoVE. (64), e3917 (2012).
- Cabral, F., et al. Purification of hepatocytes and sinusoidal endothelial cells from mouse liver perfusion. Journal of Visualized Experiments: JoVE. (132), e56993 (2018).
- Green, C. J., et al. The isolation of primary hepatocytes from human tissue: optimising the use of small non-encapsulated liver resection surplus. Cell and Tissue Banking. 18 (4), 597-604 (2017).
- Seglen, P. O. Preparation of isolated rat liver cells. Methods in Cell Biology. 13, 29-83 (1976).
- Gopalakrishnan, S., Harris, E. N. In vivo liver endocytosis followed by purification of liver cells by liver perfusion. Journal of Visualized Experiments: JoVE. (57), e3138 (2011).
- Wen, J. W., Olsen, A. L., Perepelyuk, M., Wells, R. G. Isolation of rat portal fibroblasts by in situ liver perfusion. Journal of Visualized Experiments: JoVE. (64), e3669 (2012).
- Korelova, K., Jirouskova, M., Sarnova, L., Gregor, M. Isolation and 3D collagen sandwich culture of primary mouse hepatocytes to study the role of cytoskeleton in bile canalicular formation in vitro. Journal of Visualized Experiments: JoVE. (154), e60501 (2019).
- Shi, W., et al. Isolation and purification of immune cells from the liver. International Immunopharmacology. 85 (95), 106632 (2020).
- Salem, E. S. B., et al. Isolation of primary mouse hepatocytes for nascent protein synthesis analysis by non-radioactive L-azidohomoalanine labeling method. Journal of Visualized Experiments: JoVE. (140), e58323 (2018).
- Xia, L., et al. Tethered spheroids as an in vitro hepatocyte model for drug safety screening. Biomaterials. 33 (7), 2165-2176 (2012).
- Kegel, V., et al. Protocol for isolation of primary human hepatocytes and corresponding major populations of non-parenchymal liver cells. Journal of Visualized Experiments: JoVE. (109), e53069 (2016).
- Zhu, L., et al. A vertical-flow bioreactor array compacts hepatocytes for enhanced polarity and functions. Lab on a Chip. 16 (20), 3898-3908 (2016).
- Du, Y., et al. Synthetic sandwich culture of 3D hepatocyte monolayer. Biomaterials. 29 (3), 290-301 (2008).
- Tong, W. H., et al. Constrained spheroids for prolonged hepatocyte culture. Biomaterials. 80, 106-120 (2016).
- Xia, L., et al. Laminar-flow immediate-overlay hepatocyte sandwich perfusion system for drug hepatotoxicity testing. Biomaterials. 30 (30), 5927-5936 (2009).
- Gupta, K., et al. Bile canaliculi contract autonomously by releasing calcium into hepatocytes via mechanosensitive calcium channel. Biomaterials. 259, 120283 (2020).
- Horner, R., et al. Impact of Percoll purification on isolation of primary human hepatocytes. Scientific Reports. 9 (1), 6542 (2019).
- Osypiw, J. C., et al. Subpopulations of rat hepatocytes separated by Percoll density-gradient centrifugation show characteristics consistent with different acinar locations. The Biochemical Journal. 304, 617-624 (1994).
- Beal, E. W., et al. A small animal model of ex vivo normothermic liver perfusion. Journal of Visualized Experiments: JoVE. (136), e57541 (2018).
- Hillebrandt, K., et al. Procedure for decellularization of rat livers in an oscillating-pressure perfusion device. Journal of Visualized Experiments: JoVE. (102), e53029 (2015).
Reprints and Permissions
Request permission to reuse the text or figures of this JoVE article
Request PermissionThis article has been published
Video Coming Soon
Copyright © 2025 MyJoVE Corporation. All rights reserved